elasticsearch 8.0 centos8安装部署简单快捷无废话!!!
elasticsearch 8.0官方下载地址:
https://www.elastic.co/cn/downloads/past-releases/elasticsearch-8-0-0
选择 LINUX X86_64
解压安装包
tar -zxvf elasticsearch-8.0.0-linux-x86_64.tar.gz
移动到指定文件夹
mv elasticsearch-8.0.0 /usr/local/elasticsearch-8.0
进入指定文件夹
cd /usr/local/elasticsearch-8.0/
新建data和log文件夹用于存放数据
mkdir data
mkdir log
进入config文件夹
cd config/
修改elasticsearch.yml
vim elasticsearch.yml
注意:主要是前面没有“”#“”注释的需要修改和添加即可!!!
注意端口号放开和network 改为自己的
# Use a descriptive name for your cluster:
#

cluster.name: es8
#
# ------------------------------------ Node ------------------------------------
#
# Use a descriptive name for the node:
#
node.name: node-1
#
# Add custom attributes to the node:
#
node.attr.rack: r1
#
# ----------------------------------- Paths ------------------------------------
#
# Path to directory where to store the data (separate multiple locations by comma):
#
path.data: /usr/local/elasticsearch-8.0/data
#
# Path to log files:
#
path.logs: /usr/local/elasticsearch-8.0/log


#开启xpack
xpack.security.enabled:  false
xpack.security.transport.ssl.enabled: false

#允许跨域
http.cors.enabled: true
http.cors.allow-origin: "*"
http.cors.allow-headers: Authorization,X-Requested-With,Content-Type,Content-Length


#开启集群中https传输
#xpack.security.transport.ssl.enabled: true
#xpack.security.transport.ssl.verification_mode: certificate
#xpack.security.transport.ssl.keystore.path: certs/elastic-certificates.p12
#xpack.security.transport.ssl.truststore.path: certs/elastic-certificates.p12

#开启api接口https传输,配置HTTP层TLS/SSL加密传输
#xpack.security.http.ssl.enabled: true
#xpack.security.http.ssl.keystore.path: certs/elastic-certificates.p12
#xpack.security.http.ssl.truststore.path: certs/elastic-certificates.p12

#xpack.security.http.ssl.enabled: true
#xpack.security.http.ssl.keystore.path: "certs/http.p12"
回到bin目录,启动
cd /usr/local/elasticsearch-8.0/bin/
不推荐使用root启动es,通常需要去创建一个新用户
adduser es

passwd es

chown -R es:es /usr/local/elasticsearch-8.0/

chmod 770 /usr/local/elasticsearch-8.0/
切换用户,重新启动es
su es
启动方式一:
./elasticsearch
启动方式二:
./elasticsearch -d
开放端口:
firewall-cmd --zone=public --add-port=9200/tcp --permanent
firewall-cmd --reload
可能你是在es的权限下报错,更换root,没有报错忽略
 firewall-cmd --zone=public --add-port=9200/tcp --permanent
Authorization failed.
    Make sure polkit agent is running or run the application as superuser.
su root
密码。。。。。注意是自己的密码
root
再次开放端口即可
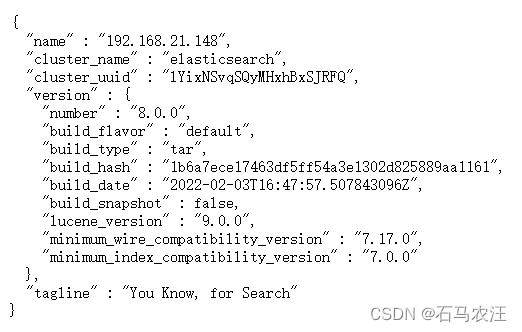
访问
#ip是配置文件中network.host
http://自己Linux地址:9200/
会报错
ERROR: [3] bootstrap checks failed. You must address the points described in the following [3] lines before starting Elasticsearch.
bootstrap check failure [1] of [3]: max file descriptors [4096] for elasticsearch process is too low, increase to at least [65535]
bootstrap check failure [2] of [3]: max virtual memory areas vm.max_map_count [65530] is too low, increase to at least [262144]
bootstrap check failure [3] of [3]: the default discovery settings are unsuitable for production use; at least one of [discovery.seed_hosts, discovery.seed_providers, cluster.initial_master_nodes] must be configured
ERROR: Elasticsearch did not exit normally - check the logs at /usr/local/elasticsearch-8.0/log/es8.log
主要是文件权限与内存大小问题:
elasticsearch用户拥有的可创建文件描述的权限太低,至少需要65536,
#切换到root用户修改

vim /etc/security/limits.conf   # 在最后面追加下面内容

es hard nofile 65536

es soft nofile 65536            #es是启动elasticsearch的用户
max_map_count文件包含限制一个进程可以拥有的VMA(虚拟内存区域)的数量
#切换到root用户修改

vim /etc/sysctl.conf    # 在最后面追加下面内容

vm.max_map_count=655360

执行  sysctl -p
重新启动
访问:
http://自己的地址:9200/
版权声明:本文为CSDN博主「isTrueLoveColour」的原创文章,遵循CC 4.0 BY-SA版权协议,转载请附上原文出处链接及本声明。
原文链接:https://blog.csdn.net/persistence_PSH/article/details/124760748
略有改动。。
