SpringCloud注册中心与服务消费者初体验
晚风吹拂澎湖湾,白浪逐沙滩.
咳咳(严肃脸),这几天一直在看微服务和什么分布式框架之类的东西,坦率的说没怎么看懂,然后呢,我就看了一下SpringBoot的事频,然后又看了一下SpringCloud的视频,嗯,了解了不少的东西呢.
第一次,心里还是很紧张的嘛,嘿嘿嘿.
额,不说废话了,直接上东西.
开发工具是Idea,SpringBoot版本是2.0.4.RELEASE.
首先搞了一个Eureka的注册中心,然后写了俩服务并注册上去了,少废话,直接上东西.
server:
  port: 4567
eureka:
  instance:
    hostname: localhost
  client:
    registerWithEureka: false
    fetchRegistry: false
    serviceUrl:
      defaultZone: http://${eureka.instance.hostname}:${server.port}/eureka/
Enurka的配置,这里统一用的是.yml文件,要用老的.properties的请自己改一下.
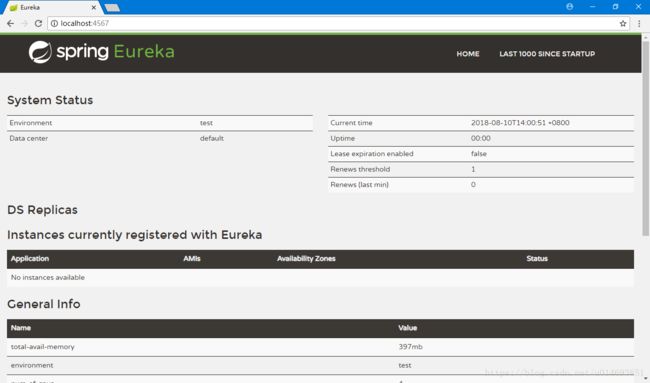
然后直接启动就可以了,如下图:
注册中心写好了,然后呢,就开始写一个服务端,一个客户端.
这两个我打算把放在一块,因为本质上没啥区别
Service端:
application.yml
eureka:
  client:
    serviceUrl:
      defaultZone: http://localhost:4567/eureka/
server:
  port: 1234
spring:
  application:
    name: service
ServiceController.java
@RestController
@RequestMapping(value = "/ServiceController")
public class ServiceController {

    @RequestMapping(value = "/getList")
    public List getList(){
        List list = new ArrayList<>();
        list.add("AAA");
        list.add("BBB");
        list.add("CCC");
        return list;
    }
}
这个地方在类开头自己手贱加了个RequestMapping,然后留了一个坑,先不说,后面给大家看一下.
ServiceApplication.java(启动类)
@SpringBootApplication
@EnableEurekaClient
public class ServiceApplication {

    public static void main(String[] args) {
        SpringApplication.run(ServiceApplication.class, args);
    }
}
嗯,没啥东西,直接启动.
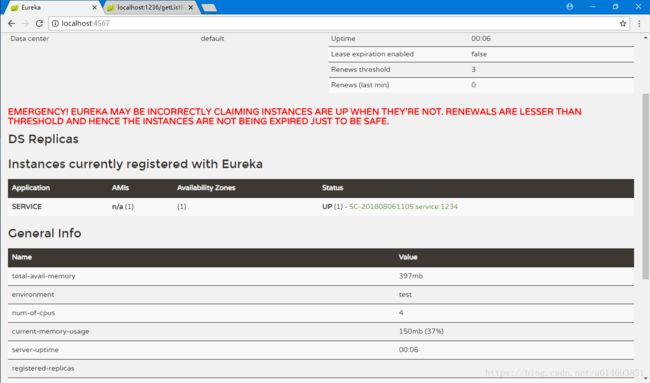
多了一个SERVICE有木有,这就说明注册上去了.
同理,看一下Client的
application.yml
eureka:
  client:
    serviceUrl:
      defaultZone: http://localhost:4567/eureka/
server:
  port: 1235
spring:
  application:
    name: client
要注意一下,defaultZone的地址要和Eureka里面的是一样的,然后port是不一样的!!!
ClientController.java
@RestController
@RequestMapping(value = "/ClientController")
public class ClientController {

    @Autowired
    RestTemplate restTemplate ;

    @RequestMapping(value = "/getList")
    public List getList(){
        return restTemplate.getForObject("http://service/ServiceController/getList" , List.class) ;
    }

}
这里用的是RestTemplate,这里在编译时可能会报错,要稍微注意一下,API就不说了,百度一堆.
ClientApplication.java(启动类)
@EnableEurekaClient
@SpringBootApplication
public class ClientApplication {

    public static void main(String[] args) {
        SpringApplication.run(ClientApplication.class, args);
    }

    @LoadBalanced
    @Bean
    RestTemplate restTemplate(){
        return new RestTemplate();
    }
}
嗯,这块把RestTemplate加上,就没啥问题了,直接启动.
嗯,就酱紫.
OK了,结束了吗,并木有,接下来,咱们用Feign去创建一个Client
话不多说,上东西.
application.yml
eureka:
  client:
    serviceUrl:
      defaultZone: http://localhost:4567/eureka/
server:
  port: 1236
spring:
  application:
    name: feign
IFeignService.java
@FeignClient(value = "service/ServiceController")
public interface IFeignService {

    @RequestMapping(value = "/getList")
    public List getAllList();
}
坑来了,就是这个地方,之前在FeignClient里面直接写service组件的名称的时候死活访问不要,然后把地址贴上也不对,后来看了网上的博客才意识到这么写应该是可以的,然后就可以了,如果你在service的controller上面没写requestMapping,那直接用组件名字,在方法上带上调用方法的url就可以了.
FeignController.java
@RestController
public class FeignController {

    @Autowired
    IFeignService iFeignService;

    @RequestMapping(value = "/getListByFeign")
    public List getAllList(){
        return iFeignService.getAllList();
    }
}
这里在Autowried的时候会提示找不到那个Bean,直接忽视,不鸟他.
FeignApplication.java
@SpringBootApplication
@EnableFeignClients
@EnableEurekaClient
@EnableDiscoveryClient
public class FeignApplication {

    public static void main(String[] args) {
        SpringApplication.run(FeignApplication.class, args);
    }
}
这里好几个注解,你懂得.
到这里,简单的demo就结束了,后面还有一些,现在还没看,后面再继续写.
Demo地址:
https://github.com/Dr-Monster/SpringCloudDemo-Simple-.git


