springBoot集成flowable
来源: https://www.cnblogs.com/songweipeng/p/17119106.html
前言
Flowable 项目提供了一套核心的开源业务流程引擎,这些引擎紧凑且高效。它们为开发人员、系统管理员和业务用户提供工作流和业务流程管理 (BPM) 平台。它的核心是一个闪电般快速、久经考验的动态 BPMN 流程引擎,伴随着 DMN 决策表和 CMMN 案例管理引擎,所有这些引擎都是用 Java 编写的。它们是 Apache 2.0 许可的开放源代码,拥有一个承诺社区。所有引擎都可以嵌入在 Java 应用程序中运行,也可以作为服务器、集群和云中的服务运行。它们可以作为独立的引擎或服务运行,也可以集成在一起为业务流程管理提供丰富的套件。它们与 Spring 完美集成。凭借丰富的 Java 和 REST API,它们是编排人工或机器人自动化处理的理想基础。它们启用微服务编排或软连接微服务本身。
一、pom中引入Flowable相关框架
本Demo使用的SpringBoot版本是2.7.5
<parent>
        <groupId>org.springframework.boot</groupId>
        <artifactId>spring-boot-starter-parent</artifactId>
        <version>2.7.5</version>
        <relativePath/> <!-- lookup parent from repository -->
</parent>
<dependency>
            <groupId>org.springframework.boot</groupId>
            <artifactId>spring-boot-starter-web</artifactId>
        </dependency>
        <!-- 工作流flowable架包 -->
        <dependency>
            <groupId>org.flowable</groupId>
            <artifactId>flowable-spring-boot-starter</artifactId>
            <version>6.4.0</version>
        </dependency>
        <!-- mysql数据库连接架包 -->
        <dependency>
            <groupId>mysql</groupId>
            <artifactId>mysql-connector-java</artifactId>
            <version>8.0.11</version>
        </dependency>
        <!-- mybatis ORM 架包 -->
        <dependency>
            <groupId>org.mybatis.spring.boot</groupId>
            <artifactId>mybatis-spring-boot-starter</artifactId>
            <version>2.2.2</version>
        </dependency>
        <!-- thymeleaf架包 -->
        <dependency>
            <groupId>org.springframework.boot</groupId>
            <artifactId>spring-boot-starter-thymeleaf</artifactId>
        </dependency>
        <dependency>
            <groupId>org.projectlombok</groupId>
            <artifactId>lombok</artifactId>
        </dependency>

        <dependency>
            <groupId>org.springframework.boot</groupId>
            <artifactId>spring-boot-starter-test</artifactId>
            <scope>test</scope>
        </dependency>
二、相关配置文件
1.application.properties配置文件
server.port=8081
#数据库配置
spring.datasource.url=jdbc:mysql://localhost:3306/flowable01?autoReconnect=true&useUnicode=true&characterEncoding=utf8&useSSL=false&serverTimezone=GMT%2B8
spring.datasource.username=root
spring.datasource.password=song@1234
spring.datasource.driver-class-name=com.mysql.cj.jdbc.Driver
  #开启调试信息
logging.level.org.flowable=DEBUG
  #业务流程涉及的表自动生成
flowable.database-schema-update=true
flowable.async-executor-activate=false
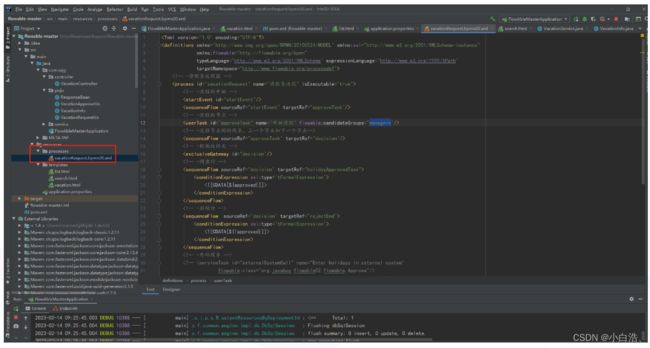
2.审批流程xml文件,默认放置在resources下的processess文件夹下

3.vacationRequest.bpmn20.xml 内容如下:
<?xml version="1.0" encoding="UTF-8"?>
<definitions xmlns="http://www.omg.org/spec/BPMN/20100524/MODEL" xmlns:xsi="http://www.w3.org/2001/XMLSchema-instance"
             xmlns:flowable="http://flowable.org/bpmn"
             typeLanguage="http://www.w3.org/2001/XMLSchema" expressionLanguage="http://www.w3.org/1999/XPath"
             targetNamespace="http://www.flowable.org/processdef">
    <!-- -请假条流程图 -->
    <process id="vacationRequest" name="请假条流程" isExecutable="true">
        <!-- -流程的开始 -->
        <startEvent id="startEvent"/>
        <sequenceFlow sourceRef="startEvent" targetRef="approveTask"/>
        <!-- -流程的节点 -->
        <userTask id="approveTask" name="开始请假" flowable:candidateGroups="managers"/>
        <!-- -流程节点间的线条,上一个节点和下一个节点-->
        <sequenceFlow sourceRef="approveTask" targetRef="decision"/>
        <!-- -排他性网关 -->
        <exclusiveGateway id="decision"/>
        <!-- -同意时 -->
        <sequenceFlow sourceRef="decision" targetRef="holidayApprovedTask">
            <conditionExpression xsi:type="tFormalExpression">
                <![CDATA[${approved}]]>
            </conditionExpression>
        </sequenceFlow>
        <!-- -拒绝时 -->
        <sequenceFlow  sourceRef="decision" targetRef="rejectEnd">
            <conditionExpression xsi:type="tFormalExpression">
                <![CDATA[${!approved}]]>
            </conditionExpression>
        </sequenceFlow>
        <!-- -外部服务 -->
        <!-- <serviceTask id="externalSystemCall" name="Enter holidays in external system"
                     flowable:class="org.javaboy.flowable02.flowable.Approve"/>
        <sequenceFlow sourceRef="externalSystemCall" targetRef="holidayApprovedTask"/> -->

        <userTask id="holidayApprovedTask" flowable:assignee="${employee}" name="同意请假"/>
        <sequenceFlow sourceRef="holidayApprovedTask" targetRef="approveEnd"/>

        <!-- <serviceTask id="rejectLeave" name="Send out rejection email"
                     flowable:class="org.javaboy.flowable02.flowable.Reject"/>
        <sequenceFlow sourceRef="rejectLeave" targetRef="rejectEnd"/> -->

        <endEvent id="approveEnd"/>

        <endEvent id="rejectEnd"/>
        <!-- -流程的结束 -->
    </process>
</definitions>
三、控制层代码块
package com.sxjg.controller;

import com.sxjg.pojo.ResponseBean;
import com.sxjg.pojo.VacationApproveVo;
import com.sxjg.pojo.VacationRequestVo;
import com.sxjg.service.VacationService;
import org.springframework.beans.factory.annotation.Autowired;
import org.springframework.web.bind.annotation.*;
import org.springframework.web.servlet.ModelAndView;

/**
 * @project 请假流程测试
 * @Description
 * @Author songwp
 * @Date 2023/2/13 20:06
 * @Version 1.0.0
 **/
@RequestMapping("vacation")
@RestController
public class VacationController {
    @Autowired
    VacationService vacationService;

    /**
     * 请假条新增页面
     * @return
     */
    @GetMapping("/add")
    public ModelAndView add(){
        return new ModelAndView("vacation");
    }

    /**
     * 请假条审批列表
     * @return
     */
    @GetMapping("/aList")
    public ModelAndView aList(){
        return new ModelAndView("list");
    }

    /**
     * 请假条查询列表
     * @return
     */
    @GetMapping("/sList")
    public ModelAndView sList(){
        return new ModelAndView("search");
    }

    /**
     * 请假请求方法
     * @param vacationRequestVO
     * @return
     */
    @PostMapping
    public ResponseBean askForLeave(@RequestBody VacationRequestVo vacationRequestVO) {
        return vacationService.askForLeave(vacationRequestVO);
    }

    /**
     * 获取待审批列表
     * @param identity
     * @return
     */
    @GetMapping("/list")
    public ResponseBean leaveList(String identity) {
        return vacationService.leaveList(identity);
    }

    /**
     * 拒绝或同意请假
     * @param vacationVO
     * @return
     */
    @PostMapping("/handler")
    public ResponseBean askForLeaveHandler(@RequestBody VacationApproveVo vacationVO) {
        return vacationService.askForLeaveHandler(vacationVO);
    }

    /**
     * 请假查询
     * @param name
     * @return
     */
    @GetMapping("/search")
    public ResponseBean searchResult(String name) {
        return vacationService.searchResult(name);
    }
}
四、Service层,请假条新增、审批、查询的业务处理
package com.sxjg.service;

import com.sxjg.pojo.ResponseBean;
import com.sxjg.pojo.VacationApproveVo;
import com.sxjg.pojo.VacationInfo;
import com.sxjg.pojo.VacationRequestVo;
import java.util.ArrayList;
import java.util.Date;
import java.util.HashMap;
import java.util.List;
import java.util.Map;
import org.flowable.engine.HistoryService;
import org.flowable.engine.RuntimeService;
import org.flowable.engine.TaskService;
import org.flowable.engine.history.HistoricProcessInstance;
import org.flowable.task.api.Task;
import org.flowable.variable.api.history.HistoricVariableInstance;
import org.springframework.beans.factory.annotation.Autowired;
import org.springframework.stereotype.Service;
import org.springframework.transaction.annotation.Transactional;

/**
 * @project 请假流程测试
 * @Description
 * @Author songwp
 * @Date 2023/2/13 20:08
 * @Version 1.0.0
 **/
@Service
public class VacationService {
    @Autowired
    RuntimeService runtimeService;

    @Autowired
    TaskService taskService;

    @Autowired
    HistoryService historyService;

    /**
     * 申请请假
     * @param vacationRequestVO
     * @return
     */
    @Transactional
    public ResponseBean askForLeave(VacationRequestVo vacationRequestVO) {
        Map<String, Object> variables = new HashMap<>();
        variables.put("name", vacationRequestVO.getName());
        variables.put("days", vacationRequestVO.getDays());
        variables.put("reason", vacationRequestVO.getReason());
        try {
            //指定业务流程
            runtimeService.startProcessInstanceByKey("vacationRequest", vacationRequestVO.getName(), variables);
            return ResponseBean.ok("已提交请假申请");
        } catch (Exception e) {
            e.printStackTrace();
        }
        return ResponseBean.error("提交申请失败");
    }

    /**
     * 审批列表
     * @param identity
     * @return
     */
    public ResponseBean leaveList(String identity) {
        List<Task> tasks = taskService.createTaskQuery().taskCandidateGroup(identity).list();
        List<Map<String, Object>> list = new ArrayList<>();
        for (int i = 0; i < tasks.size(); i++) {
            Task task = tasks.get(i);
            Map<String, Object> variables = taskService.getVariables(task.getId());
            variables.put("id", task.getId());
            list.add(variables);
        }
        return ResponseBean.ok("加载成功", list);
    }

    /**
     * 操作审批
     * @param vacationVO
     * @return
     */
    public ResponseBean askForLeaveHandler(VacationApproveVo vacationVO) {
        try {
            boolean approved = vacationVO.getApprove();
            Map<String, Object> variables = new HashMap<String, Object>();
            variables.put("approved", approved);
            variables.put("employee", vacationVO.getName());
            Task task = taskService.createTaskQuery().taskId(vacationVO.getTaskId()).singleResult();
            taskService.complete(task.getId(), variables);
            if (approved) {
                //如果是同意,还需要继续走一步
                Task t = taskService.createTaskQuery().processInstanceId(task.getProcessInstanceId()).singleResult();
                taskService.complete(t.getId());
            }
            return ResponseBean.ok("操作成功");
        } catch (Exception e) {
            e.printStackTrace();
        }
        return ResponseBean.error("操作失败");
    }

    /**
     * 请假列表
     * @param name
     * @return
     */
    public ResponseBean searchResult(String name) {
        List<VacationInfo> vacationInfos = new ArrayList<>();
        List<HistoricProcessInstance> historicProcessInstances = historyService.createHistoricProcessInstanceQuery().processInstanceBusinessKey(name).finished().orderByProcessInstanceEndTime().desc().list();
        for (HistoricProcessInstance historicProcessInstance : historicProcessInstances) {
            VacationInfo vacationInfo = new VacationInfo();
            Date startTime = historicProcessInstance.getStartTime();
            Date endTime = historicProcessInstance.getEndTime();
            List<HistoricVariableInstance> historicVariableInstances = historyService.createHistoricVariableInstanceQuery()
                    .processInstanceId(historicProcessInstance.getId())
                    .list();
            for (HistoricVariableInstance historicVariableInstance : historicVariableInstances) {
                String variableName = historicVariableInstance.getVariableName();
                Object value = historicVariableInstance.getValue();
                if ("reason".equals(variableName)) {
                    vacationInfo.setReason((String) value);
                } else if ("days".equals(variableName)) {
                    vacationInfo.setDays(Integer.parseInt(value.toString()));
                } else if ("approved".equals(variableName)) {
                    vacationInfo.setStatus((Boolean) value);
                } else if ("name".equals(variableName)) {
                    vacationInfo.setName((String) value);
                }
            }
            vacationInfo.setStartTime(startTime);
            vacationInfo.setEndTime(endTime);
            vacationInfos.add(vacationInfo);
        }
        return ResponseBean.ok("ok", vacationInfos);
    }
}
五、POJO相关类
import lombok.Data;

/**
 * 请假条审批
 * @Date
 */
@Data
public class VacationApproveVo {

  private String taskId;

    private Boolean approve;

    private String name;
}

import lombok.Data;

/**
 * 请假条申请
 * @Date
 */
@Data
public class VacationRequestVo {

    private String name;

    private Integer days;

    private String reason;
}

import lombok.Data;

/**
 * 响应类
 * @Date
 */
@Data
public class ResponseBean {

    private Integer status;

    private String msg;

    private Object data;

    public static ResponseBean ok(String msg, Object data) {
        return new ResponseBean(200, msg, data);
    }


    public static ResponseBean ok(String msg) {
        return new ResponseBean(200, msg, null);
    }


    public static ResponseBean error(String msg, Object data) {
        return new ResponseBean(500, msg, data);
    }


    public static ResponseBean error(String msg) {
        return new ResponseBean(500, msg, null);
    }

    private ResponseBean() {
    }

    private ResponseBean(Integer status, String msg, Object data) {
        this.status = status;
        this.msg = msg;
        this.data = data;
    }
}

import java.util.Date;

import lombok.Data;

/**
 * 请假条DO
 * @Date
 */
@Data
public class VacationInfo {

  private String name;

  private Date startTime;

  private Date endTime;

  private String reason;

  private Integer days;

  private Boolean status;
}
六、页面代码,页面文件放在resources的templates文件夹下
1.提交请假条申请页面vacation.html
<!DOCTYPE html>
<html lang="en">
<head>
    <meta charset="UTF-8">
    <title>提交请假条申请页面</title>
    <script src="https://unpkg.com/axios/dist/axios.min.js"></script>
    <!-- Import style -->
    <link rel="stylesheet" href="https://unpkg.com/element-plus/dist/index.css"/>
    <script src="https://unpkg.com/vue@3"></script>
    <!-- Import component library -->
    <script src="//unpkg.com/element-plus"></script>
</head>
<body>
<div id="app">
    <h1>开始一个请假流程</h1>
    <table>
        <tr>
            <td>请输入姓名:</td>
            <td>
                <el-input type="text" v-model="afl.name"/>
            </td>
        </tr>
        <tr>
            <td>请输入请假天数:</td>
            <td>
                <el-input type="text" v-model="afl.days"/>
            </td>
        </tr>
        <tr>
            <td>请输入请假理由:</td>
            <td>
                <el-input type="text" v-model="afl.reason"/>
            </td>
        </tr>
    </table>
    <el-button type="primary" @click="submit">提交请假申请</el-button>
</div>
<script>
    Vue.createApp(
        {
            data() {
                return {
                    afl: {
                        name: 'test',
                        days: 3,
                        reason: '测试'
                    }
                }
            },
            methods: {
                submit() {
                    let _this = this;
                    axios.post('/vacation', this.afl)
                        .then(function (response) {
                            if (response.data.status == 200) {
                                //提交成功
                                _this.$message.success(response.data.msg);
                            } else {
                                //提交失败
                                _this.$message.error(response.data.msg);
                            }
                        })
                        .catch(function (error) {
                            console.log(error);
                        });
                }
            }
        }
    ).use(ElementPlus).mount('#app')
</script>
</body>
</html>
2.审批请假条页面list.html
<!DOCTYPE html>
<html lang="en">
<head>
    <meta charset="UTF-8">
    <title>审批请假条页面</title>
    <script src="https://unpkg.com/axios/dist/axios.min.js"></script>
    <!-- Import style -->
    <link rel="stylesheet" href="https://unpkg.com/element-plus/dist/index.css"/>
    <script src="https://unpkg.com/vue@3"></script>
    <!-- Import component library -->
    <script src="//unpkg.com/element-plus"></script>
</head>
<body>
<div id="app">
    <div>
        <div>请选择你的身份:</div>
        <div>
            <el-select name="" id="" v-model="identity" @change="initTasks">
                <el-option :value="iden" v-for="(iden,index) in identities" :key="index" :label="iden"></el-option>
            </el-select>
            <el-button type="primary" @click="initTasks">刷新一下</el-button>
        </div>

    </div>
    <el-table border strip :data="tasks">
        <el-table-column prop="name" label="姓名"></el-table-column>
        <el-table-column prop="days" label="请假天数"></el-table-column>
        <el-table-column prop="reason" label="请假原因"></el-table-column>
        <el-table-column lable="操作">
            <template #default="scope">
                <el-button type="primary" @click="approveOrReject(scope.row.id,true,scope.row.name)">批准</el-button>
                <el-button type="danger" @click="approveOrReject(scope.row.id,false,scope.row.name)">拒绝</el-button>
            </template>
        </el-table-column>
    </el-table>
</div>
<script>
    Vue.createApp(
        {
            data() {
                return {
                    tasks: [],
                    identities: [
                        'managers'
                    ],
                    identity: ''
                }
            },
            methods: {
                initTasks() {
                    let _this = this;
                    axios.get('/vacation/list?identity=' + this.identity)
                        .then(function (response) {
                            _this.tasks = response.data.data;
                        })
                        .catch(function (error) {
                            console.log(error);
                        });
                },
                approveOrReject(taskId, approve,name) {
                    let _this = this;
                    axios.post('/vacation/handler', {taskId: taskId, approve: approve,name:name})
                        .then(function (response) {
                            _this.$message.success("审批成功");
                            _this.initTasks();

                        })
                        .catch(function (error) {
                            _this.$message.error("操作失败");
                            console.log(error);
                        });
                }
            }
        }
    ).use(ElementPlus).mount('#app')
</script>
</body>
</html>
3.已审批请假条查询页面search.html
<!DOCTYPE html>
<html lang="en">
<head>
    <meta charset="UTF-8">
    <title>已审批请假条查询页面</title>
    <script src="https://unpkg.com/axios/dist/axios.min.js"></script>
    <!-- Import style -->
    <link rel="stylesheet" href="https://unpkg.com/element-plus/dist/index.css"/>
    <script src="https://unpkg.com/vue@3"></script>
    <!-- Import component library -->
    <script src="//unpkg.com/element-plus"></script>
</head>
<body>
<div id="app">
    <div style="margin-top: 50px">
        <el-input v-model="name" style="width: 300px" placeholder="请输入用户名"></el-input>
        <el-button type="primary" @click="search">查询</el-button>
    </div>

    <div>
        <el-table border strip :data="historyInfos">
            <el-table-column prop="name" label="姓名"></el-table-column>
            <el-table-column prop="startTime" label="提交时间"></el-table-column>
            <el-table-column prop="endTime" label="审批时间"></el-table-column>
            <el-table-column prop="reason" label="事由"></el-table-column>
            <el-table-column prop="days" label="天数"></el-table-column>
            <el-table-column label="状态">
                <template #default="scope">
                    <el-tag type="success" v-if="scope.row.status">已通过</el-tag>
                    <el-tag type="danger" v-else>已拒绝</el-tag>
                </template>
            </el-table-column>
        </el-table>
    </div>
</div>
<script>
    Vue.createApp(
        {
            data() {
                return {
                    historyInfos: [],
                    name: 'zhangsan'
                }
            },
            methods: {
                search() {
                    let _this = this;
                    axios.get('/vacation/search?name=' + this.name)
                        .then(function (response) {
                            if (response.data.status == 200) {
                                _this.historyInfos=response.data.data;
                            } else {
                                _this.$message.error(response.data.msg);
                            }
                        })
                        .catch(function (error) {
                            console.log(error);
                        });
                }
            }
        }
    ).use(ElementPlus).mount('#app')
</script>
</body>
</html>
七、启动并测试

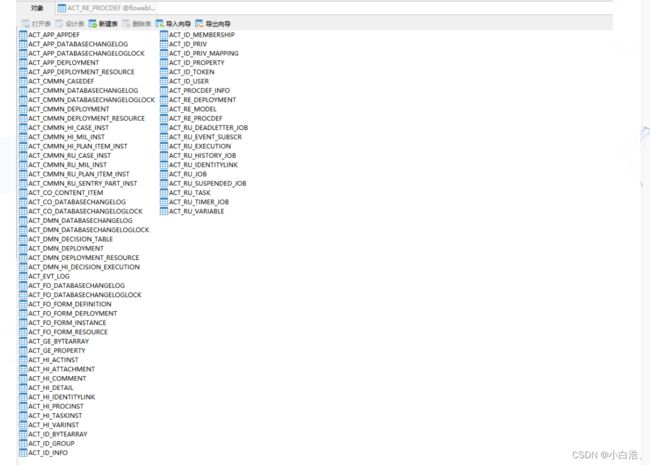
1.第一次运行,系统会自动创建flowable需要数据表结构

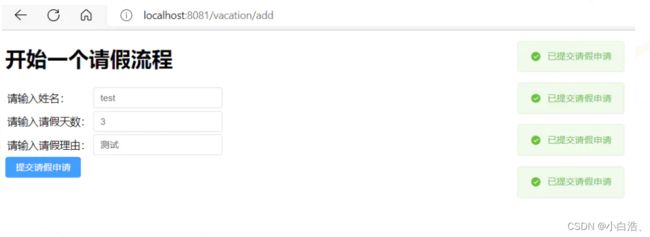
2.输入url地址:localhost:8081/vacation/add,建立几个请假条

3.请假条建立好了,审批处理一下

注意:第一次运行这个demo,权限暂且不管,角色也先写死,先把demo跑起来再说。四个请假条两个通过,两个拒绝,操作完成后,在待审批列表不在出现
4.作为请假人,查询一下自己提交的假条审批了.

通过查询结果得知,两个通过,两个拒绝。至此,一个简单的请假条审批流程走完了!!!
八、API梳理说明
1.FormService
表单数据的管理; 是可选服务,也就是说Flowable没有它也能很好地运行,而不必牺牲任何功能。这个服务引入了开始表单(start form)与任务表单(task form)的概念。 开始表单是在流程实例启动前显示的表单,
而任务表单是用户完成任务时显示的表单。Flowable可以在BPMN 2.0流程定义中定义这些表单。表单服务通过简单的方式暴露这些数据。再次重申,表单不一定要嵌入流程定义,因此这个服务是可选的
formService.getStartFormKey() // 获取表单key
formService.getRenderedStartForm()  // 查询表单json(无数据)
2.RepositiryService
提供了在编辑和发布审批流程的api。主要是模型管理和流程定义的业务api
这个服务提供了管理与控制部署(deployments)与流程定义(process definitions)的操作
查询引擎现有的部署与流程定义。 暂停或激活部署中的某些流程,或整个部署。暂停意味着不能再对它进行操作,激活刚好相反,重新使它可以操作。 获取各种资源,比如部署中保存的文件,
或者引擎自动生成的流程图。 获取POJO版本的流程定义。它可以用Java而不是XML的方式查看流程。
1.提供了带条件的查询模型流程定义的api
repositoryService.createXXXQuery()
例如:
repositoryService.createModelQuery().list() 模型查询
repositoryService.createProcessDefinitionQuery().list() 流程定义查询

repositoryService.createXXXXQuery().XXXKey(XXX) (查询该key是否存在)

2.提供一大波模型与流程定义的通用方法
模型相关
repositoryService.getModel()  (获取模型)
repositoryService.saveModel()  (保存模型)
repositoryService.deleteModel() (删除模型)
repositoryService.createDeployment().deploy(); (部署模型)
repositoryService.getModelEditorSource()  (获得模型JSON数据的UTF8字符串)
repositoryService.getModelEditorSourceExtra()  (获取PNG格式图像)

3.流程定义相关
repositoryService.getProcessDefinition(ProcessDefinitionId);  获取流程定义具体信息
repositoryService.activateProcessDefinitionById() 激活流程定义
repositoryService.suspendProcessDefinitionById()  挂起流程定义
repositoryService.deleteDeployment()  删除流程定义
repositoryService.getProcessDiagram()获取流程定义图片流
repositoryService.getResourceAsStream()获取流程定义xml流
repositoryService.getBpmnModel(pde.getId()) 获取bpmn对象(当前进行到的那个节点的流程图使用)

4.流程定义授权相关
repositoryService.getIdentityLinksForProcessDefinition() 流程定义授权列表
repositoryService.addCandidateStarterGroup()新增组流程授权
repositoryService.addCandidateStarterUser()新增用户流程授权
repositoryService.deleteCandidateStarterGroup() 删除组流程授权
repositoryService.deleteCandidateStarterUser()  删除用户流程授权
3.RuntimeService
处理正在运行的流程
runtimeService.createProcessInstanceBuilder().start() 发起流程
runtimeService.deleteProcessInstance() 删除正在运行的流程
runtimeService.suspendProcessInstanceById() 挂起流程定义
runtimeService.activateProcessInstanceById() 激活流程实例
runtimeService.getVariables(processInstanceId); 获取表单中填写的值
runtimeService.getActiveActivityIds(processInstanceId)获取以进行的流程图节点 (当前进行到的那个节点的流程图使用)
runtimeService.createChangeActivityStateBuilder().moveExecutionsToSingleActivityId(executionIds, endId).changeState(); 终止流程
4.HistoryService
在用户发起审批后,会生成流程实例。historyService为处理流程实例的api,但是其中包括了已完成的和未完成的流程实例; 如果是处理正在运行的流程实例,请使用runtimeService;
暴露Flowable引擎收集的所有历史数据。当执行流程时,引擎会保存许多数据(可配置),例如流程实例启动时间、谁在执行哪个任务、完成任务花费的事件、每个流程实例的执行路径,等等。这个服务主要提供查询这些数据的能力
historyService.createHistoricProcessInstanceQuery().list() 查询流程实例列表(历史流程,包括未完成的)
historyService.createHistoricProcessInstanceQuery().list().foreach().getValue() 可以获取历史中表单的信息
historyService.createHistoricProcessInstanceQuery().processInstanceId(processInstanceId).singleResult(); 根绝id查询流程实例
historyService.deleteHistoricProcessInstance() 删除历史流程
historyService.deleteHistoricTaskInstance(taskid); 删除任务实例
historyService.createHistoricActivityInstanceQuery().processInstanceId(processInstanceId).list()  流程实例节点列表 (当前进行到的那个节点的流程图使用)

flowable 有api查看act_hi_varinst里面的数据吗
HistoricVariableInstanceQuery query = historyService.createHistoricVariableInstanceQuery().processInstanceId(instance.getId());
                HistoricVariableInstance operate = query.variableName("operate").singleResult();
                if (operate.getValue().toString().equals("1")) {             // 表示流程同意          }
5.TaskService
对流程实例的各个节点的审批处理
流转的节点审批
taskService.createTaskQuery().list() 待办任务列表
taskService.createTaskQuery().taskId(taskId).singleResult();  待办任务详情
taskService.saveTask(task); 修改任务
taskService.setAssignee() 设置审批人
taskService.addComment() 设置审批备注
taskService.complete() 完成当前审批
taskService.getProcessInstanceComments(processInstanceId); 查看任务详情(也就是都经过哪些人的审批,意见是什么)
taskService.delegateTask(taskId, delegater); 委派任务
taskService.claim(taskId, userId);认领任务
taskService.unclaim(taskId); 取消认领
taskService.complete(taskId, completeVariables); 完成任务

任务授权
taskService.addGroupIdentityLink()新增组任务授权
taskService.addUserIdentityLink() 新增人员任务授权
taskService.deleteGroupIdentityLink() 删除组任务授权
taskService.deleteUserIdentityLink() 删除人员任务授权
6.ManagementService
主要是执行自定义命令

managementService.executeCommand(new classA())  执行classA的内部方法

在自定义的方法中可以使用以下方法获取repositoryService

ProcessEngineConfiguration processEngineConfiguration =
            CommandContextUtil.getProcessEngineConfiguration(commandContext);
RepositoryService repositoryService = processEngineConfiguration.getRepositoryService();

也可以获得流程定义方法集合

ProcessEngineConfigurationImpl processEngineConfiguration =
            CommandContextUtil.getProcessEngineConfiguration(commandContext);
        ProcessDefinitionEntityManager processDefinitionEntityManager =
            processEngineConfiguration.getProcessDefinitionEntityManager();
如 findById/findLatestProcessDefinitionByKey/findLatestProcessDefinitionByKeyAndTenantId 等。
7.IdentityService
用于身份信息获取和保存,这里主要是获取身份信息
用于管理(创建,更新,删除,查询……)组与用户。请注意,Flowable实际上在运行时并不做任何用户检查。
例如任务可以分派给任何用户,而引擎并不会验证系统中是否存在该用户。这是因为Flowable有时要与LDAP、Active Directory等服务结合使用
identityService.createUserQuery().userId(userId).singleResult();  获取审批用户的具体信息
identityService.createGroupQuery().groupId(groupId).singleResult(); 获取审批组的具体信息
8.DynamicBpmnService
可用于修改流程定义中的部分内容,而不需要重新部署它。例如可以修改流程定义中一个用户任务的办理人设置,或者修改一个服务任务中的类名。
九、数据库表说明(34张表)