手写一个简单的Spring(一)
一、简介
Spring这个框架可以说是每一个Java开发者必会的框架,可以说Java的成功离不开Spring。所以本着吃透Spring的想法,今天我们手写一个简单的Spring版本。通过模仿写一个简易版Spring可以加深对框架的理解,也可以更好的学习其思想,话不多说让我们开始吧。
二、创建Maven工程
1、POM文件
<project xmlns="http://maven.apache.org/POM/4.0.0"
  xmlns:xsi="http://www.w3.org/2001/XMLSchema-instance"
  xsi:schemaLocation="http://maven.apache.org/POM/4.0.0 http://maven.apache.org/xsd/maven-4.0.0.xsd">
  <modelVersion>4.0.0modelVersion>

  <groupId>org.examplegroupId>
  <artifactId>spring-demoartifactId>
  <version>1.0-SNAPSHOTversion>

  <properties>
    <maven.compiler.source>11maven.compiler.source>
    <maven.compiler.target>11maven.compiler.target>
    <project.build.sourceEncoding>UTF-8project.build.sourceEncoding>
  properties>

project>
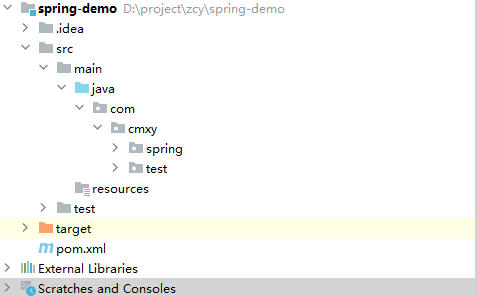
2、代码结构
三、需求分析+实现
正所谓磨刀不误砍柴工,在动手写之前我们要明确我们想要做成的是一个什么东西。我们知道Spring最基本的就是一个容器(或者说工厂)用于管理Bean的生命周期,那么我们这一次就从最基本的入手,完成一个可以创建Bean、获取Bean的功能。
1、Spring容器
通常我们会把Spring称之为容器,以为Spring中存放了大量的Bean对象,这些Bean对象由Spring来管理。我们知道Spring中的最底层的容器(工厂)是BeanFactory,但是实际使用中我们更多的是使用其子类例如ApplicationContext,所以我们也写一个自己的ApplicationContext
package com.cmxy.spring;

public class MyApplicationContext {
	//配置类
    private Class<?> appConfig;

    public MyApplicationContext(Class<?> appConfig) {
        this.appConfig = appConfig;

    }

 }
代码解析:在该类中我们定义了一个appConfg(配置类)由外部传入(总得告诉Spring你要扫描的包路径、等等一系列信息,这里只是简单的定义了一个class)。上文说了我们是要创建Bean和获取Bean,所以我门堆外提供一个获取Bean的方法
package com.cmxy.spring;

public class MyApplicationContext {
	//配置类
    private Class<?> appConfig;

    public MyApplicationContext(Class<?> appConfig) {
        this.appConfig = appConfig;
    }

    public Object(String beanName){
    	return null;
    }
 }
至此我们对外提供的方法就定义好了,那么接下来要考虑的是如何实现。
2、基于注解的包扫描
使用过Spring的你对于各种注解一定很熟悉,要让Spring帮我们管理Bean那么我们至少要告诉Spring我们的Bean在哪里,此时我们可以通过注解来实现这一功能(当然也有其他的方案,比如配置文件等等),所以我们定义一个ComponentScan注解
package com.cmxy.spring.anno;

import java.lang.annotation.*;

@Documented
@Retention(RetentionPolicy.RUNTIME)
@Target(ElementType.TYPE)
public @interface ComponentScan {

    String value() default "";

    /**
    * 包的扫描路径
    */
    String basicPackage() default "";
}
有了该注解我们自己的Spring就知道从哪里去扫描,那接下来该做的就是去扫描了。(所谓的扫描其实就是遍历指定路径下的所有java类),我们定一个scan方法用于扫描。
    /**
     * 当容器启动的时候去扫描指定包路径下的所有组件(含有Component注解的类),并存在容器中
     */
    public void scanComponent(Class<?> configClass) throws ClassNotFoundException {
        //1、获取当前传过来的配置的地址
        ComponentScan componentScan = configClass.getAnnotation(ComponentScan.class);
        //简单处理
        if (componentScan == null) {
            System.out.println("当前配置类不需要扫描");
            return;
        }
        String basicPackage = componentScan.basicPackage();
        basicPackage = basicPackage.replace(".", "/");
        URL resource = this.getClass().getClassLoader().getResource(basicPackage);
        String path = Objects.requireNonNull(resource).getPath();
        //2、扫描当前包下的所有类,并且将带有Component注解的类存到List中
        loopReadDir(path, basicPackage);
    }
代码解析:
1、由于我们在注解上写的basicPackage是以包的形式,例如 com.example.test,但是我们读取文件则是需要转换成路径(无论是相对的还是绝对的)转换成 com/example/test。
2、通过获取当前类(MyApplicationContext)获取他的类加载器,然后获取到文件的url,在通过递归的方法就能拿到当前包下的所有类。
3、这里有一个loopReadDir方法:该方法就是递归获取所有java类的方法,放到后面将
2.1、怎么确定我们所需要的类
由于我们的包下可能存在很多很多的类,有一些类我们不需要交由Spring管理,例如我们的一些工具类,那么我们该如何区分呢?
当然这也很简单,使用过Spring的你一定知道Spring中的各种注解,例如@Service @Component等等,那么我们是不是也可以仿照着来一个呢?
package com.cmxy.spring.anno;

import java.lang.annotation.*;

@Documented
@Retention(RetentionPolicy.RUNTIME)
@Target(ElementType.TYPE)
public @interface Component {

    String value() default "";

}
2.2、扫描出带有Component注解的类
    /**
     * 循环获取指定文件夹下的所有文件
     */
    private void loopReadDir(String path, String basicPath) throws ClassNotFoundException {
        File filePath = new File(path);
        File[] list = filePath.listFiles();
        if (list != null) {
            for (File f : list) {
                String classPath = f.getPath();
                if (f.isFile()) {
                    classPath = classPath.substring(classPath.indexOf(basicPath.replace("/", "\\")),
                        classPath.indexOf(".class"));
                    ClassLoader classLoader = this.getClass().getClassLoader();
                    classPath = classPath.replace("\\", ".");
                    Class<?> clazz = classLoader.loadClass(classPath);
                    if (clazz.isAnnotationPresent(Component.class)) {
                        System.out.println("扫描到一个带有Component注解的类");
                        componentList.add(clazz);
                    }
                } else if (f.isDirectory()) {
                    loopReadDir(classPath, basicPath);
                }
            }
        }
    }
代码解析:
1、这里可能稍微有点饶的就是获取路径这一块,其实这部分就是上面转换过来,之前读取File需要将包路径转换成文件路径(com.cmxy.test=>com/comxy/test),那么现在要做的就是转换回来,因为ClassLoader加载类需要的包路径而不是文件路径。
2、我们将扫描到的java类添加到一个名为ComponentList的List对象中,为后续使用做准备。
3、实例化Bean
3.1、明确Bean的作用域
要想根据名称获取Bean,前提是在容器中有这个bean对象,所以我们需要让Spring替我们创建。此时又有一个小问题,我们知道在Spring中Bean是有作用域的(Scope),不同的Scope的创建策略是不一样的,比如Singleton是容器初始化的时候一同创建的 prototype则是每次getBean的时候创建等等。本次咱们就简单点就两个作用域,Singleton和ProtoType。
package com.cmxy.spring.anno;

import com.cmxy.spring.enums.ScopeEnum;
import java.lang.annotation.Documented;
import java.lang.annotation.ElementType;
import java.lang.annotation.Retention;
import java.lang.annotation.RetentionPolicy;
import java.lang.annotation.Target;


@Documented
@Retention(RetentionPolicy.RUNTIME)
@Target(ElementType.TYPE)
public @interface Scope {

    ScopeEnum value() default ScopeEnum.SINGLETON;


}
package com.cmxy.spring.enums;


public enum ScopeEnum {

    SINGLETON,

    PROTOTYPE,;
}
3.2、封装Bean的信息
在创建Bean之前我们要思考一个问题,我们的最终要达到的目的是根据Bean的名称获取到Bean,也就是说我们的要把 beanName(例如userSerivce)=>class那么以prototype的Bean为例,每次getBean的时候创建,那么难道要每次都去重新走一遍上面的流程再拿到class吗?显然这是很麻烦的一件事情,所以我们可以将Bean信息封装好,同时通过名称获取Bean,这个就很符合Map的结构,所以我们初步认为Bean是存在Map中。结合Spring,我们可以想到将Bean封装成一个对象,我们称之为BeanDefinition。
package com.cmxy.spring;

/**
 * Bean定义信息
 */
public class BeanDefinition {

    /**
     * Bean的名称
     */
    private String beanName;

    /**
     * 作用域
     */
    private String scope;

    private Class<?> clazz;

    public String getScope() {
        return scope;
    }

    public void setScope(final String scope) {
        this.scope = scope;
    }

    public String getBeanName() {
        return beanName;
    }

    public void setBeanName(final String beanName) {
        this.beanName = beanName;
    }

    public Class<?> getClazz() {
        return clazz;
    }

    public void setClazz(final Class<?> clazz) {
        this.clazz = clazz;
    }
}
3.3、注册BeanDefinition
    /**
     * 注册BeanDefinition
     */
    private void registerBeanDefinition() {
        if (componentList == null || componentList.isEmpty()) {
            return;
        }
        for (final Class<?> clazz : componentList) {
            BeanDefinition definition = new BeanDefinition();
            definition.setClazz(clazz);
            final String beanName = clazz.getAnnotation(Component.class).value();
            definition.setBeanName(beanName);
            final Scope scope = clazz.getAnnotation(Scope.class);
            //默认为单例
            definition.setScope(scope == null ? ScopeEnum.SINGLETON.name() : scope.value().name());
            beanDefinitionMap.put(beanName, definition);
        }
    }
代码解析:这段代码也不难,就是将含有Component注解的类封装成BeanDefinition
3.4、创建Bean
/**
 * 创建Bean对象
 */
private void createBean() {
    if (beanDefinitionMap.isEmpty()) {
        return;
    }
    beanDefinitionMap.forEach((beanName, beanDefinition) -> {
        //调用默认构造函数(先写的简单点)
        final Class<?> beanClass = beanDefinition.getClazz();
        //如果Scope(作用域)为空或者为单例则在初始化ApplicationContext时进行创建
        if (beanDefinition.getScope().equals(ScopeEnum.SINGLETON.name())) {
            try {
                final Object bean = beanClass.getDeclaredConstructor().newInstance();
                singletonObjectMap.put(beanName,bean);
            } catch (Exception e) {
                throw new RuntimeException(e);
            }
        }
    });
}
代码解析:根据BeanDefinition中的信息,调用默认构造函数通过反射的形式来创建Bean对象
3.5、获取Bean
    public Object getBean(String beanName) {
        //TODO 先简单的返回一下!
        return singletonObjectMap.get(beanName);
    }
}
4、完整代码
package com.cmxy.spring;

import com.cmxy.spring.anno.Component;
import com.cmxy.spring.anno.ComponentScan;

import com.cmxy.spring.anno.Scope;
import com.cmxy.spring.enums.ScopeEnum;
import java.io.File;
import java.net.URL;
import java.util.ArrayList;
import java.util.List;
import java.util.Objects;
import java.util.concurrent.ConcurrentHashMap;

public class MyApplicationContext {


    private Class<?> appConfig;

    private static List<Class<?>> componentList = new ArrayList<>();

    /**
     * BeanDefinition Map:key:Bean名称 value:BeanDefinition对象
     */
    private static ConcurrentHashMap<String, BeanDefinition> beanDefinitionMap = new ConcurrentHashMap();

    /**
     * 单例的Bean对象
     */
    private static ConcurrentHashMap<String, Object> singletonObjectMap = new ConcurrentHashMap<>();


    public MyApplicationContext(Class<?> appConfig) {
        this.appConfig = appConfig;
        try {
            //扫描指定包下的组件
            scanComponent(appConfig);
            //注册BeanDefinition
            registerBeanDefinition();
            //创建单例Bean对象
            createBean();
        } catch (ClassNotFoundException e) {
            throw new RuntimeException(e);
        }
    }

    /**
     * 当容器启动的时候去扫描指定包路径下的所有组件(含有Component注解的类),并存在容器中
     */
    public void scanComponent(Class<?> configClass) throws ClassNotFoundException {
        //1、获取当前传过来的配置的地址
        ComponentScan componentScan = configClass.getAnnotation(ComponentScan.class);
        //简单处理
        if (componentScan == null) {
            System.out.println("当前配置类不需要扫描");
            return;
        }
        String basicPackage = componentScan.basicPackage();
        basicPackage = basicPackage.replace(".", "/");
        URL resource = this.getClass().getClassLoader().getResource(basicPackage);
        String path = Objects.requireNonNull(resource).getPath();
        //2、扫描当前包下的所有类,并且将带有Component注解的类存到List中
        loopReadDir(path, basicPackage);
    }


    /**
     * 注册BeanDefinition
     */
    private void registerBeanDefinition() {
        if (componentList == null || componentList.isEmpty()) {
            return;
        }
        for (final Class<?> clazz : componentList) {
            BeanDefinition definition = new BeanDefinition();
            definition.setClazz(clazz);
            final String beanName = clazz.getAnnotation(Component.class).value();
            definition.setBeanName(beanName);
            final Scope scope = clazz.getAnnotation(Scope.class);
            //默认为单例
            definition.setScope(scope == null ? ScopeEnum.SINGLETON.name() : scope.value().name());
            beanDefinitionMap.put(beanName, definition);
        }
    }

    /**
     * 创建Bean对象
     */
    private void createBean() {
        if (beanDefinitionMap.isEmpty()) {
            return;
        }
        beanDefinitionMap.forEach((beanName, beanDefinition) -> {
            //调用默认构造函数(先写的简单点)
            final Class<?> beanClass = beanDefinition.getClazz();
            //如果Scope(作用域)为空或者为单例则在初始化ApplicationContext时进行创建
            if (beanDefinition.getScope().equals(ScopeEnum.SINGLETON.name())) {
                try {
                    final Object bean = beanClass.getDeclaredConstructor().newInstance();
                    singletonObjectMap.put(beanName,bean);
                } catch (Exception e) {
                    throw new RuntimeException(e);
                }
            }

        });
    }


    /**
     * 循环获取指定文件夹下的所有文件
     */
    private void loopReadDir(String path, String basicPath) throws ClassNotFoundException {
        File filePath = new File(path);
        File[] list = filePath.listFiles();
        if (list != null) {
            for (File f : list) {
                String classPath = f.getPath();
                if (f.isFile()) {
                    classPath = classPath.substring(classPath.indexOf(basicPath.replace("/", "\\")),
                        classPath.indexOf(".class"));
                    ClassLoader classLoader = this.getClass().getClassLoader();
                    classPath = classPath.replace("\\", ".");
                    Class<?> clazz = classLoader.loadClass(classPath);
                    if (clazz.isAnnotationPresent(Component.class)) {
                        System.out.println("扫描到一个带有Component注解的类");
                        componentList.add(clazz);
                    }
                } else if (f.isDirectory()) {
                    loopReadDir(classPath, basicPath);
                }
            }
        }
    }


    public Object getBean(String beanName) {
        //TODO 先简单的返回一下!
        return singletonObjectMap.get(beanName);
    }
}
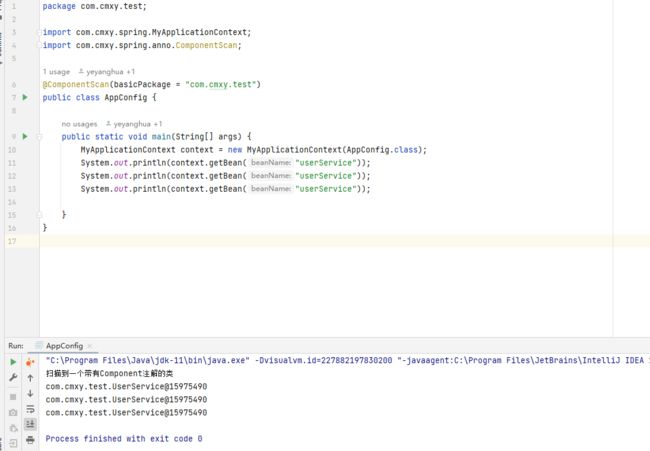
四、测试
五、结束语
这一次我们写一个非常简单的Spring,目的只是为了更好的学习Spring,未完待续。
gitee地址:https://gitee.com/zaige/spring-demo.git

