MyBatis-plus实现代码自动生成以及简单的增删改查
接着上篇博客前后端分离项目搭建,本片博客主要通过mybatis-plus实现代码自动生成以及简单的后端增删改查功能,话不多说,直接上代码。有需要代码的可以私聊
首先pom文件将需要的依赖引入进来,我这边用到的依赖如下代码所示。
    4.0.0

        org.springframework.boot
        spring-boot-starter-parent
        2.6.6


    com.example.mm
    demo1
    0.0.1-SNAPSHOT
    demo1
    demo1

        1.8


            org.springframework.boot
            spring-boot-starter-web


            org.mybatis.spring.boot
            mybatis-spring-boot-starter
            2.2.0


            com.baomidou
            mybatis-plus-generator
            3.3.1.tmp


            org.freemarker
            freemarker


            mysql
            mysql-connector-java
            runtime


            com.alibaba
            druid
            1.2.3


            org.projectlombok
            lombok
            true


            com.baomidou
            mybatis-plus-boot-starter
            3.4.3.1


            cn.hutool
            hutool-all
            5.7.3


                org.apache.maven.plugins
                maven-resources-plugin
                3.1.0


                org.springframework.boot
                spring-boot-maven-plugin
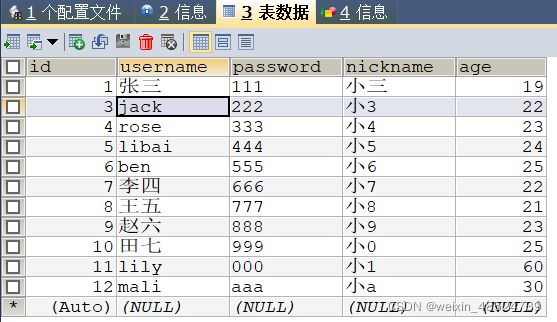
创建一个数据库,我用的sql工具是sqlyog,还有其他的很多工具看个人习惯,就不一一介绍。新建一个表users,插入一些数据。
CREATE TABLE users(
    id INT(10) PRIMARY KEY AUTO_INCREMENT,
    username VARCHAR(20),
    `password` VARCHAR(20),
    nickname VARCHAR(20),
    age INT(10)
)

INSERT INTO users(username,`password`,nickname,age) VALUES ('张三','111','小2',20);
INSERT INTO users(username,`password`,nickname,age) VALUES ('jack','222','小3',22);
INSERT INTO users(username,`password`,nickname,age) VALUES ('rose','333','小4',23);
INSERT INTO users(username,`password`,nickname,age) VALUES ('libai','444','小5',24);
INSERT INTO users(username,`password`,nickname,age) VALUES ('ben','555','小6',25);
INSERT INTO users(username,`password`,nickname,age) VALUES ('李四','666','小7',22);
INSERT INTO users(username,`password`,nickname,age) VALUES ('王五','777','小8',21);
INSERT INTO users(username,`password`,nickname,age) VALUES ('赵六','888','小9',23);
INSERT INTO users(username,`password`,nickname,age) VALUES ('田七','999','小0',25);
INSERT INTO users(username,`password`,nickname,age) VALUES ('lily','000','小1',60);
INSERT INTO users(username,`password`,nickname,age) VALUES ('mali','aaa','小a',30);
然后在resources下面新建一个application.properties文件(或者yaml文件也可以),相应配置如下
server.port=8888
spring.datasource.driver-class-name=com.mysql.cj.jdbc.Driver
spring.datasource.url=jdbc:mysql://localhost:3306/crudTest?useUnicode=true&characterEncoding=utf-8&allowMultiQueries=true&useSSL=false&serverTimezone=GMT%2b8
spring.datasource.username=root
spring.datasource.password=root
spring.datasource.type=com.alibaba.druid.pool.DruidDataSource
这两个地方注意一下,端口号自己设置,一般默认是8080,还有下面的是数据库名称,不是表名称,不要搞错,其他的像驱动,用户名密码这些填写自己设置的就好了。
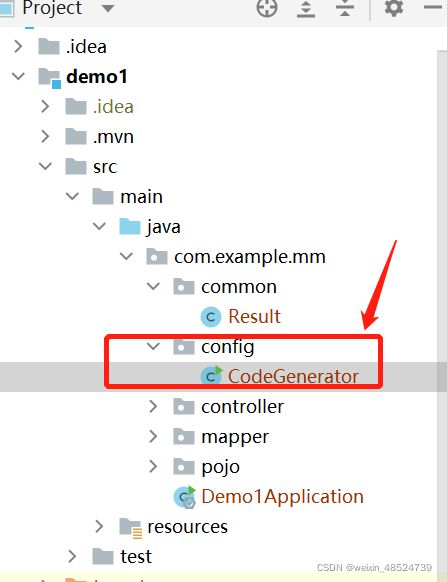
随后创建一个package,命名为config,创建一个CodeGenerator文件,主要用来自动生成代码,对于一些简单的项目能够大大提高效率。
public class CodeGenerator {
    /**
     *
     * 读取控制台内容
     *
     */
    public static String scanner(String tip) {
        Scanner scanner = new Scanner(System.in);
        StringBuilder help = new StringBuilder();
        help.append("请输入" + tip + ":");
        System.out.println(help.toString());
        if (scanner.hasNext()) {
            String ipt = scanner.next();
            if (StringUtils.isNotEmpty(ipt)) {
                return ipt;
            }
        }
        throw  new MybatisPlusException("请输入正确的" + tip + "!");
    }
    public static void main(String[] args) {
        // 代码生成器
        AutoGenerator mpg = new AutoGenerator();
        // 全局配置
        GlobalConfig gc = new GlobalConfig();
        String projectPath = System.getProperty("user.dir");
        gc.setOutputDir(projectPath + "/demo1/src/main/java");
        //作者
        gc.setAuthor("mozz");
        //打开输出目录
        gc.setOpen(false);
        //xml开启 BaseResultMap
        gc.setBaseResultMap(true);
        //xml 开启BaseColumnList
        gc.setBaseColumnList(true);
        // 实体属性 Swagger2 注解
        gc.setSwagger2(true);
        mpg.setGlobalConfig(gc);
        // 数据源配置
        DataSourceConfig dsc = new DataSourceConfig();
        dsc.setUrl("jdbc:mysql://localhost:3306/crudTest? useUnicode=true&characterEncoding=UTF-8&serverTimezone=Asia" + "/Shanghai");
        dsc.setDriverName("com.mysql.jdbc.Driver");
        dsc.setUsername("root");
        dsc.setPassword("root");
        mpg.setDataSource(dsc);
        // 包配置
        PackageConfig pc = new PackageConfig();
        pc.setParent("com.example.mm")
                .setEntity("pojo")
                .setMapper("mapper")
                .setService("service")
                .setServiceImpl("service.impl")
                .setController("controller");
        mpg.setPackageInfo(pc);
        // 自定义配置
        InjectionConfig cfg = new InjectionConfig() {
            @Override
            public void initMap() {
                // to do nothing
            }
        };
        // 如果模板引擎是 freemarker
        String templatePath = "/templates/mapper.xml.ftl";
        // 如果模板引擎是 velocity
        // String templatePath = "/templates/mapper.xml.vm";
        // 自定义输出配置
        List focList = new ArrayList<>();
        // 自定义配置会被优先输出
        focList.add(new FileOutConfig(templatePath) {
            @Override
            public String outputFile(TableInfo tableInfo) {
                // 自定义输出文件名 , 如果你 Entity 设置了前后缀、此处注意 xml 的名称会
                return projectPath + "/demo1/src/main/resources/mapper/"
                        + tableInfo.getEntityName() + "Mapper"
                        + StringPool.DOT_XML;
            }
        });
        cfg.setFileOutConfigList(focList);
        mpg.setCfg(cfg);
        // 配置模板
        TemplateConfig templateConfig = new TemplateConfig();
        templateConfig.setXml(null);
        mpg.setTemplate(templateConfig);
        // 策略配置
        StrategyConfig strategy = new StrategyConfig();
        //数据库表映射到实体的命名策略
        strategy.setNaming(NamingStrategy.underline_to_camel);
        //数据库表字段映射到实体的命名策略
        strategy.setColumnNaming(NamingStrategy.no_change);
        //lombok模型
        strategy.setEntityLombokModel(true);
        //生成 @RestController 控制器
        strategy.setRestControllerStyle(true);
        strategy.setInclude(scanner("表名,多个英文逗号分割").split(","));
        strategy.setControllerMappingHyphenStyle(true);
        //表前缀
//        strategy.setTablePrefix("t_");
        mpg.setStrategy(strategy);
        mpg.setTemplateEngine(new FreemarkerTemplateEngine());
        mpg.execute();
    }
}
随后运行代码生成器,会出现下图提示。
如果多个表,用逗号隔开就可以,如下图(举个例子)
因为 我这边只建了一个表users,所以只需要输入users就可以,按下回车键,就会自动生成代码。
因为返回前端一般都是三大部分组成,状态码code,信息msg以及data(后端数据),所以需要一个Result文件用来封装,创建一个名为common的package,创建Resut文件,内容如下。
public class Result {
    private String code;
    private String msg;
    private T data;

    public Result(String code, String msg, T data) {
        this.code = code;
        this.msg = msg;
        this.data = data;
    }

    public String getCode() {
        return code;
    }

    public void setCode(String code) {
        this.code = code;
    }

    public String getMsg() {
        return msg;
    }

    public void setMsg(String msg) {
        this.msg = msg;
    }

    public T getData() {
        return data;
    }

    public void setData(T data) {
        this.data = data;
    }

    public Result(){};
    public Result(T data){
        this.data=data;
    }

    public static  Result success(){
        Result result=new Result<>();
        result.setCode("0");
        result.setMsg("成功");
        return result;
    }
    public static  Result success(T data){
        Result result=new Result<>(data);
        result.setCode("0");
        result.setMsg("成功");
        return result;
    }
    public static Result error(String code, String msg){
        Result result=new Result<>();
        result.setCode(code);
        result.setMsg(msg);
        return result;
    }
}
然后会自动分好层,包括sql语句在resources目录下面的mapper里都写好了,只需要在controller层写下相应的增删改查就可以了,因为这个比较简单,我就没有用service层,在mapper层继承了baseMapper,也可以加一层service层,他会继承Iservice,有兴趣的可以去了解一下baseMapper和Iservice的区别,具体的代码如下。
import cn.hutool.core.util.StrUtil;
import com.baomidou.mybatisplus.core.conditions.query.LambdaQueryWrapper;
import com.baomidou.mybatisplus.core.toolkit.Wrappers;
import com.baomidou.mybatisplus.extension.plugins.pagination.Page;
import com.example.mm.common.Result;
import com.example.mm.mapper.UsersMapper;
import com.example.mm.pojo.Users;
import org.springframework.web.bind.annotation.*;

import javax.annotation.Resource;

/**
 *
 *  前端控制器
 *
 *
 * @author mozz
 * @since 2022-04-07
 */
@RestController
@RequestMapping("/users")
public class UsersController {

    @Resource
    private UsersMapper usersMapper;

    /**
     * 根据id获取用户信息
     */
    @GetMapping("/{id}")
    public Result getNewsById(@PathVariable Long id){
        return Result.success(usersMapper.selectById(id));
    }

    /**
     * 分页查询用户信息
     */
    @GetMapping("/userInfo")
    public Result findPage(@RequestParam(defaultValue = "1") Integer pageNum,
                              @RequestParam(defaultValue = "10") Integer pageSize,
                              @RequestParam(defaultValue = "") String search) {
        LambdaQueryWrapper wrapper = Wrappers.lambdaQuery();
        if (StrUtil.isNotBlank(search)) {
            wrapper.like(Users::getUsername, search);
        }
        Page usersPage = usersMapper.selectPage(new Page<>(pageNum, pageSize), wrapper);
        return Result.success(usersPage);
    }

    /**
     * 查询所有用户信息
     */
    @GetMapping("/all")
    public Result findAll() {
        return Result.success(usersMapper.selectList(null));
    }

    /**
     * 根据id修改用户信息
     */
    @PutMapping("update")
    public Result update(@RequestBody Users users){
        usersMapper.updateById(users)
        return Result.success(users);
    }

    /**
     * 根据id删除用户信息
     */
    @DeleteMapping("delete/{id}")
    public Result delete(@PathVariable int id){

        return Result.success(usersMapper.deleteById(id));
    }

    /**
     * 添加用户信息
     */
    @PostMapping("add")
    public Result addUsers(@RequestBody Users users){
        usersMapper.insert(users);
        return Result.success(users);
    }
}
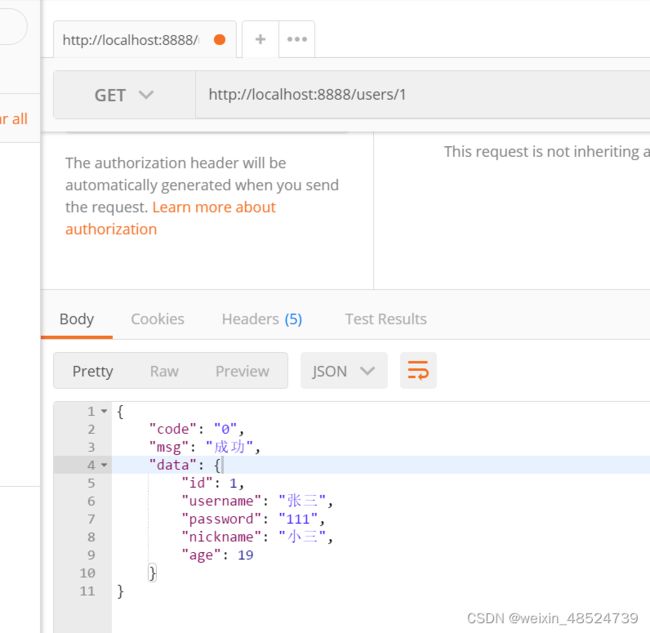
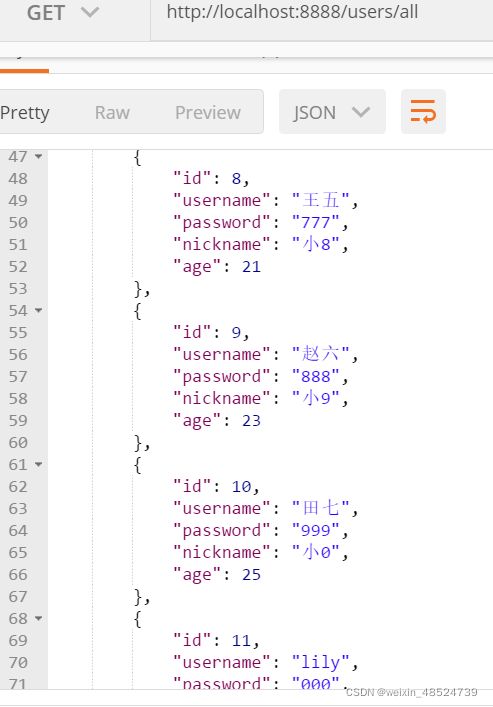
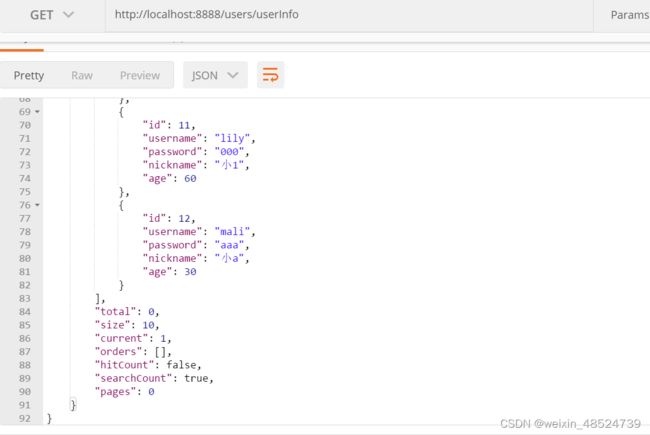
最后在postman中测试一下,结果如下,增删改查成功。
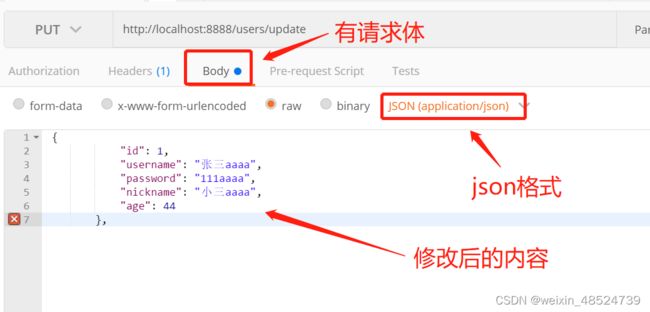
更新操作需要注意一下,该操作是put操作,有请求体。
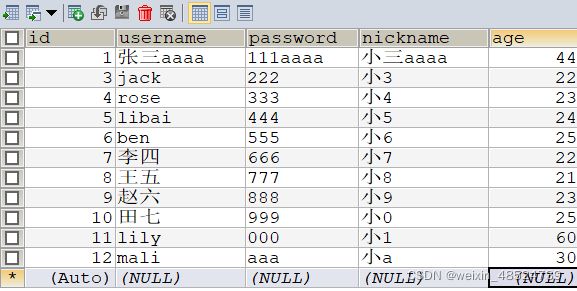
更新后可以看到数据库内容发生变化。
