基于PyQt5的图形化界面开发——自制ssh工具
基于PyQt5的图形化界面开发——自制ssh工具
- 0. 前言
- 1. 第三方库的安装
- 2. ssh原理
- 3. 完整代码
- 4. 演示效果
- 其他PyQt5文章
0. 前言
本节我们使用PyQt5来制作一个简单的ssh小工具。
操作系统:Windows10 专业版
开发环境:Pycahrm Comunity 2022.3
Python解释器版本:Python3.8
第三方库:PyQt5 和 paramiko
1. 第三方库的安装
本节需要安装第三方库PyQt5和paramiko,如果你并不熟悉第三方库的安装,你可以参考以下文章来学习:
Python第三方库安装——使用vscode、pycharm安装Python第三方库
2. ssh原理
SSH(Secure Shell)是一种加密的网络协议,用于在不安全的网络中安全地传输数据。它提供了一种安全的远程登录方式,可以在不安全的网络中远程访问和控制计算机。
SSH协议的工作原理如下:
-
客户端向服务器发起连接请求,请求连接到服务器的SSH端口(默认为22)。
-
服务器收到连接请求后,会向客户端发送一个公钥,客户端使用该公钥对数据进行加密。
-
客户端将加密后的数据发送给服务器,服务器使用自己的私钥对数据进行解密。
-
服务器将解密后的数据发送给应用程序进行处理,应用程序将处理结果返回给服务器。
-
服务器将处理结果加密后发送给客户端,客户端使用自己的私钥对数据进行解密。
-
客户端将解密后的数据显示给用户。
在SSH协议中,数据传输过程中使用了加密算法,保证了数据的安全性。同时,SSH协议还支持身份验证,可以使用密码、公钥等方式进行身份验证,保证了连接的安全性。
3. 完整代码
这次不像以前使用Qtdesigner设计,所以仅仅需要这一个文件即可运行。
import sys
import paramiko
from PyQt5.QtWidgets import QApplication, QMainWindow, QWidget, QVBoxLayout, QHBoxLayout, QLabel, QLineEdit, QPushButton, QTextEdit, QFileDialog, QMessageBox

class SSHWindow(QMainWindow):
    def __init__(self):
        super().__init__()
        self.initUI()

    def initUI(self):
        self.setWindowTitle('SSH Tool')
        self.setGeometry(100, 100, 800, 600)

        # 创建主窗口
        main_widget = QWidget(self)
        main_layout = QVBoxLayout()
        main_widget.setLayout(main_layout)
        self.setCentralWidget(main_widget)

        # 创建连接信息输入框
        connect_widget = QWidget(self)
        connect_layout = QVBoxLayout()
        connect_widget.setLayout(connect_layout)
        main_layout.addWidget(connect_widget)

        host_layout = QHBoxLayout()
        host_label = QLabel('Host:')
        self.host_edit = QLineEdit()
        host_layout.addWidget(host_label)
        host_layout.addWidget(self.host_edit)
        connect_layout.addLayout(host_layout)

        port_layout = QHBoxLayout()
        port_label = QLabel('Port:')
        self.port_edit = QLineEdit()
        self.port_edit.setText('22')
        port_layout.addWidget(port_label)
        port_layout.addWidget(self.port_edit)
        connect_layout.addLayout(port_layout)

        username_layout = QHBoxLayout()
        username_label = QLabel('Username:')
        self.username_edit = QLineEdit()
        username_layout.addWidget(username_label)
        username_layout.addWidget(self.username_edit)
        connect_layout.addLayout(username_layout)

        password_layout = QHBoxLayout()
        password_label = QLabel('Password:')
        self.password_edit = QLineEdit()
        self.password_edit.setEchoMode(QLineEdit.Password)
        password_layout.addWidget(password_label)
        password_layout.addWidget(self.password_edit)
        connect_layout.addLayout(password_layout)

        # 创建连接按钮
        connect_button = QPushButton('Connect', self)
        connect_button.clicked.connect(self.connect_ssh)
        connect_layout.addWidget(connect_button)

        # 创建命令输入框
        command_widget = QWidget(self)
        command_layout = QVBoxLayout()
        command_widget.setLayout(command_layout)
        main_layout.addWidget(command_widget)

        command_label = QLabel('Command:')
        command_layout.addWidget(command_label)

        self.command_edit = QTextEdit()
        command_layout.addWidget(self.command_edit)

        # 创建执行按钮
        execute_button = QPushButton('Execute', self)
        execute_button.clicked.connect(self.execute_command)
        command_layout.addWidget(execute_button)

        # 创建输出框
        output_widget = QWidget(self)
        output_layout = QVBoxLayout()
        output_widget.setLayout(output_layout)
        main_layout.addWidget(output_widget)

        output_label = QLabel('Output:')
        output_layout.addWidget(output_label)

        self.output_edit = QTextEdit()
        self.output_edit.setReadOnly(True)
        output_layout.addWidget(self.output_edit)

    def connect_ssh(self):
        host = self.host_edit.text()
        port = int(self.port_edit.text())
        username = self.username_edit.text()
        password = self.password_edit.text()

        try:
            self.ssh = paramiko.SSHClient()
            self.ssh.set_missing_host_key_policy(paramiko.AutoAddPolicy())
            self.ssh.connect(host, port, username, password)
            self.output_edit.append('Connected to {}:{} as {}'.format(host, port, username))
        except Exception as e:
            QMessageBox.warning(self, 'Error', str(e))

    def execute_command(self):
        command = self.command_edit.toPlainText()

        try:
            stdin, stdout, stderr = self.ssh.exec_command(command)
            output = stdout.read().decode('utf-8')
            error = stderr.read().decode('utf-8')
            if output:
                self.output_edit.append(output)
            if error:
                self.output_edit.append(error)
        except Exception as e:
            QMessageBox.warning(self, 'Error', str(e))

if __name__ == '__main__':
    app = QApplication(sys.argv)
    window = SSHWindow()
    window.show()
    sys.exit(app.exec_())
4. 演示效果
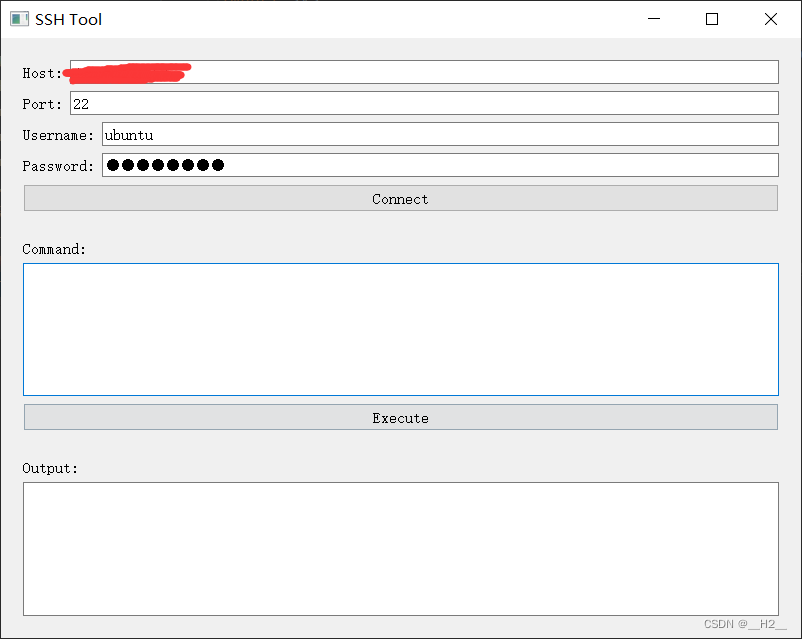
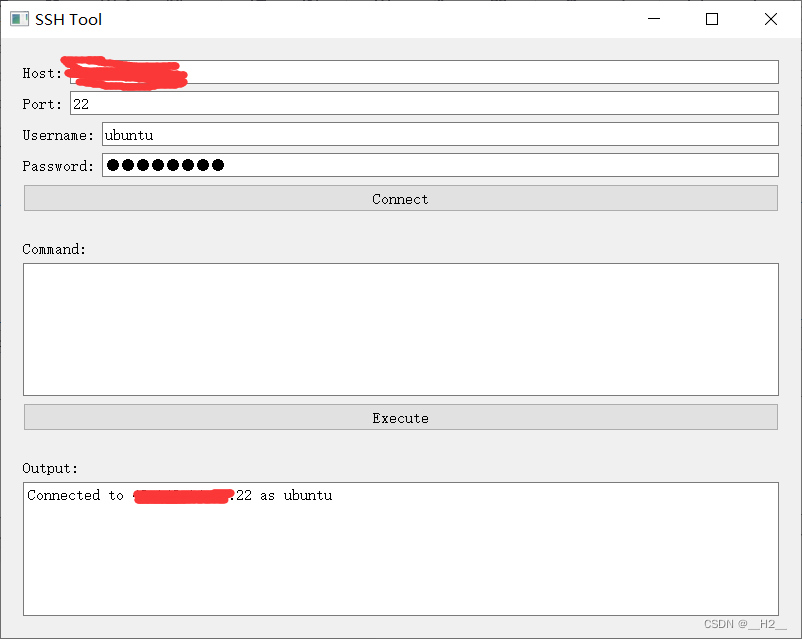
由于我的服务器是公网IP所以遮挡住了,现在点击Connect后我们即可连接上我们的服务器:

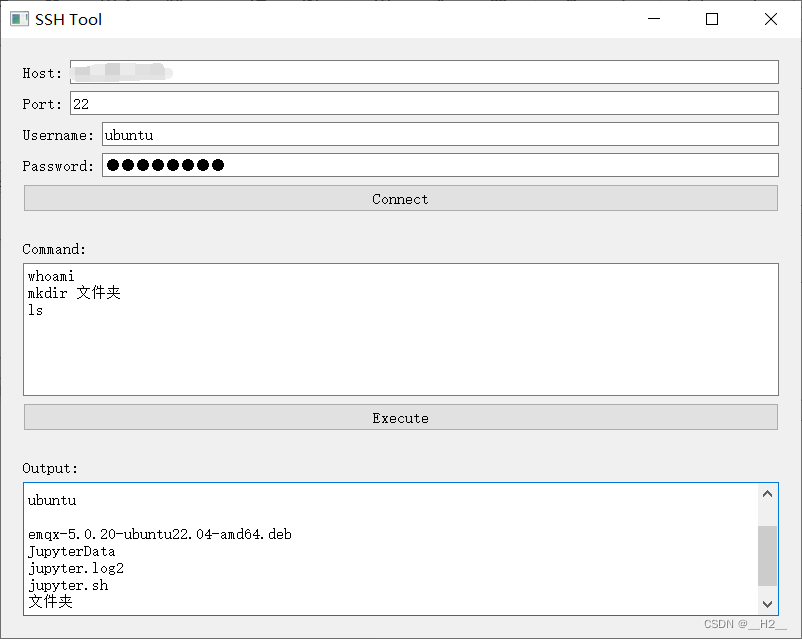
现在我输入了一些比较基础的Linux命令来测试:
whoami ——输出当前所登录的用户
mkdir 文件夹  ——创建一个名为文件夹的文件夹
ls ——查看当前目录下的所以文件
其他PyQt5文章
基于PyQt5的图形化界面开发——自制MQTT客户端
基于PyQt5的图形化界面开发——Windows内存资源监视助手[附带编译exe教程]
基于PyQt5的图形化界面开发——模拟医院管理系统
基于PyQt5的图形化界面开发——自制ssh工具
基于PyQt5的图形化界面开发——PyQt示例_计算器
基于PyQt5的图形化界面开发——PyQt示例_扫雷
基于PyQt5的图形化界面开发——自制Redis图形化客户端(文末附源码)
基于PyQt5的图形化界面开发——堆栈动画演示
基于PyQt5的图形化界面开发——队列动画演示(https://blog.csdn.net/qq_53381910/article/details/130736891)

