SpringSecurity+Vue:实现添加登录图片验证码
第一步,准备一个可以生成验证码的类或者jar包,我这里就用工具类了,网上随便找的一个工具类
/**
 * 生成图片验证码的工具类
 */
public class VerifyCode {
    private int w = 70;
    private int h = 35;
    private Random r = new Random();
    // {"宋体", "华文楷体", "黑体", "华文新魏", "华文隶书", "微软雅黑", "楷体_GB2312"}
    private String[] fontNames  = {"宋体", "华文楷体", "黑体", "微软雅黑", "楷体_GB2312"};
    //可选字符
    private String codes  = "23456789abcdefghjkmnopqrstuvwxyzABCDEFGHJKMNPQRSTUVWXYZ";
    //背景色
    private Color bgColor  = new Color(255, 255, 255);
    private String text ;

    //生成随机的颜色
    private Color randomColor () {
        int red = r.nextInt(150);
        int green = r.nextInt(150);
        int blue = r.nextInt(150);
        return new Color(red, green, blue);
    }

    //生成随机字体
    private Font randomFont () {
        int index = r.nextInt(fontNames.length);
        String fontName = fontNames[index];
        int style = r.nextInt(4);  //生成随机样式,0:无样式,1:粗体,2:斜体,3:粗体+斜体
        int size = r.nextInt(5) + 24; //生成随机字号
        return new Font(fontName, style, size);
    }

    //画干扰线
    private void drawLine (BufferedImage image) {
        int num  = 3; //总共画三条干扰线
        Graphics2D g2 = (Graphics2D)image.getGraphics();
        for(int i = 0; i < num; i++) { //生成两个点的左边,即4个值
            int x1 = r.nextInt(w);
            int y1 = r.nextInt(h);
            int x2 = r.nextInt(w);
            int y2 = r.nextInt(h);
            g2.setStroke(new BasicStroke(1.5F));
            g2.setColor(Color.BLUE);   //设置干扰线颜色为蓝色
            g2.drawLine(x1, y1, x2, y2);
        }
    }

    //随机生成一个字符
    private char randomChar () {
        int index = r.nextInt(codes.length());
        return codes.charAt(index);
    }

    //创建BufferedImage
    private BufferedImage createImage () {
        BufferedImage image = new BufferedImage(w, h, BufferedImage.TYPE_INT_RGB);
        Graphics2D g2 = (Graphics2D)image.getGraphics();
        g2.setColor(this.bgColor);
        g2.fillRect(0, 0, w, h);
        return image;
    }

    public BufferedImage getImage () {
        BufferedImage image = createImage(); //创建图片缓冲区
        Graphics2D g2 = (Graphics2D)image.getGraphics();//得到绘制环境,画笔
        StringBuilder sb = new StringBuilder();//用来装载生成的验证码文本
        // 向图片中画4个字符
        for(int i = 0; i < 4; i++)  {
            String s = randomChar() + "";   //随机生成一个字符
            sb.append(s);
            float x = i * 1.0F * w / 4; //设置当前字符的x轴坐标
            g2.setFont(randomFont());  //设置随机字体
            g2.setColor(randomColor()); //设置随机颜色
            g2.drawString(s, x, h-5);  //画图
        }
        this.text = sb.toString();  //把生成的字符串赋给this.text
        drawLine(image); //添加干扰线
        return image;
    }

    //返回验证码图片上的文本
    public String getText () {
        return text;
    }

    //保存图片到指定的输出流
    public static void output (BufferedImage image, OutputStream out)
            throws IOException {
        ImageIO.write(image, "JPEG", out);
    }
}
第二步,写个请求接口,用以获取验证码
/**
 * 验证码的controller
 */
@RestController
public class VerifyCodeController {
    /**
     * 获取验证码
     *
     * @param request
     * @param response
     * @throws IOException
     */
    @GetMapping("/verifyCode/getVerifyCode")
    public void getVerifyCode(HttpServletRequest request, HttpServletResponse response) throws IOException {
        VerifyCode verifyCode = new VerifyCode();
        //生成图片
        BufferedImage image = verifyCode.getImage();
        //获取图片上的文本
        String text = verifyCode.getText();
        //把验证码的文本保存到session中,用以校验前端输入的验证码是否正确
        request.getSession().setAttribute("VERIFY_CODE", text);

        System.out.println("request.getSession().getAttribute(\"VERIFY_CODE\") = " + request.getSession().getAttribute("VERIFY_CODE"));

        //把生成的图片验证码响应给前端 客户端
        VerifyCode.output(image, response.getOutputStream());
    }
}
这里的代码逻辑就是:调用方法生成验证码,然后保存在 session 中,并通过流响应给前端。有的小伙伴不懂了,为什么要保存在 session 中呢,那是因为需要和前端传递过来的验证码进行比较。
来看结果:
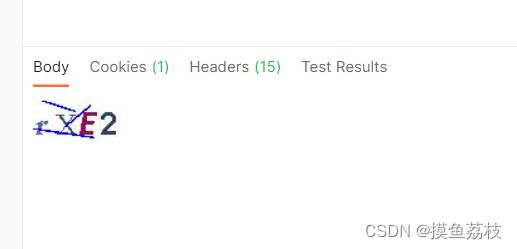
此时验证码已经成功返回了。
接下来需要写一个验证码的过滤器,来验证验证码是否正确:
/**
 * 验证码的过滤器
 */
@Component//注入到Spring容器中
public class VerificationCodeFilter extends GenericFilter {
    @Override
    public void doFilter(ServletRequest request, ServletResponse response, FilterChain chain) throws IOException, ServletException {

        /**
         * 强转为 ServletRequest和ServletResponse的子接口:
         *      HttpServletRequest和HttpServletResponse
         */
        HttpServletRequest req = (HttpServletRequest) request;
        HttpServletResponse resp = (HttpServletResponse) response;


        //如果是post请求,并且路径是 login 再进行校验,否则放行
        if ("POST".equals(req.getMethod()) && "/login".equals(req.getServletPath())) {
            System.out.println("VerificationCodeFilter-VERIFY_CODE = " + req.getSession().getAttribute("VERIFY_CODE"));
            //获取 session 中的验证码字符串
            String verifyCode = (String) req.getSession().getAttribute("VERIFY_CODE");
            //获取客户端传递过来的验证码
            String vc = req.getParameter("verifyCode");
            /**
             * 如果 客户端传递过来的验证码
             *   为"" 为 null 和session的值不一致 视为 验证码错误
             */
            if (vc == null ||"".equals(vc) ||  !vc.toLowerCase().equals(verifyCode.toLowerCase())) {
                //设置响应头 要不然会出现乱码情况
                resp.setHeader("Content-Type", "text/html;charset=utf-8");


                //要往前端返回的数据/抛出异常
            } else {//验证码正确
                //让过滤器往下执行
                chain.doFilter(request, response);
            }
        } else {
            //让过滤器往下执行
            chain.doFilter(request, response);
        }
    }
}
上面代码的逻辑:如果请求路径是 `/login` 并且请求方式是 `POST` 的话,再去校验,然后判断前端传递过来的验证码 是否为空、是否为null、验证码是否正确。条件满足其一就返回错误信息。
接下来就是 SpringSecurity 的配置类了:
/**
 * SpringSecurity 的配置类
 */
@Configuration
@EnableWebSecurity//开启web安全
public class SecurityConfig extends WebSecurityConfigurerAdapter {
    @Autowired
    private VerificationCodeFilter verificationCodeFilter;


    @Override
    protected void configure(HttpSecurity http) throws Exception {
        /**
         * 在 UsernamePasswordAuthenticationFilter 执行前,执行校验验证码的逻辑
         * 如果验证码输入错误,那就不用再继续接下来的流程了
         */

        //所有请求都需要登录校验
        http.authorizeRequests()
                /**
                 * 注意代码中配置的三条规则的顺序非常重要,和 Shiro 类似,Spring Security
                 * 在匹配的时候也是按照从上往下的顺序来匹配,一旦匹配到了就不继续匹配了,
                 * 「所以拦截规则的顺序不能写错」。
                 */
                .antMatchers("/login", "/verifyCode/getVerifyCode").permitAll()
                //其余所有请求都需要认证
                .anyRequest().authenticated()
                .and()
                 //在 UsernamePasswordAuthenticationFilter 过滤器前添加
                .addFilterBefore(verificationCodeFilter, UsernamePasswordAuthenticationFilter.class);

        //禁用csrf
        http.csrf().disable();
        //允许跨域
        http.cors();
    }
}
接下来测试,登录就必须传验证码了,如果验证码不传或者传错,就会报错:

登录成功的情况:

现在就到前端 Vue了:

vcURL:
//验证码的请求地址
vcURL: 'http://ip:port/path?time=' + new Date().getTime(),
点图片更换验证码的方法:
      //更换验证码  利用了只要变量的值更改,标签的值就会更改的特点,实现了更换验证码
      updateVcURL() {
        // console.info("new Date()", new Date().getTime());
        this.vcURL = "http://ip:port/path?time=" + new Date().getTime();
      }
使用获取当前时间戳的方式实现。只要变量的值更改,它就会重新发送一个请求请求验证码