Docker安装Kong
一、安装Kong
1. 构建 Kong 的容器网络
首先我们创建一个 Docker 自定义网络,以允许容器相互发现和通信。在下面的创建命令中 kong-net 是我们创建的 Docker 网络名称。
docker network create kong-net2. 搭建数据库环境
Kong 目前使用 Cassandra 或者 PostgreSQL,你可以执行以下命令中的一个来选择你的 Database。请注意定义网络 --network=kong-net 。
使用 PostgreSQL:
docker pull postgres:9.6

docker run -d --name kong-database \
               --network=kong-net \
               -p 5432:5432 \
               -e "POSTGRES_USER=kong" \
               -e "POSTGRES_DB=kong" \
               -e "POSTGRES_PASSWORD=kong" \
               postgres:9.6
3. 初始化或者迁移数据库
我们使用 docker run --rm 来初始化数据库,该命令执行后会退出容器而保留内部的数据卷(volume)。这个命令我们还是要注意的,一定要跟你声明的网络,数据库类型、host 名称一致。同时注意 Kong 的版本号,注:当前 Kong 最新版本为 2.x,不过目前的 kong-dashboard (Kong Admin UI) 尚未支持 2.x 版的 Kong,为了方便后面的演示,这里以最新的 1.x 版的 Kong 作为演示。
下面指定的数据库是 PostgreSQL:
docker run --rm \
     --network=kong-net \
     -e "KONG_DATABASE=postgres" \
     -e "KONG_PG_HOST=kong-database" \
     -e "KONG_PG_PASSWORD=kong" \
     -e "KONG_CASSANDRA_CONTACT_POINTS=kong-database" \
     kong:1.5.1 kong migrations bootstrap
4. 启动 Kong 容器
完成初始化或者迁移数据库后,我们就可以启动一个连接到数据库容器的 Kong 容器,请务必保证你的数据库容器启动状态,同时检查所有的环境参数 -e 是否是你定义的环境。
docker pull kong:1.5.1

docker run -d --name kong \
     --network=kong-net \
     -e "KONG_DATABASE=postgres" \
     -e "KONG_PG_HOST=kong-database" \
     -e "KONG_PG_PASSWORD=kong" \
     -e "KONG_CASSANDRA_CONTACT_POINTS=kong-database" \
     -e "KONG_PROXY_ACCESS_LOG=/dev/stdout" \
     -e "KONG_ADMIN_ACCESS_LOG=/dev/stdout" \
     -e "KONG_PROXY_ERROR_LOG=/dev/stderr" \
     -e "KONG_ADMIN_ERROR_LOG=/dev/stderr" \
     -e "KONG_ADMIN_LISTEN=0.0.0.0:8001, 0.0.0.0:8444 ssl" \
     -p 8000:8000 \
     -p 8443:8443 \
     -p 8001:8001 \
     -p 8444:8444 \
     kong:1.5.1
Kong 默认绑定 4 个端口:
- 8000:用来接收客户端的 HTTP 请求,并转发到 upstream。
- 8443:用来接收客户端的 HTTPS 请求,并转发到 upstream。
- 8001:HTTP 监听的 API 管理接口。
- 8444:HTTPS 监听的 API 管理接口。
到这里,Kong 已经安装完毕,我们可以使用 docker ps 命令查看当前运行容器,正常情况下可以看到 Kong 和 PostgreSQL 的两个容器:
docker ps

CONTAINER ID   IMAGE                 COMMAND                  CREATED          STATUS          PORTS                                                                                                                          NAMES
06003dc47d4b   kong:1.5.1            "/docker-entrypoint.…"   11 minutes ago   Up 11 minutes   0.0.0.0:8000-8001->8000-8001/tcp, :::8000-8001->8000-8001/tcp, 0.0.0.0:8443-8444->8443-8444/tcp, :::8443-8444->8443-8444/tcp   kong
5de52299a815   postgres:9.6          "docker-entrypoint.s…"   16 minutes ago   Up 16 minutes   0.0.0.0:5432->5432/tcp, :::5432->5432/tcp                                                                                      kong-database
我们可以通过 curl -i http://10.95.35.92:8001 来查看 Kong 是否运行完好。
二、Kong UI
Kong 企业版提供了管理 UI,开源版本是没有的。但是有很多的开源的管理 UI ,其中比较 Fashion 的有Kong Dashboard 和 Konga。Kong Dashboard 当前最新版本(3.6.x)并不支持最新版本的 Kong,最后一次更新也要追溯到 1 年多以前了,选择 Konga 会更好一点。这里简单介绍一下 Kong Dashboard 和 Konga。
1、Kong Dashboard
docker 环境中安装运行如下:
docker pull pgbi/kong-dashboard

docker run --rm  \
--network=kong-net \
-p 8080:8080 \
pgbi/kong-dashboard start \
--kong-url http://kong:8001
启动之后,可以在浏览器中输入 http://10.95.35.92:8080/ 来访问 Kong Dashboard 管理界面。

2、Konga
Konga (官网地址:pantsel.github.io/konga/ ,Github 地址:github.com/pantsel/kon… )可以很好地通过 UI 观察到现在 Kong 的所有的配置,并且可以对于管理 Kong 节点情况进行查看、监控和预警。Konga 主要是用 AngularJS 写的,运行于 nodejs 服务端。具有以下特性:
- 管理所有 Kong Admin API 对象。
- 支持从远程源(数据库,文件,API等)导入使用者。
- 管理多个 Kong 节点。使用快照备份,还原和迁移 Kong 节点。
- 使用运行状况检查监视节点和 API 状态。
- 支持电子邮件和闲置通知。
- 支持多用户。
- 易于数据库集成(MySQL,PostgresSQL,MongoDB,SQL Server)。
下面使用的 PostgreSQL 是和上面在 docker 环境中安装 Kong 时的是一致的,注意用户名、密码、数据库名称等配置,docker 环境安装启动 Konga:
docker pull pantsel/konga
docker run -d -p 1337:1337 \
--network kong-net \
--name konga \
-e "DB_ADAPTER=postgres" \
-e "DB_URI=postgresql://kong:kong@kong-database/kong" \
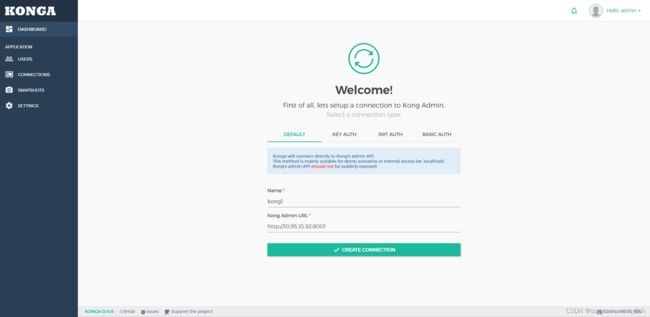
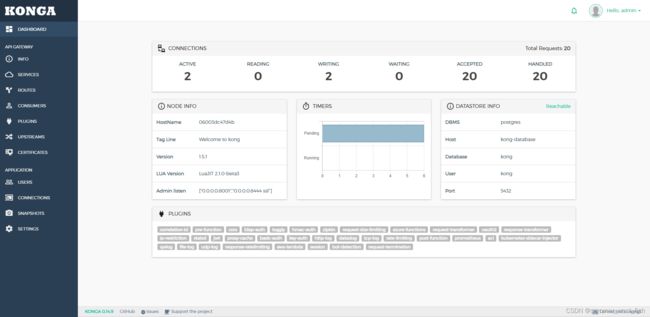
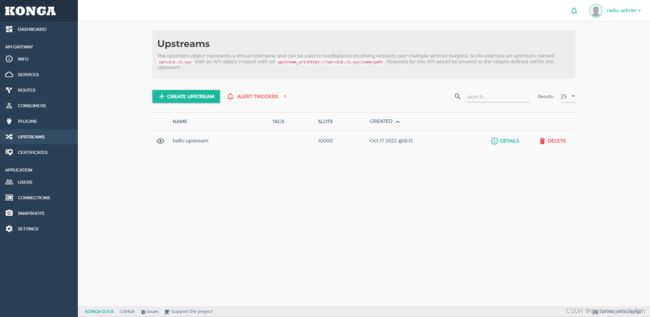
pantsel/konga如果 Konga 容器启动成功,可以通过 http://10.95.35.92:1337/ 访问管理界面。通过注册后进入,然后在 CONNECTIONS 中添加 Kong 服务的管理路径 http://10.95.35.92:8001。Konga 管理界面示例如下:
三、Kong Admin API
部署好 Kong 之后,则需要将我们自己的接口加入到 Kong 的中管理,Kong 提供了比较全面的RESTful API,每个版本会有所不同,详细可以参考官网:docs.konghq.com/2.0.x/admin… 。Kong 管理 API 的端口是 8001(8044),服务、路由、配置都是通过这个端口进行管理,所以部署好之后页面可以直接访问 http://10.95.35.92:8001
这里我们先来了解一下如何使用 RESTful 管理接口来管理 Service (服务)、Route(路由)。
1. 添加一个Service
curl -i -X POST http://10.95.35.92:8001/services \
> --data name=hello-service \
> --data url='http://10.95.35.92:9000/hello'

HTTP/1.1 201 Created
Date: Mon, 17 Oct 2022 07:44:16 GMT
Content-Type: application/json; charset=utf-8
Connection: keep-alive
Access-Control-Allow-Origin: *
Server: kong/1.5.1
Content-Length: 301
X-Kong-Admin-Latency: 42

{"host":"10.95.35.92","created_at":1665992656,"connect_timeout":60000,"id":"a5b306b6-4399-4294-9240-6ffdca12f05a","protocol":"http","name":"hello-service","read_timeout":60000,"port":9000,"path":"\/hello","updated_at":1665992656,"retries":5,"write_timeout":60000,"tags":null,"client_certificate":null}
2、查询Service
curl http://10.95.35.92:8001/services/hello-service

{"host":"10.95.35.92","created_at":1665992656,"connect_timeout":60000,"id":"a5b306b6-4399-4294-9240-6ffdca12f05a","protocol":"http","name":"hello-service","read_timeout":60000,"port":9000,"path":"\/hello","updated_at":1665992656,"retries":5,"write_timeout":60000,"tags":null,"client_certificate":null}
3、为 Service 添加一个 Route
curl -i -X POST \
> --url http://10.95.35.92:8001/services/hello-service/routes \
> --data 'paths[]=/hello' \
> --data name=hello-route

HTTP/1.1 201 Created
Date: Mon, 17 Oct 2022 07:49:02 GMT
Content-Type: application/json; charset=utf-8
Connection: keep-alive
Access-Control-Allow-Origin: *
Server: kong/1.5.1
Content-Length: 434
X-Kong-Admin-Latency: 35

{"id":"eed7e6e7-937a-4f79-b9b4-51b5824fafca","path_handling":"v1","paths":["\/hello"],"destinations":null,"headers":null,"protocols":["http","https"],"methods":null,"snis":null,"service":{"id":"a5b306b6-4399-4294-9240-6ffdca12f05a"},"name":"hello-route","strip_path":true,"preserve_host":false,"regex_priority":0,"updated_at":1665992942,"sources":null,"hosts":null,"https_redirect_status_code":426,"tags":null,"created_at":1665992942}[root@aswtechlabpoc92 helloworld]#
4、测试
我们可以通过访问 http://10.95.35.92:8000/hello 来验证一下配置是否正确。
Kong代理:
url http://10.95.35.92:8000/hello
Hello world !


真实服务:
http://10.95.35.92:9000/hello/
前面的操作就等效于配置 nginx.conf:
server {
  listen 8000;
  location /hello {
    proxy_pass http://10.95.35.92:9000/hello;
  }
}
不过,前面的配置操作都是动态的,无需像 Nginx一样需要重启。
Service是抽象层面的服务,它可以直接映射到一个物理服务,也可以指向一个Upstream(同Nginx中的Upstream,是对上游服务器的抽象)。Route是路由的抽象,它负责将实际的请求映射到 Service。除了Serivce、Route之外,还有 Tag、Consumer、Plugin、Certificate、SNI、Upstream、Target等,读者可以从 官网的介绍文档 中了解全貌。
下面在演示一个例子,修改 Service,将其映射到一个 Upstream:
# 添加 name为 hello-upstream 的 Upstream
curl -i -X POST http://10.95.35.92:8001/upstreams \
> --data name=hello-upstream
HTTP/1.1 201 Created
Date: Mon, 17 Oct 2022 08:13:20 GMT
Content-Type: application/json; charset=utf-8
Connection: keep-alive
Access-Control-Allow-Origin: *
Server: kong/1.5.1
Content-Length: 868
X-Kong-Admin-Latency: 51
{"created_at":1665994400,"hash_on":"none","id":"b9760079-8321-4b44-beba-fbaf65cbc1a2","algorithm":"round-robin","name":"hello-upstream","tags":null,"hash_fallback_header":null,"hash_fallback":"none","hash_on_cookie":null,"host_header":null,"hash_on_cookie_path":"\/","healthchecks":{"active":{"unhealthy":{"http_statuses":[429,404,500,501,502,503,504,505],"tcp_failures":0,"timeouts":0,"http_failures":0,"interval":0},"type":"http","http_path":"\/","timeout":1,"healthy":{"successes":0,"interval":0,"http_statuses":[200,302]},"https_sni":null,"https_verify_certificate":true,"concurrency":10},"passive":{"unhealthy":{"http_failures":0,"http_statuses":[429,500,503],"tcp_failures":0,"timeouts":0},"healthy":{"http_statuses":[200,201,202,203,204,205,206,207,208,226,300,301,302,303,304,305,306,307,308],"successes":0},"type":"http"}},"hash_on_header":null,"slots":10000}
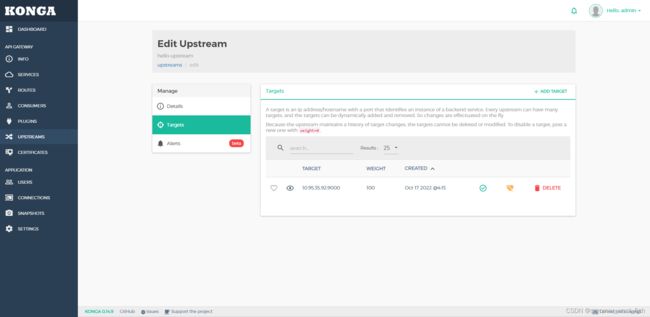
# 为 mock-upstream 添加 Target,Target 代表了一个物理服务(IP地址/hostname + port的抽象),一个Upstream可以包含多个Targets
curl -i -X POST http://10.95.35.92:8001/upstreams/hello-upstream/targets \
> --data target="10.95.35.92:9000"
HTTP/1.1 201 Created
Date: Mon, 17 Oct 2022 08:15:02 GMT
Content-Type: application/json; charset=utf-8
Connection: keep-alive
Access-Control-Allow-Origin: *
Server: kong/1.5.1
Content-Length: 171
X-Kong-Admin-Latency: 54
{"created_at":1665994502.454,"upstream":{"id":"b9760079-8321-4b44-beba-fbaf65cbc1a2"},"id":"fa9b8da2-ac9f-46e7-9528-23181b5577cd","target":"10.95.35.92:9000","weight":100}
# 修改 hello-service,为其配置
curl -i -X PATCH http://10.95.35.92:8001/services/hello-service \
> --data url='http://hello-upstream/hello'
HTTP/1.1 200 OK
Date: Mon, 17 Oct 2022 10:06:27 GMT
Content-Type: application/json; charset=utf-8
Connection: keep-alive
Access-Control-Allow-Origin: *
Server: kong/1.5.1
Content-Length: 302
X-Kong-Admin-Latency: 40
{"host":"hello-upstream","created_at":1665992656,"connect_timeout":60000,"id":"a5b306b6-4399-4294-9240-6ffdca12f05a","protocol":"http","name":"hello-service","read_timeout":60000,"port":80,"path":"\/hello","updated_at":1666001187,"retries":5,"write_timeout":60000,"tags":null,"client_certificate":null}上面的配置等同于 Nginx 中的nginx.conf配置 :
upstream hello-upstream{
server 10.95.35.92:8001;
}
server {
listen 8000;
location /hello {
proxy_pass http://hello-upstream/hello;
}
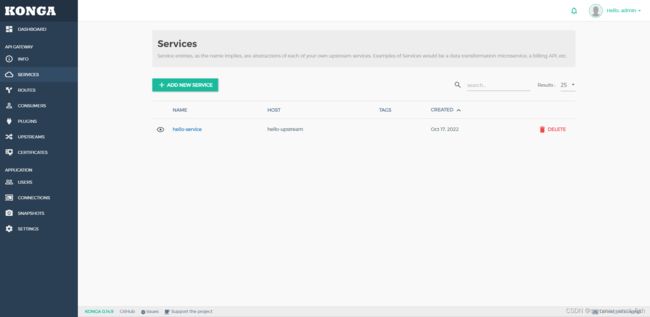
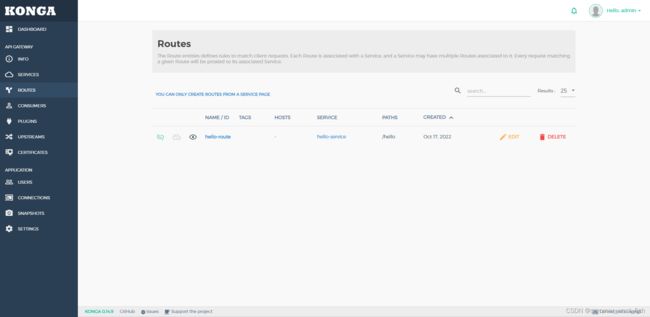
}当然,这里的配置我们也可以通过管理界面来操作。上面操作完之后,在Konga中也有相关信息展示出来:
四、Kong Plugins
Kong通过插件Plugins实现日志记录、安全检测、性能监控和负载均衡等功能。下面我将演示一个例子,通过启动 apikey 实现简单网关安全检验。
1. 配置 key-auth 插件
curl -i -X POST http://10.95.35.92:8001/routes/hello-route/plugins \
> --data name=key-auth

HTTP/1.1 201 Created
Date: Tue, 18 Oct 2022 01:23:00 GMT
Content-Type: application/json; charset=utf-8
Connection: keep-alive
Access-Control-Allow-Origin: *
Server: kong/1.5.1
Content-Length: 380
X-Kong-Admin-Latency: 282

{"created_at":1666056180,"config":{"key_names":["apikey"],"run_on_preflight":true,"anonymous":null,"hide_credentials":false,"key_in_body":false},"id":"79c9fdce-6997-45eb-9615-003708f75827","service":null,"name":"key-auth","protocols":["grpc","grpcs","http","https"],"enabled":true,"run_on":"first","consumer":null,"route":{"id":"eed7e6e7-937a-4f79-b9b4-51b5824fafca"},"tags":null}
这个插件接收 config.key_names 定义参数,默认参数名称 ['apikey']。在 HTTP 请求中 header 和 params 参数中包含 apikey 参数,参数值必须 apikey 密钥,Kong 网关将坚持密钥,验证通过才可以访问后续服务。
此时我们使用 curl -i http://10.95.35.92:8000/hello/ 来验证一下是否生效,如果如下所示,访问失败(HTTP/1.1 401 Unauthorized,"No API key found in request" ),说明 Kong 安全机制生效了。
curl -i http://10.95.35.92:8000/hello/
HTTP/1.1 401 Unauthorized
Date: Tue, 18 Oct 2022 01:24:51 GMT
Content-Type: application/json; charset=utf-8
Connection: keep-alive
WWW-Authenticate: Key realm="kong"
Content-Length: 41
X-Kong-Response-Latency: 21
Server: kong/1.5.1

{"message":"No API key found in request"}
在 Konga 中我们也可以看到相关记录:

2. 为Service添加服务消费者(Consumer)
定义消费者访问 API Key, 让他拥有访问 hello-service 的权限。
创建消费者 Hidden:
curl -i -X POST http://10.95.35.92:8001/consumers/ \
> --data username=Hidden

HTTP/1.1 201 Created
Date: Tue, 18 Oct 2022 01:28:24 GMT
Content-Type: application/json; charset=utf-8
Connection: keep-alive
Access-Control-Allow-Origin: *
Server: kong/1.5.1
Content-Length: 118
X-Kong-Admin-Latency: 38


创建成功之后,返回:

{"custom_id":null,"created_at":1666056504,"id":"9cab1417-a152-441c-a5a8-9640e04a38ee","tags":null,"username":"Hidden"}
之后为消费者 Hidden 创建一个 api key,输入如下命令:
curl -i -X POST http://10.95.35.92:8001/consumers/Hidden/key-auth/ \
> --data key=123456

HTTP/1.1 201 Created
Date: Tue, 18 Oct 2022 01:30:16 GMT
Content-Type: application/json; charset=utf-8
Connection: keep-alive
Access-Control-Allow-Origin: *
Server: kong/1.5.1
Content-Length: 164
X-Kong-Admin-Latency: 36

{"created_at":1666056616,"consumer":{"id":"9cab1417-a152-441c-a5a8-9640e04a38ee"},"id":"8023ced8-cdf7-4436-90df-257e93fae482","tags":null,"ttl":null,"key":"123456"}
现在我们再来验证一下 http://10.95.35.92:8000/hello:
curl -i http://10.95.35.92:8000/hello/ \
> --header "apikey:123456"

返回:
HTTP/1.1 200 OK
Content-Type: text/html; charset=utf-8
Content-Length: 14
Connection: keep-alive
Date: Tue, 18 Oct 2022 01:32:30 GMT
Server: WSGIServer/0.1 Python/2.7.5
X-Frame-Options: SAMEORIGIN
X-Kong-Upstream-Latency: 13
X-Kong-Proxy-Latency: 19
Via: kong/1.5.1

Hello world !
Kong 网关插件概括为如下:
- 身份认证插件:Kong 提供了 Basic Authentication、Key authentication、OAuth2.0 authentication、HMAC authentication、JWT、LDAP authentication 认证实现。
- 安全控制插件:ACL(访问控制)、CORS(跨域资源共享)、动态 SSL、IP 限制、爬虫检测实现。
- 流量控制插件:请求限流(基于请求计数限流)、上游响应限流(根据 upstream 响应计数限流)、请求大小限制。限流支持本地、Redis 和集群限流模式。
- 分析监控插件:Galileo(记录请求和响应数据,实现 API 分析)、Datadog(记录 API Metric 如请求次数、请求大小、响应状态和延迟,可视化 API Metric)、Runscope(记录请求和响应数据,实现 API 性能测试和监控)。
- 协议转换插件:请求转换(在转发到 upstream 之前修改请求)、响应转换(在 upstream 响应返回给客户端之前修改响应)。
- 日志应用插件:TCP、UDP、HTTP、File、Syslog、StatsD、Loggly 等。
五、总结
Kong 作为 API 网关提供了 API 管理功能及围绕 API 管理实现了一些默认的插件,另外还具备集群水平扩展能力,从而提升整体吞吐量。Kong 本身是基于 OpenResty,可以在现有 Kong 的基础上进行一些扩展,从而实现更复杂的特性。虽然有一些特性 Kong 默认是缺失的,如 API 级别的超时、重试、fallback 策略、缓存、API 聚合、AB 测试等,这些功能插件需要企业开发人员通过 Lua 语言进行定制和扩展。综上所述,Kong API 网关默认提供的插件比较丰富, 适应针对企业级的 API 网关定位。