rsync+inotify实时备份工具部署与使用
rsync+inotify
notify是一种强大的、细粒度的、异步的文件系统事件监控机制,linux内核从2.6.13起,加入了Inotify支持,通过Inotify可以监控文件系统中添加、删除,修改、移动等各种细微事件,利用这个内核接口,第三方软件就可以监控文件系统下文件的各种变化情况,而inotify-tools就是这样的一个第三方软件。
rsync简介
rsync是linux系统下的数据镜像备份工具。使用快速增量备份工具Remote Sync可以远程同步,支持本地复制,或者与其他SSH、rsync主机同步。
rsync的部分特性
rsync支持很多特性:
可以镜像保存整个目录树和文件系统
可以很容易做到保持原来文件的权限、时间、软硬链接等等
无须特殊权限即可安装
快速:第一次同步时rsync会复制全部内容,但在下一次只传输修改过的文件。rsync在传输数据的过程中可以实行压缩及解压缩操作,因此可以使用更少带宽
安全:可以使用scp、ssh等方式来传输文件,也可以通过直接的socket连接
支持匿名传输,以方便进行网站镜象
rsync的ssh认证协议
rsync命令来同步系统文件之前要先登录remote主机认证,认证过程中用到的协议有2种:
ssh协议
rsync协议
rsync server端不用启动rsync的daemon进程,只要获取remote host的用户名和密码就可以直接rsync同步文件
rsync server端因为不用启动daemon进程,所以也不用配置文件/etc/rsyncd.conf
rsync命令的常用选项
rsync常用选项:
-a, --archive //归档
-v, --verbose //啰嗦模式
-q, --quiet //静默模式
-r, --recursive //递归
-p, --perms //保持原有的权限属性
-z, --compress //在传输时压缩,节省带宽,加快传输速度
--delete //在源服务器上做的删除操作也会在目标服务器上同
Server端192.168.11.186 操作系统centos:7
目标端 192.168.11.187 操作系统centos:7
测试要求把server端的 /root/test/llvision 同步到目标端/root
注意以下是在目标端 192.168.11.187进行的操作
注意关闭防火墙与selinux
systemctl stop firewalld ;setenforce 0
安装rsync服务端软件
yum -y install rsync
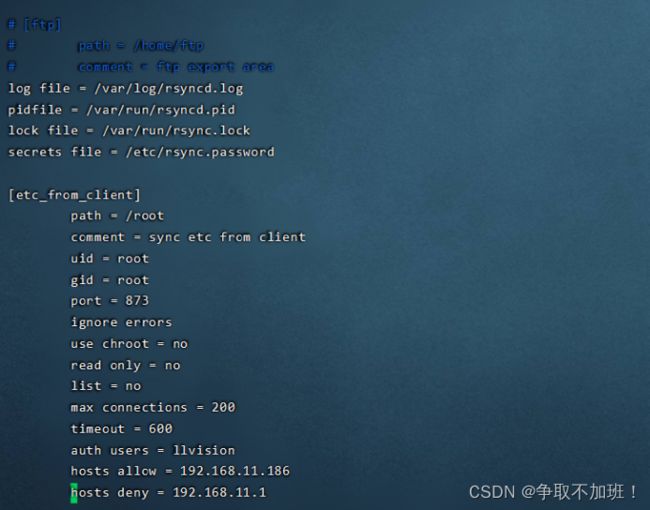
设置rsyncd.conf配置文件
vim /etc/rsyncd.conf
log file = /var/log/rsyncd.log
pidfile = /var/run/rsyncd.pid
lock file = /var/run/rsync.lock
secrets file = /etc/rsync.password
[etc_from_client]
path = /root 传输文件到的目录
comment = sync etc from client
uid = root
gid = root
port = 873
ignore errors
use chroot = no
read only = no
list = no
max connections = 200
timeout = 600
auth users = llvision
hosts allow = 192.168.11.186 server端ip
hosts deny = 192.168.11.1
vim /etc/rsync.password
llvision:123456 文件传输使用的用户和密码
最好设置一下权限chmod 700 /etc/rsync.password
启动rsync服务systemctl start rsyncd
以下是在Server端192.168.11.186进行的操作
注意关闭防火墙与selinux
systemctl stop firewalld ;setenforce 0
安装rsync服务端软件
yum -y install rsync
创建认证密码文件,只需要密码,不需要用户
vim /etc/rsync.password
123456
chmod 700 /etc/rsync.password
在server端创建测试文件 mkdir -p /root/test/llvision
然后运行以下命令
rsync -avH --port 873 --delete /root/test/ [email protected]::etc_from_client --password-file=/etc/rsync.password
选择目标路径需要注意 本人在做此操作时覆盖了原有的文件!!!
以上rsync 的配置已经做好,不需要做inotify实时同步文件配置的忽略以下内容
查看服务器内核是否支持inotify ll /proc/sys/fs/inotify/
如果有这个三个以max开头的文件,则表示服务器内核支持inotify
使用安装 inotify-tools 进行实时同步文件
yum -y install inotify-tools
写同步脚本,这是最最重要的一步,请慎之又慎。让脚本自动去检测我们制定的目录下
文件发生的变化,然后再执行rsync的命令把它同步到我们的服务器端去
host=192.168.11.187 //目标服务器的ip(备份服务器)
data_dir=/root/test //在源服务器上所要监控的备份目录(此处可以自定义,但是要保证存在)
des=etc_from_client //自定义的模块名,需要与目标服务器上定义的同步名称一致
username=llvision //执行数据同步的用户名
vim inotify.sh
#!/bin/bash
host=192.168.11.187
data_dir=/root/test
dst=etc_from_client
username=llvision
/usr/bin/inotifywait -mrq --timefmt '%d/%m/%y %H:%M' --format '%T %w%f%e' -e modify,delete,create,attrib $data_dir | while read files
do
/usr/bin/rsync -vzrtopg --delete --progress --password-file=/etc/rsync.password $data_dir $username@$host::$dst
echo "${files} was rsynced" >> /tmp/rsync.log 2>&1
done
Chmod 775 inotify.sh 权限给一下
nohup bash inotify.sh &
[root@minio-1 test]# nohup bash inotify.sh &
[1] 19548
[root@minio-1 test]# nohup: 忽略输入并把输出追加到"nohup.out"
[root@minio-1 test]# ps -ef |grep inotify.sh
root 26421 2280 0 17:11 pts/0 00:00:00 bash inotify.sh
root 26423 26421 0 17:11 pts/0 00:00:00 bash inotify.sh
root 32883 2280 0 17:16 pts/0 00:00:00 grep --color=auto inotify.sh
数据已同步试一下在server端删除操作 如果目标服务器也删除了证明成功
设置脚本为开机自动启动
chmod +x /etc/rc.local
vim /etc/rc.local 添加内容
nohup /bin/bash /root/inotify.sh &


