springboot整合eureka、config搭建注册中心和配置中心
目录
一 、springboot整合eureka实现注册中心
二、springboot整合config实现配置中心
三、从配置中心拉取配置
这篇文章详细介绍怎么通过eureka和config分别搭建一个注册中心和配置中心的服务。
一 、springboot整合eureka实现注册中心
1、创建一个springboot项目,并命名为eureka
2、修改pom.xml,添加eureka-server的依赖
因为博主之前整合springcloud的springboot版本用的都是2.3.2.RELEASE,而springboot对应的springcloud版本为Hoxton.SR
    4.0.0


        org.springframework.boot
        spring-boot-starter-parent
        2.3.2.RELEASE


    com.example
    eureka
    0.0.1-SNAPSHOT


        1.8
        1.18.22
        1.4.4.RELEASE


                org.springframework.cloud
                spring-cloud-dependencies
                Hoxton.SR12
                pom
                import


            org.springframework.boot
            spring-boot-starter-web


            org.springframework.cloud
            spring-cloud-starter-eureka-server
            ${eureka.version}


                org.springframework.boot
                spring-boot-maven-plugin
3、修改配置文件
server:
  port: 9000

eureka:
  instance:
    hostname: localhost # eureka所在的服务器名
  client:
    fetch-registry: false
    register-with-eureka: false
    # eureka提供服务的地址
    service-url:
      defaultZone: http://${eureka.instance.hostname}:${server.port}/eureka
4、启动类上添加注解@EnableEurekaServer
package com.example.eureka;

import org.slf4j.Logger;
import org.slf4j.LoggerFactory;
import org.springframework.boot.SpringApplication;
import org.springframework.boot.autoconfigure.SpringBootApplication;
import org.springframework.cloud.netflix.eureka.server.EnableEurekaServer;

@EnableEurekaServer
@SpringBootApplication
public class EurekaApplication {
    private final static Logger logger = LoggerFactory.getLogger(EurekaApplication.class);

    public static void main(String[] args) {
        if (logger.isDebugEnabled()) {
            logger.debug("启动eureka注册中心......");
        }

        SpringApplication.run(EurekaApplication.class, args);
    }

}
5、启动项目
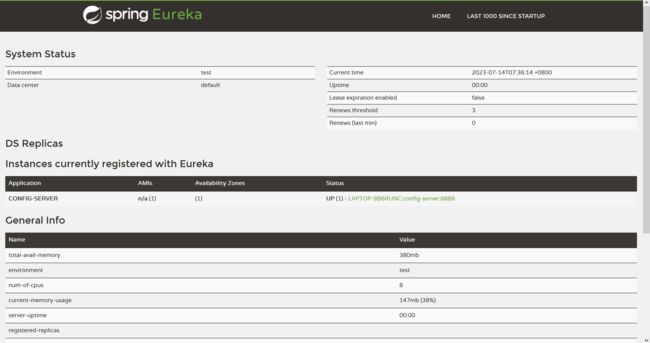
6、浏览器访问localhost:9000,如果能看到下面的界面,说明eureka配置完成了
二、springboot整合config实现配置中心
1、创建一个springboot项目,并命名为config
2、修改pom.xml,添加config-server的依赖
    4.0.0


        org.springframework.boot
        spring-boot-starter-parent
        2.3.2.RELEASE


    cn.edu.sgu.www
    config
    0.0.1-SNAPSHOT


        1.8
        1.4.4.RELEASE
        2.2.8.RELEASE


                org.springframework.cloud
                spring-cloud-dependencies
                Hoxton.SR12
                pom
                import


                org.springframework.cloud
                spring-cloud-starter-eureka-server
                ${eureka.version}


                org.springframework.cloud
                spring-cloud-config-server
                ${config.version}


            org.springframework.boot
            spring-boot-starter-web


            org.springframework.cloud
            spring-cloud-starter-eureka-server


            org.springframework.cloud
            spring-cloud-config-server


                org.springframework.boot
                spring-boot-maven-plugin
4、修改配置文件,注册到euraka并添加配置中心的配置
这里的配置文件可以存到当前项目下,也可以存到git仓库,还能保存到远程的服务器。
server:
  port: 8888

# 注册到eureka
eureka:
  client:
    service-url:
      defaultZone: http://localhost:9000/eureka

spring:
  application:
    name: config-server
  cloud:
    config:
      server:
        # 本地
#        native:
#          searchLocations: classpath:/config #本地配置的路径 读取/resources/config下的配置
        # 远程git仓库
        git:
          search-paths: config  # 配置文件所在根目录
          uri: https://gitee.com/he-yunlin/repository.git # git仓库地址
5、启动类上添加注解@EnableConfigServer和@EnableEurekaClient
package cn.edu.sgu.www.config;

import org.slf4j.Logger;
import org.slf4j.LoggerFactory;
import org.springframework.boot.SpringApplication;
import org.springframework.boot.autoconfigure.SpringBootApplication;
import org.springframework.cloud.config.server.EnableConfigServer;
import org.springframework.cloud.netflix.eureka.EnableEurekaClient;

@EnableConfigServer
@EnableEurekaClient
@SpringBootApplication
public class ConfigApplication {
    private final static Logger logger = LoggerFactory.getLogger(ConfigApplication.class);

    public static void main(String[] args) {
        if (logger.isDebugEnabled()) {
            logger.debug("启动config配置中心......");
        }

        SpringApplication.run(ConfigApplication.class, args);
    }

}
5、启动项目
6、浏览器访问localhost:9000,查看服务config是否注册到了eureka上
三、从配置中心拉取配置
经过前面的两步,已经搭建好了配置中心,并且能够正确的注册到注册中心,接下来创建一个服务,从配置中心拉取配置。
1、创建一个springboot项目eureka-client
2、添加maven依赖
    4.0.0


        org.springframework.boot
        spring-boot-starter-parent
        2.3.2.RELEASE


    com.example
    euraka-client
    0.0.1-SNAPSHOT


        1.8
        1.4.4.RELEASE
        2.2.8.RELEASE


                org.springframework.cloud
                spring-cloud-dependencies
                Hoxton.SR12
                pom
                import


                org.springframework.cloud
                spring-cloud-starter-eureka
                ${eureka.version}


                org.springframework.cloud
                spring-cloud-config-client
                ${config.version}


            org.springframework.boot
            spring-boot-starter-web


            org.springframework.cloud
            spring-cloud-starter-eureka


            org.springframework.cloud
            spring-cloud-config-client


                org.springframework.boot
                spring-boot-maven-plugin
3、修改配置文件
server:
  port: 9001

spring:
  application:
    name: eureka-client
  profiles:
    active: dev
  cloud:
    config:
      profile: dev          # 不加此属性直接获取eureka-client.yml,加了后符合config的名字规则eureka-client-dev.yml
      enabled: true
      name: eureka-client   # 配置中心Git仓库config文件夹里的文件名字
      label: master         # 默认分支master
      fail-fast: true       # 是否启动快速失败功能,功能开启则优先判断config server是否正常
      discovery:
        enabled: true
        service-id: config-server  #spring cloud 配置中心服务名

eureka:
  instance:
    hostname: eureka
  client:
    service-url:
      defaultZone: http://localhost:9000/eureka
4、创建一个git仓库,取名为repository,新建一个config包,在config包下新建一个eureka-client-dev.yml,配置项目的启动端口号
server:
  port: 9002
5、启动项目
如果最后项目启动的端口号不是9001,而是9002,说明成功拉取到了配置。
总结:通过手动配置了一下eureka和config,发现一个问题,spring cloud config的uri不能通过配置文件更改,具体原因不详,可能是版本的bug
好了,文章就分享到这里了,接下来将要学习consul