微服务之Eureka服务注册中⼼
关于务注册中⼼服
服务注册中⼼本质上是为了解耦服务提供者和服务消费者,尽可能量使两者联系可控在一定的范围外
1.在父项目下下引入 Spring Cloud 依赖
org.springframework.cloud spring-cloud-dependencies Greenwich.RELEASE pom import
2. 在⽗⼯程【 yx-parent 】的 pom.xml ⽂件中⼿动引⼊ jaxb 的依赖。因为 JDK9 之后默认没有加载该模块,⽽ EurekaServer依赖 jaxb ,所以需要⼿动导⼊,否则 Eureka Server 服务⽆法启动。
com.sun.xml.bind jaxb-core 2.2.11 javax.xml.bind jaxb-api com.sun.xml.bind jaxb-impl 2.2.11 org.glassfish.jaxb jaxb-runtime 2.2.10-b140310.1920 javax.activation activation 1.1.1
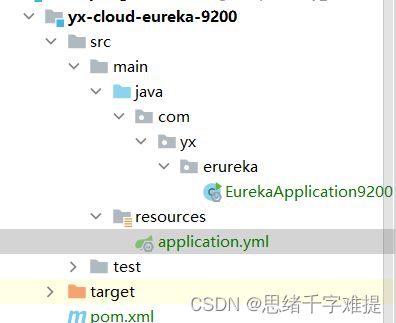
3.在父工程创建一个yx-cloud-eureka-9200工程,并引入依赖
org.springframework.cloud spring-cloud-starter-netflix-eureka-server
4.在创建yx-cloud-eureka-9200的工程下的的resources⽬录下创建application.yml配置⽂件,配置Eureka Server服务端⼝, 服务名等信息。
server:
  port: 9200  # Eureka Server服务端口
spring:
  application:
    name: yx-service-eureka #应用名称,在Eureka中服务的唯一标识id
eureka:
  client: #Eureka Server本身也是Eureka的一个客户端,因为在集群下需要与其他Eureka Server进行数据的同步
    service-url:  # 客户端与Eureka Server交互的地址,如果是集群情况下defaultZone设置为集群下其他的Eureka Server地址,多个地址使用","隔开
      defaultZone: http://YXCloudEurekaServerC:9200/eureka,http://YXCloudEurekaServerD:9201/eureka
    register-with-eureka: true  # 表示是否向Eureka中心注册自己的信息,因为自己就是Eureka Server所以不进行注册,默认为true
    fetch-registry: true # 是否查询/拉取Eureka Server服务注册列表,默认为true
  instance:
    #hostname: localhost # 当前Eureka实例的主机名
    # 使用ip注册,否则会使用主机名注册(此处考虑到对老版本的兼容,新版本经过实验都是ip)
    prefer-ip-address: true
    # 自定义实例显示格式,加上版本号,便于多版本管理,注意是ip-address早期版本是ipAddress
    instance-id: ${spring.cloud.client.ip-address}:${spring.application.name}:${server.port}:@project.version@
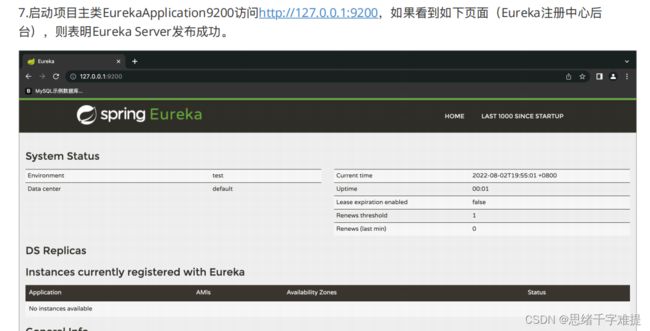
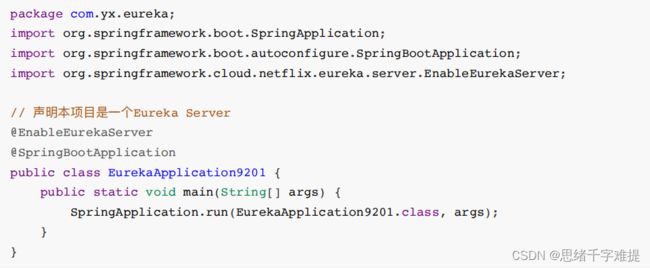
6. 在 com.yx.eureka 包下,创建 EurekaApplication9200 启动类
@EnableEurekaServer 此注解是申明项目是一个Eureka Server
微服务注册到Eureka\
1.向服务提供者的项目中添加Eureka Client依赖。
org.springframework.cloud spring-cloud-starter-netflix-eureka-client
2.向消费者的项目的application.yml⽂件中配置Eureka服务端信息
eureka:
  client: #Eureka Server本身也是Eureka的一个客户端,因为在集群下需要与其他Eureka Server进行数据的同步
    service-url:  # 客户端与Eureka Server交互的地址,如果是集群情况下defaultZone设置为集群下其他的Eureka Server地址,多个地址使用","隔开
      defaultZone: http://localhost:9200/eureka
    register-with-eureka: true  # 表示是否向Eureka中心注册自己的信息,因为自己就是Eureka Server所以不进行注册,默认为true
    fetch-registry: true # 是否查询/拉取Eureka Server服务注册列表,默认为true
  instance:
    #hostname: localhost # 当前Eureka实例的主机名
    # 使用ip注册,否则会使用主机名注册(此处考虑到对老版本的兼容,新版本经过实验都是ip)
    prefer-ip-address: true
    # 自定义实例显示格式,加上版本号,便于多版本管理,注意是ip-address早期版本是ipAddress
    instance-id: ${spring.cloud.client.ip-address}:${spring.application.name}:${server.port}:@project.version@
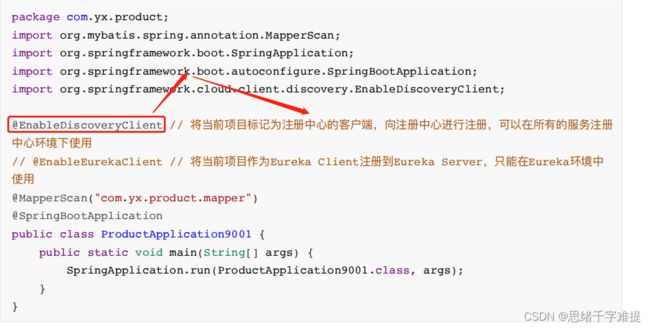
3. 修改 yx-service-page(消费者) 项⽬的启动类 ProductApplication ,添加 @EnableDiscoveryClient 注解
package com . yx . page ;import org . springframework . boot . SpringApplication ;import org . springframework . boot . autoconfigure . SpringBootApplication ;import org . springframework . cloud . client . discovery . EnableDiscoveryClient ;import org . springframework . context . annotation . Bean ;import org . springframework . web . client . RestTemplate ;@EnableDiscoveryClient// @EnableEurekaClient@SpringBootApplicationpublic class PageApplication {public static void main ( String [] args ) {SpringApplication . run ( PageApplication . class , args );}@Beanpublic RestTemplate restTemplate () {return new RestTemplate ();}}
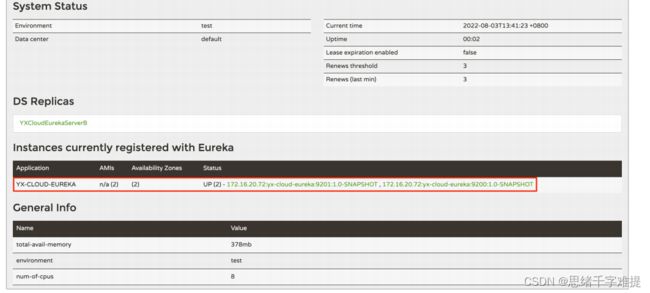
搭建Eureka Server⾼可⽤集群
Win11 操作系统
1. 打开 C 盘下的 C:\Windows\System32\drivers\etc\hosts ⽂件
2. 在 hosts ⽂件中添加 Eureka Server 集群地址的配置
127.0.0.1 YXCloudEurekaServerC127.0.0.1 YXCloudEurekaServerD
搭建 Eureka Server 服务【 yx-cloud-eureka-9201 】,把之前搭建好的单个赋值出一份并修改信息
1.导入坐标
org.springframework.cloud spring-cloud-starter-netflix-eureka-server
声明当前服务为Eureka注册中⼼
6.修改连接集群的提供者的项目的配置文件
也改为这个
Ribbon负载均衡
Ribbon 开发代码 实现
多创建两个提供者,在所有提供者项目下 创建ServerConfigController 类定,定义 ⽅法返回当前微服务端⼝号。
package com . yx . product . controller ;import org . springframework . beans . factory . annotation . Value ;import org . springframework . web . bind . annotation . RequestMapping ;import org . springframework . web . bind . annotation . RestController ;@RestController@RequestMapping ( "server" )public class ServerConfigController {@Value ( "${server.port}" )private String serverPort ;@RequestMapping ( "query_port" )public String findServerPort () {return serverPort ;}}
在所有提供者的主启动类上,加上注解
注意提供者的端口号不一样但是名称要一样
在消费者(page)的项目中的restTemplate()⽅法上添加启动Ribbon负载均衡的注解
4. 在 yx-service-page ⻚⾯静态化微服务中定义调⽤ yx-server-product 服务获取端⼝信息的
queryProductServerPort() ⽅法,同时重构 queryProductById() ⽅法。
消费者的配置一览
server:
  port: 9100
spring:
  application:
    name: yx-service-page
  datasource:
    url: jdbc:mysql://localhost:3306/yx_sc?useSSL=false&useUnicode=true&characterEncoding=utf-8&serverTimezone=UTC
    username: root
    password: 123
eureka:
  client: #Eureka Server本身也是Eureka的一个客户端,因为在集群下需要与其他Eureka Server进行数据的同步
    service-url:  # 客户端与Eureka Server交互的地址,如果是集群情况下defaultZone设置为集群下其他的Eureka Server地址,多个地址使用","隔开
      defaultZone: http://YXCloudEurekaServerC:9200/eureka,http://YXCloudEurekaServerD:9201/eureka
  instance:
    #hostname: localhost # 当前Eureka实例的主机名
    # 使用ip注册,否则会使用主机名注册(此处考虑到对老版本的兼容,新版本经过实验都是ip)
    prefer-ip-address: true
    # 自定义实例显示格式,加上版本号,便于多版本管理,注意是ip-address早期版本是ipAddress
    instance-id: ${spring.cloud.client.ip-address}:${spring.application.name}:${server.port}:@project.version@
## 针对的被调⽤⽅微服务名称,不加就是全局⽣效
#yx-service-product:
#  ribbon:
##    NFLoadBalancerRuleClassName: com.netflix.loadbalancer.RandomRule  # 随机策略
#    NFLoadBalancerRuleClassName: com.netflix.loadbalancer.RoundRobinRule # 轮询策略
#    NFLoadBalancerRuleClassName: com.netflix.loadbalancer.RetryRule # 重试策略
提供者的配置一览
server:
  port: 9001
spring:
  application:
    name: yx-service-product
  datasource:
    url: jdbc:mysql://localhost:3306/yx_sc?useSSL=false&useUnicode=true&characterEncoding=utf-8&serverTimezone=UTC
    username: root
    password: 123
eureka:
  client: #Eureka Server本身也是Eureka的一个客户端,因为在集群下需要与其他Eureka Server进行数据的同步
    service-url:  # 客户端与Eureka Server交互的地址,如果是集群情况下defaultZone设置为集群下其他的Eureka Server地址,多个地址使用","隔开
      defaultZone: http://YXCloudEurekaServerC:9200/eureka,http://YXCloudEurekaServerD:9201/eureka
    registry-fetch-interval-seconds: 30 #表示客户端每隔多少秒拉去一次最新数据
  instance:
    #hostname: localhost # 当前Eureka实例的主机名
    # 使用ip注册,否则会使用主机名注册(此处考虑到对老版本的兼容,新版本经过实验都是ip)
    prefer-ip-address: true
    # 自定义实例显示格式,加上版本号,便于多版本管理,注意是ip-address早期版本是ipAddress
    instance-id: ${spring.cloud.client.ip-address}:${spring.application.name}:${server.port}:@project.version@
    metadata-map:
      username: admin
      password: 123456
      telphone: 1301112222
      #每隔30秒向注册中心汇报心跳
    lease-renewal-interval-in-seconds: 30
    #超过90秒还没汇报心跳Eureka Server会将该服务信息移除
    lease-expiration-duration-in-seconds: 90
Hystrix熔断器
1.1.在服务消费者⼯程(静态化微服务)中引⼊Hystrix依赖坐标
org.springframework.cloud spring-cloud-starter-netflix-hystrix
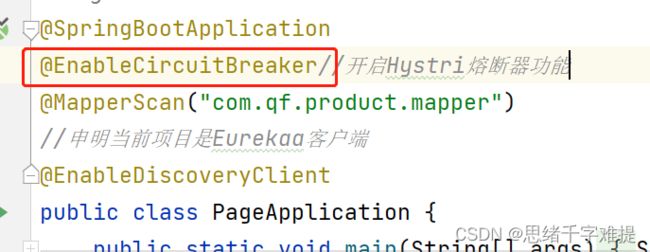
2. 开启熔断,服务消费者⼯程(静态化微服务)的启动类上添加熔断器开启注解 @EnableCircuitBreaker
3 PageController 类中添加 findProductServerPort() 业务⽅法,并使⽤ @HystrixCommand进⾏熔断控制
/** 服务提供者模拟请求处理超时,服务消费者通过Hystrix控制 */
// 使⽤@HystrixCommand注解进⾏熔断控制
@HystrixCommand(
 // 线程池标识,默认情况下所有的请求共同维护⼀个线程池,实际开发中每个⽅法维护⼀个唯⼀的线程池
 threadPoolKey = "findProductServerPort",
 // 线程池细节属性配置
 threadPoolProperties = {
 @HystrixProperty(name="coreSize", value="2"), // 线程数
 @HystrixProperty(name="maxQueueSize", value="20") // 等待队列⻓度
 },
// commandProperties熔断的⼀些细节属性配置
 commandProperties = {
 // 每⼀个属性都是⼀个HystrixProperty
 // 设置请求的超时时间,⼀旦请求超过设定的时间就会按照超时进⾏处理
 @HystrixProperty(name="execution.isolation.thread.timeoutInMilliseconds",
value="2000")
 }
)
@RequestMapping("find_port")
public String findProductServerPort() {
 String url = "http://yx-service-product/server/query_port";
 return restTemplate.getForObject(url, String.class);
}
降级处理
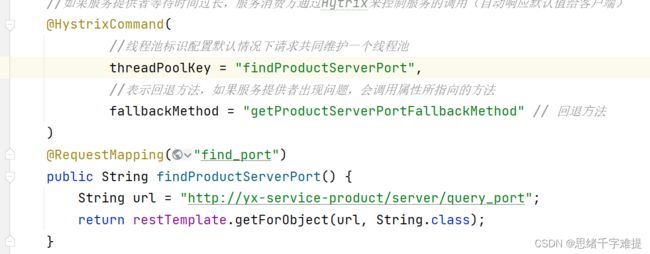
添加 getProductServerPort() 业务⽅法,配置 @HystrixCommand 注解,定义降级处理⽅法。
    //如果服务提供者等待时间过长,服务消费方通过Hytrix来控制服务的调用(自动响应默认值给客户端)
    @HystrixCommand(
            //线程池标识配置默认情况下请求共同维护一个线程池
            threadPoolKey = "findProductServerPort",
            threadPoolProperties = {
                //核心线程为2
                    @HystrixProperty(name="coreSize",value = "2"),
                //等待队列的最大长度
                    @HystrixProperty(name="maxQueueSize",value = "20")
            },
            commandProperties = {
                    //设置请求的超时时间,一旦超过时间,会触发Hystrix的处理机制
          @HystrixProperty(name="execution.isolation.thread.timeoutInMilliseconds",
                           value="2000")
            },
            //表示回退方法,如果服务提供者出现问题,会调用属性所指向的方法
            fallbackMethod = "getProductServerPortFallbackMethod" // 回退⽅法
    )
    @RequestMapping("find_port")
    public String findProductServerPort() {
        String url = "http://yx-service-product/server/query_port";
        return restTemplate.getForObject(url, String.class);
    }
    /**
     * 定义回退⽅法,返回预设默认值。注意,该⽅法的参数列表和返回值类型必须与原始⽅法保持⼀致。
     * @return 预设默认值
     */
    public String getProductServerPortFallbackMethod() {
        return "-1";
    }
Hystrix⾼级应⽤
1.注解配置
    //如果服务提供者等待时间过长,服务消费方通过Hytrix来控制服务的调用(自动响应默认值给客户端)
    @HystrixCommand(
            //线程池标识配置默认情况下请求共同维护一个线程池
            threadPoolKey = "findProductServerPort",
            threadPoolProperties = {
                    //核心线程为2
                    @HystrixProperty(name = "coreSize", value = "2"),
                    //等待队列的最大长度
                    @HystrixProperty(name = "maxQueueSize", value = "20")
            },
            commandProperties = {
                    //设置请求的超时时间,一旦超过时间,会触发Hystrix的处理机制
                    @HystrixProperty(name = "execution.isolation.thread.timeoutInMilliseconds",
                            value = "2000"),
                    // Hystrix⾼级配置,定制⼯作过程细节
                    // 统计时间窗⼝定义
                    @HystrixProperty(name = "metrics.rollingStats.timeInMilliseconds", value = "8000"),
                    // 统计时间窗⼝内的最⼩请求数
                    @HystrixProperty(name = "circuitBreaker.requestVolumeThreshold", value = "2"),
                    // 统计时间窗⼝内的错误数量百分⽐阈值
                    @HystrixProperty(name = "circuitBreaker.errorThresholdPercentage", value = "50"),
                    // ⾃我修复时的活动窗⼝⻓度
                    @HystrixProperty(name = "circuitBreaker.sleepWindowInMilliseconds", value = "3000")
            },
            //表示回退方法,如果服务提供者出现问题,会调用属性所指向的方法
            fallbackMethod = "getProductServerPortFallbackMethod" // 回退⽅法
    )
    @RequestMapping("find_port")
    public String findProductServerPort() {
        String url = "http://yx-service-product/server/query_port";
        return restTemplate.getForObject(url, String.class);
    }

    /**
     * 定义回退⽅法,返回预设默认值。注意,该⽅法的参数列表和返回值类型必须与原始⽅法保持⼀致。
     *
     * @return 预设默认值
     */
    public String getProductServerPortFallbackMethod() {
        return "-1";
    }
2.yml配置就不必再配置以上图片的的内容
#配置HySTRIX的同短期参数
hystrix:
  command:
    default:   #就算不给也不报错有默认
      circuitBreaker:
        # 强制打开熔断器,如果该属性设置为true,强制断路器进入打开状态,将会拒绝所有的请求,默认false关闭的
        forceOpen: false
        # 触发熔断错误比例阈值,默认值50%
        errorThresholdPercentage: 50
        # 熔断后休眠时长,默认值5秒
        sleepWindowInMilliseconds: 3000
        # 熔断触发最小请求次数,默认值是20
        requestVolumeThreshold: 2
      execution:
        isolation:
          thread:
            # 熔断超时设置,默认为1秒
            timeoutInMilliseconds: 2000
  threadpool: #hytix线程池配置
    default:
      coreSize: 10 # 并发执⾏的最⼤线程数,默认10
      maxQueueSize: 1000 # BlockingQueue的最⼤队列数,默认值-1
      # 即使maxQueueSize没有达到,达到queueSizeRejectionThreshold该值后,请求也会被拒绝,默认值5
      queueSizeRejectionThreshold: 800
基于 Spring Boot 的健康检查观察跳闸状态(⾃动投递微服务暴露 健康检查 细节),在 yx-service-page 项⽬的 application.yml⽂件中配置。
# Spring Boot中暴露健康检查等断点接口
management:
  endpoints:
    web:
      exposure:
        include: "*"
  # 暴露健康接口的细节
  endpoint:
    health:
      show-details: always
配置完以上,注解这就简单了
Feign(终于来到这个了,其实以上的内容都是可以用feign来解决的)
1.在服务消费者⼯程(⻚⾯静态化微服务)中引⼊Feign依赖(或者⽗类⼯程)
org.springframework.cloud spring-cloud-starter-openfeign
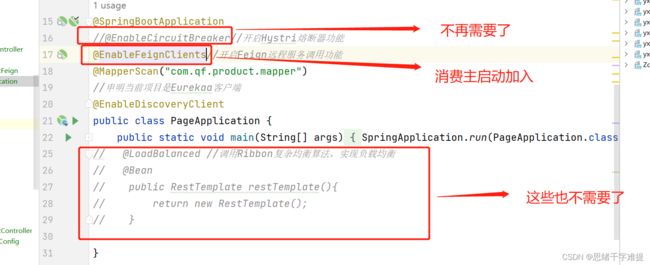
服务消费者⼯程(或者⽗类⼯程)启动类上使⽤注解@EnableFeignClients添加Feign⽀持
3.在消费者微服务(⻚⾯静态化微服务)的com.yx.page.feign包下创建ProductFeign接⼝。
package com.yx.erureka.feign;

import com.qf.common.pojo.Products;
import org.springframework.cloud.openfeign.FeignClient;
import org.springframework.web.bind.annotation.PathVariable;
import org.springframework.web.bind.annotation.RequestMapping;

// 注解表示Feign的远程调用
//-name:表示feign远程调用对应的服务提供者的名称
@FeignClient(name = "yx-service-product")
public interface ProductFeign {
    //载该接口中定义抽象方法,每一个抽象方法映射一个对应远程请求处理方法,注意要与远程处理方法的结构保持一致
@RequestMapping("/product/DD/{id}")
Products findById(@PathVariable Integer id);
@RequestMapping("/server/query_port")
 String findProductServerPort();
}
自动装配
5.3 Feign对负载均衡的⽀持
yx-service-product:
  ribbon:
  # 请求连接超时时间
    ConnectTimeout: 2000
  # 请求处理超时时间
    ReadTimeout: 10000
  # 对所有操作都进⾏重试
    OkToRetryOnAllOperations: true
  # 根据如上配置,当访问到故障请求的时候,它会再尝试访问⼀次当前实例(次数由MaxAutoRetries配置),如果不⾏,
  # 就换⼀个实例进⾏访问;如果还不⾏,再换⼀次实例访问(更换次数由MaxAutoRetriesNextServer配置);如果依然不⾏,返回失败信息。
    MaxAutoRetries: 0 # 对当前选中实例重试次数,不包括第⼀次调⽤
    MaxAutoRetriesNextServer: 0 # 切换实例的重试次数
    NFLoadBalancerRuleClassName: com.netflix.loadbalancer.RandomRule # 负载策略调整
5.4 Feign对熔断器的⽀持
配置⽂件 application.yml 中开启 Feign 对熔断器的⽀持
# 开启Feign的熔断功能
feign:
  hystrix:
enabled: true # 开启Feign的熔断功能 在 com.yx.page.feign 包下⾃定义 ProductFeignFallback 处理类,需要实现 ProductFeign 接⼝。
4.在ProductFeign接⼝的@FeignClient注解上添加fallback属性来指定回退类
5.5 Feign对请求压缩和响应压缩的⽀持
application.yml⽂件中,通过下⾯的参数配置即可开启请求与响应的压缩功能
# 开启Feign的熔断功能
feign:
  hystrix:
    enabled: true  # 开启Feign的熔断功能
  compression:
    request:
      enabled: true # 默认不开启
      mime-types: text/html,application/xml,application/json # 设置压缩的数据类型,设置为默认值
      min-request-size: 2048 # 设置触发压缩的大小下限,2048为默认值
    response:
      enabled: true # 默认不开启