4.9 x64dbg 内存处理与差异对比
LyScript 插件中针对内存读写函数的封装功能并不多,只提供了最基本的内存读取和内存写入系列函数的封装,本章将继续对API接口进行封装,实现一些在软件逆向分析中非常实用的功能,例如ShellCode代码写出与置入,内存交换,内存区域对比,磁盘与内存镜像比较,内存特征码检索等功能,学会使用这些功能对于后续漏洞分析以及病毒分析都可以起到事半功倍的效果,读者应重点关注这些函数的使用方式。
4.9.1 实现ShellCode的灵活注入
Shellcode 是一种特殊类型的恶意代码,通常用于利用系统漏洞、执行恶意软件等攻击性行为。Shellcode 通常是一段二进制代码,没有可执行文件头,并且设计用于利用操作系统的特定漏洞,从而使攻击者能够获得对系统的控制或执行其他恶意操作。
由于 Shellcode 通常是在内存中执行的,因此它不需要像可执行文件一样拥有完整的文件结构。攻击者通常通过利用漏洞将Shellcode注入到受攻击系统的进程中,并使其在内存中执行,从而达到攻击目的。由于Shellcode是一种非常灵活的攻击工具,攻击者可以使用它来执行各种攻击行为,例如提权、执行远程命令、下载恶意软件等。因此,Shellcode已成为黑客和攻击者的常用工具之一。
通常读者应该自行准备好如下文本案例中所规范的ShellCode格式,这类格式通常经过处理后即可直接注入到远程进程内。
"\xfc\xe8\x8f\x00\x00\x00\x60\x31\xd2\x89\xe5\x64\x8b\x52\x30"
"\x8b\x52\x0c\x8b\x52\x14\x0f\xb7\x4a\x26\x31\xff\x8b\x72\x28"
"\x31\xc0\xac\x3c\x61\x7c\x02\x2c\x20\xc1\xcf\x0d\x01\xc7\x49"
"\x75\xef\x52\x57\x8b\x52\x10\x8b\x42\x3c\x01\xd0\x8b\x40\x78"
"\x85\xc0\x74\x4c\x01\xd0\x8b\x58\x20\x01\xd3\x50\x8b\x48\x18"
"\x85\xc9\x74\x3c\x31\xff\x49\x8b\x34\x8b\x01\xd6\x31\xc0\xac"
接着笔者将带大家实现一个将文件内的ShellCode注入到进程远程堆空间内的案例,既然要注入到远程堆中,那么第一步则是通过create_alloc(1024)在对端开辟一段堆空间,如果读者需要让该空间可被执行则需要调用set_local_protect(address,32,1024)将该地址设置为32也就是读写执行,设置长度为1024字节,接着通过read_shellcode()函数从文本中读取ShellCode代码,并作压缩处理,最后通过循环write_memory_byte写内存的方式将其逐字节写出,总结起来核心代码如下所示;
from LyScript32 import MyDebug

# 将shellcode读入内存
def read_shellcode(path):
    shellcode_list = []
    with open(path, "r", encoding="utf-8") as fp:
        for index in fp.readlines():
            shellcode_line = index.replace('"', "").replace(" ", "").replace("\n", "").replace(";", "")
            for code in shellcode_line.split("\\x"):
                if code != "" and code != "\\n":
                    shellcode_list.append("0x" + code)
    return shellcode_list

if __name__ == "__main__":
    dbg = MyDebug()
    dbg.connect()

    # 开辟堆空间
    address = dbg.create_alloc(1024)
    print("开辟堆空间: {}".format(hex(address)))
    if address == False:
        exit()

    # 设置内存可执行属性
    dbg.set_local_protect(address, 32, 1024)

    # 从文本中读取shellcode
    shellcode = read_shellcode("c://shellcode.txt")

    # 循环写入到内存
    for code_byte in range(0, len(shellcode)):
        bytef = int(shellcode[code_byte], 16)
        dbg.write_memory_byte(code_byte + address, bytef)

    # 设置EIP位置
    dbg.set_register("eip", address)

    input()
    dbg.delete_alloc(address)

    dbg.close()
运行这段程序,则读者应该能看到如下图所示的输出结果,这说明我们的数据已经写出到对端堆中了;
而有时我们还需要将这段代码反写,将一段我们挑选好的指令集保存到本地,此时就需要使用read_memory_byte依次循环读入数据,并动态写出到文件中,代码如下所示;
from LyScript32 import MyDebug

# 将特定内存保存到文本中
def write_shellcode(dbg,address,size,path):
    with open(path,"a+",encoding="utf-8") as fp:
        for index in range(0, size - 1):
            # 读取机器码
            read_code = dbg.read_memory_byte(address + index)

            if (index+1) % 16 == 0:
                print("\\x" + str(read_code))
                fp.write("\\x" + str(read_code) + "\n")
            else:
                print("\\x" + str(read_code),end="")
                fp.write("\\x" + str(read_code))

if __name__ == "__main__":
    dbg = MyDebug()
    dbg.connect()

    eip = dbg.get_register("eip")
    write_shellcode(dbg,eip,128,"d://shellcode.txt")
    dbg.close()
如上代码运行后,并可将EIP位置出的指令集前128字节动态写出到d://shellcode.txt文件内,输出效果图如下图所示;
4.9.2 内存区域交换与对比
区域交换的原理是通过第三方变量依次交换内存两端的数据,例如将如下图中的0x5B0010与0x5B0070的前四个字节进行交换,则可调用memory_xchage(dbg, 5963792,5963792,4)传递参数实现,在调用前该内存区域如下图所示;
通过运行如下代码片段,则可实现数据交换。
from LyScript32 import MyDebug

# 交换两个内存区域
def memory_xchage(dbg,memory_ptr_x,memory_ptr_y,bytes):
    ref = False
    for index in range(0,bytes):
        # 读取两个内存区域
        read_byte_x = dbg.read_memory_byte(memory_ptr_x + index)
        read_byte_y = dbg.read_memory_byte(memory_ptr_y + index)

        # 交换内存
        ref = dbg.write_memory_byte(memory_ptr_x + index,read_byte_y)
        ref = dbg.write_memory_byte(memory_ptr_y + index, read_byte_x)
    return ref

if __name__ == "__main__":
    dbg = MyDebug()
    dbg.connect()

    eip = dbg.get_register("eip")

    # 内存交换
    flag = memory_xchage(dbg, 5963792,5963888,4)
    print("内存交换状态: {}".format(flag))
    dbg.close()
交换后的内存区域如下图所示;
4.9.3 内存与磁盘机器码对比
在某些时候我们还需要对比某个特定程序内存与磁盘之间的数据差异,这类需求的实现前提是实现两个特殊的读写函数,一般而言get_memory_hex_ascii函数可用于读出内存中的机器码数据,而get_file_hex_ascii则可用于读出磁盘中的机器码数据,将两者最进一步对比从而获取某些字节是否发生了改变。
首先实现get_memory_hex_ascii函数,该函数用于从给定的内存地址开始,读取指定长度的二进制数据,并将其转换为十六进制形式输出。具体解释如下:
- 函数接收三个参数:内存地址address,偏移量offset,和要读取的长度len。
- 定义变量count用于计算已经读取的字节数,并定义ref_memory_list用于存储读取的数据的十六进制形式。
- 使用for循环读取指定范围内的二进制数据。
- 调用dbg.read_memory_byte方法读取内存中的每个字节,并将其赋值给变量char。
- 将读取的字节的十六进制表示输出到控制台。
- 将读取的字节的十六进制形式存储到ref_memory_list列表中。
- 如果已经读取了16个字节,就换行输出。
- 如果字节的十六进制表示只有一位,则在前面添加一个0以保证两个字符宽度。
- 最后返回ref_memory_list列表,包含了所有读取字节的十六进制形式。
# 得到程序的内存镜像中的机器码
def get_memory_hex_ascii(address,offset,len):
    count = 0
    ref_memory_list = []
    for index in range(offset,len):
        # 读出数据
        char = dbg.read_memory_byte(address + index)
        count = count + 1

        if count % 16 == 0:
            if (char) < 16:
                print("0" + hex((char))[2:])
                ref_memory_list.append("0" + hex((char))[2:])
            else:
                print(hex((char))[2:])
                ref_memory_list.append(hex((char))[2:])
        else:
            if (char) < 16:
                print("0" + hex((char))[2:] + " ",end="")
                ref_memory_list.append("0" + hex((char))[2:])
            else:
                print(hex((char))[2:] + " ",end="")
                ref_memory_list.append(hex((char))[2:])
    return ref_memory_list
其次实现get_memory_hex_ascii函数,该函数用于从给定的文件路径中读取指定长度的二进制数据,并将其转换为十六进制形式输出。具体解释如下:
- 函数接收三个参数:文件路径path,偏移量offset,和要读取的长度len。
- 定义变量count用于计算已经读取的字节数,并定义ref_file_list用于存储读取的数据的十六进制形式。
- 使用with open语句打开指定路径的文件,并使用rb模式以二进制方式读取。
- 使用fp.seek方法将文件指针移动到指定的偏移量offset处。
- 使用for循环读取指定长度的二进制数据。
- 使用fp.read(1)方法读取一个字节的数据,并将其赋值给变量char。
- 将读取的字节的十六进制表示输出到控制台。
- 将读取的字节的十六进制形式存储到ref_file_list列表中。
- 如果已经读取了16个字节,就换行输出。
- 如果字节的十六进制表示只有一位,则在前面添加一个0以保证两个字符宽度。
- 最后返回ref_file_list列表,包含了所有读取字节的十六进制形式。
# 读取程序中的磁盘镜像中的机器码
def get_file_hex_ascii(path,offset,len):
    count = 0
    ref_file_list = []

    with open(path, "rb") as fp:
        # file_size = os.path.getsize(path)
        fp.seek(offset)

        for item in range(offset,offset + len):
            char = fp.read(1)
            count = count + 1
            if count % 16 == 0:
                if ord(char) < 16:
                    print("0" + hex(ord(char))[2:])
                    ref_file_list.append("0" + hex(ord(char))[2:])
                else:
                    print(hex(ord(char))[2:])
                    ref_file_list.append(hex(ord(char))[2:])
            else:
                if ord(char) < 16:
                    print("0" + hex(ord(char))[2:] + " ", end="")
                    ref_file_list.append("0" + hex(ord(char))[2:])
                else:
                    print(hex(ord(char))[2:] + " ", end="")
                    ref_file_list.append(hex(ord(char))[2:])
    return ref_file_list
有了这两个函数读者就可以实现依次输出内存与磁盘中的机器码功能,
import binascii,os,sys
from LyScript32 import MyDebug

# 得到程序的内存镜像中的机器码
def get_memory_hex_ascii(address,offset,len):
    pass

# 读取程序中的磁盘镜像中的机器码
def get_file_hex_ascii(path,offset,len):
    pass

if __name__ == "__main__":
    dbg = MyDebug()

    connect_flag = dbg.connect()
    print("连接状态: {}".format(connect_flag))

    module_base = dbg.get_base_from_address(dbg.get_local_base())
    print("模块基地址: {}".format(hex(module_base)))

    # 得到内存机器码
    memory_hex_byte = get_memory_hex_ascii(module_base,0,100)

    # 得到磁盘机器码
    file_hex_byte = get_file_hex_ascii("d://lyshark.exe",0,100)

    # 输出机器码
    print("\n内存机器码: ",memory_hex_byte)
    print("\n磁盘机器码: ",file_hex_byte)

    dbg.close()
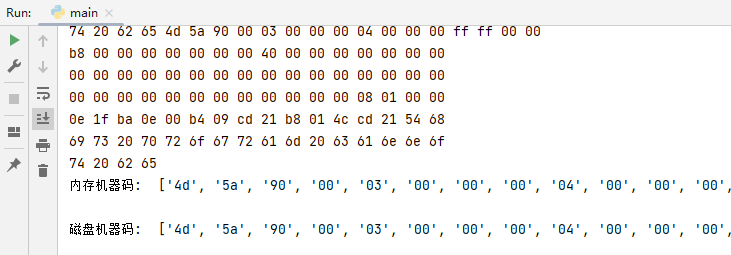
如上代码片段的输出效果如下图所示,分别得到该进程的内存与磁盘机器码格式,取前100个字节作比较;
至于如何做对比,读者只需要通过for循环输出其参数即可得到,这里就不做截图演示了,效果同理;
    # 输出机器码
    for index in range(0,len(memory_hex_byte)):
        # 比较磁盘与内存是否存在差异
        if memory_hex_byte[index] != file_hex_byte[index]:
            # 存在差异则输出
            print("\n相对位置: [{}] --> 磁盘字节: 0x{} --> 内存字节: 0x{}".
                  format(index,memory_hex_byte[index],file_hex_byte[index]))
    dbg.close()
原文地址
https://www.lyshark.com/post/1875a6c.html


