自动化运维工具——Ansible学习(一)
目录
一、运维自动化发展历程及技术应用
(二)程序发布相关知识
(三)常用的自动化运维工具
二、Ansible入门
(一)Ansible发展史
(二)特点
(三)Ansible架构
(四)工作原理
(五)Ansible主要组成部分
(六) 安装步骤
1.各种安装方法与命令
(1)rpm包安装:EPEL源
(2)编译安装
(3)Git方式
(4)pip安装:pip是安装python包的管理器,类似于yum
2.yum方式详细安装步骤
(1)新建了一个虚拟机,配置如下:
(2)检查python版本
(3)安装EPEL(Extra Packages for Enterprise Linux)存储库。
(4)更新系统软件包列表。
(5)安装Ansible
(6)检查Ansible的版本
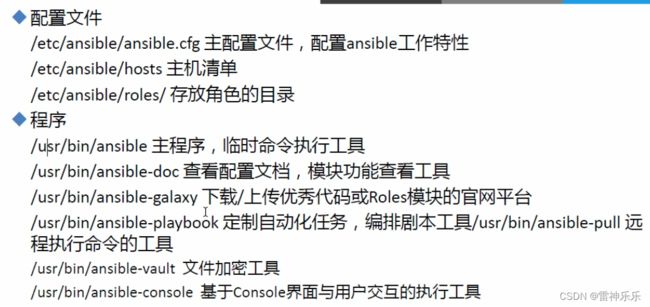
(七)相关文件
三、ansible的主机清单
1.不配置主机清单时,无法检查被控机能否正常使用
2.配置主机清单
3.检查被控机
(1)当主控机配置ssh后——检查一台机器
(2)当主控机配置ssh后——检查两台机器,ip地址用逗号隔开
(3)当主控机配置ssh后——检查所有机器
(4)当主控机没有配置ssh——检查机器的命令后面要加上-k,并且输入密码
4.对主机进行分组
四、ansible的主配置文件——/etc/ansible/ansible.cfg
五、ansible系列命令
1.默认以root用户连接该分组下的主机列表
编辑2.以普通用户连接该组下面的主机
编辑3.普通用户查看对方的/root目录
六、ansible的主机模式
1.基本命令
2.ping主机清单以"192.168.22.14"开头的主机列表
3.ping主机清单中以srvs结尾的组
4.ping两个主机清单
5.逻辑与——ping两个组的交集
6.逻辑非——ping在websrvs中的主机,而不是在dbsrvs中的,要用单引号
7.正则表达式——ping包含在websrvs或dbsrvs中的主机
七、ansible命令执行过程
1.详细查看执行过程,并过滤出有chmod的信息
八、ansible常用模块
(一)Command模块
1.批量添加文件
2.批量查看添加情况与详细查看
3.批量查看被控机内存使用情况
4.Command模块:如果不存在/etc/fs文件则执行后面的cat /ect/fstab命令
5.Command模块:如果不存在/etc/fs文件则跳过执行后面的cat /ect/fstab命令
6.chdir——切换,切换到/boot目录下,并执行ls命令
7.chdir——切换,切换到/data目录下,执行脚本
8.添加用户、查看用户密码和设置用户密码
(二)Shell模块
1.显示主机清单对应的hostname——注意单引号
2.给主机清单中指定用户设置密码
3.给主机清单中指定目录下创建文件并查看
4.删除指定目录下的文件——不推荐,因为有专门管理文件的命令
(三)Script模块——运行脚本
1.在ansible主控机端建立脚本,能够自动在被控机上运行。
(四)copy模块——复制
1.设置被控机的SELinux状态
2.复制主控机的/etc/shadow文件到被控机的/data/目录下
3.复制主控机的/etc/shadow文件到被控机的/data/目录下,并设置权限和所有者
2.copy的content功能——直接生成文件内容
(1)在被控机的/data/目录下直接生成新文件f2,内容就是双引号中的内容
(2)查看是否成功生成
(五)Fetch模块——只能从被控机复制单个文件到主控机
1.将被控机的日志文件抓取到主控机的/data目录下
2.抓取被控机以.log为结尾的文件
(1)首先将被控机以.log为结尾的文件打包
(2)查看打包目录是否有压缩文件
(3)从被控机上拉取该压缩文件
(4)查看拉取过来的文件
(六)File模块——对文件进行操作
1.新建与删除文件和文件夹
(1)查看/data目录
(2)删除文件——state=ansent
(3)新建文件夹
(4)再次查看目录
(5)删除文件夹
2.给被控机新建与删除软链接
(1)给被控机新建软链接
(2)给被控机删除软链接
3.删除文件目录命令
(七)Hostname模块——管理主机名
1.修改主机名
(八)Cron模块——计划任务
1.设置被控机时间同步
(1)配置主机列表
(2)时间同步命令
2.定时发送警告
(1)启用定时任务——每分钟发送一次警告
(2)禁用定时任务,相当于给任务注释掉
(3)重新启用被禁用的定时任务
(4)删除定时任务
(九)Yum模块——管理包
1.给被控机安装vsftpd
2.查看所有被控机的安装包
3.卸载安装包
4.查看是否成功卸载
5.安装多个程序——用逗号隔开
6.查看下载的多个程序是否成功下载
7.同时卸载多个已安装的程序
8.查看卸载的多个程序是否已成功卸载
9.安装镜像源中没有的程序
(1)先将rpm程序拷贝到被控机上
(2)查看是否复制成功
(3)开始安装rpm
(4)在被控机检查是否安装成功
(5)更新缓存
(6)一边下载,一边更新缓存
(十)Service模块——管理服务
1.启动服务,并设置开机自启
2.在被控机上可以确认该服务是否是开机自启的
3.检查被控机该服务目前的状态
4.重启该服务
5.停用该服务
6.取消开机自启该服务
7.停用后检查该服务
(十一)User模块——管理用户
1.新增用户
2.检查用户是否创建成功
3.删除该用户,并删除他的家目录
4.检查是否删除成功
(十二)Group模块——管理组
1.创建组
2.查看组是否创建成功
3.删除组
4.检查是否成功删除组
(十三)ansible-galaxy模块——管理角色
1.查看是否安装geerlingguy.nginx
2.配置阿里云镜像后,开始下载geerlingguy.nginx
3.生成roles文件
4.其中的yml就是剧本文件,打开其中一个查看:
5.再次查看是否安装成功
6.复制geerlingguy.nginx
7.删除geerlingguy.nginx角色
九、ansible的playbook剧本
(一)playbook剧本示例
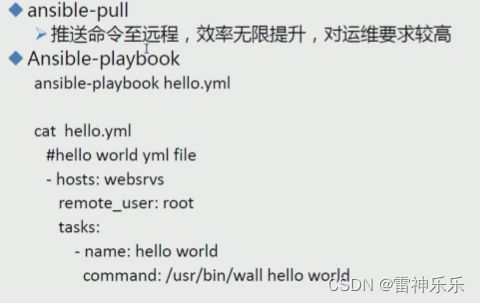
1.编写hello.yml剧本
2.执行该剧本
(二)ansible系列命令
1.给剧本加密
2.加密后不能查看和执行
3.加密后查看需要输入密码
4.加密后重新编辑剧本也要输入密码
5.重设密码
6.解密
7.解密后才查看和执行
8.创建一个新的加密好的剧本
(三)ansible-console模块——交互执行命令
(四)playbok正式学习
1.概述
2.playbook核心元素
(1)hosts
(2)playbook文件示例
(2)task列表和action
(3)Playbook和ShellScripts
一、运维自动化发展历程及技术应用
IaaS:Infrastructure(基础设施)-as-a-Service——提供硬件;
PaaS:Platform(平台)-as-a-Service——提供操作系统和平台;
SaaS:Software(软件)-as-a-Service——提供全套软件服务,包括硬件、操作系统和平台。
(二)程序发布相关知识
(三)常用的自动化运维工具
二、Ansible入门
(一)Ansible发展史
创始人——Michael DeHaan
2012年发布0.0.1版,红帽收购
2015年红帽宣布收购
(二)特点
(三)Ansible架构
(四)工作原理
(五)Ansible主要组成部分
(六) 安装步骤
1.各种安装方法与命令
(1)rpm包安装:EPEL源
yum -y install ansible
(2)编译安装
yum -y install python-jinjia2 PyYAML python-paramiko python-babel python-crypto

tar -xf ansible-1.5.2.tar.gz

cd ansible-1.5.4

python setup.py build

python setup.py install

mkdir /etc/ansible

cp -r examples/* /etc/ansible/
(3)Git方式
git clone git://github.com/ansible/ansible.git --recursive

cd ./ansible

source ./hacking/env-setup
(4)pip安装:pip是安装python包的管理器,类似于yum
yum -y install python-pip python-devel

yum -y install gcc glib-devel zlibl-devel rpm-build openssl-devel

pip install --upgrade pip

pip install ansible --upgrade

确认安装:ansible --version
2.yum方式详细安装步骤
(1)新建了一个虚拟机,配置如下:
(2)检查python版本
python是虚拟机自带的,2.7.x即可
[root@localhost ~]# python2 --version
Python 2.7.5

# 如果没有安装python,可以执行下面的命令
yum install python2
(3)安装EPEL(Extra Packages for Enterprise Linux)存储库。
Ansible可以通过EPEL存储库进行安装。
yum install epel-release(4)更新系统软件包列表。
yum update(5)安装Ansible
yum install ansible(6)检查Ansible的版本
如果显示了Ansible的版本信息,则表示安装成功。
ansible --version(七)相关文件
三、ansible的主机清单
ansible中最重要的就是主机清单,不进行配置主机清单ansible就好比光杆司令,无法控制其他主机。ansible所在的机器叫主控机,被控制的机器叫被控机。
1.不配置主机清单时,无法检查被控机能否正常使用
[root@ansible145 ~]# ansible node141 -m ping
[WARNING]: provided hosts list is empty, only localhost is available. Note that
the implicit localhost does not match 'all'
[WARNING]: Could not match supplied host pattern, ignoring: node141

# 也无法检查ansible自己
[root@ansible145 ~]# ansible ansible145 -m ping
[WARNING]: provided hosts list is empty, only localhost is available. Note that
the implicit localhost does not match 'all'
[WARNING]: Could not match supplied host pattern, ignoring: ansible145
2.配置主机清单
[root@ansible145 ~]# vim /etc/ansible/hosts

 40 # Here's another example of host ranges, this time there are no
 41 # leading 0s:
 42
 43 ## db-[99:101]-node.example.com
 44 192.168.22.141
 45 192.168.22.142
 46 192.168.22.143
3.检查被控机
(1)当主控机配置ssh后——检查一台机器
[root@ansible145 ~]# ansible 192.168.22.141 -m ping
192.168.22.141 | SUCCESS => {
    "ansible_facts": {
        "discovered_interpreter_python": "/usr/bin/python"
    },
    "changed": false,
    "ping": "pong"
}
(2)当主控机配置ssh后——检查两台机器,ip地址用逗号隔开
[root@ansible145 ~]# ansible 192.168.22.141,192.168.22.142 -m ping -k
SSH password:
192.168.22.141 | SUCCESS => {
    "ansible_facts": {
        "discovered_interpreter_python": "/usr/bin/python"
    },
    "changed": false,
    "ping": "pong"
}
192.168.22.142 | SUCCESS => {
    "ansible_facts": {
        "discovered_interpreter_python": "/usr/bin/python"
    },
    "changed": false,
    "ping": "pong"
}
(3)当主控机配置ssh后——检查所有机器
[root@ansible145 ~]# ansible all -m ping
# 或者是   ansible all -a ping
192.168.22.141 | SUCCESS => {
    "ansible_facts": {
        "discovered_interpreter_python": "/usr/bin/python"
    },
    "changed": false,
    "ping": "pong"
}
192.168.22.142 | SUCCESS => {
    "ansible_facts": {
        "discovered_interpreter_python": "/usr/bin/python"
    },
    "changed": false,
    "ping": "pong"
}
192.168.22.143 | SUCCESS => {
    "ansible_facts": {
        "discovered_interpreter_python": "/usr/bin/python"
    },
    "changed": false,
    "ping": "pong"
}
当执行命令
ansible all -a ping时,不需要显式地输入-m选项,是因为 Ansible 默认使用的是command模块。在 Ansible 中,
command模块用于在远程主机上执行命令。当你使用命令ansible时,Ansible 默认会使用-a command模块来执行指定的命令。因此,当执行
ansible all -a ping命令时,Ansible 会自动识别-a选项后的参数ping,并使用默认的command模块来执行ping命令。
(4)当主控机没有配置ssh——检查机器的命令后面要加上-k,并且输入密码
[root@ansible145 ~]# ansible all -m ping -k
SSH password:
192.168.22.141 | SUCCESS => {
    "ansible_facts": {
        "discovered_interpreter_python": "/usr/bin/python"
    },
    "changed": false,
    "ping": "pong"
}
192.168.22.142 | SUCCESS => {
    "ansible_facts": {
        "discovered_interpreter_python": "/usr/bin/python"
    },
    "changed": false,
    "ping": "pong"
}
192.168.22.143 | SUCCESS => {
    "ansible_facts": {
        "discovered_interpreter_python": "/usr/bin/python"
    },
    "changed": false,
    "ping": "pong"
}
4.对主机进行分组
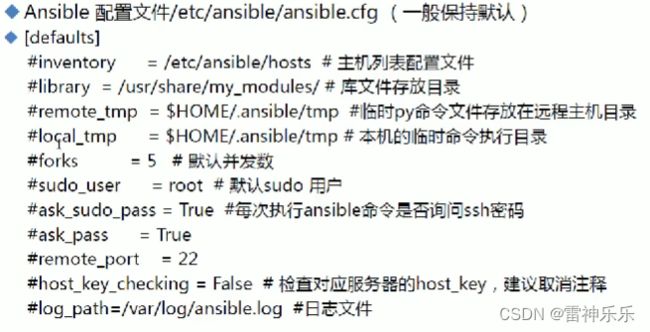
四、ansible的主配置文件——/etc/ansible/ansible.cfg
1.建议打开主机公钥认证。
2.建议打开日志记录,以后执行ansible命令后就会在该路径自动生成命令日志。
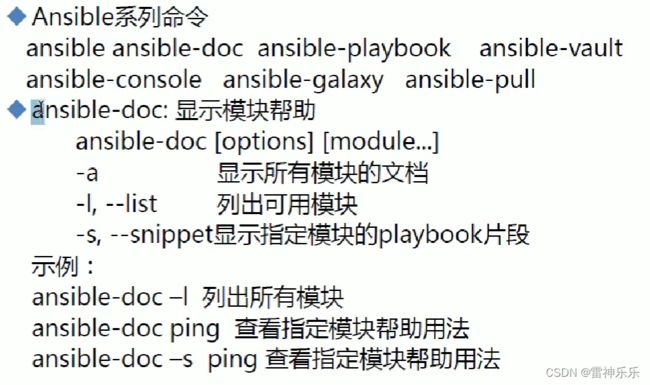
五、ansible系列命令
[root@ansible145 ~]# ansible
ansible               ansible-doc           ansible-playbook-2
ansible-2             ansible-doc-2         ansible-playbook-2.7
ansible-2.7           ansible-doc-2.7       ansible-pull
ansible-config        ansible-galaxy        ansible-pull-2
ansible-connection    ansible-galaxy-2      ansible-pull-2.7
ansible-console       ansible-galaxy-2.7    ansible-vault
ansible-console-2     ansible-inventory     ansible-vault-2
ansible-console-2.7   ansible-playbook      ansible-vault-2.7
这里的-a表示参数列表,后面可以给出参数
1.默认以root用户连接该分组下的主机列表
 2.以普通用户连接该组下面的主机
 3.普通用户查看对方的/root目录
# 给普通用户添加root权限

yum install -y vim

usermod -aG wheel lxm


# 为指定文件添加颜色区分

echo export EDITOR=vim >> /etc/profile.d/env.sh

source /etc/profile
另外三台被控机visudo里面要讲下面的粉色字体取消注释
如果不操作上面的步骤,每次查看被控机的/root目录都会输入密码,比较繁琐:
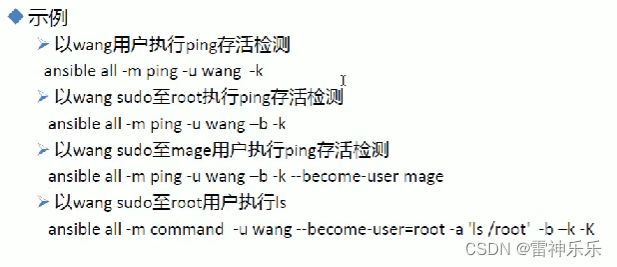
下面命令的意思是:使用 Ansible 的 command 模块执行了一个命令,该命令是在 dbsrvs 主机上以 lxm 用户身份执行的,并且要求输入密码(使用 -k 参数)和提升为超级用户权限(使用 -b 和 -K 参数)。这个命令的作用是列出 /root 目录下的文件和目录。它会在远程主机上运行,并返回结果。
[root@ansible145 ~]# ansible dbsrvs -m command -a 'ls /root' -u lxm -k -b -K
SSH password:
BECOME password[defaults to SSH password]:
192.168.22.143 | CHANGED | rc=0 >>
anaconda-ks.cfg
192.168.22.141 | CHANGED | rc=0 >>
anaconda-ks.cfg
执行上面的命令后就不需要输入两次lxm用户的密码了
[root@ansible145 ~]# ansible dbsrvs -m command -a 'ls /root' -u lxm -k -b
SSH password:
192.168.22.143 | CHANGED | rc=0 >>
anaconda-ks.cfg
192.168.22.141 | CHANGED | rc=0 >>
anaconda-ks.cfg
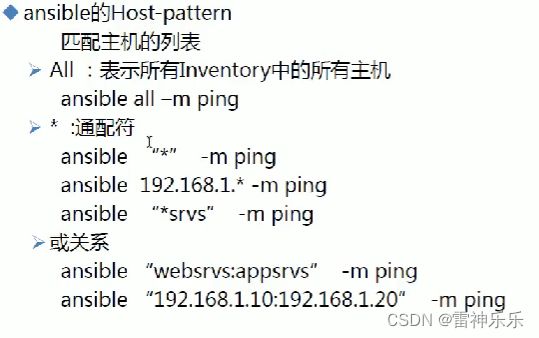
六、ansible的主机模式
1.基本命令
2.ping主机清单以"192.168.22.14"开头的主机列表
[root@ansible145 ~]# ansible 192.168.22.14* -m ping
3.ping主机清单中以srvs结尾的组
[root@ansible145 ~]# ansible *srvs -m ping
4.ping两个主机清单
[root@ansible145 ~]# ansible websrvs:dbsrvs -m ping

[root@ansible145 ~]# ansible 192.168.22.141:192.168.22.142 -m ping
192.168.22.141 | SUCCESS => {
    "ansible_facts": {
        "discovered_interpreter_python": "/usr/bin/python"
    },
    "changed": false,
    "ping": "pong"
}
192.168.22.142 | SUCCESS => {
    "ansible_facts": {
        "discovered_interpreter_python": "/usr/bin/python"
    },
    "changed": false,
    "ping": "pong"
}
5.逻辑与——ping两个组的交集
[root@ansible145 ~]# ansible websrvs --list
  hosts (2):
    192.168.22.141
    192.168.22.142
[root@ansible145 ~]# ansible dbsrvs --list
  hosts (2):
    192.168.22.141
    192.168.22.143

# 单引号与双引号的效果一样
[root@ansible145 ~]# ansible 'websrvs:&dbsrvs' -m ping
192.168.22.141 | SUCCESS => {
    "ansible_facts": {
        "discovered_interpreter_python": "/usr/bin/python"
    },
    "changed": false,
    "ping": "pong"
}
[root@ansible145 ~]# ansible "websrvs:&dbsrvs" -m ping
192.168.22.141 | SUCCESS => {
    "ansible_facts": {
        "discovered_interpreter_python": "/usr/bin/python"
    },
    "changed": false,
    "ping": "pong"
}
6.逻辑非——ping在websrvs中的主机,而不是在dbsrvs中的,要用单引号
[root@ansible145 ~]# ansible 'websrvs:!dbsrvs' -m ping
192.168.22.142 | SUCCESS => {
    "ansible_facts": {
        "discovered_interpreter_python": "/usr/bin/python"
    },
    "changed": false,
    "ping": "pong"
}
7.正则表达式——ping包含在websrvs或dbsrvs中的主机
[root@ansible145 ~]# ansible '~(web|db)srvs' -m ping

[root@ansible145 ~]# ansible '~(web|db)srv' -m ping
七、ansible命令执行过程
1.详细查看执行过程,并过滤出有chmod的信息
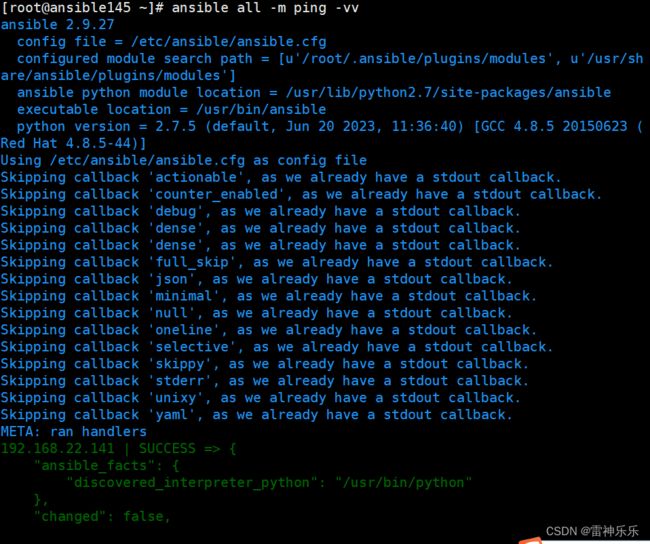
[root@ansible145 ~]# ansible all -m ping -vvv | grep chmod八、ansible常用模块
(一)Command模块
1.批量添加文件
[root@ansible145 ~]# ansible all -a 'mkdir /opt/soft'
[WARNING]: Consider using the file module with state=directory rather than
running 'mkdir'.  If you need to use command because file is insufficient you
can add 'warn: false' to this command task or set 'command_warnings=False' in
ansible.cfg to get rid of this message.
192.168.22.142 | CHANGED | rc=0 >>

192.168.22.141 | CHANGED | rc=0 >>

192.168.22.143 | CHANGED | rc=0 >>
2.批量查看添加情况与详细查看
[root@ansible145 ~]# ansible all -a 'ls /opt'
192.168.22.143 | CHANGED | rc=0 >>
soft
192.168.22.142 | CHANGED | rc=0 >>
soft
192.168.22.141 | CHANGED | rc=0 >>
soft

[root@ansible145 ~]# ansible all -a 'ls -dl /opt'
192.168.22.142 | CHANGED | rc=0 >>
drwxr-xr-x. 3 root root 18 Jul 11 21:36 /opt
192.168.22.143 | CHANGED | rc=0 >>
drwxr-xr-x. 3 root root 18 Jul 11 21:36 /opt
192.168.22.141 | CHANGED | rc=0 >>
drwxr-xr-x. 3 root root 18 Jul 11 21:36 /opt
3.批量查看被控机内存使用情况
[root@ansible145 ~]# ansible all -a 'df -h'4.Command模块:如果不存在/etc/fs文件则执行后面的cat /ect/fstab命令
[root@ansible145 ~]# ansible all -a 'creates=/etc/fs cat /etc/fstab'5.Command模块:如果不存在/etc/fs文件则跳过执行后面的cat /ect/fstab命令
[root@ansible145 ~]# ansible all -a 'removes=/etc/fs cat /etc/fstab'
192.168.22.143 | SUCCESS | rc=0 >>
skipped, since /etc/fs does not exist
192.168.22.142 | SUCCESS | rc=0 >>
skipped, since /etc/fs does not exist
192.168.22.141 | SUCCESS | rc=0 >>
skipped, since /etc/fs does not exist
6.chdir——切换,切换到/boot目录下,并执行ls命令
ansible all -a 'chdir=/boot ls'7.chdir——切换,切换到/data目录下,执行脚本
先在被控机定义脚本
[root@node141 data]# cat f1.sh
#!/bin/bash
hostname
执行ansible命令
[root@ansible145 ~]# ansible 192.168.22.141 -a 'chdir=/data ./f1.sh'
192.168.22.141 | CHANGED | rc=0 >>
node141
8.添加用户、查看用户密码和设置用户密码
 但是command模块在支持特殊符号是有问题的,上面的给test1用户设置密码并未成功
例如显示主机名字也是无效的
因此,解决方案就是用shell模块。
(二)Shell模块
1.显示主机清单对应的hostname——注意单引号
2.给主机清单中指定用户设置密码
3.给主机清单中指定目录下创建文件并查看
![]()
4.删除指定目录下的文件——不推荐,因为有专门管理文件的命令
(三)Script模块——运行脚本
1.在ansible主控机端建立脚本,能够自动在被控机上运行。
[root@ansible145 ~]# mkdir ansible

[root@ansible145 ~]# cd ansible/

[root@ansible145 ~]# ansible-doc script  # 查看script的帮助文档

[root@ansible145 ansible]# vim host.sh
#!/bin/bash
hostname

[root@ansible145 ansible]#chmod +x ./host.sh

[root@ansible145 ansible]#ansible all -m script -a '/root/ansible/host.sh'
script执行host.sh脚本运行结果:
(四)copy模块——复制
1.设置被控机的SELinux状态
# 拷贝文件
[root@ansible145 ansible]# cp /etc/sysconfig/selinux .

[root@ansible145 ansible]# ls
host.sh  selinux

# 设置selinux=disabled
[root@ansible145 ansible]# vim selinux
6 #    disabled - No SELinux policy is loaded.
7 SELINUX=disabled

# 将主控机下的/root/ansible/目录下的selinux文件,覆盖被控机的/etc/selinux目录下的config文件,并建立备份
[root@ansible145 ansible]# ansible all -m copy -a 'src=/root/ansible/selinux dest=/etc/selinux/config backup=yes'
# src表示源文件目录  dest表示目标文件目录  backup=yes表示建立备份
# mode表示权限  owner表示所有者

[root@ansible145 ansible]# ansible all -a 'ls /etc/sysconfig/selinux'

[root@ansible145 ansible]# ansible all -a 'cat /etc/sysconfig/selinux'
查看是否成功覆盖:
原有的config文件已成功覆盖
查看备份文件:
查看拷贝到被控机的文件内容是否一样:
删除备份文件:
[root@ansible145 ansible]# ansible all -m shell -a 'rm -f /etc/selinux/config.*'
检查是否删除成功:
[root@ansible145 ansible]# ansible all -a 'ls /etc/selinux/'
要想使拷贝过去的selinux生效,需要重启被控机:
[root@ansible145 ansible]# ansible all -m shell -a 'reboot'使被控机selinux设置生效:
ansible all -m shell -a 'getenforce'getenforce 是一个用于查看 SELinux 当前模式(Enforcing、Permissive 或 Disabled)的命令。执行该命令后,Ansible 会将目标主机上的输出结果。
2.复制主控机的/etc/shadow文件到被控机的/data/目录下
[root@ansible145 ansible]# ansible all -m copy -a 'src=/etc/shadow dest=/data/'

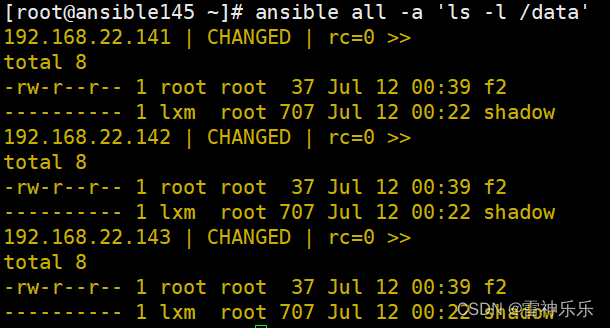
[root@ansible145 ansible]# ansible all -a 'ls -l /data/'
3.复制主控机的/etc/shadow文件到被控机的/data/目录下,并设置权限和所有者
[root@ansible145 ansible]# ansible all -m copy -a 'src=/etc/shadow dest=/data/ mode=000 owner=lxm'

[root@ansible145 ansible]# ansible all -a 'ls -l /data/'
权限和所有者更改成功
用上面这种方法,如果想要将一些配置文件的模板推广到所有的被控机上,只需要使用ansible的copy模块,将主控机上的文件复制到被控机上即可。
2.copy的content功能——直接生成文件内容
(1)在被控机的/data/目录下直接生成新文件f2,内容就是双引号中的内容
注意\t和\n用来分隔和换行。
[root@ansible145 ansible]# ansible all -m copy -a 'content="hello\tworld\nhello\tjava\nhello\tansible\n" dest=/data/f2'(2)查看是否成功生成
(五)Fetch模块——只能从被控机复制单个文件到主控机
1.将被控机的日志文件抓取到主控机的/data目录下
[root@ansible145 ~]# ansible all -m fetch -a 'src=/var/log/messages dest=/data'2.抓取被控机以.log为结尾的文件
(1)首先将被控机以.log为结尾的文件打包
[root@ansible145 ~]# ansible all -m shell -a 'tar Jcf log.tar.xz /var/log/*.log'(2)查看打包目录是否有压缩文件
[root@ansible145 ~]# ansible all -m shell -a 'ls /root'(3)从被控机上拉取该压缩文件
[root@ansible145 ~]# ansible all -m fetch -a 'src=/root/log.tar.xz dest=/data'(4)查看拉取过来的文件
[root@ansible145 ~]# cd /data/192.168.22.141/root/

[root@ansible145 root]# ll
total 4
-rw-r--r--. 1 root root 1740 Jul 12 14:57 log.tar.xz
[root@ansible145 root]# tar tvf log.tar.xz
-rw------- root/root         0 2023-07-12 14:12 var/log/boot.log
-rw-r--r-- root/root      9166 2023-07-12 21:48 var/log/vmware-vmsvc.log
-rw------- root/root      2281 2023-07-12 01:19 var/log/yum.log
(六)File模块——对文件进行操作
1.新建与删除文件和文件夹
[root@ansible145 ~]# ansible all -m file -a 'name=/data/f3 state=touch'

# 用path也可以
[root@ansible145 ~]# ansible all -m file -a 'path=/data/f4 state=touch'
(1)查看/data目录
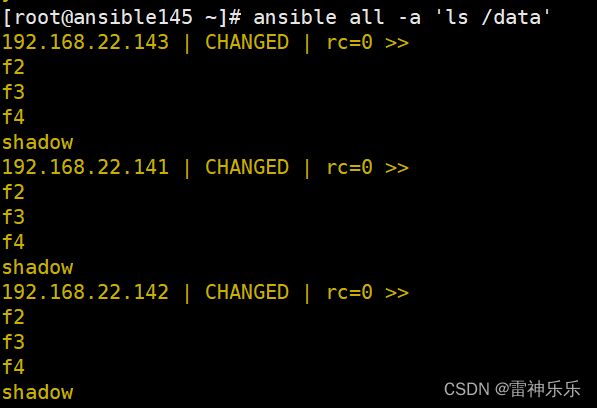
[root@ansible145 ~]# ansible all -a 'ls /data'(2)删除文件——state=ansent
[root@ansible145 ~]# ansible all -m file -a 'path=/data/f4 state=absent'

[root@ansible145 ~]# ansible all -m file -a 'name=/data/f3 state=absent'
(3)新建文件夹
[root@ansible145 ~]# ansible all -m file -a 'path=/data/dir1 state=directory'(4)再次查看目录
(5)删除文件夹
[root@ansible145 ~]# ansible all -m file -a 'path=/data/dir1 state=absent'文件被成功删除。
2.给被控机新建与删除软链接
(1)给被控机新建软链接
[root@ansible145 ~]# ansible all -m file -a 'src=/etc/fstab dest=/data/fstab.link state=link'
软链接成功建立
(2)给被控机删除软链接
[root@ansible145 ~]# ansible all -m file -a 'dest=/data/fstab.link state=absent'软链接成功删除
3.删除文件目录命令
[root@ansible145 ~]# ansible all -m file -a 'dest=/data/ state=absent'
文件夹目录被成功删除
(七)Hostname模块——管理主机名
1.修改主机名
[root@ansible145 ~]# ansible 192.168.22.141 -m hostname -a 'name=node1'该条命令有个缺点:
主机名已经成功改动,但是/etc/hosts里面的主机映射没有修改。
(八)Cron模块——计划任务
1.设置被控机时间同步
(1)配置主机列表
[root@ansible145 ~]# vim /etc/ansible/hosts
(2)时间同步命令
[root@ansible145 ~]# ansible allhosts -m yum -a 'name=ntpdate'

[root@ansible145 ~]# ansible allhosts -m cron -a "name='time' minute=* job='/usr/sbin/ntpdate -u ntp.ntsc.ac.cn'"

[root@ansible145 ~]# ansible allhosts -m shell -a "crontab -l"
192.168.22.145 | CHANGED | rc=0 >>
#Ansible: time
* * * * * /usr/sbin/ntpdate -u ntp.ntsc.ac.cn
192.168.22.142 | CHANGED | rc=0 >>
#Ansible: time
* * * * * /usr/sbin/ntpdate -u ntp.ntsc.ac.cn
192.168.22.143 | CHANGED | rc=0 >>
#Ansible: time
* * * * * /usr/sbin/ntpdate -u ntp.ntsc.ac.cn
192.168.22.141 | CHANGED | rc=0 >>
#Ansible: time
* * * * * /usr/sbin/ntpdate -u ntp.ntsc.ac.cn

[root@ansible145 ~]# ansible allhosts -m shell -a "date '+%Y-%m-%d %H:%M:%S'"
192.168.22.143 | CHANGED | rc=0 >>
2023-07-11 17:23:28
192.168.22.141 | CHANGED | rc=0 >>
2023-07-11 17:23:28
192.168.22.145 | CHANGED | rc=0 >>
2023-07-11 17:23:28
192.168.22.142 | CHANGED | rc=0 >>
2023-07-11 17:23:28
2.定时发送警告
(1)启用定时任务——每分钟发送一次警告
[root@ansible145 ~]# ansible all -m cron -a "name=warningcron minute='*' weekday=1,3,5 job='/usr/bin/wall FBI warning'"(2)禁用定时任务,相当于给任务注释掉
true左右单引号也可以不加。 disabed的值也可以设置为yes。
如果不写name,ansible会认为要禁用一个新命令。
[root@ansible145 ~]# ansible all -m cron -a "disabled='true' name=warningcron job='/usr/bin/wall FBI warning'"
(3)重新启用被禁用的定时任务
disabed的值也可以设置为no。
[root@ansible145 ~]# ansible all -m cron -a "disabled=false name=warningcron job='/usr/bin/wall FBI warning'"![]()
(4)删除定时任务
[root@ansible145 ~]# ansible all -m cron -a "name=warningcron state=absent"(九)Yum模块——管理包
1.给被控机安装vsftpd
[root@ansible145 ~]# ansible all -m yum -a 'name=vsftpd'2.查看所有被控机的安装包
[root@ansible145 ~]# ansible all -m yum -a 'list=installed'
3.卸载安装包
[root@ansible145 ~]# ansible all -m yum -a 'name=vsftpd state=removed'
# 或者state=absent
4.查看是否成功卸载
[root@ansible145 ~]# ansible all -m shell -a 'rpm -q vsftpd'
5.安装多个程序——用逗号隔开
[root@ansible145 ~]# ansible all -m yum -a 'name=vsftpd,memcached,httpd'
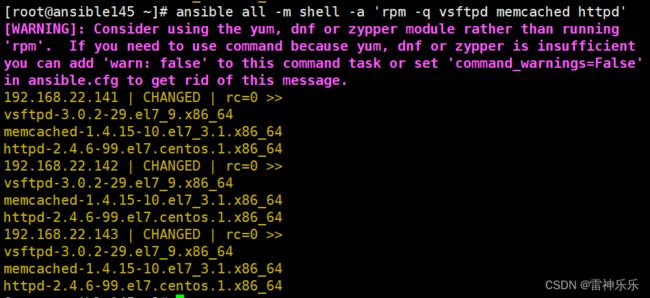
6.查看下载的多个程序是否成功下载
[root@ansible145 ~]# ansible all -m shell -a 'rpm -q vsftpd memcached httpd'7.同时卸载多个已安装的程序
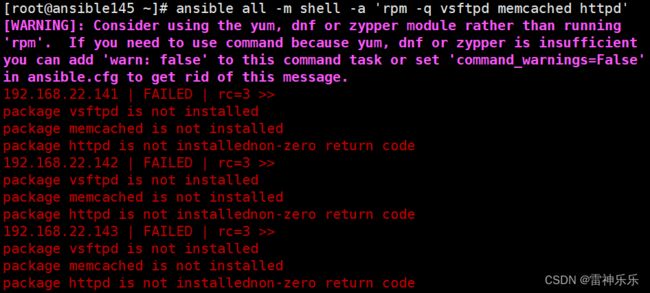
[root@ansible145 ~]# ansible all -m yum -a 'name=vsftpd,memcached,httpd state=absent'8.查看卸载的多个程序是否已成功卸载
[root@ansible145 ~]# ansible all -m shell -a 'rpm -q vsftpd memcached httpd'
9.安装镜像源中没有的程序
(1)先将rpm程序拷贝到被控机上
ansible 192.168.22.141,192.168.22.142 -m copy -a 'src=/data/vsftpd-3.0.2-22.e17.x86_64.rpm dest=/root/'(2)查看是否复制成功
ansible 192.168.22.141,192.168.22.142 -a 'ls /root'(3)开始安装rpm
ansible 192.168.22.141,192.168.22.142 -m yum -a 'name=/root/vsftpd-3.0.2-22.e17.x86_64.rpm'

# 安装时忽略key(公钥)的检查
ansible 192.168.22.141,192.168.22.142 -m yum -a 'name=/root/vsftpd-3.0.2-22.e17.x86_64.rpm disable_gpg_check=yes'
(4)在被控机检查是否安装成功
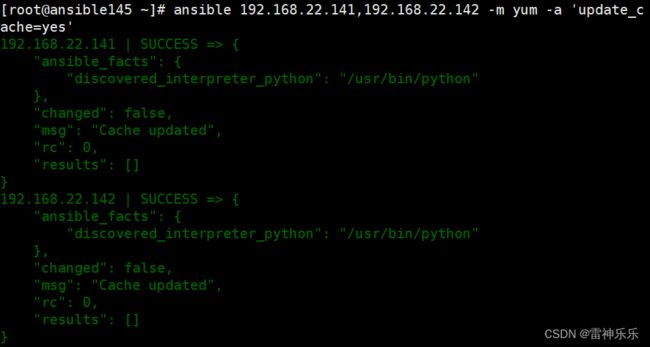
rpm -q vsftpd(5)更新缓存
[root@ansible145 ~]# ansible 192.168.22.141,192.168.22.142 -m yum -a 'update_cache=yes'(6)一边下载,一边更新缓存
[root@ansible145 ~]# ansible 192.168.22.141,192.168.22.142 -m yum -a 'name=dstat update_cache=yes'使用该程序,用来监控进程。
(十)Service模块——管理服务
1.启动服务,并设置开机自启
ansible websrvs -m service -a 'name=vsftpd state=started enabled=yes'2.在被控机上可以确认该服务是否是开机自启的
[root@node141 ~]# systemctl is-enabled vsftpd
enabled
3.检查被控机该服务目前的状态
[root@node141 ~]# systemctl status vsftpd![]()
4.重启该服务
ansible websrvs -m service -a 'name=vsftpd state=restarted'5.停用该服务
ansible websrvs -m service -a 'name=vsftpd state=stopped'6.取消开机自启该服务
ansible websrvs -m service -a 'name=vsftpd state=stopped enabled=false'

# enabled=no 也可以
7.停用后检查该服务
[root@node141 ~]# systemctl is-enabled vsftpd
disabled
(十一)User模块——管理用户
1.新增用户
ansible websrvs -m user -a 'name=nginx shell=/sbin/nologi=/sbin/nologin system=yes home=/var/nginx groups=root,bin uid=80 comment="nginx service"'这个命令是使用 Ansible 的 "user" 模块来在目标主机上创建一个名为 "nginx" 的用户。下面是该命令的具体含义:
ansible websrvs: 这表示将命令发送给名为 "websrvs" 的主机组。您可以根据实际情况替换为您需要管理的主机组名称。
-m user: 这表示使用 "user" 模块执行相关操作。
-a 'name=nginx shell=/sbin/nologin system=yes home=/var/nginx groups=root,bin uid=80 comment="nginx service"': 这是传递给模块的参数和选项。
name=nginx: 设置用户名为 "nginx"。
shell=/sbin/nologin: 指定登录shell为 "/sbin/nologin",这是一种无法登录的特殊shell,常用于系统服务账户。
system=yes: 将用户标记为系统用户,这意味着它是为了运行系统服务而创建的。
home=/var/nginx: 设置用户的家目录为 "/var/nginx"。
groups=root,bin: 将用户添加到 "root" 和 "bin" 用户组中。
uid=80: 指定用户的UID为80。
comment="nginx service": 提供有关用户的注释或描述,这里是指 "nginx service"。此命令的目的是在名为 "websrvs" 的主机组上创建一个名为 "nginx" 的系统用户,该用户是为了运行nginx服务而创建的。它具有特定的shell、家目录、用户组和UID。
2.检查用户是否创建成功
[root@ansible145 ~]# ansible websrvs -a 'getent passwd nginx'[root@ansible145 ~]# ansible websrvs -a 'ls -l /var/'3.删除该用户,并删除他的家目录
ansible websrvs -m user -a 'name=nginx state=absent remove=yes'
4.检查是否删除成功
(十二)Group模块——管理组
1.创建组
[root@ansible145 ~]# ansible websrvs -m group -a 'name=nginx system=yes gid=80'2.查看组是否创建成功
[root@ansible145 ~]# ansible websrvs -a 'getent group nginx'3.删除组
[root@ansible145 ~]# ansible websrvs -m group -a 'name=nginx state=absent'
4.检查是否成功删除组
(十三)ansible-galaxy模块——管理角色
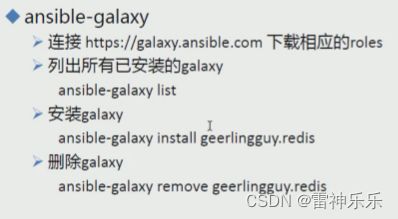
ansible-galaxy 是 Ansible 工具中的一个模块,用于管理和发布 Ansible 角色。通过使用 ansible-galaxy 命令,可以轻松地搜索、安装、创建和分享 Ansible 角色。
1.查看是否安装geerlingguy.nginx
[root@ansible145 ~]# ansible-galaxy list geerlingguy.nginx
- the role geerlingguy.nginx was not found
2.配置阿里云镜像后,开始下载geerlingguy.nginx
配置阿里云镜像源,参考文章《Linux设置yum源为阿里云镜像源》
[root@ansible145 yum.repos.d]# ansible-galaxy install geerlingguy.nginx
- downloading role 'nginx', owned by geerlingguy
- downloading role from https://github.com/geerlingguy/ansible-role-nginx/archive/3.1.4.tar.gz
- extracting geerlingguy.nginx to /root/.ansible/roles/geerlingguy.nginx
- geerlingguy.nginx (3.1.4) was installed successfully
3.生成roles文件
[root@ansible145 ~]# ls .ansible/
cp  galaxy_token  roles  tmp

[root@ansible145 ~]# tree .ansible/roles/
.ansible/roles/
└── geerlingguy.nginx
    ├── defaults
    │   └── main.yml
    ├── handlers
    │   └── main.yml
    ├── LICENSE
    ├── meta
    │   └── main.yml
    ├── molecule
    │   └── default
    │       ├── converge.yml
    │       └── molecule.yml
    ├── README.md
    ├── tasks
    │   ├── main.yml
    │   ├── setup-Archlinux.yml
    │   ├── setup-Debian.yml
    │   ├── setup-FreeBSD.yml
    │   ├── setup-OpenBSD.yml
    │   ├── setup-RedHat.yml
    │   ├── setup-Ubuntu.yml
    │   └── vhosts.yml
    ├── templates
    │   ├── nginx.conf.j2
    │   ├── nginx.repo.j2
    │   └── vhost.j2
    └── vars
        ├── AlmaLinux.yml
        ├── Archlinux.yml
        ├── Debian.yml
        ├── FreeBSD.yml
        ├── OpenBSD.yml
        ├── RedHat.yml
        └── Rocky.yml

9 directories, 25 files
4.其中的yml就是剧本文件,打开其中一个查看:
[root@ansible145 ~]# vim /root/.ansible/roles/geerlingguy.nginx/tasks/main.yml

---
# Variable setup.
- name: Include OS-specific variables.
  include_vars: "{{ ansible_os_family }}.yml"

- name: Define nginx_user.
  set_fact:
    nginx_user: "{{ __nginx_user }}"
  when: nginx_user is not defined

# Setup/install tasks.
- include_tasks: setup-RedHat.yml
  when: ansible_os_family == 'RedHat' or ansible_os_family == 'Rocky' or ansible_os_family == 'AlmaLinux'

- include_tasks: setup-Ubuntu.yml
  when: ansible_distribution == 'Ubuntu'

- include_tasks: setup-Debian.yml
  when: ansible_os_family == 'Debian'

- include_tasks: setup-FreeBSD.yml
  when: ansible_os_family == 'FreeBSD'

- include_tasks: setup-OpenBSD.yml
  when: ansible_os_family == 'OpenBSD'

- include_tasks: setup-Archlinux.yml
  when: ansible_os_family == 'Archlinux'

# Vhost configuration.
- import_tasks: vhosts.yml

# Nginx setup.
- name: Copy nginx configuration in place.
  template:
    src: "{{ nginx_conf_template }}"
    dest: "{{ nginx_conf_file_path }}"
    owner: root
    group: "{{ root_group }}"
    mode: 0644
  notify:
    - reload nginx

- name: Ensure nginx service is running as configured.
  service:
    name: nginx
    state: "{{ nginx_service_state }}"
    enabled: "{{ nginx_service_enabled }}"
5.再次查看是否安装成功
[root@ansible145 geerlingguy.nginx]# ansible-galaxy list geerlingguy.nginx
# /root/.ansible/roles
- geerlingguy.nginx, 3.1.4
6.复制geerlingguy.nginx
将名为 geerlingguy.nginx 的文件夹(或文件)复制到一个名为 lxm.nginx 的目标位置,并且在复制过程中递归地复制子目录以及其所有内容,并保留源文件夹的属性和权限。
[root@ansible145 roles]# cp geerlingguy.nginx/ lxm.nginx -rp

[root@ansible145 roles]# ansible-galaxy list
# /root/.ansible/roles
- geerlingguy.nginx, 3.1.4
- lxm.nginx, 3.1.4
# /usr/share/ansible/roles
# /etc/ansible/roles
7.删除geerlingguy.nginx角色
[root@ansible145 ~]# ansible-galaxy remove geerlingguy.nginx
- successfully removed geerlingguy.nginx

# 查看是否成功删除
[root@ansible145 ~]# ansible-galaxy list geerlingguy.nginx
- the role geerlingguy.nginx was not found

[root@ansible145 ~]# cd .ansible/roles/

[root@ansible145 roles]# ll
total 0
drwxr-xr-x. 10 root root 211 Jul 13 15:23 lxm.nginx

# 删除复制的
[root@ansible145 roles]# ansible-galaxy remove lxm.nginx
- successfully removed lxm.nginx

[root@ansible145 roles]# ansible-galaxy list
# /root/.ansible/roles
# /usr/share/ansible/roles
# /etc/ansible/roles
九、ansible的playbook剧本
(一)playbook剧本示例
1.编写hello.yml剧本
[root@ansible145 ansible]# vim hello.yml

---
- hosts: websrvs
  remote_user: root

  tasks:
    - name: hello
      command: hostname
2.执行该剧本
[root@ansible145 ansible]# ansible-playbook hello.yml(二)ansible系列命令
Ansible-vault————功能: 管理加密解密yml文件

ansible-vault [createldecrypt|edit encrypt|rekeylview]

ansible-vault encrypt hello.yml    加密

ansible-vault decrypt hello.yml    解密

ansible-vault view hello.yml       查看

ansible-vault edit hello.yml       编辑加密文件

ansible-vault rekey hello.yml      修改口令

ansible-vault create new.yml       创建新文件
1.给剧本加密
[root@ansible145 ansible]# ansible-vault encrypt hello.yml
New Vault password:
Confirm New Vault password:
Encryption successful
2.加密后不能查看和执行
[root@ansible145 ansible]# ansible-playbook hello.yml
ERROR! Attempting to decrypt but no vault secrets found
3.加密后查看需要输入密码
[root@ansible145 ansible]# ansible-vault view hello.yml
Vault password:
---
- hosts: websrvs
  remote_user: root

  tasks:
    - name: hello
      command: hostname
4.加密后重新编辑剧本也要输入密码
[root@ansible145 ansible]# ansible-vault edit hello.yml

Vault password:
5.重设密码
[root@ansible145 ansible]# ansible-vault rekey hello.yml
Vault password:  # 输入旧口令
New Vault password:  # 输入新口令
Confirm New Vault password:  # 再次输入新口令
Rekey successful
6.解密
[root@ansible145 ansible]# ansible-vault decrypt hello.yml
Vault password:
Decryption successful
7.解密后才查看和执行
8.创建一个新的加密好的剧本
[root@ansible145 ansible]# ansible-vault create hello2.yml
New Vault password:
Confirm New Vault password:
(三)ansible-console模块——交互执行命令
[root@ansible145 ~]# ansible-console
Welcome to the ansible console.
Type help or ? to list commands.

root@all (3)[f:5]$
(四)playbok正式学习
1.概述
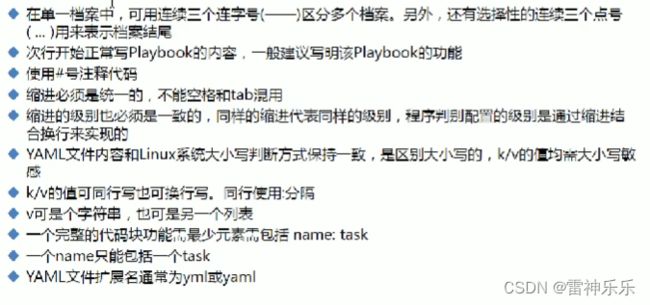
- playbook是由一个或多个“play”组成的列表;
- play的主要功能在于将事先归并为一组的主机装扮成事先通过ansible中的task定义好的角色。从根本上来讲,所谓task无非是调用ansible的一个module。将多个play组织在一个playbook中,即可以让它们联同起来按事先编排的机制运行;
- Playbook采用YAML语言编写。
YAML是一个可读性高的用来表达资料序列的格式。YAML参考了其他多和语言,包括:XML、C语言、Python、Perl以及电子邮件格式RFC2822等。Clark Evans在2001年在首次发表了这种语言,另外Ingy dot Net与Oren Ben-Kiki也是这语言的共同设计者YAML Ain't Markup Language,即YAML不是XML。不过,在开发的这种语言时,YAML的高思其实是:"Yet Another Markup Language"( 仍是一种标记语言)特性。
YAML的可读性好、和脚本语言的交互性好、使用实现语言的数活类型、有一个一致的信息模型、易于实现、可以基于流来处理、表达能力强,扩展性好更多的内容及规范参见http://www.yaml.org
list用-开头,key-value键值对用:号分隔
2.playbook核心元素
(1)hosts
相当于单行命令的ansible后面的主机名称
(2)playbook文件示例
[root@ansible145 ~]# ansible all -a 'rpm -q httpd'
[root@ansible145 ~]# yum install httpd
[root@ansible145 ~]# rpm -ql httpd
[root@ansible145 ~]# echo welcome to ansible > /var/www/html/index.html
编写playbook文件
vim file.yml

---
- hosts: websrvs
  remote_user: root

  tasks:
      - name: create new file
        file: name=/data/newfile state=touch
        # 如果被控机没有/data目录,则需要递归创建,file命令换成下面的
        # state=directory表示创建目录          recurse=yes表示递归
        # file: name=/data/newfile state=directory recurse=yes
      - name: create new user
        user: name=test2 system=yes shell=/sbin/nologin
      - name: install package
        yum: name=httpd
      - name: copy html
        copy: src=/var/www/html/index.html dest=/var/www/html/
      - name: start service
        service: name=httpd state=started enabled=yes
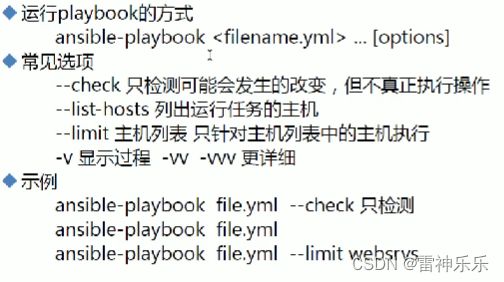
执行playbook文件,-C表示检查
ansible-playbook -C file.yml批量删除被控机的data文件
ansible all -m file -a 'path=/data state=absent'
正式执行该剧本
[root@ansible145 ansible]# ansible-playbook file.yml 检查剧本中的命令是否执行成功
[root@ansible145 ansible]# ansible websrvs -a 'ls -l /data'
192.168.22.142 | CHANGED | rc=0 >>
total 0
drwxr-xr-x 2 root root 6 Jul 13 22:47 newfile
192.168.22.141 | CHANGED | rc=0 >>
total 0
drwxr-xr-x 2 root root 6 Jul 13 22:47 newfile


[root@ansible145 ansible]# ansible websrvs -a 'getent passwd test2'
192.168.22.142 | CHANGED | rc=0 >>
test2:x:997:995::/home/test2:/sbin/nologin
192.168.22.141 | CHANGED | rc=0 >>
test2:x:997:995::/home/test2:/sbin/nologin


[root@ansible145 ansible]# ansible websrvs -m shell -a 'ss -tln | grep :80'
192.168.22.142 | CHANGED | rc=0 >>
LISTEN     0      128         :::80                      :::*
192.168.22.141 | CHANGED | rc=0 >>
LISTEN     0      128         :::80                      :::*


[root@ansible145 ansible]# curl 192.168.22.141
welcome to ansible


[root@ansible145 ansible]# curl 192.168.22.142
welcome to ansible
(2)task列表和action
- play的主体部分是task list。task list中的各任务按次序逐个在hosts中指定的所有主机上执行,即在所有主机上完成第一个任务后再开始第二个。在运行自上而下某playbook时,如果中途发生错误,所有已执行任务都将回滚,因此再更正playbook后重新执行一次即可。
- task的目的是使用指定的参数执行模块,而在模块参数中可以使用变量。模块执行是幂等的,这意味着多次执行是安全的,因为其结果均一致。
- 每个task都应该有其name,用于playbook的执行结果输出,建议其内容尽可能清晰地描述任务执行步骤。如果未提供name,则action的结果将用于输出。
[root@ansible145 ansible]# ansible websrvs -m shell -a 'getent passwd test2' --list-hosts
  hosts (2):
    192.168.22.141
    192.168.22.142


[root@ansible145 ansible]# ansible websrvs -a 'getent passwd test2' --list-hosts
  hosts (2):
    192.168.22.141
    192.168.22.142


[root@ansible145 ansible]# ansible websrvs -a 'getent passwd test2' --limit 192.168.22.141
192.168.22.141 | CHANGED | rc=0 >>
test2:x:997:995::/home/test2:/sbin/nologin


[root@ansible145 ansible]# ansible websrvs -a 'getent passwd test2' -vv


[root@ansible145 ansible]# ansible-playbook file.yml --list-hosts

playbook: file.yml

  play #1 (websrvs): websrvs	TAGS: []
    pattern: [u'websrvs']
    hosts (2):
      192.168.22.141
      192.168.22.142


[root@ansible145 ansible]# ansible-playbook file.yml --list-tasks

playbook: file.yml

  play #1 (websrvs): websrvs	TAGS: []
    tasks:
      create new file	TAGS: []
      create new user	TAGS: []
      install package	TAGS: []
      copy html	TAGS: []
      start service	TAGS: []


[root@ansible145 ansible]# ansible-playbook file.yml --list-tags

playbook: file.yml

  play #1 (websrvs): websrvs	TAGS: []
      TASK TAGS: []
(3)Playbook和ShellScripts
当代码中有语法错误时,比如:
[root@ansible145 ansible]# cd /var/www/html/

[root@ansible145 html]# ll
total 4
-rw-r--r--. 1 root root 19 Jul 13 22:23 index.html

[root@ansible145 html]# cat index.html
welcome to ansible

[root@ansible145 html]# echo test html > test.html

[root@ansible145 html]# cd /root/ansible/

[root@ansible145 ansible]# vim file.yml


---
- hosts: websrvs
  remote_user: root

  tasks:
    - name: create new file
      file: name=/data/newfile state=directory recurse=yes
    - name: create new user
      user: name=test2 system=yes shell=/sbin/nologin
    - name: install package
      yum: name=httpd
    - name: copy html
      copy: src=/var/www/html/index.html dest=/var/www/html/
      copy: src=/var/www/html/test.html dest=/var/www/html/
    - name: start service
      service: name=httpd state=started enabled=yes
检查代码时会提示错误——copy模块
但是并不影响其他代码的执行
---
- hosts: websrvs
  remote_user: root

  tasks:
    - name: create new file
      file: name=/data/newfile state=directory recurse=yes
    - name: create new user
      user: name=test2 system=yes shell=/sbin/nologin
    - name: install package
      yum: name=httpd
    - name: copy html
      copy: src=/var/www/html/index.html dest=/var/www/html/
    - name: copy test html
      copy: src=/var/www/html/test.html dest=/var/www/html/
    - name: start service
      service: name=httpd state=started enabled=yes
src可以简写:
[root@ansible145 ansible]# ls
file.yml  hello2.yml  hello.yml  host.sh  selinux

[root@ansible145 ansible]# mkdir files

[root@ansible145 ansible]# pwd
/root/ansible

[root@ansible145 ansible]# cp /var/www/html/* files/

[root@ansible145 ansible]# tree
.
├── files
│?? ├── index.html
│?? └── test.html
├── file.yml
├── hello2.yml
├── hello.yml
├── host.sh
└── selinux

1 directory, 7 files
[root@ansible145 ansible]# vim file.yml


---
- hosts: websrvs
  remote_user: root

  tasks:
    - name: create new file
      file: name=/data/newfile state=directory recurse=yes
    - name: create new user
      user: name=test2 system=yes shell=/sbin/nologin
    - name: install package
      yum: name=httpd
    - name: copy html
      copy: src=files/index.html dest=/var/www/html/
    - name: copy test html
      copy: src=files/test.html dest=/var/www/html/
    - name: start service
      service: name=httpd state=started enabled=yes
简写后,删除之前复制的文件
[root@ansible145 ansible]# ansible websrvs -m shell -a 'rm -f /var/www/html/*'

[root@ansible145 ansible]# ansible websrvs -m shell -a 'ls /var/www/html/'
剧本仍然能够正常运行
修改test.html的内容后,仍旧能够执行,但是服务没有重启,并且直接覆盖原有的test.html文件


