全志F1C100s入坑与填坑 uboot Linux Kernel 与buildroot
全志F1C100s
入手了几块全志的板子准备玩一玩随便记录一下!!
如图 是一块荔枝派 Nano

从sipeed官网可得如下介绍
官网传送门-----》 sipeed

Nano 硬件参数#
硬件参数
CPU: 全志 F1C100s, ARM 926EJS , 最高 900MHz
内存:
集成32MB DDR
存储:
预留SOP8 SPI Flash焊盘(可定制贴片8~32MB SPI Nor Flash);
板载 TF卡座,可TF启动。
显示:
通用 40P RGB LCD FPC座
可直插常见的40P 4.3/5/7寸屏幕(板载背光驱动),通过转接板可插50P 7/9寸屏
支持常见的272x480, 480x800, 1024x600等分辨率
板载电阻式触摸屏芯片,另配合底板可适配电容触摸屏
支持 720P 视频输出
支持 H.264 / MPEG 等视频流解码
通信接口
SDIO,可搭配配套SDIO WiFi+BT 模块
SPI x2
TWI x3
UART x3
OTG USB x1
TV out
下面开始入坑!!!
uboot
首先获取uboot源码
git clone https://gitee.com/LicheePiNano/u-boot.git
cd u-boot

# 查看分支
git branch -a
# 切换到 Nano 分支
git checkout nano-lcd800480
# 此处告知make采用arm-linux-gnueabi下的所有交叉编译工具,目标架构为Arm,设定各项默认配置为 nano 的spiflash支持版
make ARCH=arm CROSS_COMPILE=arm-linux-gnueabi- f1c100s_nano_uboot_defconfig

# 若不带spi-flash的板子,请换成 licheepi_nano_defconfig

# 进行可视化配置
make ARCH=arm menuconfig
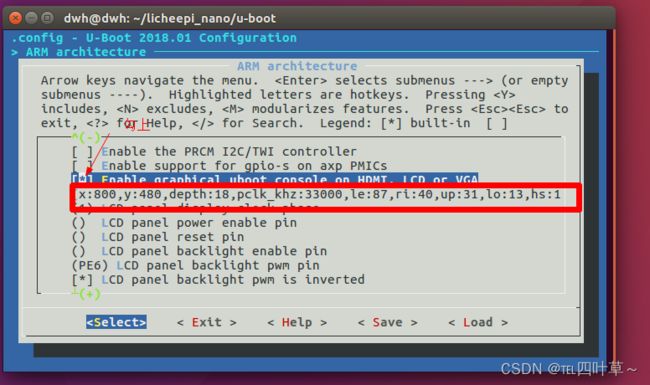
我这里使用的屏幕分辨率是800 x 480
需要去修改一下配置
第一步
ARM architecture --> Enable graphical uboot console on HDMI, LCD or VGA 为 Y
第二步
LCD panel timing details 为:
x:800,y:480,depth:18,pclk\khz:33000,le:87,ri:40,up:31,lo:13,hs:1,vs:1,sync:3,vmode:0
开始编译
make ARCH=arm CROSS_COMPILE=arm-linux-gnueabi- -j16
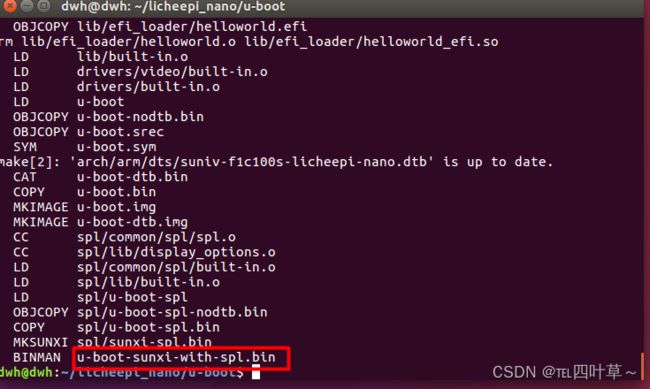
成功生成了 u-boot-sunxi-witch-spl.bin文件
在这里u-boot已经编译完成
下一步开始编译Linux
Linux
第一步 获取Linux源码
git clone https://gitee.com/LicheePiNano/Linux.git
使用./arch/arm/configs/f1c100s_nano_linux_defconfig配置文件
make ARCH=arm f1c100s_nano_linux_defconfig
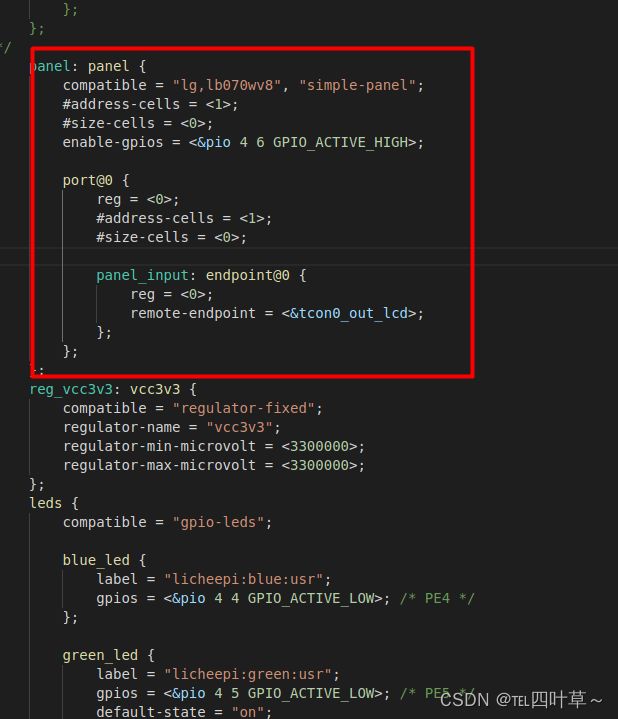
修改设备树支持LCD屏幕
Nano的设备树在源码的
linux --> arch --> arm --> boot --> dts --> suniv-f1c100s-licheepi-nano.dts;
改为适配800X480的屏,此处应当:
/ { }所包裹的根节点目录下,panel属性下的compatible,应修改为:
“lg,lb070wv8”, “simple-panel”
make ARCH=arm CROSS_COMPILE=arm-linux-gnueabi- -j8
make ARCH=arm CROSS_COMPILE=arm-linux-gnueabi- -j8 INSTALL_MOD_PATH=out modules
make ARCH=arm CROSS_COMPILE=arm-linux-gnueabi- -j8 INSTALL_MOD_PATH=out modules_install
最后生成zImage文件与dtb文件
内核img文件:./arch/arm/boot/zImage
设备树dtb文件:./arch/arm/boot/dts/suniv-f1c100s-licheepi-nano.dtb
下一步编译buildroot
buildroot
首先安装一些依赖,比如linux头文件:
apt-get install linux-headers-$(uname -r)
wget https://buildroot.org/downloads/buildroot-2021.02.4.tar.gz
tar xvf buildroot-2021.02.4.tar.gz
cd buildroot-2021.02.4/
make menuconfig
make menuconfig
以下选项为基础配置:
- Target options
- Target Architecture (ARM (little endian))
- Target Variant arm926t
- Toolchain
- C library (musl) # 使用musl减小最终体积
- System configuration
- Use syslinks to /usr … # 启用/bin, /sbin, /lib的链接
- Enable root login # 启用root登录
- Run a getty after boot # 启用登录密码输入窗口
- (123456) Root password # 默认账户为root 密码为licheepi
另可自行添加或删除指定的软件包
如下图所示


开始编译!!!
make
根文件系统编译花费时间较长
把编译好的文件准备好之后下面开始烧录进flash了
编译和使用sunxi-tools
烧录需要这个工具
git clone https://github.com/Icenowy/sunxi-tools.git -b f1c100s-spiflash
安装依赖库
sudo apt install libz libusb-1.0-0-dev
make
make install
在flash芯片第一脚 飞出一根线在板子USB上电时与GND连接 启动后然后断开连接

然后连接到Ubuntu
可以通过下面命令查看是否连接成功
sudo sunxi-fel ver

烧写u-boot
sunxi-fel -p spiflash-write 0 ../u-boot/u-boot-sunxi-with-spl.bin
然后等待下载完成即可完成uboot烧写

烧写Linux&dtb
sudo sunxi-fel -p spiflash-write 0x0100000 ../Linux/arch/arm/boot/dts/suniv-f1c100s-licheepi-nano.dtb
sudo sunxi-fel -p spiflash-write 0x0110000 ../Linux/arch/arm/boot/zImage
烧写文件系统
在buildroot
/licheepi_nano/buildroot-2021.02.4/output/images生成了一个rootfs.tar文件
![]()
然后解压到一个目录
sudo tar -xvf rootfs.tar -C /home/dwh/f1c100s/rootfs
使用mkfs.jffs2 工具把/rootfs转为img文件
sudo mkfs.jffs2 -s 0x100 -e 0x10000 --pad=0xAF0000 -d rootfs/ -o jffs2.img
烧录
sudo sunxi-fel -p spiflash-write 0x510000 ../../f1c100s/jffs2.img
最后看看效果吧u-boot成功启动

屏幕也显示了荔枝派开机的Logo
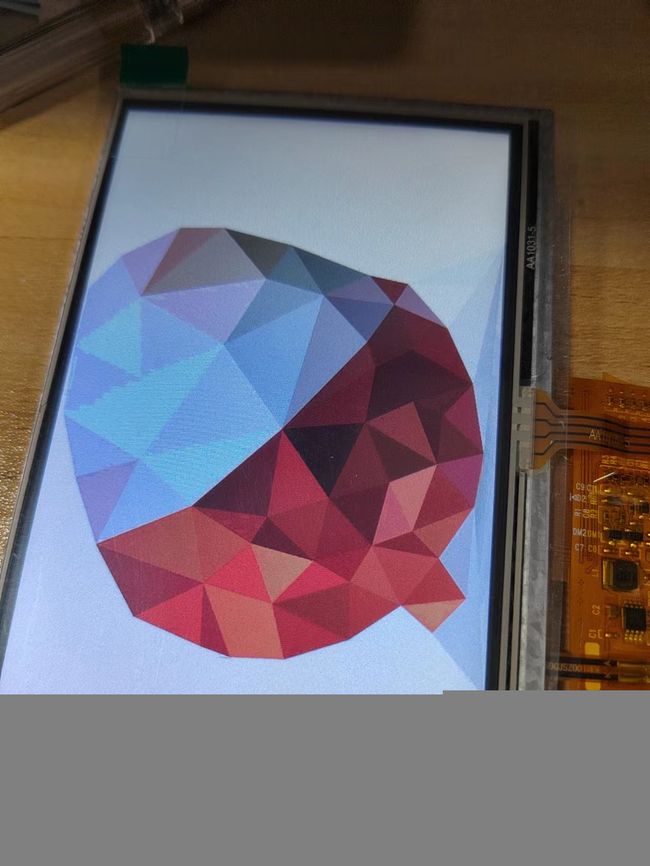
最后成功进入文件系统

遇到的问题,试过一次出现Linux内核启动后进入不了文件系统的情况
[    1.550893] ALSA device list:
[    1.560150]   #0: Loopback 1
[    1.569966] platform regulatory.0: Direct firmware load for regulatory.db failed with error -2
[    1.590760] cfg80211: failed to load regulatory.db
[    1.603821] EXT4-fs (mmcblk0p2): couldn't mount as ext3 due to feature incompatibilities
[    1.670528] EXT4-fs (mmcblk0p2): recovery complete
[    1.683334] EXT4-fs (mmcblk0p2): mounted filesystem with ordered data mode. Opts: (null)
[    1.703641] VFS: Mounted root (ext4 filesystem) on device 179:2.
[    1.724527] devtmpfs: mounted
[    1.738167] Freeing unused kernel memory: 1024K
[    1.814266] request_module: kmod_concurrent_max (0) close to 0 (max_modprobes: 50), for module binfmt-0000, throttling...
[    6.888833] request_module: modprobe binfmt-0000 cannot be processed, kmod busy with 50 threads for more than 5 seconds now
[    6.928203] Starting init: /sbin/init exists but couldn't execute it (error -8)
[    7.029799] request_module: kmod_concurrent_max (0) close to 0 (max_modprobes: 50), for module binfmt-0000, throttling...
[   12.088839] request_module: modprobe binfmt-0000 cannot be processed, kmod busy with 50 threads for more than 5 seconds now
[   12.129497] Starting init: /bin/sh exists but couldn't execute it (error -8)
[   12.179874] Kernel panic - not syncing: No working init found.  Try passing init= option to kernel. See Linux Documentation/admin-guide/init.rst for guidance.
[   12.213491] CPU: 0 PID: 1 Comm: swapper Not tainted 4.15.0-rc8-licheepi-nano+ #4
[   12.234051] Hardware name: Allwinner suniv Family
[   12.245560] [<c010e550>] (unwind_backtrace) from [<c010b6a8>] (show_stack+0x10/0x14)
[   12.266672] [<c010b6a8>] (show_stack) from [<c0116878>] (panic+0xb8/0x230)
[   12.286927] [<c0116878>] (panic) from [<c06652bc>] (kernel_init+0xd4/0x10c)
[   12.307407] [<c06652bc>] (kernel_init) from [<c0107dc0>] (ret_from_fork+0x14/0x34)
[   12.328601] Rebooting in 5 seconds..
[   18.314583] Reboot failed -- System halted
解决方法出现编译文件系统然后出现烧录。