Debian11懒人版安装Nginx、PHP7、Mysql8,配置连接MSSQL(Sql server)笔记
1、最小化安装debian11,中文环境、磁盘分区、填写ip信息,只选择ssh server和基本工具
2、安装完后编辑sshd允许root远程(-__-)b
nano /etc/ssh/sshd_config
	PermitRootLogin yes
systemctl restart sshd
3、编辑源,更新系统,安装自己喜欢的常用工具
nano /etc/apt/sources.list
deb http://mirrors.aliyun.com/debian/ bullseye main non-free contrib
deb-src http://mirrors.aliyun.com/debian/ bullseye main non-free contrib
deb http://mirrors.aliyun.com/debian-security/ bullseye-security main
deb-src http://mirrors.aliyun.com/debian-security/ bullseye-security main
deb http://mirrors.aliyun.com/debian/ bullseye-updates main non-free contrib
deb-src http://mirrors.aliyun.com/debian/ bullseye-updates main non-free contrib
deb http://mirrors.aliyun.com/debian/ bullseye-backports main non-free contrib
deb-src http://mirrors.aliyun.com/debian/ bullseye-backports main non-free contrib

apt-get -y update
apt-get -y dist-upgrade
apt-get -y upgrade

apt-get install -y iftop curl net-tools
4、安装mysql-server8,最新的地址可以上mysql官网查https://dev.mysql.com/downloads/,安装期间会让你选择server(不是cluster),启用客户端和lib和禁用预览版功能,安装完成后配置mysql允许远程连接:
apt-get install gnupg
wget https://dev.mysql.com/get/mysql-apt-config_0.8.22-1_all.deb
dpkg -i mysql-apt-config_0.8.22-1_all.deb
apt-get -y update
apt-get install -y mysql-server
systemctl status mysql
mysql -uroot -p
(输入安装时设置的密码):
use mysql;
update user set host = '%' where user = 'root';
GRANT ALL PRIVILEGES ON *.* TO 'root'@'%';
5、编辑mysql配置文件,禁止主机名反向解析,减少连接时候的延迟
nano /etc/mysql/mysql.conf.d/mysqld.cnf

[mysqld]
skip-name-resolve
6、安装nginx和php7
apt-get install -y nginx php php7.4-fpm php7.4-curl php-mysql
7、根据自己实际需求配置nginx,注意中英文字符和{}等别错误,起不来可以看看/var/log/nginx/error.log日志报错
nano /etc/nginx/sites-available/default
server {
        listen 80 default_server;
        listen [::]:80 default_server;
        # SSL configuration
        #
        # listen 443 ssl default_server;
        # listen [::]:443 ssl default_server;
        #
        # Note: You should disable gzip for SSL traffic.
        # See: https://bugs.debian.org/773332
        #
        # Read up on ssl_ciphers to ensure a secure configuration.
        # See: https://bugs.debian.org/765782
        #
        # Self signed certs generated by the ssl-cert package
        # Don't use them in a production server!
        #
        # include snippets/snakeoil.conf;
        root /var/www/html;
        # Add index.php to the list if you are using PHP;
        index index.php index.nginx-debian.html;

        server_name _;
        location / {
                # First attempt to serve request as file, then
                # as directory, then fall back to displaying a 404.
                try_files $uri $uri/ =404;
				  charset utf-8,gbk;
        }
        # pass PHP scripts to FastCGI server
        #
        location ~ \.php$ {
                include snippets/fastcgi-php.conf;
        #
        #       # With php-fpm (or other unix sockets):
                fastcgi_pass unix:/run/php/php7.4-fpm.sock;
        #       # With php-cgi (or other tcp sockets):
        #       fastcgi_pass 127.0.0.1:9000;
        }
        # deny access to .htaccess files, if Apache's document root
        # concurs with nginx's one
        #
        #location ~ /\.ht {
        #       deny all;
        #}
}
systemctl restart nginx
8、放一个info文件看看系统配置
nano /var/www/html/index.php
<?php
phpinfo();
?>
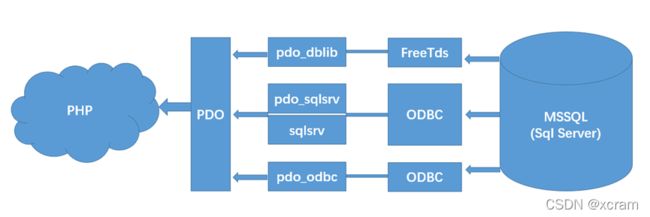
到这里基本就能通过nginx+php7+mysql8访问到主页了,因为业务需要,还需要php远程连MSSQL(SQL Server),就我目前的理解,因为php5.3以后的版本不再提供php_mssql扩展方式,所以debian11下php7连sqlserver常见的有三种方法,第一种是古老的dblib+FreeTds方式,官方已经不推荐使用dblib方式,但是上古代码已经大量使用只能接着搞。第二种安装微软官方的驱动结合odbc驱动。第三种采用pdo+odbc方式

9、第一种dblib+FreeTds方式
一开始没找到dblib,在debian官网https://www.debian.org/distrib/packages#search_packages查到dblib在php7.4-sybase中,赶紧装上


apt-get install -y php7.4-sybase freetds-bin freetds-common freetds-dev libdbd-freetds
以下包随着依赖关系会一起被安装上:
libct4 libdbi1 libltdl7 libodbc1 libsybdb5
修改freetds.conf配置,tds version的取值参考:
auto 自动
7.4 支持 2012 ,2014 2016版本
7.3 支持2008
7.2 支持 2005
7.1 支持 2000
nano /etc/freetds/freetds.conf

# 增加字符集utf8
[global]
client charset = UTF8
# 注释掉不用的sybase server
# A typical Sybase server
#[egServer50]
#       host = symachine.domain.com
#       port = 5000
#       tds version = 5.0
# [egServer73]
#        host = ntmachine.domain.com
#       port = 1433
#        tds version = 7.3
# 修改mssql 为自己的配置
[mssql2008]
        host =192.168.0.1
        port = 1433
        tds version = 7.3
修改结果集日期格式
cp /usr/share/doc/freetds-common/examples/locales.conf /etc/freetds/
nano /etc/freetds/locales.conf
[default]
date format = %Y-%m-%d %H:%M:%S
重启php-fpm服务后,在/etc/php/7.4/fpm/conf.d文件夹下能看到扩展ini文件,例如:
/etc/php/7.4/fpm/conf.d/20-pdo_dblib.ini
这时浏览主页能看到,写个dblib连接方式就能测试。

10、第二种微软官方驱动,详细说明请移步
https://docs.microsoft.com/zh-cn/sql/connect/php/installation-tutorial-linux-mac?view=sql-server-2017
https://docs.microsoft.com/en-us/sql/connect/php/installation-tutorial-linux-mac?view=sql-server-ver15
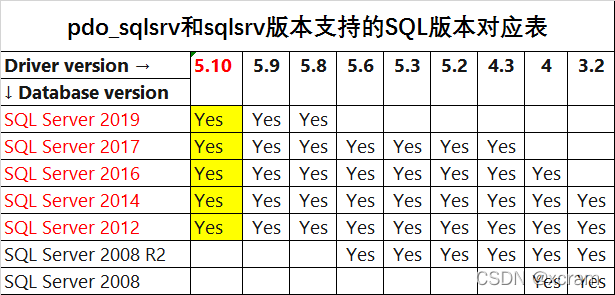
目前最新的Microsoft PHP Drivers for SQL Server版本是5.10。从兼容列表可以看到,debian11只有最新的5.10兼容:

根据上表,debian11只能用5.10以上驱动版本,所以查下表,debian11只能用php7.4以上:

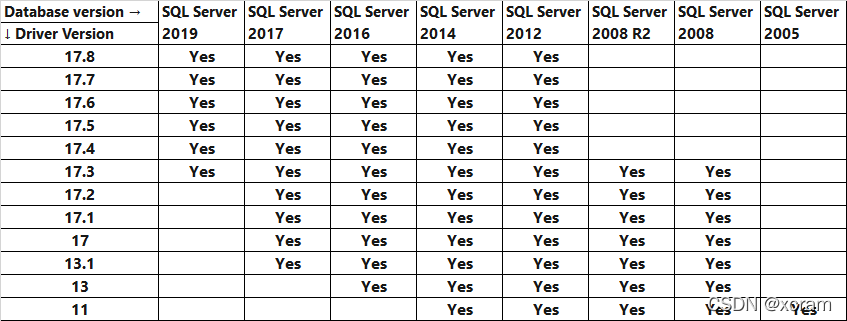
从微软驱动支持的数据库对应关系可以看出,debian11只能支持到SQL Server2012及以上。

这里微软的Microsoft PHP Drivers for SQL Server依赖于odbc驱动,debian11需要前置安装的odbc版本为13.1和17。

因为我的业务需要连sql2008,debian只能连到sql2012,而且微软支持debian11的odbc驱动还没有出,所以没做完这个测试。
安装方法如下:
curl https://packages.microsoft.com/keys/microsoft.asc | apt-key add -
curl https://packages.microsoft.com/config/debian/11/prod.list > /etc/apt/sources.list.d/mssql-release.list
apt-get -y update
apt-get install -y msodbcsql17 unixodbc-dev
pecl install sqlsrv
pecl install pdo_sqlsrv
$serverName = "yourServername";
$databaseName = "yourDatabase";
$uid = "yourUsername";
$pwd = "yourPassword";

$conn = new PDO("sqlsrv:server = $serverName; Database = $databaseName;", $uid, $pwd);
$serverName = "yourServername";
$connectionOptions = array(
    "database" => "yourDatabase",
    "uid" => "yourUsername",
    "pwd" => "yourPassword"
);
$conn = sqlsrv_connect($serverName, $connectionOptions);
11、第三种PDO+ODBC应该也可以,因为目前微软官方最新版本最高只支持到debian10,先把兼容列表和安装方法写下,等微软更新后可以研究一下。喜欢尝鲜的可以去手动下debian10的安装包来试试行不行( ̄▽ ̄)":
https://packages.microsoft.com/debian/10/prod/pool/main/m/msodbcsql17/msodbcsql17_17.8.1.1-1_amd64.deb
先搬一个微软Microsoft PHP Drivers for SQL Server驱动和微软ODBC SQL Server驱动的功能对比


curl https://packages.microsoft.com/keys/microsoft.asc | apt-key add -
curl https://packages.microsoft.com/config/debian/11/prod.list > /etc/apt/sources.list.d/mssql-release.list
apt-get -y update
apt-get install -y msodbcsql17
apt-get install -y mssql-tools
驱动安装好后连接测试:
//dblib方式
//$db = new PDO("dblib:host=".HOST.";dbname=".NAME.";charset=utf8", "".USER."", "".PASS."");
//odbc方式
$db = new PDO("odbc:Driver={ODBC Driver 17 for SQL Server};Server=".HOST.";Database=".NAME.";", "".USER."", "".PASS."");
暂时到这里,微软出新版本再接着测试,希望越来越多的人喜欢debian,远离孤儿centos(●ˇ∀ˇ●)。

