SpringBoot【 Thymeleaf、SpringBoot热部署、SpringBoot整合MyBatis、 SpringBoot参数校验】(四)-全面详解(学习总结---从入门到深化)
目录
Thymeleaf_获取域中的数据
Thymeleaf_URL写法
Thymeleaf_相关配置
SpringBoot热部署
SpringBoot整合MyBatis
SpringBoot参数校验_简单数据类型
SpringBoot参数校验_异常处理
SpringBoot参数校验_校验相关注解
SpringBoot参数校验_对象类型
Thymeleaf_获取域中的数据
thymeleaf也可以获取request,session,application域中的数 据,方法如下:
1.准备数据
request.setAttribute("req","HttpServletRequest");
session.setAttribute("ses","HttpSession");
session.getServletContext().setAttribute("app","application");
2.获取域数据
request1:
request2:

session1:
session2:

application1:
application2:
Thymeleaf_URL写法
在Thymeleaf中路径的写法为 @{路径}
百度在路径中添加参数
1. 准备数据
model.addAttribute("id","100");
model.addAttribute("name","bzcxy");
2.准备跳转后访问的Controller
@GetMapping("/show2")
@ResponseBody
public String show2(String id,String name)
{
    return id+":"+name;
}
3.在URL中添加参数
静态参数一
静态参数二
动态参数一
动态参数二
在RESTful风格路径中添加参数
1.准备跳转后访问的Controller
@GetMapping("/show3/{id}/{name}")
@ResponseBody
public String show3(@PathVariable String id,@PathVariable String name){
    return id+":"+name;
}
2.在URL中添加参数
restful格式传递参数方式Thymeleaf_相关配置
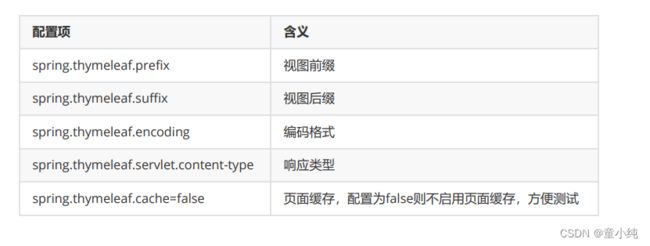
在Springboot配置文件中可以进行Thymeleaf相关配置
spring:
 thymeleaf:
   prefix: classpath:/templates/
   suffix: .html
   encoding: UTF-8
   cache: false
   servlet:
     content-type: text/html
SpringBoot热部署
热部署,就是在应用正在运行的时候升级软件,却不需要重新启动 应用。即修改完代码后不需要重启项目即可生效。在SpringBoot 中,可以使用DevTools工具实现热部署
1.添加DevTools依赖
    org.springframework.boot
    spring-bootdevtools
    true
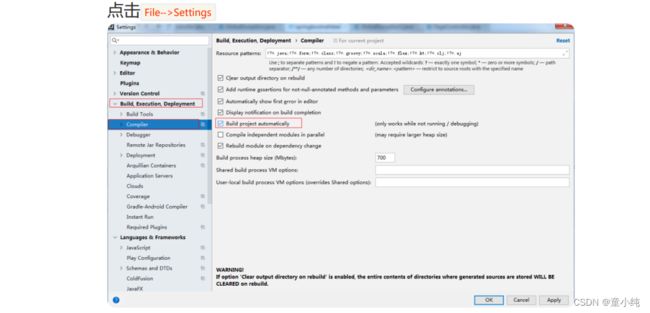
2.在idea中设置自动编译
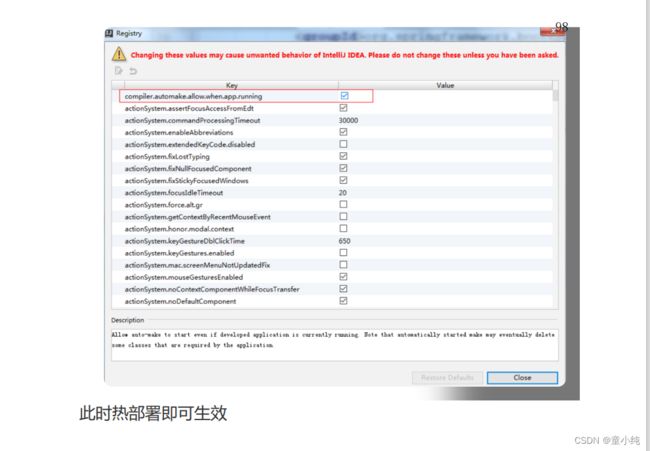
3.在Idea设置自动运行 快捷键 Ctrl+Shift+Alt+/ 后点击 Registry ,勾选 complier.automake.allow.when.app.running
SpringBoot整合MyBatis
Spring整合MyBatis时需要进行大量配置,而SpringBoot整合 MyBatis则可以简化很多配置:
1.准备数据库数据
CREATE DATABASE `student`;
USE `student`;
DROP TABLE IF EXISTS `student`;
CREATE TABLE `student` (
  `id` int(11) NOT NULL AUTO_INCREMENT,
  `name` varchar(255) DEFAULT NULL,
  `sex` varchar(10) DEFAULT NULL,
  `address` varchar(255) DEFAULT NULL,
  PRIMARY KEY (`id`)
) ENGINE=InnoDB AUTO_INCREMENT=3 DEFAULT
CHARSET=utf8;
insert  into
`student`(`id`,`name`,`sex`,`address`)
values (1,'程序员','男','北京'),(2,'北京','女','北京');
创建SpringBoot项目,添加MyBatis起步依赖和Mysql驱动依赖
    org.springframework.boot
    spring-boot-starterweb


    org.mybatis.spring.boot
    mybatis-spring-bootstarter
    2.2.1


    mysql
    mysql-connectorjava
    runtime


org.springframework.boot
    spring-boot-startertest
    test
3.编写实体类
public class Student {
    private int id;
    private String name;
    private String sex;
    private String address;

    // 省略构造方法/getter/setter/tostring
}
4.编写Mapper接口
@Mapper
public interface StudentMapper {
    List findAll();
}
5.编写Mapper映射文件
6.编写配置文件
# 数据源
spring:
 datasource:
   driver-class-name: com.mysql.cj.jdbc.Driver
   url: jdbc:mysql:///student?serverTimezone=UTC
   username: root
   password: root
   # mybatis配置
mybatis:
  # 映射文件位置
 mapper-locations: com/tong/springbootmybatis/mapper/*Mapper.xml
  # 别名
 type-aliases-package: com.tong.springbootmybatis.domain

#日志格式
logging:
 pattern:
 console: '%d{HH:mm:ss.SSS} %clr(%-5level) --- [%-15thread] %cyan(%-50logger{50}):%msg%n'
7. 编写测试类
// 测试类注解,可以在运行测试代码时加载Spring容器
@SpringBootTest
public class StudentMapperTest {
    @Autowired
    private StudentMapper studentMapper;
    @Test
    public void testFindAll(){
        List all = studentMapper.findAll();
        all.forEach(System.out::println);
   }
}
SpringBoot参数校验_简单数据类型
SpringBoot自带了validation工具可以从后端对前端传来的参数进 行校验,用法如下:
1.引入 validation 起步依赖
    org.springframework.boot
    spring-boot-startervalidation
2.编写Controller
// 该控制器开启参数校验
@Validated
@Controller
public class TestController {
    @RequestMapping("/t1")
    @ResponseBody
    // 在参数前加校验注解,该注解的意思是字符串参数不能为null
    public String t1(@NotBlank String username){
        System.out.println(username);
        return "请求成功!";
   }
}
3.访问http://localhost:8080/t1,发现当没有传来参数时,会抛 出 ConstraintViolationException 异常。
4.在校验参数的注解中添加 message 属性,可以替换异常信息。
// 该控制器开启参数校验
@Validated
@Controller
public class TestController {
    @RequestMapping("/t1")
    @ResponseBody
    // 在参数前加校验注解,该注解的意思是字符串参数不能为null
    public String t1(@NotBlank(message = "用户名不能为空") String username){
        System.out.println(username);
        return "请求成功!";
   }
}
SpringBoot参数校验_异常处理
当抛出 ConstraintViolationException 异常后,我们可以使用SpringMVC的异 常处理器,也可以使用SpringBoot自带的异常处理机制。 当程序出现了异常,SpringBoot会使用自带的 BasicErrorController 对象处 理异常。该处理器会默认跳转到/resources/templates/error.html 页面。
编写异常页面:
    错误页面


   服务器开小差了!
SpringBoot参数校验_校验相关注解
@RequestMapping("/t2")
@ResponseBody
public String t2(
        @NotBlank @Length(min = 1, max = 5) String username,
        @NotNull @Min(0) @Max(150) Integer age,
        @NotEmpty @RequestParam List address,
        @NotBlank @Email String email) {
    System.out.println(username);
    System.out.println(age);
    System.out.println(address);
    System.out.println(email);
    return "请求成功!";
}
SpringBoot参数校验_对象类型
SpringBoot也可以校验对象参数中的每个属性,
用法如下: 1 添加实体类
public class Student {
    @NotNull(message = "id不能为空")
    private Integer id;
    @NotBlank(message = "姓名不能为空")
    private String name;
    // 省略getter/setter/tostring
}
2.编写控制器
@Controller
public class TestController2 {
    @RequestMapping("/t3")
    @ResponseBody
    // 校验的对象参数前添加@Validated,并将异常信息封装到BindingResult对象中
    public String t3(@Validated Student  student,BindingResult result) {
        // 判断是否有参数异常
        if (result.hasErrors()) {
            // 所有参数异常
            List list =  result.getAllErrors();
             // 遍历参数异常,输出异常信息
            for (ObjectError err : list) {
                FieldError fieldError = (FieldError) err;

            System.out.println(fieldError.getDefaultMessage());
           }
            return "参数异常";
       }
        System.out.println(student);
        return "请求成功!";
   }
} 


