python - yaml文件操作
下载相应的第三方库
跟excel文件操作这篇文章一样,我们先下载相应的第三方库。
进入下载的python文件夹下面,找到Scripts文件夹,在文件路径那里输入cmd,
在命令提示符中输入:pip install PyYAML 然后回车,等待下载状态为sucess就代表成功了。
yaml简介
ymal:标记语言,专门用来写配置文件的语言,是python自动化中常见的数据驱动的方式
文件规则:
- 大小写敏感
- 缩进表示层级关系
- 缩进时要使用空格,不允许使用tab键
- 所进的空格数目不重要,只要同一层级的元素左侧对其即可
数据结构:
- 对象: 标识符是
:键值对的集合,又称为映射、哈希、字典 - 数组:标识符是
-一组按次序排列的值,又称为序列、列表 - 纯量:单个的,不可再分割的值。
- 字符串:可以加引号,也可以不加引号
- 布尔值:TRUE/True/true、FALSE/False/false
- 整数:1、2、3、4.。。。
- 浮点数:1.2、1.3、、、、、
- Nulll: ~
- 日期:2022-10-10 格式:yyy-MM-dd
- 时间:2022-10-01 10:10:10 格式:yyy-MM-ddTHH:mm:ss 日期与时间用T连接
yaml文件的键值之间要多加一个空格,不然语法错误, # 表示注释,这一点和python一样。
普通数据转成yaml格式
dic = {
    'name':'jone',
    'age':32,
    'score':[100,80,90],
    'isTrue':True,
    'isNumber':12.344,
    'teacher':{'python':"p",'web':'o'}
}
dic:
    name: "jone"
    age: 23
    score:
         - 100
         - 80
         - 90
    isTrue: True
    isNumber: 12.344
    teacher:
        python: "p"
        web: "o"
读取文件
1、导包 import yaml
2、打开yaml文件 with open('file path', mode = 'r', encoding='utf-8') as file:
3、读取yaml文件内容: msg = yaml.load(file)
load(stream)方法,将yaml文件转化为python数据类型,load参数是一个文件流。
注意:as后面的file只是一个别名,个人习惯喜欢用file,也可以用f或者其他自己喜欢的变量名都可。
# 读取data1.yaml文件中的内容
import yaml
with open(r'D:\WorkSpace\function_folder\data1.yaml', mode='r',encoding='utf-8') as file:
    msg = yaml.safe_load(file)
    print("yaml文件中的内容:",msg)
运行结果:
yaml文件中的内容: {'dic': {'name': 'jone', 'age': 23, 'score': [100, 80, 90], 'isTrue': True, 'isNumber': 12.344, 'teacher': {'python': 'p', 'web': 'o'}}}
写入文件
1、导包 import yaml
2、打开yaml文件 with open('file path', mode = 'a', encoding = 'utf-8) af file:
3、将准备的数据写入yaml文件
yaml.dump(数据,文件流,allow_unicode=True)
dump(data,file path,allow_unicode=True) 将pythoon对象转化为yaml文件
- data:写入的数据
- stream:文件流
- allow_unicode = True 如果添加的数据包含中文,避免写入的数据出现乱码
dic11 = {
'dic1':{
    'name1':'jone1',
    'age1':32,
    'score1':[100,80,90,70,60,50,40,30,20],
    'isTrue':True,
    'isNumber':12.344,
    'teacher':{'python':"p",'web':'o'}
}
}
import yaml
with open(r'D:\WorkSpace\function_folder\data1.yaml', mode='a',encoding='utf-8') as file:
    yaml.dump(dic11,file,allow_unicode=True)
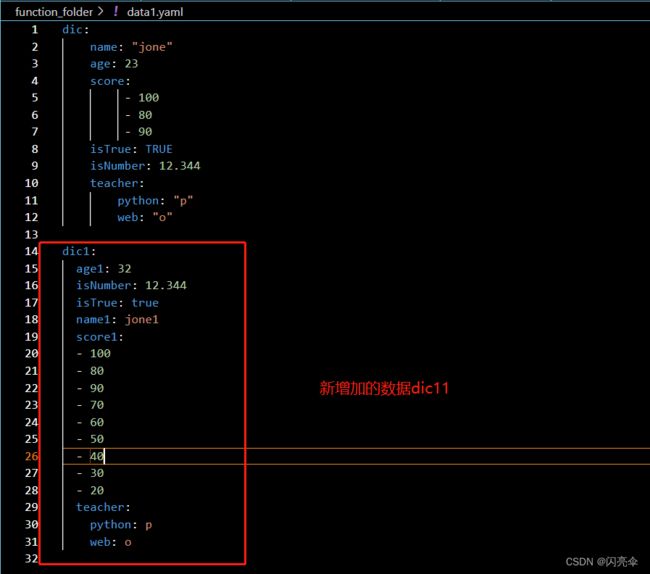
细致的同学可以发现,写入到yaml文件中的数据跟dic1的数据顺序不对照,那是因为字典本身就是无序的。有一点需要注意,我们写入文件的方式以追加的方式mode = 'a'写入的,所以yaml文件中鼠标的光标要放在最后面,否则就会导致,光标在哪里,追加的内容就从那里开始。
