【WebSocket】多节点下WebSocket消息收发
Websocket 多节点情况下消息收发
单节点
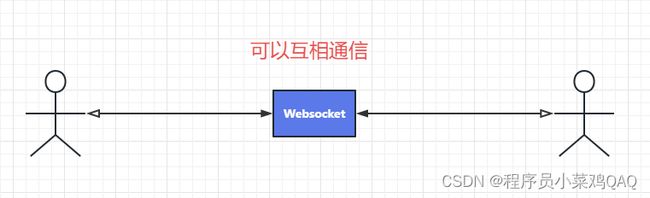
问题抛出
本地启动 两个websocket 端,通过Nginx代理。
如下所示:
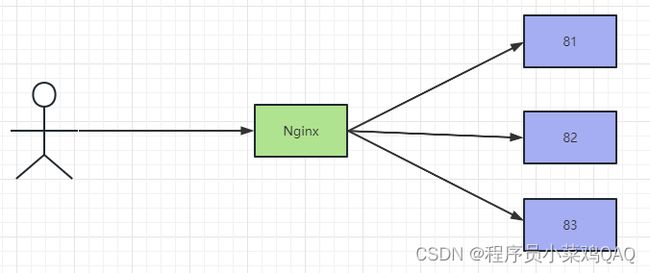
问题
如果两个客户端通过NG代理的 分别连接在不同的节点上,如下所示:
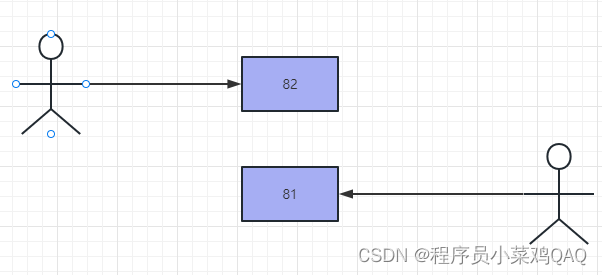
当A给82发送消息给B时,由于B连接在81上,82上无法找到B,故消息无法推送给B ,因为两个客户端,不在同一个节点上。
演示一下子
使用IDEA启动两个客户端 分别为8081 和 8082。
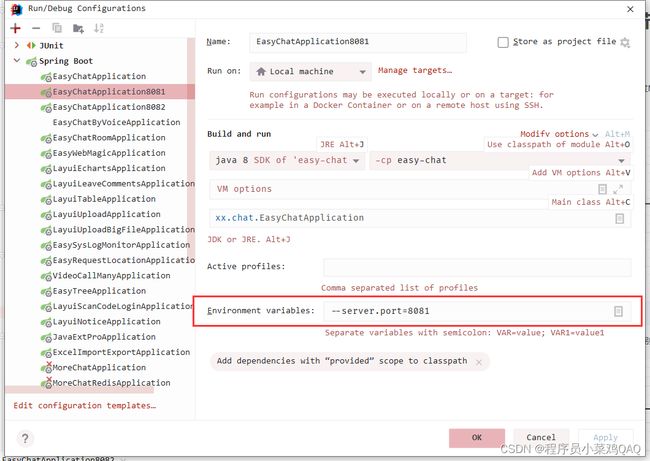
在这里指定启动的端口哦。
启动完成后 通过NG代理,配置如下所示:
  upstream chat {
    	server localhost:8081;
    	server localhost:8082;
    }

  ## server 里面的配置哦
  location ~ /chat/ {
            proxy_pass  http://chat;
            proxy_http_version 1.1;
       	 	proxy_set_header Upgrade $http_upgrade;
        	proxy_set_header Connection "upgrade";
        }
NG 端口为 1000
故:访问地址为-> localhost:1000/chat/toPage
注意: Nginx代理Websocket时,需要将协议升级哦,不然会导致Websocket连接不上。

问题来了
消息接收不到!Oh GG。

解决方案
基于Redis的消息订阅与发布
即:客户端订阅同一个主题,发送消息的时候,将消息发送到对应的主题。
废话不多说,那就直接贴代码吧,这里只贴出核心代码哦
核心依赖
<dependency>
    <groupId>org.springframework.bootgroupId>
    <artifactId>spring-boot-starter-data-redisartifactId>
dependency>
Redis相关代码
消息订阅配置类
@Configuration
public class RedisSubscriberConfig {

    /**
     * 消息监听适配器,注入接受消息方法
     *
     * @param receiver
     * @return
     */
    @Bean
    public MessageListenerAdapter messageListenerAdapter(ChatMessageListener receiver) {
        return new MessageListenerAdapter(receiver);
    }

    /**
     * 创建消息监听容器
     *
     * @param redisConnectionFactory
     * @param messageListenerAdapter
     * @return
     */
    @Bean
    public RedisMessageListenerContainer getRedisMessageListenerContainer(RedisConnectionFactory redisConnectionFactory, MessageListenerAdapter messageListenerAdapter) {
        RedisMessageListenerContainer redisMessageListenerContainer = new RedisMessageListenerContainer();
        redisMessageListenerContainer.setConnectionFactory(redisConnectionFactory);
        redisMessageListenerContainer.addMessageListener(messageListenerAdapter, new PatternTopic(ConstantUtils.TOPIC_MSG));
        return redisMessageListenerContainer;
    }

}
消息监听器
@Slf4j
@Component
public class ChatMessageListener implements MessageListener {

    @Resource
    private StringRedisTemplate stringRedisTemplate;

    @Override
    public void onMessage(Message message, byte[] pattern) {
        RedisSerializer<String> valueSerializer = stringRedisTemplate.getStringSerializer();
        String value = valueSerializer.deserialize(message.getBody());
        log.info("监听消息--- {}", value);
        ChatMsg dto = null;
        if (StringUtils.isNotBlank(value)) {
            try {
                dto = JacksonUtil.json2pojo(value, ChatMsg.class);
            } catch (Exception e) {
                e.printStackTrace();
                log.error("消息格式转换异常:{}", e.toString());
            }
            WebSocketServer.oneToOne(dto.getReceiver(), dto);
        }
    }
}
简单的工具类
@Slf4j
@Component
public class RedisUtil {

    @Autowired
    private StringRedisTemplate stringRedisTemplate;

    /**
     * 发布消息
     *
     * @param key
     */
    public void publish(String key, String value) {
        stringRedisTemplate.convertAndSend(key, value);
    }
}
WebSocket 相关代码
解码器
public class DecoderUtil implements Decoder.Text<ChatMsg> {

    @Override
    public ChatMsg decode(String jsonMessage) throws DecodeException {
        return JSON.parseObject(jsonMessage, ChatMsg.class);

    }

    @Override
    public boolean willDecode(String jsonMessage) {
       /* try {
            // Check if incoming message is valid JSON
           // JSON.createReader(new StringReader(jsonMessage)).readObject();
            //检查是否是合法的json字符串
            final ObjectMapper mapper = new ObjectMapper();
            mapper.readTree(jsonMessage);
            return true;
        } catch (Exception e) {
            return false;
        }*/
        return true;
    }

    @Override
    public void init(EndpointConfig ec) {
        //System.out.println("MessageDecoder -init method called");
    }

    @Override
    public void destroy() {
        //System.out.println("MessageDecoder - destroy method called");
    }

}
编码器
/**
 * @Description: 编码器
 * @Date: 10:14 2019/10/31
 */
public class EncoderUtil implements Encoder.Text<ChatMsg> {

    @Override
    public String encode(ChatMsg message) throws EncodeException {
        return JSONObject.toJSONString(message);

    }

    @Override
    public void init(EndpointConfig ec) {
        //System.out.println("MessageEncoder - init method called");
    }


    @Override
    public void destroy() {
        //System.out.println("MessageEncoder - destroy method called");
    }

}
WebSocketServer
@ServerEndpoint(value = "/chat/{userName}", encoders = {EncoderUtil.class}, decoders = {DecoderUtil.class})
@Component
@Slf4j
public class WebSocketServer {

    /**
     * 静态变量,用来记录当前在线连接数。应该把它设计成线程安全的。
     */
    private static int onlineCount = 0;
    /**
     * concurrent包的线程安全Set,用来存放每个客户端对应的MyWebSocket对象。
     */
    private static ConcurrentHashMap<String, WebSocketServer> webSocketMap = new ConcurrentHashMap<>();
    /**
     * 与某个客户端的连接会话,需要通过它来给客户端发送数据
     */
    private Session session;

    /**
     * 不能使用@AutoWire原因:发现注入不了redis,redis注入失败 可能是因为实例化的先后顺序吧,WebSocket先实例化了,  但是@Autowire是会触发getBean操作
     * 因为@ServerEndpoint不支持注入,所以使用SpringUtils获取IOC实例
     */
    private RedisUtil redisUtil = SpringUtils.getBean(RedisUtil.class);

    /**
     * 接收userId
     */
    private String userName = "";

    /**
     * @Description: 连接建立成功调用的方法,成功建立之后,将用户的userName 存储到redis
     * @params: [session, userId]
     * @return: void
     * @Author: wangxianlin
     * @Date: 2020/5/9 9:13 PM
     */
    @OnOpen
    public void onOpen(Session session, @PathParam("userName") String userName) {
        this.session = session;
        this.userName = userName;
        webSocketMap.put(userName, this);
        addOnlineCount();
        log.info("用户连接:" + userName + ",当前在线人数为:" + getOnlineCount());
    }

    /**
     * @Description: 连接关闭调用的方法
     * @params: []
     * @return: void
     * @Author: wangxianlin
     * @Date: 2020/5/9 9:13 PM
     */
    @OnClose
    public void onClose() {
        if (webSocketMap.containsKey(userName)) {
            webSocketMap.remove(userName);
            //从set中删除
            subOnlineCount();
        }
        log.info("用户退出:" + userName + ",当前在线人数为:" + getOnlineCount());
    }


    /**
     * @Description: 收到客户端消息后调用的方法, 调用API接口 发送消息到
     * @params: [message, session]
     * @return: void
     * @Author: wangxianlin
     * @Date: 2020/5/9 9:13 PM
     */
    @OnMessage
    public void onMessage(ChatMsg chatMsg) {
        log.info("接收到客户端发送的消息:【{}】", chatMsg.toString());
        String receiver = chatMsg.getReceiver();
        if (StringUtils.isEmpty(receiver)) {
            log.info("接收人为空,无法推送消息");
        } else {
            chatMsg.setSender(userName);
            redisUtil.publish(ConstantUtils.TOPIC_MSG, JSON.toJSONString(chatMsg));
        }
    }

    /**
     * @param session
     * @param error
     */
    @OnError
    public void onError(Session session, Throwable error) {
        log.error("用户错误:" + this.userName + ",原因:" + error.getMessage());
        error.printStackTrace();
    }

    /**
     * 服务器主动推送
     */
    public static void oneToOne(String toUser, ChatMsg message) {
        WebSocketServer webSocketServer = webSocketMap.get(toUser);
        if (webSocketServer == null) {
            log.error("当前节点找不到此用户哦:[{}]", toUser);
            return;
        }
        Session session = webSocketServer.session;
        if (session != null && session.isOpen()) {
            try {
                // 为了避免并发情况下造成异常
                synchronized (session) {
                    session.getBasicRemote().sendObject(message);
                }
            } catch (IOException e) {
                log.error("websocket 消息发送异常");
            } catch (EncodeException e) {
                e.printStackTrace();
            }
        } else {
            log.error("当前用户[{}]可能不在线,无法推送数据", toUser);
        }
    }


    /**
     * @Description: 获取在线人数
     * @params: []
     * @return: int
     * @Author: wangxianlin
     * @Date: 2020/5/9 9:09 PM
     */
    public static synchronized int getOnlineCount() {
        return onlineCount;
    }

    /**
     * @Description: 在线人数+1
     * @params: []
     * @return: void
     * @Author: wangxianlin
     * @Date: 2020/5/9 9:09 PM
     */
    public static synchronized void addOnlineCount() {
        WebSocketServer.onlineCount++;
    }

    /**
     * @Description: 在线人数-1
     * @params: []
     * @return: void
     * @Author: wangxianlin
     * @Date: 2020/5/9 9:09 PM
     */
    public static synchronized void subOnlineCount() {
        WebSocketServer.onlineCount--;
    }

}
配置文件
server:
port: 8082

spring:
  thymeleaf:
    #模板的模式,支持 HTML, XML TEXT JAVASCRIPT
    mode: HTML5
    #编码 可不用配置
    encoding: UTF-8
    #内容类别,可不用配置
    content-type: text/html
    #开发配置为false,避免修改模板还要重启服务器
    cache: false
    #    #配置模板路径,默认是templates,可以不用配置
    prefix: classpath:/templates
    suffix: .html

  #Redis配置
  redis:
    host: localhost
    port: 6379
    password: 123456
    timeout: 5000
    database: 4
前端代码
包含HTML 片段 + JS Code
DOCTYPE html>
<html lang="en" xmlns:th="http://www.w3.org/1999/xhtml">
<head>
<meta charset="UTF-8">
<title>Redis 消息订阅与发布title>
<link rel="stylesheet" type="text/css" th:href="@{/layui/css/layui.css}">
<link rel="shortcut icon" th:href="@{/ico/favicon.ico}">
<link rel="stylesheet" type="text/css" th:href="@{/css/client.css}">
head>
<body>
<div class="layui-container">
<fieldset class="layui-elem-field layui-field-title" style="margin-top: 25px;">
<legend style="margin-left: 40%;">基于Redis消息订阅与发布聊天界面legend>
fieldset>
<div class="layui-row layui-col-space5">
<div class="layui-col-md4">
<blockquote class="layui-elem-quote">用户信息blockquote>
<form class="layui-form">
<div class="layui-form-item">
<div class="layui-inline">
<label class="layui-form-label">用户Idlabel>
<div class="layui-input-inline">
<input id="userId" autocomplete="off" class="layui-input">
div>
div>
<div class="layui-inline">
<label class="layui-form-label">接收人Idlabel>
<div class="layui-input-inline">
<input id="toUserId" autocomplete="off" class="layui-input">
div>
div>
div>
<div class="layui-form-item">
<div class="layui-input-block">
<button class="layui-btn" onclick="start()" type="button">建立连接button>
div>
div>
form>
div>
<div class="layui-col-md8">
<blockquote class="layui-elem-quote">接收信息区blockquote>
<fieldset class="layui-elem-field layui-field-title">
<legend>消息记录legend>
fieldset>
<div class="layui-tab layui-tab-card" style="height: 200px;overflow: auto">
<div id="msgDiv">
div>
div>
div>
div>
<div class="layui-row">
<div class="layui-col-xs12">
<div class="layui-form-item layui-form-text">
<label class="layui-form-label">消息label>
<div class="layui-input-block">
<textarea placeholder="请输入内容" class="layui-textarea" id="msg">textarea>
div>
div>
<div class="layui-form-item">
<div class="layui-input-block">
<button type="button" class="layui-btn layui-btn-normal" onclick="sendMsg()">发送消息
button>
div>
div>
div>
div>
div>
<script type="application/javascript" th:src="@{/jquery-2.1.4.js}">script>
<script type="application/javascript" th:src="@{/layui/layui.js}">script>
<script>
var ws = null;
var layer = null;
layui.use(['layer'], function () {
$(function () {
layer = layui.layer;
});
});
function start() {
if (typeof (WebSocket) == "undefined") {
layer.msg('您的浏览器不支持WebSocket', {icon: 5})
return false;
}
var userId = $("#userId").val();
if (userId == '' || userId == null) {
layer.msg('请输入您的用户Id', {icon: 5})
return false;
}
//实现化WebSocket对象,指定要连接的服务器地址与端口 建立连接
var socketUrl = "" + window.location.protocol + "//" + window.location.host + "/chat/" + userId;
socketUrl = socketUrl.replace("https", "ws").replace("http", "ws");
if (ws != null) {
ws.close();
ws = null;
}
ws = new WebSocket(socketUrl);
//打开事件
ws.onopen = function () {
layer.msg('已建立WebSocket连接', {icon: 1})
};
//关闭事件
ws.onclose = function () {
layer.msg('websocket已关闭', {icon: 5})
};
//发生了错误事件
ws.onerror = function () {
layer.msg('websocket发生了错误', {icon: 5})
};
/**
* 接收消息
* @param msg
*/
ws.onmessage = function (msg) {
msg = JSON.parse(msg.data)
$("#msgDiv").append('' +
'' +
'  ' +
' ' +
'
' +
' ' +
' 用户名:'
+ msg.sender + ''
+ msg.msg + '' +
' ' +
'');
scroolBottom();
};
}
function sendMsg() {
if (!ws) {
layer.msg('请先建立连接', {icon: 5});
return false;
}
var msg = $("#msg").val();
if (msg == '' || msg == null) {
layer.msg('消息内容不能为空', {icon: 5});
return;
}
var receiver = $("#toUserId").val();
if (receiver == '' || receiver == null) {
layer.msg('请输入接收人', {icon: 5});
return;
}
var msgObj = {
"receiver": receiver,
"msg": msg
};
try {
if (ws.readyState == 1) {
ws.send(JSON.stringify(msgObj));
$("#msgDiv").append('' +
'' +
'  ' +
' ' +
'
' +
' ' +
' 用户名:'
+ $("#userId").val() + ''
+ msgObj.msg + '' +
' ' +
'');
scroolBottom()
$("#msg").val('');
} else {
layer.msg('请检查连接是否正常?', {icon: 5});
}
} catch (e) {
layer.msg('消息发送失败...', {icon: 5})
}
}
/**
* 滚动至底部
*/
function scroolBottom(){
var $div = document.getElementById("msgDiv");
$div.scrollTop = $div.scrollHeight;
}
script>
body>
html>
MQ 消息中间件
基于RabbitMQ
首先,你需要了解一下rabbitmq 相关的一些知识。
我们这里采用的是基于rabbitmq的扇形分发器,消息生产者发送到指定的队列,消息消费者监听此队列的消息,
常量
public class ConstantUtils {
    /**交换机名称*/
    public static final String FANOUT_EXCHANGE = "fanout_exchange";
    /**队列名称*/
    public static final String FANOUT_QUEUE_MSG = "fanout.msg";
}
RabiitMQ 相关代码
@Configuration
public class FanoutRabbitConfig {

    /**
     *  创建三个队列 :fanout.msg
     *  将三个队列都绑定在交换机 fanoutExchange 上
     *  因为是扇型交换机, 路由键无需配置,配置也不起作用
     */
    @Bean
    public Queue queueMsg() {
        return new Queue(ConstantUtils.FANOUT_QUEUE_MSG);
    }

    @Bean
    FanoutExchange fanoutExchange() {
        return new FanoutExchange(ConstantUtils.FANOUT_EXCHANGE);
    }

    @Bean
    Binding bindingExchangeA() {
        return BindingBuilder.bind(queueMsg()).to(fanoutExchange());
    }
}
@Slf4j
@Component
@RabbitListener(queues = ConstantUtils.FANOUT_QUEUE_MSG)
public class FanoutReceiverMsg {
    @RabbitHandler
    public void process(String string) throws IOException {
        if (string != null) {
            log.info("MQ 接收到消息:{}",string);
            ChatMsg chatMsg = JSON.parseObject(string, ChatMsg.class);
            WebSocketServer.oneToOne(chatMsg.getReceiver(), chatMsg);
        }
    }
}
@Slf4j
@Configuration
public class RabbitConfig {

    /**
     * 发送消息 序列化
     * @param connectionFactory
     * @return
     */
    @Bean
    public RabbitTemplate rabbitTemplate(final ConnectionFactory connectionFactory) {
        final RabbitTemplate rabbitTemplate = new RabbitTemplate(connectionFactory);
        rabbitTemplate.setMessageConverter(messageConverter());
        return rabbitTemplate;
    }

    @Bean
    public RabbitListenerContainerFactory<?> rabbitListenerContainerFactory(ConnectionFactory connectionFactory){
        SimpleRabbitListenerContainerFactory factory = new SimpleRabbitListenerContainerFactory();
        factory.setConnectionFactory(connectionFactory);
        factory.setMessageConverter(new Jackson2JsonMessageConverter());
        return factory;
    }

    @Bean
    public MessageConverter messageConverter(){
        return new Jackson2JsonMessageConverter();
    }
}
WebSocket 相关代码
这里只需要将上一部分 Websocket 代码修改下就好了。
修改的地方如下所示:
/**
 * @Description: 收到客户端消息后调用的方法,调用API接口 发送消息到
 * @params: [message, session]
 * @return: void
 * @Date: 2020/5/9 9:13 PM
 */
@OnMessage
public void onMessage(ChatMsg chatMsg) {
    log.info("接收到客户端发送的消息:【{}】", chatMsg.toString());
    String receiver = chatMsg.getReceiver();
    if (org.thymeleaf.util.StringUtils.isEmpty(receiver)) {
        log.info("接收人为空,无法推送消息");
    } else {
        chatMsg.setSender(userName);
        chatMsg.setCreateTime(new Date());
        rabbitTemplate.convertAndSend(ConstantUtils.FANOUT_EXCHANGE, null, JSONObject.toJSONString(chatMsg));
    }
}
前端代码不需要修改!
然后自己测试就OK了
基于RocketMQ
后续在补充…
最后
大家如果觉得对你有帮助的话,请点个赞呗。