Springboot源码解析之启动流程-01
highlight: a11y-dark
不管是工作还是面试 深入了解SpringBoot源码 都将给你带来非常实实在在的收获 so 今天我们来揭开SpringBoot的第一个面纱(run方法)。
1.初始化.搭建阅读环境 springboot版本为 2.1.x
github fork或者下载: https://github.com/spring-projects/spring-boot/tree/v2.1.0.RELEASE
#### 下载后 idea打开 由于springboo默认没将其写到父pom的modles中 所以我们将spring-boot-samples导入,执行 SampleTestApplication执行run方法(这里我选的是这个启动类)。
启动项目
报错 Kotlin: Language version 1.1 is no longer supported; please, use version 1.2 or greater.
解决方式
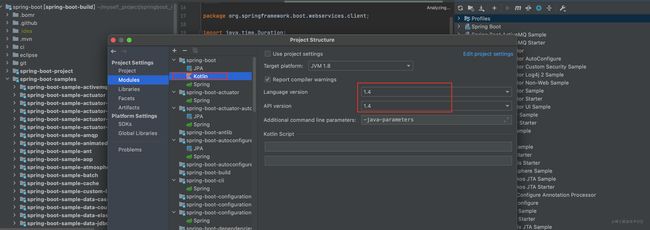
可能和idea版本有关系 我报了这个错 然后勾选idea这个选项就好了
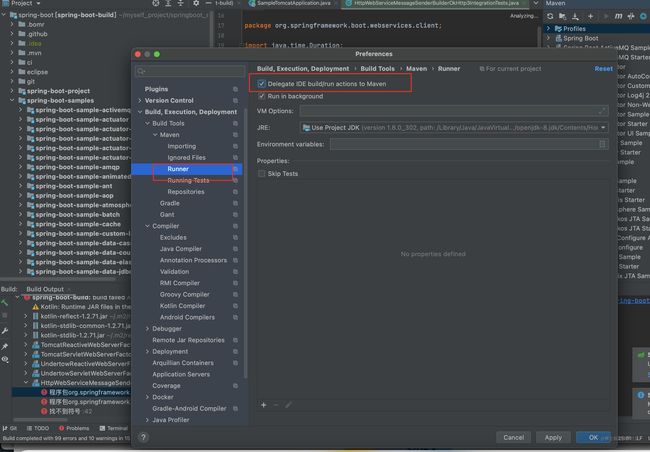
- 注意其会有代码格式检查 需要关掉 在properties标签中加入 true
- 或者格式化下代码 mvn spring-javaformat:apply
2. SpringBoot main方法执行过程详解
注意:(由于一边调试一边写注释的话 debug会错位 造成调试不便 所以我在另一个项目中调试的源码版本都一样)
1. 启动run();方法
```java @SpringBootApplication public class SampleTestApplication {
// NOTE: this application will intentionally not start without MySQL, the test will // still run. // 启动入口 public static void main(String[] args) { SpringApplication.run(SampleTestApplication.class, args); }
} ```
2. 进入SpringApplication的构造方法
主要包含两个 1.上下文初始化对象 2.监听器对象
```java /** * 创建一个新的 {@link SpringApplication} 实例。该应用程序上下文将从指定的primarySources加载 bean * (有关详细信息,请参阅 {@link SpringApplication class-level} 文档。可以在调用之前自定义实例 * {@link #run(String...)}. * @param resourceLoader the resource loader to use * @param primarySources the primary bean sources * @see #run(Class, String[]) * @see #setSources(Set) * * -- 在该构造中 将创建上下文对象 * */
@SuppressWarnings({ "unchecked", "rawtypes" }) public SpringApplication(ResourceLoader resourceLoader, Class>... primarySources) { //初始化资源加载器,默认为null this.resourceLoader = resourceLoader; //校验 Assert.notNull(primarySources, "PrimarySources must not be null"); //初始化 primarySources 类并去重 一般我们就是一个即启动类 this.primarySources = new LinkedHashSet<>(Arrays.asList(primarySources)); //推断当前 WEB 应用类型,一共有三种:NONE,SERVLET,REACTIVE 默认SERVLET this.webApplicationType = WebApplicationType.deduceFromClasspath();
// <2.1> 设置应用上下文初始化器,从META-INF/spring.factories读取 ApplicationContextInitializer类对应的实例名称集合并去重(一共6个) 随后 利用反射工具进行对象的创建
setInitializers((Collection) getSpringFactoriesInstances(ApplicationContextInitializer.class));
// <2.2> 设置监听器,从META-INF/spring.factories 读取ApplicationListener类的实例名称集合并去重。然后反射创建对象 其实和2.1过程很相似 唯一区别是 传入的参数 不同 setListeners((Collection) getSpringFactoriesInstances(ApplicationListener.class));
//推断主入口应用类,通过当前调用栈,获取Main方法所在类,并赋值给mainApplicationClass this.mainApplicationClass = deduceMainApplicationClass(); } ```
## 紧接着我们看下 <2.1> 处做了什么


可以看到其用的系统类加载器 关于类加载器 可聊得就太多了 这里不做展开了


 -
- 接着使用 private static Map
```java private static Map > loadSpringFactories(@Nullable ClassLoader classLoader) { //根据类加载器先看看有没有 有直接返回 其实大部分情况都有 只有第一次调用该方法 也就是 构造SpringApplication上下文时候 需要加载当前包以及子包下的spring.factories文件 MultiValueMap result = (MultiValueMap)cache.get(classLoader); if (result != null) { return result; } else { try { //获取当前类加载器下的所有META-INF/spring.factories文件 Enumeration urls = classLoader != null ? classLoader.getResources("META-INF/spring.factories") : ClassLoader.getSystemResources("META-INF/spring.factories"); LinkedMultiValueMap result = new LinkedMultiValueMap(); //遍历properties 取出对饮的value 文件 while(urls.hasMoreElements()) { URL url = (URL)urls.nextElement(); //这里的url我理解就是 文spring.factoies文件的全路径 事实也是这样的 UrlResource resource = new UrlResource(url); //根据文件的全路径 加载文件中的数据 Properties properties = PropertiesLoaderUtils.loadProperties(resource);
Iterator var6 = properties.entrySet().iterator();
                //遍历某个spring.factory.properties文件
                while(var6.hasNext()) {
                    Entry entry = (Entry)var6.next();
                    //获取key并去空格 key的形式是啥? 比如像这样: org.springframework.context.ApplicationContextInitializer
                    String factoryClassName = ((String)entry.getKey()).trim();
                    //value就是其对饮的值啦 可能会有很多 具体看某个 spring.factories文件就知道了 commaDelimitedListToStringArray 该方法会将value切分 使用 ,号
                    String[] var9 = StringUtils.commaDelimitedListToStringArray((String)entry.getValue());
                    int var10 = var9.length;
                    //遍历value数组 填充进LinkedMultiValueMap中
                    for(int var11 = 0; var11 < var10; ++var11) {
                        String factoryName = var9[var11];
                        result.add(factoryClassName, factoryName.trim());
                    }
                }
            }
            //将类加载器下的所有spring.factores文件都加载到后 填充进 cache中
            //cache是个 ConcurrentReferenceHashMap key是 ClassLoader value是 MultiValueMap 第一个string是spring.factories的某个key value是某个值(逗号切分后的)
            cache.put(classLoader, result);//看看人家多重注性能 哈哈
            return result;
        } catch (IOException var13) {
            throw new IllegalArgumentException("Unable to load factories from location [META-INF/spring.factories]", var13);
        }
    }
}
```
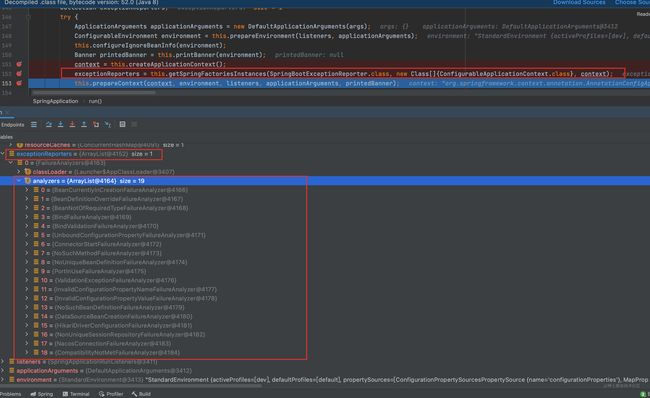
搞几张截图具体看看
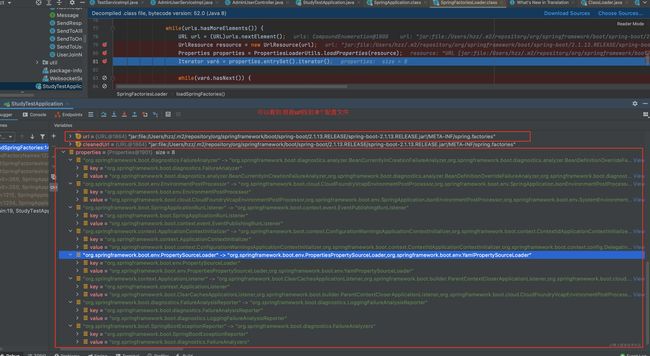
可以看到 根据 org.springframework.context.ApplicationContextInitializer这个key找到6个对应的值
注意 spring会把当前主类所在的包以及所有子包下的spring.factories都扫描出来 并存放到 cache中 这6大对象是在哪配置的呢?
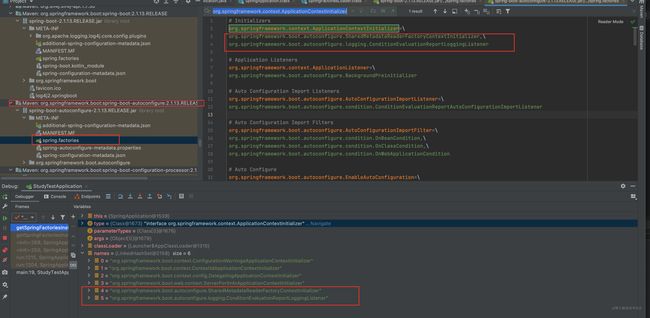
根据上边两张图片 可以看到其配置的位置加载完所有的spring.factories后 调用 createSpringFactoriesInstances方法 使用反射创建对象 这步简单没啥好说的
最后 给其排个序 注意 这里的排序是根据类注解@Order上的值来排的 不要错误以为其可以对springbean的加载顺序有影响

<2.2> 基本和<2.1>一样 只不过<2.2>是初始化的监听器组件 所以这里不在过多描述
3. SpringApplication初始化完毕后 进入其run方法
这个方法很长也很重要
```java public ConfigurableApplicationContext run(String... args) { StopWatch stopWatch = new StopWatch(); stopWatch.start(); ConfigurableApplicationContext context = null; //1. 初始化应用上下文和异常报告集合 在构造SpringApplicaiton时候已经创建过对象了 Collection exceptionReporters = new ArrayList(); //2. 设置系统属性“java.awt.headless”的值,默认为true,用于运行headless服务器,进行简单的图像处理,多用于在缺少显示屏、键盘或者鼠标时的系统配置 this.configureHeadlessProperty();
/**
 * 从spring.factories配置文件中加载到EventPublishingRunListener对象并赋值给SpringApplicationRunListeners
 * 其作用是准备运行时监听器 用于监听运行时候一切的事件
 *
 * 在spring-boot的spring.factories文件中
 *
 * # Run Listeners
 * org.springframework.boot.SpringApplicationRunListener=\
 * org.springframework.boot.context.event.EventPublishingRunListener
 */
//3. 创建所有springboot运行监听器并发布应用启动事件
SpringApplicationRunListeners listeners = this.getRunListeners(args);
//启动监听器
listeners.starting();

Collection exceptionReporters;
try {
    //初始化默认应用参数类
    ApplicationArguments applicationArguments = new DefaultApplicationArguments(args);
    //4. 根据监听器(SpringApplicationRunListeners)和应用参数(命令行 ,application.properties文件 等)来准备spring环境
    //项目中可以使用@Autowired private Environment environment;来获取一些你需要的属性 很方便哦
    ConfigurableEnvironment environment = this.prepareEnvironment(listeners, applicationArguments);
    //配置要忽略的bean
    this.configureIgnoreBeanInfo(environment);
    //5. 打印bannner
    Banner printedBanner = this.printBanner(environment);
    //6. 根据不同的类型创建不同的 ApplicationContext 类型有三种 SERVLET,REACTIVE 普通web
    context = this.createApplicationContext();
    //7. 获取异常报告器 通过getSpringFactoriesInstances方法 用来报告启动时的错误 ps : 这个方法用的地方这的是太多了
    exceptionReporters = this.getSpringFactoriesInstances(SpringBootExceptionReporter.class, new Class[]{ConfigurableApplicationContext.class}, context);
    //8. 准备应用上下文 调用各个(8个在SpringApplication时候初始化的你忘了吗)ApplicationContextInitializer的initialize方法 和触发SpringApplicationRunListeners的contextPrepared及contextLoaded方法等
    this.prepareContext(context, environment, listeners, applicationArguments, printedBanner);
    //9. 刷新应用上下文 这一步 灰常重要 这里关于bean的东西不在展开 我将写一篇文章专门解释bean相关的内容
    this.refreshContext(context);
    //10. 应用上下文后置处理,做一些扩展功能 具体怎么扩展我会写个文章专门介绍Springboot的扩展点以及方式
    this.afterRefresh(context, applicationArguments);
    //11.停止stopWatch 并打印耗时日志
    stopWatch.stop();
    if (this.logStartupInfo) {
        (new StartupInfoLogger(this.mainApplicationClass)).logStarted(this.getApplicationLog(), stopWatch);
    }
    //12. 发布应用上下文启动完成事件:触发所有SpringapplicationRunListener监听器的started事件方法
    listeners.started(context);
    //13. 执行所有Runner执行器:执行ApplicationRunner和CommandLineRunner
    this.callRunners(context, applicationArguments);
} catch (Throwable var10) {
    this.handleRunFailure(context, var10, exceptionReporters, listeners);
    throw new IllegalStateException(var10);
}

try {
    //14. 发布应用上下文就绪事件:触发SpringapplicationRunnListener 监听器的running事件方法
    listeners.running(context);
    //15. 返回应用上下文
    return context;
} catch (Throwable var9) {
    this.handleRunFailure(context, var9, exceptionReporters, (SpringApplicationRunListeners)null);
    throw new IllegalStateException(var9);
}
} ```
4.下边详细分析以上步骤
1、初始化应用上下文和异常报告集合 在构造SpringApplicaiton时候已经创建过对象了 java ConfigurableApplicationContext context = null; Collecton 2、设置系统属性java.awt.headless的值: java /* java.awt.headless模式是在缺少显示屏、键盘或者鼠标的系统配置 当配置了如下属性之后,应用程序可以执行如下操作: 1、创建轻量级组件 2、收集关于可用的字体、字体指标和字体设置的信息 3、设置颜色来渲染准备图片 4、创造和获取图像,为渲染准备图片 5、使用java.awt.PrintJob,java.awt.print.*和javax.print.*类里的方法进行打印 */ private void configureHeadlessProperty() { System.setProperty(SYSTEM_PROPERTY_JAVA_AWT_HEADLESS, System.getProperty(SYSTEM_PROPERTY_JAVA_AWT_HEADLESS, Boolean.toString(this.headless))); }
3、创建所有spring运行监听器并发布应用启动事件 ```java //创建spring监听器 private SpringApplicationRunListeners getRunListeners(String[] args) { Class>[] types = new Class>[] { SpringApplication.class, String[].class }; //new创建监听器 SpringApplicationRunListeners return new SpringApplicationRunListeners(logger, //又是调用这个方法 去获取监听器(SpringApplicationRunListener)相关的对象 getSpringFactoriesInstances(SpringApplicationRunListener.class, types, this, args)); } //构造方法 初始化log以及用 getSpringFactoriesInstances方法获取到的对象赋值给 listeners变量
SpringApplicationRunListeners(Log log, Collection extends SpringApplicationRunListener> listeners) { this.log = log; this.listeners = new ArrayList<>(listeners); } //循环遍历获取监听器 并挨个启动 void starting() { for (SpringApplicationRunListener listener : this.listeners) { listener.starting(); } }
//启动监听器 @Override public void starting() { //这里创建ApplicationStartingEvent对象 并将其设置为广播类型 this.initialMulticaster.multicastEvent(new ApplicationStartingEvent(this.application, this.args)); }
//applicationStartingEvent是springboot框架最早执行的监听器,在该监听器执行started方法时,会继续发布事件,主要是基于spring的事件机制 @Override public void multicastEvent(final ApplicationEvent event, @Nullable ResolvableType eventType) { ResolvableType type = (eventType != null ? eventType : resolveDefaultEventType(event)); //获取线程池,如果为空则同步处理。这里线程池为空,还未初始化 Executor executor = getTaskExecutor(); for (ApplicationListener> listener : getApplicationListeners(event, type)) { if (executor != null) { //异步发送事件 executor.execute(() -> invokeListener(listener, event)); } else { //同步发送事件 invokeListener(listener, event); } } } ```
4、 根据监听器(SpringApplicationRunListeners)和应用参数(命令行 ,application.properties文件 等)来准备spring环境 java ConfigurableEnvironment environment = prepareEnvironment(listeners, applicationArguments); //详细环境的准备 private ConfigurableEnvironment prepareEnvironment(SpringApplicationRunListeners listeners, ApplicationArguments applicationArguments) { // 获取或者创建应用环境 ConfigurableEnvironment environment = getOrCreateEnvironment(); // 配置应用环境,配置propertySource和activeProfiles configureEnvironment(environment, applicationArguments.getSourceArgs()); //listeners环境准备,广播ApplicationEnvironmentPreparedEvent ConfigurationPropertySources.attach(environment); listeners.environmentPrepared(environment); //将环境绑定到当前应用程序 bindToSpringApplication(environment); if (!this.isCustomEnvironment) { environment = new EnvironmentConverter(getClassLoader()).convertEnvironmentIfNecessary(environment, deduceEnvironmentClass()); } ConfigurationPropertySources.attach(environment); return environment; } // 获取或者创建应用环境,根据应用程序的类型可以分为servlet环境、标准环境(特殊的非web环境)和响应式环境 private ConfigurableEnvironment getOrCreateEnvironment() { //存在则直接返回 if (this.environment != null) { return this.environment; } //根据webApplicationType创建对应的Environment switch (this.webApplicationType) { case SERVLET: return new StandardServletEnvironment(); case REACTIVE: return new StandardReactiveWebEnvironment(); default: return new StandardEnvironment(); } } //配置应用环境 protected void configureEnvironment(ConfigurableEnvironment environment, String[] args) { if (this.addConversionService) { ConversionService conversionService = ApplicationConversionService.getSharedInstance(); environment.setConversionService((ConfigurableConversionService) conversionService); } //配置property sources 即application.properties 文件 configurePropertySources(environment, args); //配置profiles 如dev test prod configureProfiles(environment, args); }
5、打印banner略
6、 根据不同的类型创建不同的 ApplicationContext 类型有三种 SERVLET,REACTIVE 普通web ```java protected ConfigurableApplicationContext createApplicationContext() { Class> contextClass = this.applicationContextClass; if (contextClass == null) { try { switch(this.webApplicationType) { case SERVLET: contextClass = Class.forName("org.springframework.boot.web.servlet.context.AnnotationConfigServletWebServerApplicationContext"); break; case REACTIVE: contextClass = Class.forName("org.springframework.boot.web.reactive.context.AnnotationConfigReactiveWebServerApplicationContext"); break; default: contextClass = Class.forName("org.springframework.context.annotation.AnnotationConfigApplicationContext"); } } catch (ClassNotFoundException var3) { throw new IllegalStateException("Unable create a default ApplicationContext, please specify an ApplicationContextClass", var3); } }
return (ConfigurableApplicationContext)BeanUtils.instantiateClass(contextClass);} ```
7、获取异常报告器 通过 getSpringFactoriesInstances方法 ps : 这个方法用的地方这的是太多了
java private 可以看下有这些异常收集器
8、准备应用上下文
```java private void prepareContext(ConfigurableApplicationContext context, ConfigurableEnvironment environment, SpringApplicationRunListeners listeners, ApplicationArguments applicationArguments, Banner printedBanner) { //设置上下文的环境配置 context.setEnvironment(environment); //上下文后置处理 beanNameGenerator和resourceLoader默认为空,可以方便后续做扩展处理 this.postProcessApplicationContext(context); //调用ApplicationContextInitializer的初始化方法初始化context this.applyInitializers(context); //调用SpringApplicationRunListener监听器的ContextPrepared方法。添加事件监听器 listeners.contextPrepared(context); //记录启动日志 if (this.logStartupInfo) { this.logStartupInfo(context.getParent() == null); this.logStartupProfileInfo(context); } // 注册启动参数bean,将容器指定的参数封装成bean,注入容器 ConfigurableListableBeanFactory beanFactory = context.getBeanFactory(); beanFactory.registerSingleton("springApplicationArguments", applicationArguments); if (printedBanner != null) { beanFactory.registerSingleton("springBootBanner", printedBanner); }
if (beanFactory instanceof DefaultListableBeanFactory) {
((DefaultListableBeanFactory)beanFactory).setAllowBeanDefinitionOverriding(this.allowBeanDefinitionOverriding);
}
Set} ``` 看看怎么applyInitializers的 具体流程不在展开 有点复杂 
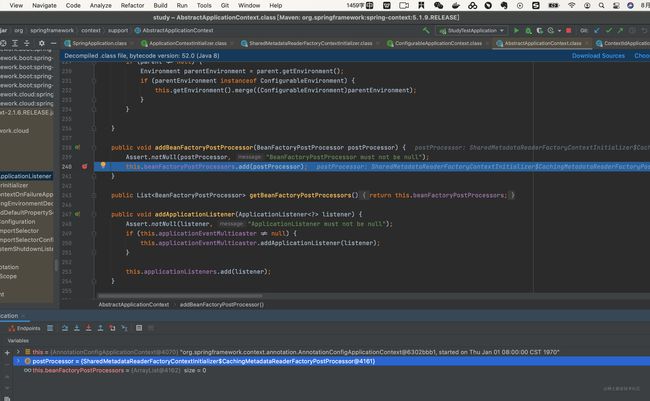
我们看下load干了啥 
加载 env信息 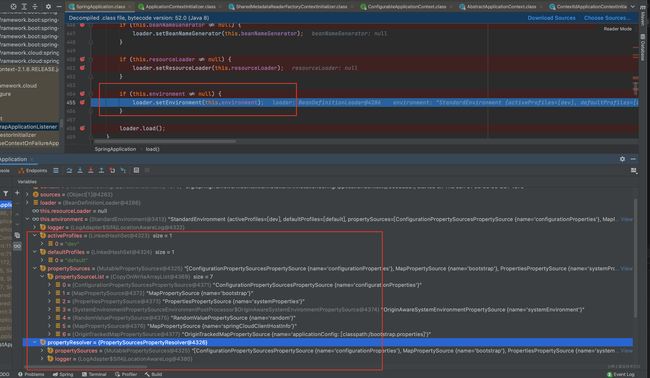
springboot会优先选择groovy加载方式,找不到在选择java方式 
9、刷新应用上下文 这一步 灰常重要 这里关于bean的东西不在展开 我将写一篇文章专门解释bean相关的内容 ```java private void refreshContext(ConfigurableApplicationContext context) { refresh(context); if (this.registerShutdownHook) { try { //注册销毁钩子 context.registerShutdownHook(); } catch (AccessControlException ex) { // Not allowed in some environments. } } }
public void refresh() throws BeansException, IllegalStateException { synchronized (this.startupShutdownMonitor) { // Prepare this context for refreshing. //刷新上下文环境,初始化上下文环境,对系统的环境变量或者系统属性进行准备和校验 prepareRefresh();
// Tell the subclass to refresh the internal bean factory.
            //初始化beanfactory,解析xml,相当于之前的xmlBeanfactory操作
            ConfigurableListableBeanFactory beanFactory = obtainFreshBeanFactory();

            // Prepare the bean factory for use in this context.
            //为上下文准备beanfactory,对beanFactory的各种功能进行填充,如@autowired,设置spel表达式解析器,设置编辑注册器,添加applicationContextAwareprocessor处理器等等
            prepareBeanFactory(beanFactory);

            try {
                    // Allows post-processing of the bean factory in context subclasses.
                    //提供子类覆盖的额外处理,即子类处理自定义的beanfactorypostProcess
                    postProcessBeanFactory(beanFactory);

                    // Invoke factory processors registered as beans in the context.
                    //激活各种beanfactory处理器
                    invokeBeanFactoryPostProcessors(beanFactory);

                    // Register bean processors that intercept bean creation.
                    //注册beanPostProcessor
                    registerBeanPostProcessors(beanFactory);

                    // Initialize message source for this context.
                    //初始化上下文中的资源文件如国际化文件的处理
                    initMessageSource();

                    // Initialize event multicaster for this context.
                    //初始化上下文事件广播器
                    initApplicationEventMulticaster();

                    // Initialize other special beans in specific context subclasses.
                    //给子类扩展初始化其他bean
                    onRefresh();

                    // Check for listener beans and register them.
                    //在所有的bean中查找listener bean,然后 注册到广播器中
                    registerListeners();

                    // Instantiate all remaining (non-lazy-init) singletons.
                    //初始化剩余的非懒惰的bean,即初始化非延迟加载的bean
                    finishBeanFactoryInitialization(beanFactory);

                    // Last step: publish corresponding event.
                    //发完成刷新过程,通知声明周期处理器刷新过程,同时发出ContextRefreshEvent通知别人
                    finishRefresh();
            }

            catch (BeansException ex) {
                    if (logger.isWarnEnabled()) {
                            logger.warn("Exception encountered during context initialization - " +
                                            "cancelling refresh attempt: " + ex);
                    }

                    // Destroy already created singletons to avoid dangling resources.
                    destroyBeans();

                    // Reset 'active' flag.
                    cancelRefresh(ex);

                    // Propagate exception to caller.
                    throw ex;
            }

            finally {
                    // Reset common introspection caches in Spring's core, since we
                    // might not ever need metadata for singleton beans anymore...
                    resetCommonCaches();
            }
    }
}
```
10、 应用上下文刷新后置处理 java afterRefresh(context, applicationArguments); //当前方法的代码是空的,可以做一些自定义的后置处理操作 protected void afterRefresh(ConfigurableApplicationContext context, ApplicationArguments args) { } 11、 停止stopWatch 并打印耗时日志 java stopWatch.stop(); if (this.logStartupInfo) { (new StartupInfoLogger(this.mainApplicationClass)).logStarted(this.getApplicationLog(), stopWatch); } 12、 发布应用上下文启动完成事件:触发所有SpringapplicationRunListener监听器的started事件方法
java listeners.started(context); void started(ConfigurableApplicationContext context) { for (SpringApplicationRunListener listener : this.listeners) { listener.started(context); } }
13、执行所有Runner执行器:执行ApplicationRunner和CommandLineRunner java private void callRunners(ApplicationContext context, ApplicationArguments args) { List
14、发布应用上下文就绪事件:触发SpringapplicationRunnListener 监听器的running事件方法 java listeners.running(context); void running(ConfigurableApplicationContext context) { for (SpringApplicationRunListener listener : this.listeners) { listener.running(context); } }
SpringApplicationRunListener说明:
注意: 由于在启动过程中多次调用了SpringApplicationRunListener的方法 我觉得有必要说明一下这个接口的方法都是干嘛的. 如下: ```java
public interface SpringApplicationRunListener { // 在run()方法开始执行时,该方法就立即被调用,可用于在初始化最早期时做一些工作 void starting(); // 当environment构建完成,ApplicationContext创建之前,该方法被调用 void environmentPrepared(ConfigurableEnvironment environment); // 当ApplicationContext构建完成时,该方法被调用 void contextPrepared(ConfigurableApplicationContext context); // 在ApplicationContext完成加载,但没有被刷新前,该方法被调用 void contextLoaded(ConfigurableApplicationContext context); // 在ApplicationContext刷新并启动后,CommandLineRunners和ApplicationRunner未被调用前,该方法被调用 void started(ConfigurableApplicationContext context); // 在run()方法执行完成前该方法被调用 void running(ConfigurableApplicationContext context); // 当应用运行出错时该方法被调用 void failed(ConfigurableApplicationContext context, Throwable exception); } ```
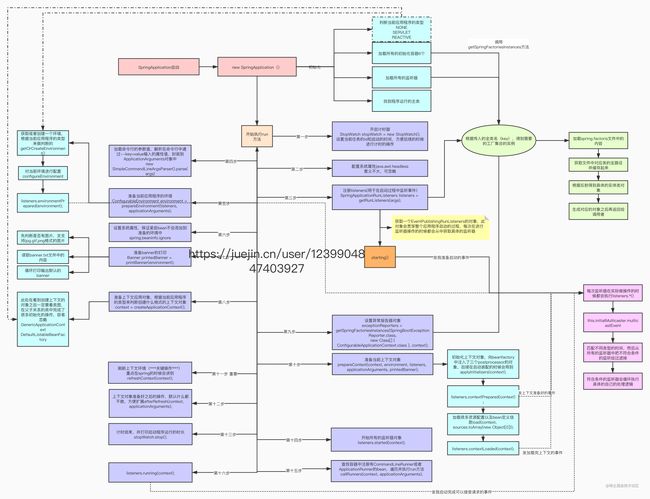
5. 最后我们来总结下整个流程 (文字+图),一图胜千言万字。
run方法启动总结(文字版)
```
构造SpringApplication对象
1.1 推断是哪种应用 通过是否包含包路径进行判断(具体看代码即可) 1.2 设置应用上下文初始化器,从META-INF/spring.factories读取ApplicationContextInitializer类的实例名称集合并去重后 创建对象 1.3 设置监听器,从META-INF/spring.factories读取ApplicationListener类的实例名称集合并去重,并创建对象 1.4 推断主入口应用类,通过当前调用栈,获取Main方法所在类,并赋值给mainApplicationClass
2.调用SpringApplication的run方法 (非重要方法这里直接略过) 2.1 加载SpringApplicationRunListeners监听器 并发送ApplicationStartingEvent事件 (这个事件的内容其实简单来说就是 "我要启动啦" ) 2.2 配置环境模块 Environment (我们可以在项目中通过他获取配置) 2.3 打印bannner (你也可以自定义你的banner) 2.4 根据不同的类型创建不同的 ApplicationContext(也叫上下文/容器) (类型有三种 SERVLET,REACTIVE 普通web) 2.5 获取异常报告器 (用来报告启动时的错误) 2.6 准备应用上下文 并调用 ApplicationContextInitializer的initialize进行初始化 2.7 刷新上下文 (如@Autoware BeanFactory初始化 等等关于bean的操作都在这里) 2.8 刷新后的操作 (由子类去扩展) 2.9 发送事件(时间内容是"我已经启动"),标志spring容器已经刷新,此时所有的bean实例都已经加载完毕 3.0 查找容器中注册有CommandLineRunner或者ApplicationRunner的bean,遍历并执行run方法 3.1 发送ApplicationReadyEvent事件(事件内容为 “启动成功我现在可以接受请求了!”) 3.2 返回应用上下文 ```
run方法启动总结(图片版更详细些)
6. 总结
- 一入源码深似海 看源码时候我们不需要过于深入专进去 要把握好一个度 如果把每个方法的内部的内部的内部的内部都看一遍 那样反而会使我们绕进去 也比较耗时费力。我个人觉得 主流程首先你一定是要看的,并且在每个阶段做了什么事情 你也一定要知道,另外就是像刷新容器这种操作 一定一定一定要多看几遍并且可以深入去研究下他到底是如何做得 ,另外 一定要有自己的注释 总结 思考。否则过几天真的很容易忘。
完。