springboot小结(1)
1.介绍
微服务架构
Spring Boot 是由 Pivotal 团队提供的全新框架,其设计目的是用来简化新 Spring 应用的初始搭建以及开发过程。
该框架使用了特定的方式来进行配置,从而使开发人员不再需要定义样板化的配置。
通过这种方式,Spring Boot 致力于在蓬勃发展的快速应用开发领域(rapidapplication development)成为领导者。
2.为什么用springboot
创建独立的 Spring 应用程序
嵌入的 Tomcat,无需部署 WAR 文件
简化 Maven 配置
自动配置 Spring
提供生产就绪型功能,如指标,健康检查和外部配置
开箱即用,没有代码生成,也无需 XML 配置。
3.特性理解
为基于 Spring 的开发提供更快的入门体验
开箱即用,没有代码生成,也无需 XML 配置。同时也可以修改默认值来满足特定的需求。
提供了一些大型项目中常见的非功能特性,如嵌入式服务器、安全、指标,健康检测、外部配置等。
Spring Boot 并不是对 Spring 功能上的增强,而是提供了一种快速使用 Spring 的方式。
2、springboot应用场景

处理高并发、大数据,当同一时刻有许多人访问时,会对服务器造成很大的压力,响应速度变慢或者出现404/500等错误,用户体验度差
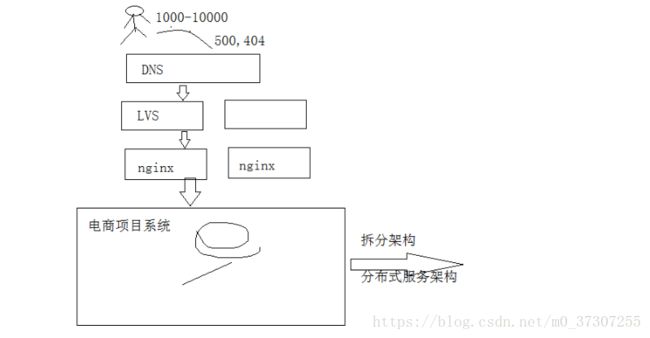
可以对架构进行拆分、拆分成分布式服务架构,分担服务器压力。
上边的系统调用下边的服务,下边的服务每个都是一个单独的项目,是一个个的war包
之所以这么拆分是因为1000-10000个请求被一台服务器承担了并发压力现在拆分之后让许多的服务器进行分担,干活的服务器多了,分担了服务器压力,处理了并发的请求就多了,服务器的效率提高,解决项目高并发。
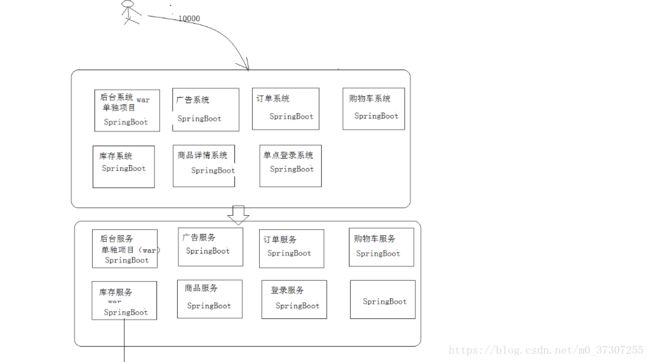
引出springboot:在大型互联网项目中需要将项目拆分成许多的服务,每一个服务都是一个项目。我们单独把一个项目,比如是库存服务拆分出来,在这个服务中需要配置大量的配置文件,如下图所示:
使用springboot不需要配置这么多 的配置文件,创建项目速度快,每一个系统都可以使用springboot解决,开发项目速度变快,可以集中精力解决业务问题。
3、springboot环境搭建
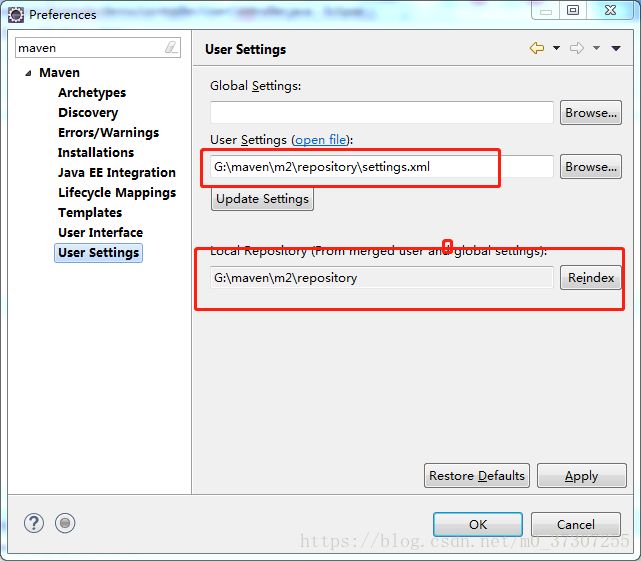
1、需要安装eclipse neon3,或者keper(个人建议neon3)2、如果想要创建一个springboot项目,那么项目一定是基于maven的项目。在搭建项目之前我们需要安装maven,需要配置自己的本地仓库,配置本地仓库在网上有,只需要拷贝maven安装目录下的conf/setting.xml到自己的本地文件夹,将setting的默认路径改为本文件夹,然后再eclipse中进行maven的配置
3、安装springsource-tool(springsource-tool-suite-3.9.4.RELEASE-e4.8.0-updatesite)插件,安装在网上也有
4、入门项目
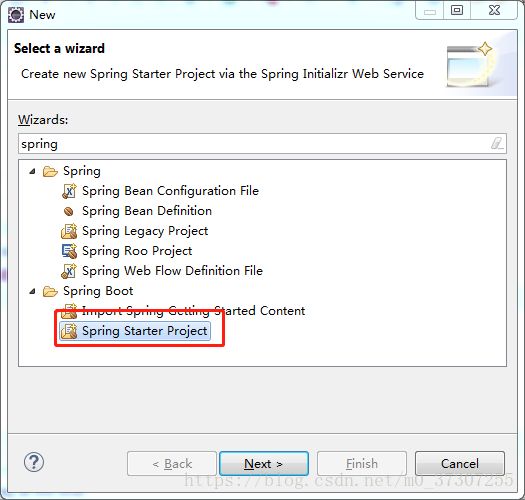
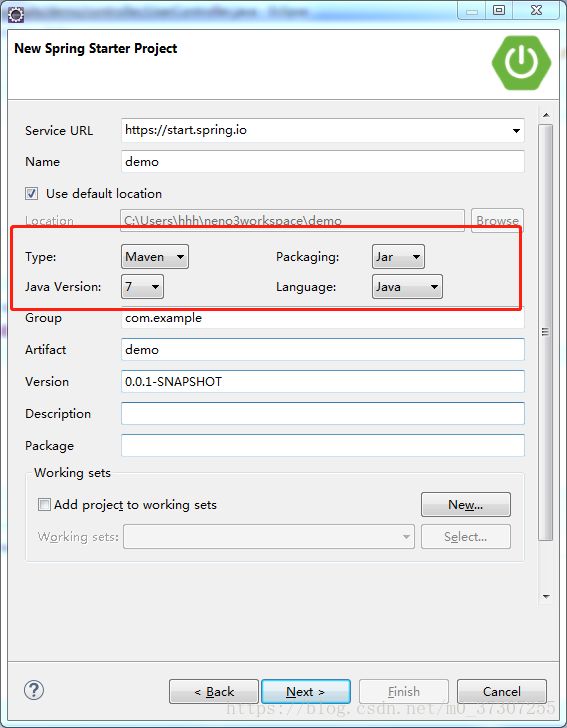
第一种、新建spring start project
可以将jdk版本修改为1.7,不然容易报错
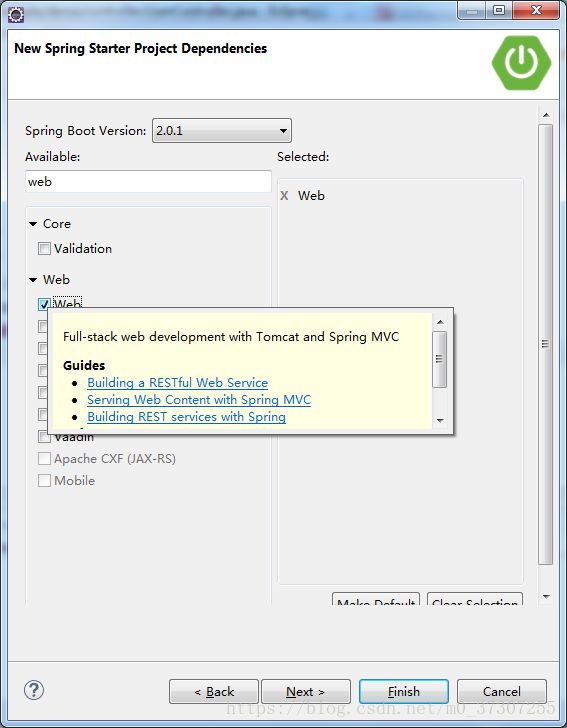
搜索,然后勾选需要的模块(比如创建的是web项目就可以勾选web项目,会自动配置web项目需要的jar),需要整合的模块可以自己勾选
项目创建成功后,会自动生成项目,项目结构:

我们需要的jar依赖都自动配置了,在maven dependencies下

这些jar依赖都是由pom.xml这个springboot的坐标仓库创建的,比如这个web项目的jar包依赖
pom.jar
	4.0.0

	com.spring-boot
	spring-bootdemo1
	0.0.1-SNAPSHOT
	jar

	spring-bootdemo1
	Demo project for Spring Boot


		org.springframework.boot
		spring-boot-starter-parent
		1.5.13.BUILD-SNAPSHOT


		UTF-8
		UTF-8
		1.7


			org.springframework.boot
			spring-boot-starter-web


			org.springframework.boot
			spring-boot-starter-test
			test


			org.mybatis.spring.boot
			mybatis-spring-boot-starter
			1.1.1


			mysql
			mysql-connector-java
			5.1.6


				org.springframework.boot
				spring-boot-maven-plugin


			spring-snapshots
			Spring Snapshots
			https://repo.spring.io/snapshot

				true


			spring-milestones
			Spring Milestones
			https://repo.spring.io/milestone

				false


			spring-snapshots
			Spring Snapshots
			https://repo.spring.io/snapshot

				true


			spring-milestones
			Spring Milestones
			https://repo.spring.io/milestone

				false
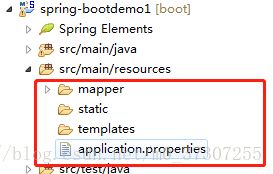
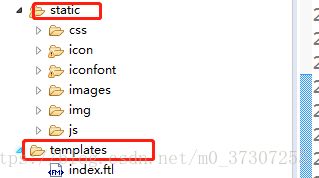
resource包下的static、templates与application.properties文件都是自动生成的
static是springboot开发web项目用来存放静态资源
templates用来存放静态页面模板(springboot不是很支持jsp页面开发,一般使用静态页面的语言)
application.properties:springboot会自动扫描这个文件
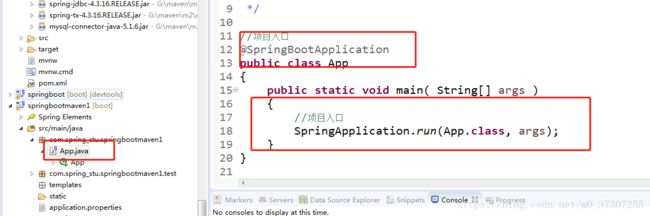
程序主入口:相当于web.xml,会被容器解析。因为我们开发的是一个jar包程序,所以一定要使用main函数作为程序的主入口

package com.example.demo;

import org.springframework.boot.SpringApplication;
import org.springframework.boot.autoconfigure.SpringBootApplication;

@SpringBootApplication
public class SpringBootdemo1Application {

	public static void main(String[] args) {
		SpringApplication.run(SpringBootdemo1Application.class, args);
	}
}
第二种使用maven仓库直接创建
new maven project
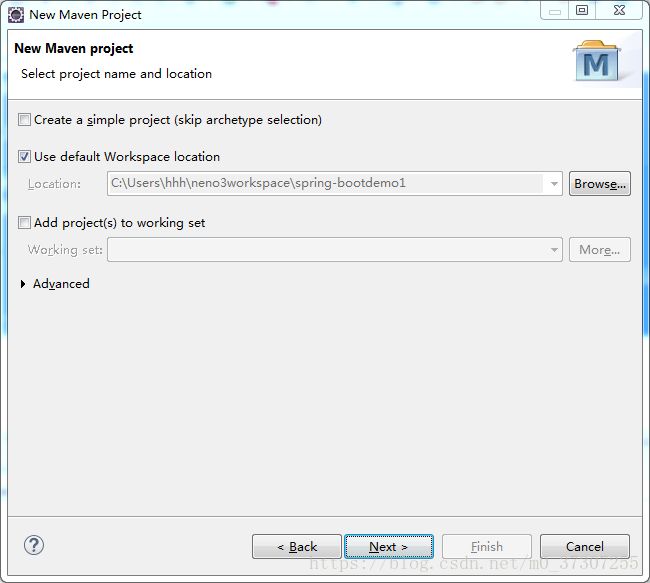
需要我们自己在resource包下创建static、templates、application.properties文件或文件夹,名称固定
还需要自己写pom.xml,为项目导入jar包
例如这个项目仓库:
	4.0.0
	cn.itcast
	springboot
	0.0.1-SNAPSHOT
	jar


		org.springframework.boot
		spring-boot-starter-parent
		1.4.0.RELEASE


		UTF-8
		UTF-8
		1.7


			org.springframework.boot
			spring-boot-starter-web


			org.springframework.boot
			spring-boot-starter-test
			test


			org.springframework.boot
			spring-boot-devtools


			org.mybatis.spring.boot
			mybatis-spring-boot-starter
			1.1.1


			org.springframework.boot
			spring-boot-starter-redis


			org.springframework.boot
			spring-boot-starter-freemarker


			mysql
			mysql-connector-java
			5.1.6


			com.alibaba
			druid
			1.0.28
可以导入自己需要的,比如需要配置mysql驱动,就需要将配置写入pom.xml
			mysql
		mysql-connector-java
			5.1.6
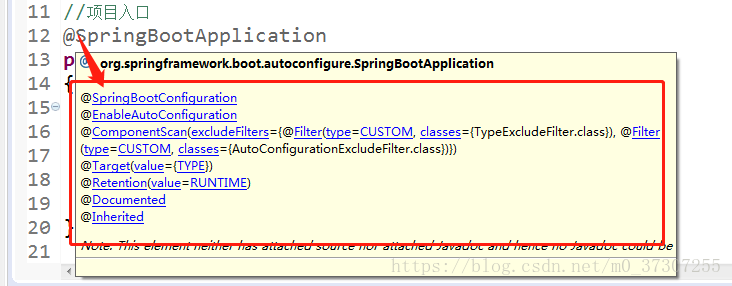
创建运行的主函数(一定要加上项目需要运行的注解@SpringBootApplication):
这个注解同时包含了下面的注解:
@ComponentScan括项目扫描:扫描所有的类,相当于ssm下的扫描接口
@SpringBootConfiguration:将@SpringBootApplication交给spring进行管理
@EnableAutoConfiguration:支持自动的注解配置
5、案例
1、简单数据类型
新建包,包下创建UserController类
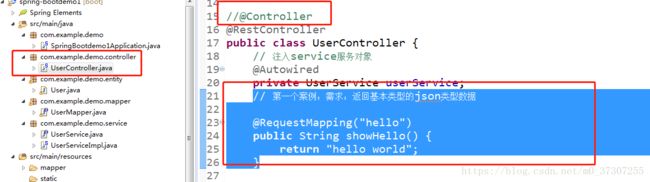
有两个注解可以使用:
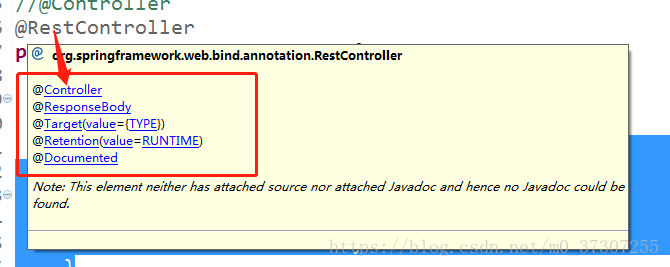
@Controller:SpringMVC的注解
@RestController:支持restFUL风格的访问格式,相当于同时使用了两个注解,@Controller与@ResponseBody,自动返回json格式。
	// 第一个案例:需求:返回基本类型的json类型数据
	@RequestMapping("hello")
	public String showHello() {
		return "hello world";
	}
直接返回的json数据:

2、返回POJO对象类型

// 需求:
// 返回user对象
@RequestMapping("pojo")
public User showUser() {
User user = new User();
user.setAddress("china");
user.setBirthday("1995-12");
user.setSex("male");
user.setId(1);
return user;
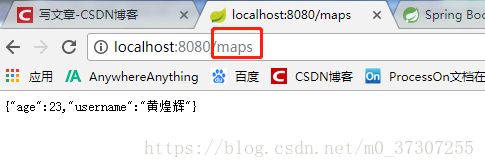
}3、返回集合对象
// 返回集合对象
	@RequestMapping("maps")
	public Map showMaps() {
		Map map = new HashMap();
		map.put("username", "黄煌辉");
		map.put("age", 23);
		return map;
	}
4、返回map集合
// 返回集合对象
@RequestMapping("list")
public List
6、springboot整合mybatis
1、导入mybatis的jar(在pom坐标仓库中创建),会自动导入mybatis与springboot整合的jar包

			org.mybatis.spring.boot
			mybatis-spring-boot-starter
			1.1.1
创建user的映射文件:

UserMapper:

sqlMapConfig:
创建数据源与mybatis配置(application.xml):
#spring集成Mybatis环境,mybatis别名
mybatis.type-aliases-package=com.example.demo.entity
#加载Mybatis配置文件
#Mapper映射文件
mybatis.mapper-locations = classpath:mapper/*Mapper.xml
#sqlMap映射文件
mybatis.config-location = classpath:mapper/config/sqlMapConfig.xml

spring.datasource.driver-class-name= com.mysql.jdbc.Driver
spring.datasource.url = jdbc:mysql://localhost:3306/springbootdemo
spring.datasource.username = root
spring.datasource.password = Huang123
必须加入mysql的坐标仓库:

			mysql
			mysql-connector-java
			5.1.6
创建service与dao

创建mapper映射,需要使用@Mapper注解,代替了,mybatis的数据扫描
//代替了mybatis扫描
@Mapper
public interface UserMapper {

	/*
	 * 需求:查询所有用户
	 */
	public List findAll();

}
创建UserServiceImpl,需要加入@Service,@Autowried注入接口代理对象:
@Service
public class UserServiceImpl implements UserService{

	//注入mapper接口代理对象
	@Autowired
	private UserMapper userMapper;
	@Override
	public List findAll() {
		List user = userMapper.findAll();
		return user;
	}
访问:
/*
* 整合ssm(spring,springboot,mybatis)
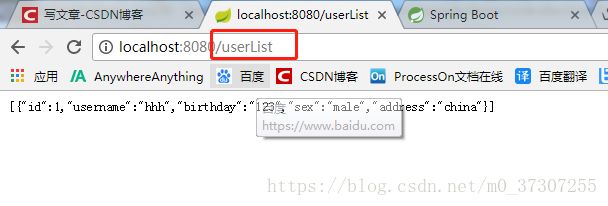
*/
@RequestMapping("userList")
public List findAll(){
List list=userService.findAll();
return list;
} 
7、springboot整合redis单机版
配置application.xml:
#整合redis单机版,使用redis作为缓存
#redis服务器地址
spring.redis.host=192.168.1.1
#指定redis的端口
spring.redis.port=6379
要加入redis的起步依赖,才会导入redis的jar:
			org.springframework.boot
			spring-boot-starter-redis
要使用缓存,有两个步骤:
1、项目入口加入注解@EnableCatch,表示开启缓存

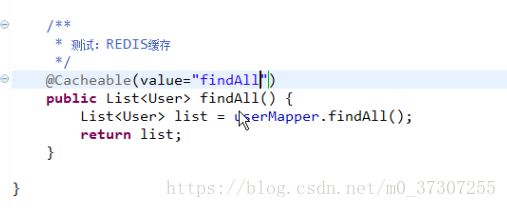
2、在需要使用缓存的地方设置缓存,加入注解@Cacheable
value的意思是(必须加入):表示在缓存区域开启一个名称空间为findAll的缓存
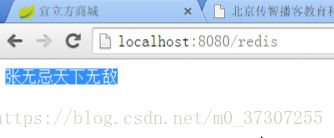
测试是否是使用的缓存查询的数据:

测试使用的是springboot的自带缓存还是redis缓存:
如果使用的是springboot的自带缓存,我们关闭springboot项目,就会重新执行syso方法,但是经过测试,关闭之后还是没有走syso方法,直接输出的List
8、springboot整个redis集群
springboot使用redis集群不是很方便需要自己配置
配置集群:
#整合redis集群
redis.cache.cluster.nodes=192.168.66.66:7001,192.168.66.66:7002,192.168.66.66:7003,192.168.66.66:7004
配置集群节点:
//相当于配置了一个beans配置文件application.xml
@Configuration
public class RedisClusterConfig {

	//注入集群节点信息(无法自动解析,需要手动配置)
	@Value("${redis.cache.clusterNodes}")
	private String clusterNodes;

	@Bean//相当于配置的bean标签
	public JedisCluster getJedisCluster() {
		// 截取集群节点
		String[] cluster = clusterNodes.split(",");
		// 创建set集合
		Set nodes = new HashSet();
		// 循环数组把集群节点添加到set集合中
		for (String node : cluster) {
			String[] host = node.split(":");
			//添加集群节点
			nodes.add(new HostAndPort(host[0], Integer.parseInt(host[1])));

		}
		JedisCluster jc = new JedisCluster(nodes);

		return jc;

	}
}
注入redis集群对象:
@Autowired
	private JedisCluster jedisCluster;
操作redis集群:
	@Override
	public Map redisMap() {
		jedisCluster.set("user", "张三丰");
		//设置完毕,获取之
		String value = jedisCluster.get("user");
		Map maps = new HashMap();
		maps.put("redis", value);
		return maps;
	}
配置UserService:


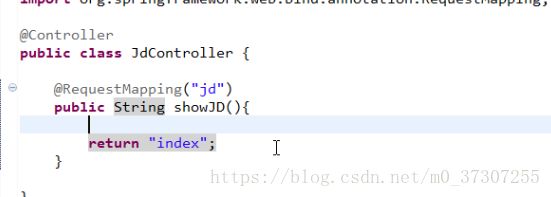
9、京东测试,加载静态资源
加入freemarker依赖
			org.springframework.boot
			spring-boot-starter-freemarker
加入静态资源:
创建JDController