SpringMVC框架(详解)
目录
-
-
- 一,简介
-
- 1.1,什么是MVC
- 1.2,SpringMVC的优缺点
- 1.3,MVC模式
- 二,使用SpringMvc
-
- 21,创建maven-web项目,修改webapp目录下WEB-INF目录下的web.xml文件
- 2.2,web.xml文件内容如下
- 2.3,引入springMVC的依赖
- 2.4,创建springmvc.xml文件
- 2.5,创建一个controller类
- 2.6,springMVC运行流程
- 2.7,使用Model上传数据
- 2.8,使用Map上传数据
- 2.9,静态资源加载问题
- 三、如何实现页面重定向
- 四、拦截器
-
- 4.1、创建拦截器
- 五、文件上传
-
- 5.1、上传到本地服务器
- 六、内容补充
-
一,简介
1.1,什么是MVC
Spring MVC是一个基于Java的实现了MVC设计模式的请求驱动类型的轻量级Web框架,通过把(M)Model,(V)View,(C)Controller分离,将web层进行职责解耦,把复杂的web应用分成逻辑清晰的几部分,简化开发,减少出错,方便组内开发人员之间的配合。
1.2,SpringMVC的优缺点
MVC 优点:
多视图共享一个模型,大大提高代码的可重用性
MVC三个模块相互独立,松耦合架构
控制器提高了应用程序的灵活性和可配置性
有利于软件工程化管理
完美的系统架构 = 松耦合+高重用性+高扩展性
MVC 缺点:
原理复杂
增加了系统结构和实现的复杂性
视图对模型数据的低效率访问
1.3,MVC模式
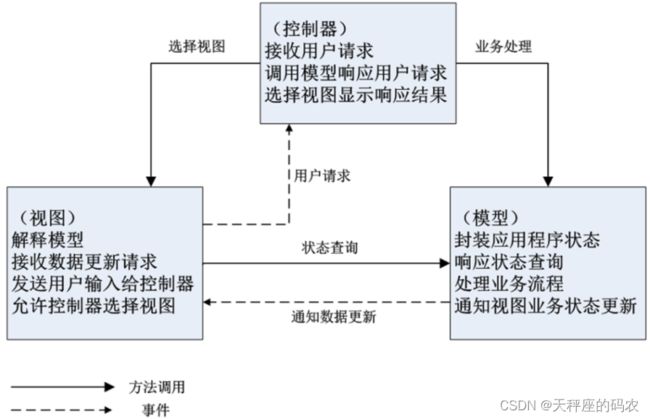
- 视图(View)-对应组件:JSP或者HTML文件
- 控制器(Controller)-对应组件:Servlet
- 模型(Model)-对应组件:JavaBean
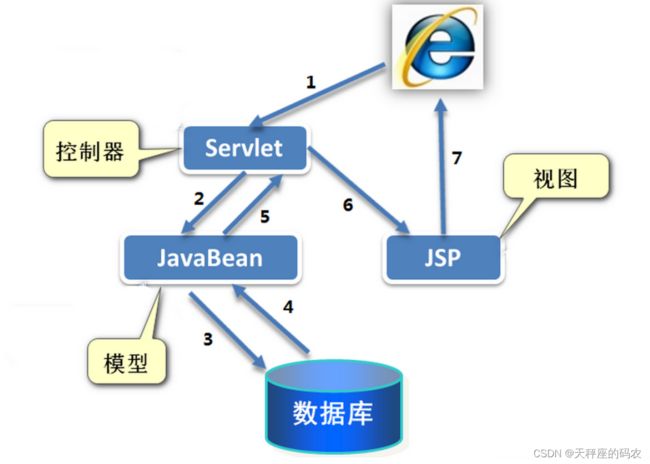
JSP Model1
JSP Model2 - Servlet:接受前端请求并调用JavaBean
- JavaBean:处理业务并操作数据库
- JSP:将处理结果响应到浏览器呈现给用户
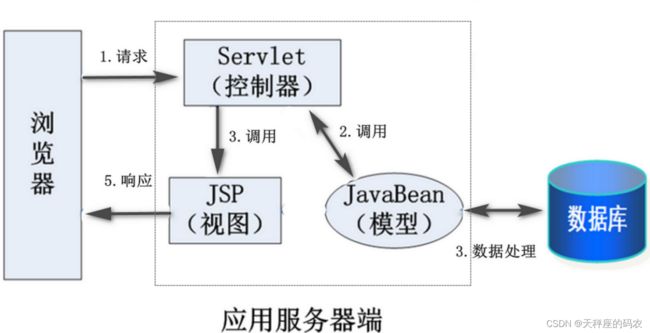
MVC处理过程

Spring MVC - 用Controller替换JSP Model2模型中的Servlet
- Controller收到请求后,完成业务处理并用Model模型对象存储处理结果
- Controller调用相应的视图解析器View对处理结果进行视图渲染,最终客户端得到响应信息
二,使用SpringMvc
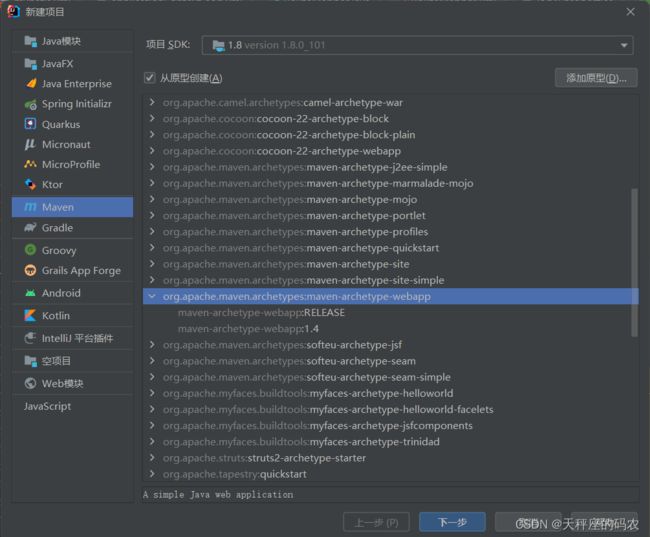
21,创建maven-web项目,修改webapp目录下WEB-INF目录下的web.xml文件
2.2,web.xml文件内容如下
DOCTYPE web-app PUBLIC
 "-//Sun Microsystems, Inc.//DTD Web Application 2.3//EN"
 "http://java.sun.com/dtd/web-app_2_3.dtd" >

<web-app>
  <display-name>Archetype Created Web Applicationdisplay-name>
  <servlet>
    <servlet-name>springmvcservlet-name>
    <servlet-class>org.springframework.web.servlet.DispatcherServletservlet-class>
    <init-param>
      <param-name>contextConfigLocationparam-name>
      <param-value>classpath:springmvc.xmlparam-value>
    init-param>
    <load-on-startup>1load-on-startup>
  servlet>
  <servlet-mapping>
    <servlet-name>springmvcservlet-name>
    <url-pattern>/url-pattern>
  servlet-mapping>


  <filter>
    <filter-name>encodingFilterfilter-name>
    <filter-class>
      org.springframework.web.filter.CharacterEncodingFilter
    filter-class>
    <init-param>
      <param-name>encodingparam-name>
      <param-value>UTF-8param-value>
    init-param>
    <init-param>
      <param-name>forceEncodingparam-name>
      <param-value>trueparam-value>
    init-param>
  filter>
  <filter-mapping>
    <filter-name>encodingFilterfilter-name>
    <url-pattern>/*url-pattern>
  filter-mapping>

web-app>
2.3,引入springMVC的依赖
<project xmlns="http://maven.apache.org/POM/4.0.0" xmlns:xsi="http://www.w3.org/2001/XMLSchema-instance"
  xsi:schemaLocation="http://maven.apache.org/POM/4.0.0 http://maven.apache.org/xsd/maven-4.0.0.xsd">
  <modelVersion>4.0.0modelVersion>

  <groupId>com.xinxi2groupId>
  <artifactId>SpringMvc1artifactId>
  <version>1.0-SNAPSHOTversion>
  <packaging>warpackaging>

  <name>SpringMvc1 Maven Webappname>

  <url>http://www.example.comurl>

  <properties>
    <project.build.sourceEncoding>UTF-8project.build.sourceEncoding>
    <maven.compiler.source>1.7maven.compiler.source>
    <maven.compiler.target>1.7maven.compiler.target>
    <spring.version>5.2.5.RELEASEspring.version>
  properties>

  <dependencies>
    <dependency>
      <groupId>junitgroupId>
      <artifactId>junitartifactId>
      <version>4.11version>
      <scope>testscope>
    dependency>


  <dependency>
    <groupId>log4jgroupId>
    <artifactId>log4jartifactId>
    <version>1.2.17version>
  dependency>


  <dependency>
    <groupId>mysqlgroupId>
    <artifactId>mysql-connector-javaartifactId>
    <version>5.1.10version>
  dependency>

  <dependency>
    <groupId>org.springframeworkgroupId>
    <artifactId>spring-coreartifactId>
    <version>${spring.version}version>
  dependency>
  <dependency>
    <groupId>org.springframeworkgroupId>
    <artifactId>spring-contextartifactId>
    <version>${spring.version}version>
  dependency>
  <dependency>
    <groupId>org.springframeworkgroupId>
    <artifactId>spring-txartifactId>
    <version>${spring.version}version>
  dependency>
  <dependency>
    <groupId>org.springframeworkgroupId>
    <artifactId>spring-jdbcartifactId>
    <version>${spring.version}version>
  dependency>
  <dependency>
    <groupId>org.aspectjgroupId>
    <artifactId>aspectjweaverartifactId>
    <version>1.9.2version>
  dependency>


  <dependency>
    <groupId>org.mybatisgroupId>
    <artifactId>mybatisartifactId>
    <version>3.2.2version>
  dependency>

  <dependency>
    <groupId>org.mybatisgroupId>
    <artifactId>mybatis-springartifactId>
    <version>1.2.2version>
  dependency>


  <dependency>
    <groupId>org.apache.commonsgroupId>
    <artifactId>commons-dbcp2artifactId>
    <version>2.1.1version>
  dependency>
  <dependency>
    <groupId>org.apache.commonsgroupId>
    <artifactId>commons-pool2artifactId>
    <version>2.4.2version>
  dependency>

  <dependency>
    <groupId>javax.servletgroupId>
    <artifactId>javax.servlet-apiartifactId>
    <version>3.1.0version>
    <scope>providedscope>
  dependency>
  <dependency>
    <groupId>javax.servletgroupId>
    <artifactId>jsp-apiartifactId>
    <version>2.0version>
    <scope>providedscope>
  dependency>
  <dependency>
    <groupId>org.springframeworkgroupId>
    <artifactId>spring-webmvcartifactId>
    <version>${spring.version}version>
  dependency>


  <dependency>
    <groupId>commons-iogroupId>
    <artifactId>commons-ioartifactId>
    <version>1.4version>
  dependency>
  <dependency>
    <groupId>commons-fileuploadgroupId>
    <artifactId>commons-fileuploadartifactId>
    <version>1.3.1version>
  dependency>


  <dependency>
    <groupId>jstlgroupId>
    <artifactId>jstlartifactId>
    <version>1.2version>
  dependency>


  <dependency>
    <groupId>com.alibabagroupId>
    <artifactId>fastjsonartifactId>
    <version>1.2.47version>
  dependency>

  dependencies>

  <build>
    <finalName>SpringMvc1finalName>
  build>
project>
2.4,创建springmvc.xml文件
<beans xmlns="http://www.springframework.org/schema/beans"
       xmlns:xsi="http://www.w3.org/2001/XMLSchema-instance"
       xmlns:context="http://www.springframework.org/schema/context"
       xmlns:mvc="http://www.springframework.org/schema/mvc"
       xsi:schemaLocation="http://www.springframework.org/schema/beans
	http://www.springframework.org/schema/beans/spring-beans.xsd

	http://www.springframework.org/schema/context
	http://www.springframework.org/schema/context/spring-context.xsd">


    <context:component-scan base-package="com.controller">context:component-scan>
beans>
2.5,创建一个controller类
import java.util.List;
import java.util.Map;


//标记该类为处理层类
@Controller
@RequestMapping("/hello")

public class HelloController {

    //把请求路径映射到该方法上
    @RequestMapping("/hello01")
    public String hello01(){
        System.out.println("hello01");

        //请求转发到hello01.jsp界面
        return "hello01.jsp";
    }
}
2.6,springMVC运行流程
- 客户端发生请求http://localhost:8080/springMVC17/hello
- 来到tomcat服务器。
- springmvc的前端控制器DipatcherServlet接受所有的请求。
- 查看你的请求地址和哪个@RequestMaping匹配。
- 执行对应的方法。方法会返回一个字符串。springmvc把该字符串解析为要转发的网页。
- 把该字符串经过视图解析器拼接。
- 拿到拼接的地址,找到对应的网页。
- 渲染该网页给客户
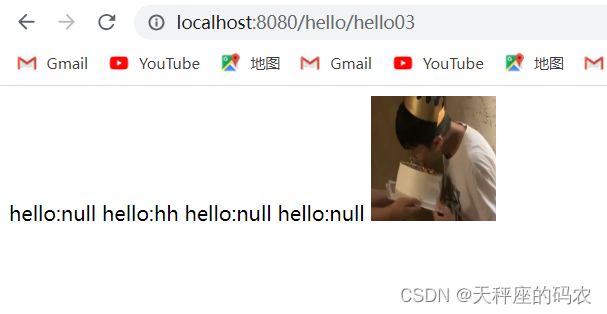
2.7,使用Model上传数据
    @RequestMapping("/hello03")
    public String hello03(Student student,Model model){
        System.out.println("hello03"+student.getUsername()+"  "+student.getPwd()+" "+student.getBirthday()+" "+student.getAge());
        model.addAttribute("linyuhao","hh");
        return "hello01.jsp";
    }
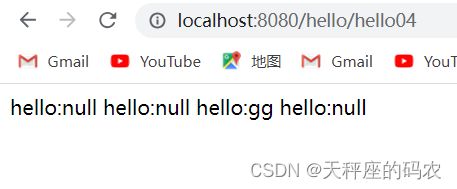
使用HttpServletRequest上传数据
    @RequestMapping("/hello04")
    public String hello04(HttpServletRequest request){
        System.out.println("hello04");
        request.setAttribute("guangtou","gg");
        return "hello01.jsp";
    }
2.8,使用Map上传数据
    @RequestMapping("/hello05")
    public String hello05(Map map){
        System.out.println("hello05");
        int count = 1/0;
        map.put("wangdao","qq");
        return "redirect:/login.jsp";
    }
2.9,静态资源加载问题

这样就需要我们在springMVC配置文件中将静态资源加载,加上
<mvc:resources mapping="/static/**" location="/static/">mvc:resources>
三、如何实现页面重定向
在controller层的方法中,返回值为String类型,返回一个界面使用的是请求转发的方式,如果想要使用重定向跳转至其他页面,在返回值中加上redirect:,/当springmvc看到你返回的字符串中含有redirect:时,将会认为你要进行重定向跳转。
return “redirect:/login.jsp”;
    @RequestMapping("/hello05")
    public String hello05(Map map){
        System.out.println("hello05");
        int count = 1/0;
        map.put("wangdao","qq");
        return "redirect:/login.jsp";
    }
四、拦截器
4.1、创建拦截器
package com.Interceptor;

import org.springframework.web.servlet.HandlerInterceptor;
import org.springframework.web.servlet.ModelAndView;

import javax.servlet.http.HttpServletRequest;
import javax.servlet.http.HttpServletResponse;

public class LoginInterceptor implements HandlerInterceptor {
    @Override
    public boolean preHandle(HttpServletRequest request, HttpServletResponse response, Object handler) throws Exception {
        System.out.println("preHandle");
//        拦截规则,自己根据业务需求实现
        String username = request.getParameter("username");
        if (null==username || "".equals(username)){
            response.sendRedirect("/index.jsp");
            return false;
        }
        return true;
    }

    @Override
    public void postHandle(HttpServletRequest request, HttpServletResponse response, Object handler, ModelAndView modelAndView) throws Exception {
        System.out.println("postHandle:handle执行完,渲染之前");
    }

    @Override
    public void afterCompletion(HttpServletRequest request, HttpServletResponse response, Object handler, Exception ex) throws Exception {
        System.out.println("afterCompletion:handle执行完,渲染之后");
    }
}
我们创建的拦截器类需要实现HandlerInterceptor接口,并且重写preHandle方法
我们如果要使用我们定义的拦截器,需要在springmvc.xml文件中注册该拦截器
    <mvc:interceptors>
        <mvc:interceptor>
            <mvc:mapping path="/hello/**"/>
            <mvc:exclude-mapping path="/hello/hello04"/>
            <bean class="com.Interceptor.LoginInterceptor">bean>
        mvc:interceptor>
    mvc:interceptors>
五、文件上传
5.1、上传到本地服务器
第一步,导入文件上传的依赖
  <dependency>
    <groupId>commons-iogroupId>
    <artifactId>commons-ioartifactId>
    <version>1.4version>
  dependency>
  <dependency>
    <groupId>commons-fileuploadgroupId>
    <artifactId>commons-fileuploadartifactId>
    <version>1.3.1version>
  dependency>
第二步,创建一个页面,这里需要注意的是提交方式必须为post提交,表单类型enctype需要设置为multipart/form-data的格式,这里的input标签的name属性不可省略,需要和controller层接收的参数名相同。
<%--
  Created by IntelliJ IDEA.
  User: lenovo
  Date: 2023/6/25
  Time: 16:39
  To change this template use File | Settings | File Templates.
--%>
<%@ page contentType="text/html;charset=UTF-8" language="java" %>
<html>
<head>
    <title>上传文件title>
head>
<body>
    <form action="/hello/hello03" method="post" enctype="multipart/form-data">
        <input type="text" name="username"><br>
        <input type="file" name="photo"><br>
        <input type="text" name="age"><br>
        <input type="text" name="birthday">
        <input type="submit" value="提交">
    form>
body>
html>
第三步,在springMVC的配置文件中配置文件上传解析器
    <bean id="multipartResolver" class="org.springframework.web.multipart.commons.CommonsMultipartResolver">
        <property name="maxInMemorySize" value="5000000">property>
        <property name="defaultEncoding" value="UTF-8">property>
    bean>
第四步,创建实现文件上传接口的方法,@RequestMapping表示请求的接口,
    @RequestMapping("/uploadPage")
    public String uploadPage(){
        return "upload.jsp";
    }

    @RequestMapping("/upload")
    @ResponseBody // 此方法的返回值就是响应体的内容
    public String upload(String username, MultipartFile photo,HttpServletRequest request){

        String fileType = photo.getOriginalFilename();
        int index = fileType.lastIndexOf(".");
        fileType = fileType.substring(index);
        String path = request.getSession().getServletContext().getRealPath("static"+File.separator+"uploadfiles");
        long filename = System.currentTimeMillis();
        System.out.println(path);
        System.out.println(fileType);
        System.out.println(path+"\\"+filename+fileType);
        File file = new File(path+"\\"+filename+fileType);
        try {
            photo.transferTo(file);
        } catch (IOException e) {
            e.printStackTrace();
        }
        return "上传成功!";
    }
六、内容补充
@RestController 等价于 @Controller+@ResponseBody
该注解下所有的方法都是返回json数据
@RequestMapping: 作用: 把请求路径映射到响应的方法上。
@RequestParam(value = “u”):设置你接受的请求参数名。查询参数
@Param(value=“name”):设置的时mybatis中mapper映射文件中的参数
@RequestMapping(value = “/addUser”,method = RequestMethod.POST)
method:表示该接口接受的请求方式.不设置可以接受任意请求方式。
@GetMapping(“addUser”):表示只接受get提交方式的请求
@RequestBody:把请求的json数据转换为java对象。从前端到后端
@ResponseBody:把java转换为json数据 从后端转前端
