安装
AndroidNativeEmu有什么用?
AndroidNativeEmu是基于Unicron实现的一个指令解析器, 让您能够跨平台模拟Android Native库函数,例如JNI_OnLoad,Java_XXX_XX等函数
特性
- 模拟 JNI Invocation API so
JNI_OnLoad can be called properly.
- 模拟 memory、malloc、memcpy
- 支持拦截系统调用(SVC #0)
- 通过符号Hook
- 所有 JavaVM, JNIEnv 和 hooked functions 都可以用python来处理
- 支持 VFP
- 支持文件系统(也就是说你可以模拟maps、status等文件)
项目地址
安装过程
环境要求: python 3.7 (注意必须是3.7版本, 我使用3.6装keystone的时候踩了坑)
自测系统环境: win7
1.Clone 该项目
| 1 |
git clone https://github.com/AeonLucid/AndroidNativeEmu.git
|
2.安装需要的支持模块
| 1 |
pip install -r requirements.txt
|
安装keystone-engine可能会失败(反正我是没装上)
解决方案:
| 1 2 3 4 |
1. 克隆keystone仓库: git clone https://github.com/keystone-engine/keystone.git
2. 打开keystone\bindings文件夹安装: python setup.py install
3. 下载对应系统和版本dll(因为我是win), 下载链接: http://www.keystone-engine.org/download/
4. 把dll复制到python的keystone目录下: [python_path]\Lib\site-packages\keystone\
|
3.把androidemu文件夹复制至sample文件夹下,并删除example.py文件下的关于"samples/"的目录访问路径
| 1 2 3 4 |
如
"samples/example_binaries/libc.so"
改为
"example_binaries/libc.so"
|
4.运行例子
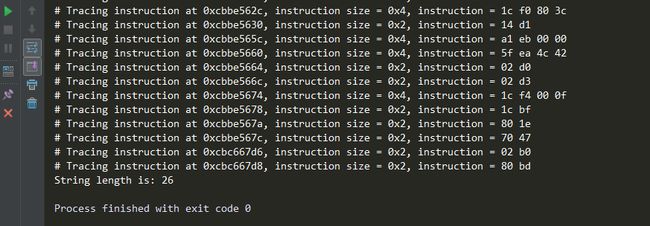
5.不出意外的话就可以看到结果了

例子文件阅读
| 1 2 3 |
example_binaries/ : 里面是需要加载的so
vfs/ : 里面是虚拟的文件系统, 有需要可以自己添加文件
androidemu/ : android虚拟机
|
| 1 2 3 4 5 6 7 8 9 10 11 12 13 14 15 16 17 18 19 20 21 22 23 24 25 26 27 28 29 30 31 32 33 34 35 36 37 38 39 40 41 42 43 44 45 |
import logging
import sys
from unicorn import UC_HOOK_CODE
from unicorn.arm_const import *
from androidemu.emulator import Emulator
# 配置日志相关设置
logging.basicConfig(
stream=sys.stdout, #标准输出流
level=logging.DEBUG, #输出等级
format="%(asctime)s %(levelname)7s %(name)34s | %(message)s" #输出格式
)
logger = logging.getLogger(__name__) #实例化对象
# 实例化虚拟机
emulator = Emulator()
#加载Libc库
emulator.load_library("example_binaries/libc.so", do_init=False)
#加载要模拟器的库
lib_module = emulator.load_library("example_binaries/libnative-lib.so")
#打印已经加载的模块
logger.info("Loaded modules:")
for module in emulator.modules:
logger.info("[0x%x] %s" % (module.base, module.filename))
#trace 每步执行的指令, 方便调试, 其实也可以取消
def hook_code(mu, address, size, user_data):
instruction = mu.mem_read(address, size)
instruction_str = ''.join('{:02x} '.format(x) for x in instruction)
print('# Tracing instruction at 0x%x, instruction size = 0x%x, instruction = %s' % (address, size, instruction_str))
emulator.mu.hook_add(UC_HOOK_CODE, hook_code)
#通过导出符号来调用函数
emulator.call_symbol(lib_module, '_Z4testv')
#通过R0来获取调用结构
print("String length is: %i" % emulator.mu.reg_read(UC_ARM_REG_R0))
|
自己写个小Demo测试
Demo代码
新建一个jni工程, demo的代码很简单, 就是一个加法
| 1 2 3 4 5 6 7 8 9 10 11 12 13 14 |
JNIEXPORT int nativeAdd(int a, int b)
{
return a + b;
}
extern "C" JNIEXPORT jint JNICALL
Java_com_mario_testunicorn_MainActivity_myAdd(
JNIEnv* env,
jobject /*this*/,
int a,
int b){
return nativeAdd(a,b);
}
|
emu代码
注释写的很详细, 具体看代码吧
| 1 2 3 4 5 6 7 8 9 10 11 12 13 14 15 16 17 18 19 20 21 22 23 24 25 26 27 28 29 30 31 32 33 34 35 36 37 38 39 40 41 42 43 44 45 46 47 48 49 50 51 52 53 54 55 56 57 58 59 60 61 62 63 |
import logging
import posixpath
import sys
from unicorn import UcError, UC_HOOK_CODE, UC_HOOK_MEM_UNMAPPED
from unicorn.arm_const import *
from androidemu.emulator import Emulator
import debug_utils
# 配置日志
logging.basicConfig(
stream=sys.stdout,
level=logging.DEBUG,
format="%(asctime)s %(levelname)7s %(name)34s | %(message)s"
)
logger = logging.getLogger(__name__)
# 初始化模拟器
emulator = Emulator(
vfp_inst_set=True,
vfs_root=posixpath.join(posixpath.dirname(__file__), "vfs")
)
# 加载依赖的动态库
emulator.load_library("example_binaries/libdl.so")
emulator.load_library("example_binaries/libc.so", do_init=False)
emulator.load_library("example_binaries/libstdc++.so")
emulator.load_library("example_binaries/libm.so")
lib_module = emulator.load_library("example_binaries/libmytest.so")
# 当前已经load的so
logger.info("Loaded modules:")
for module in emulator.modules:
logger.info("=> 0x%08x - %s" % (module.base, module.filename))
try:
# 运行jni onload 这里没有, 但不影响执行
emulator.call_symbol(lib_module, 'JNI_OnLoad', emulator.java_vm.address_ptr, 0x00)
#直接调用符号1, 计算1+2
emulator.call_symbol(lib_module, '_Z9nativeAddii', 1, 2)
print("_Z9nativeAddii result call: %i" % emulator.mu.reg_read(UC_ARM_REG_R0))
#直接调用符号2, 计算1000 + 1000
emulator.call_symbol(lib_module, 'Java_com_mario_testunicorn_MainActivity_myAdd', 0, 0, 1000, 1000)
print("myAdd result call: %i" % emulator.mu.reg_read(UC_ARM_REG_R0))
#执行完成, 退出虚拟机
logger.info("Exited EMU.")
logger.info("Native methods registered to MainActivity:")
except UcError as e:
print("Exit at %x" % emulator.mu.reg_read(UC_ARM_REG_PC))
raise
|
RuntimeError: Unhandled syscall x (x) at 解决
这个错误是因为没有实现对应syscall导致的, 缺少什么函数, 自己写一个函数绑定一下, 返回给他需要的值就可以了, 比如getpid, 那么自己写的函数随便返回一个整形就可以了
在syscall_hooks.py文件里, 可以看到作者已经实现的函数
| 1 2 3 4 5 6 7 8 9 10 11 |
self._syscall_handler.set_handler(0x4E, "gettimeofday", 2, self._handle_gettimeofday)
self._syscall_handler.set_handler(0xAC, "prctl", 5, self._handle_prctl)
self._syscall_handler.set_handler(0xF0, "futex", 6, self._handle_futex)
self._syscall_handler.set_handler(0x107, "clock_gettime", 2, self._handle_clock_gettime)
self._syscall_handler.set_handler(0x119, "socket", 3, self._socket)
self._syscall_handler.set_handler(0x11b, "connect", 3, self._connect)
self._syscall_handler.set_handler(0x159, "getcpu", 3, self._getcpu)
self._syscall_handler.set_handler(0x14e, "faccessat", 4, self._faccessat)
self._syscall_handler.set_handler(0x14, "getpid", 0, self._getpid)
self._syscall_handler.set_handler(0xe0, "gettid", 0, self._gettid)
self._syscall_handler.set_handler(0x180,"null1",0, self._null)
|
| 1 2 3 4 5 |
set_handler函数参数:
arg1: 中断号(intno),中断号可以在ndk中的unistd.h中找到
arg2: 函数名
arg3: 参数数量
arg4: 绑定的自定义函数
|
执行结果

实战一款风控SO
实战目标
以下信息通过分析所得, 具体分析过程不是本文重点, 这里不赘述;
| 1 2 3 4 |
目标文件: libtest.so
目标函数: a(char* buf, int buf_len)
返回值: return_value > 0, 表示风险环境并且会在buf参数里写入详细风险环境信息;
return_value == 0, 表示正常环境
|
EMU代码
详情看注释, 写的很详细
| 1 2 3 4 5 6 7 8 9 10 11 12 13 14 15 16 17 18 19 20 21 22 23 24 25 26 27 28 29 30 31 32 33 34 35 36 37 38 39 40 41 42 43 44 45 46 47 48 49 50 51 52 53 54 55 56 57 58 59 60 61 62 63 64 65 66 67 68 69 70 71 72 |
import logging
import posixpath
import sys
from unicorn import UcError, UC_HOOK_CODE, UC_HOOK_MEM_UNMAPPED
from unicorn.arm_const import *
from androidemu.emulator import Emulator
from androidemu.java.java_class_def import JavaClassDef
from androidemu.java.java_method_def import java_method_def
# Create java class.
import debug_utils
# 配置日志
logging.basicConfig(
stream=sys.stdout,
level=logging.DEBUG,
format="%(asctime)s %(levelname)7s %(name)34s | %(message)s"
)
logger = logging.getLogger(__name__)
# 初始化模拟器
emulator = Emulator(
vfp_inst_set=True,
vfs_root=posixpath.join(posixpath.dirname(__file__), "vfs")
)
# 加载依赖的动态库
emulator.load_library("example_binaries/libdl.so")
emulator.load_library("example_binaries/libc.so", do_init=False)
emulator.load_library("example_binaries/libstdc++.so")
emulator.load_library("example_binaries/liblog.so")
emulator.load_library("example_binaries/libm.so")
#目标so
lib_module = emulator.load_library("example_binaries/libtest.so")
# 当前已经load的so
logger.info("Loaded modules:")
for module in emulator.modules:
logger.info("=> 0x%08x - %s" % (module.base, module.filename))
try:
# 运行jni onload 这里没有, 但不影响执行
emulator.call_symbol(lib_module, 'JNI_OnLoad', emulator.java_vm.address_ptr, 0x00)
# 增加properties, 该so或通过获取一些properties来判断环境
emulator.system_properties['ro.build.fingerprint'] = 'google/passion/passion:2.3.3/GRI40/102588:user/release-keys'
emulator.system_properties['ro.product.cpu.abi'] = 'arm'
emulator.system_properties['microvirt.vbox_dpi'] = ''
#申请一块buff, 用作参数
emulator.call_symbol(lib_module, 'malloc', 0x1000)
address = emulator.mu.reg_read(UC_ARM_REG_R0)
#在之前申请的buff读取内存
detect_str = memory_helpers.read_utf8(emulator.mu, address)
print("detect_str: " + detect_str)
#执行完成, 退出虚拟机
logger.info("Exited EMU.")
logger.info("Native methods registered to MainActivity:")
except UcError as e:
print("Exit at %x" % emulator.mu.reg_read(UC_ARM_REG_PC))
raise
|
执行结果:

可以看见, 函数已经调用成功, 并且已经成功获取返回值和参数, 不过检测出风险环境了(因为我的vfs文件都是从虚拟机里拷贝出来的), 接下来就可以分析检测点了!~~
过检测
1.通过执行日志分析, 发现频繁访问了build.prop, maps等系统环境, 猜测可能是通过这些文件来判断的, 这里列出个别几个
| 1 2 3 4 5 6 7 8 |
2019-09-21 16:08:27,677 INFO androidemu.vfs.file_system | Reading 1024 bytes from '/proc/cpuinfo'
2019-09-21 16:08:27,680 DEBUG androidemu.cpu.syscall_handlers | Executing syscall read(00000005, 02089000, 00000400) at 0xcbc1ba7c
2019-09-21 16:08:27,783 INFO androidemu.vfs.file_system | Reading 1024 bytes from '/proc/self/maps'
2019-09-21 16:08:27,784 DEBUG androidemu.cpu.syscall_handlers | Executing syscall close(00000008) at 0xcbc1a854
2019-09-21 16:08:27,886 INFO androidemu.vfs.file_system | File opened '/proc/self/status'
2019-09-21 16:08:27,887 DEBUG androidemu.cpu.syscall_handlers | Executing syscall fstat64(0000000a, 000ff3e8) at 0xcbc1b314
|
2.通过反复测试, 修改对应文件中的关键信息, 最终成功躲过该风控模块的环境检测
如下:

总结
该项目是通过Unicron来实现的, Unicorn 是一款非常优秀的跨平台模拟执行框架, 通过上帝视角来调试和调用二进制代码, 几乎可以很清晰发现反调试和检测手段, 而Unicorn的应用绝不仅仅只是个虚拟机, 可以实现很多骚操作, 再次感谢QEMU, Unicron, AndroidNativeEmu等等这些开源大神, 是这些人的分享精神推进了整个圈子的技术迭代;


