python 绘图sns.distplot
0.语法
seaborn.distplot(a=None, bins=None, hist=True, kde=True, rug=False, fit=None, hist_kws=None, kde_kws=None, rug_kws=None, fit_kws=None, color=None, vertical=False, norm_hist=False, axlabel=None, label=None, ax=None, x=None)
sns.distplot:直方图(hist)+内核密度函数(kde)
关键参数:
norm_hist:若为True, 则直方图高度显示密度而非计数(含有kde图像中默认为True)。
当kde与norm_hist皆为Fasle时,它的plot与matplotlib.pyplot.hist是一模一样的。表现频次。
rug=True,绘制变量分布情况。
1.sns.distplot修改核密度曲线属性
g=sns.distplot(x,
               hist=True,
               kde=True,#开启核密度曲线kernel density estimate (KDE)
               kde_kws={'linestyle':'--','linewidth':'1','color':'#c72e29',#设置外框线属性
                       },
               color='#098154',
               axlabel='Xlabel',#设置x轴标题
              )
2.核密度函数Kernel Density Estimation(KDE)
https://blog.csdn.net/weixin_39910711/article/details/107307509
- 核密度估计(kernel density estimation)是在概率论中用来估计未知的密度函数,属于非参数检验方法之一。
- 反映出离散测量值在连续区域内的分布情况。
- 密度估计最简单的非参数技术是直方图。
- sns.distplot:y轴表示密度,每个直方图的面积代表概率。
https://www.cnblogs.com/tangjianwei/p/13753633.html - 绘制KDE图比绘制直方图要复杂得多,每个观测值首先要以该值为中心的正(高斯)曲线代替。然后各个点在加起来,计算支持网格点中每个点的密度值,然后将得到的曲线归一化,使其面积小于1,即得到核密度估计图.
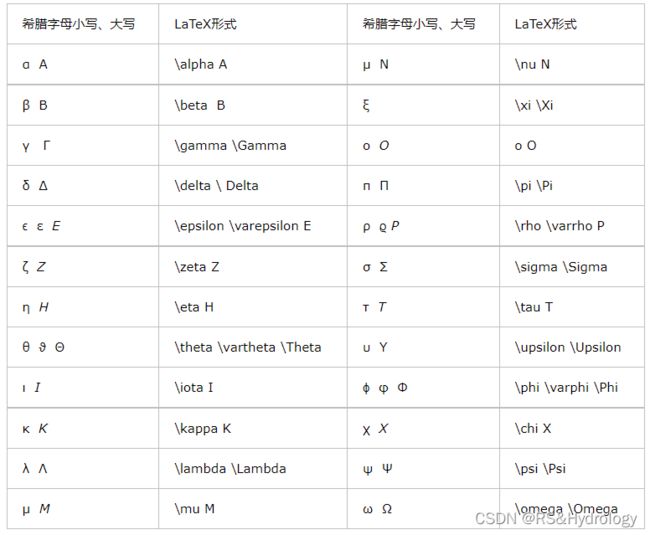
3.绘图输出希腊字母
希腊字母表:http://www.fhdq.net/yy/76.html
图片来源:https://www.cnblogs.com/gegemu/p/11459167.html
----小写-------- ------大写------
α \alpha Α
β \beta Β
γ \gamma Γ \Gamma
δ \delta Δ \Delta
ε \epsilon Ε
ζ \zeta Ζ
η \eta Η
θ \theta Θ \Theta
ι \iota Ι
κ \kappa Κ
λ \lambda Λ \Lambda
μ \mu Μ
ν \nu Ν
ξ \xi Ξ \Xi
ο \o Ο
π \pi Π \Pi
ρ \rho Ρ
σ \sigma Σ \Sigma
τ \tau Τ
υ \upsilon Υ \Upsilon
φ \phi Φ \Phi
χ \chi Χ
ψ \psi Ψ \Psi
ω \omega Ω \Omega
----------------数学符号-----------------
± \pm 上标 a^b
× \times 下标 a_b
÷ \div
≥ \geq
≤ \leq
正负 \pm 左箭头 \leftarrow 右箭头 \rightarrow 上箭头 \uparrow
python支持LaTex语法,输入格式为:r’$ \Delta $’ #其中的Delta对应于希腊字母的Δ
r'$\Delta$Height(m)' #对应于ΔHeight(m)
输出用到字符串格式化:
%o:oct 八进制
%d:dec 十进制
%x:hex 十六进制
%f:浮点数 print("浮点数:%f,%f " % (1, 22.22))
%.2f :保留2位小数
%05.2f :保留2位小数,宽5位(包括小数点),不足补0
%s:字符串输出
%5s:字符串不足5位,左边补空格
%-5s:字符串不足5位,右边补空格
具体用法:
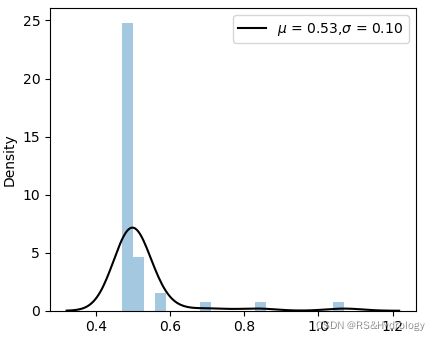
sns.kdeplot(x, label=r'$\mu$ = %.2f,$\sigma$ = %.2f'%(var_mean,var_std))
4.利用plot绘制 直方图+核密度曲线图
https://www.statsmodels.org/stable/examples/notebooks/generated/kernel_density.html
代码:
df = pd.read_excel('./1.xlsx')
x = df['variable']
var_mean = x.mean()
var_std = x.std()

kde = sm.nonparametric.KDEUnivariate(x)
kde.fit()  # Estimate the densities

fig = plt.figure(figsize=(12/2.54,10/2.54))
ax = fig.add_subplot(111)

# Plot the histrogram
ax.hist(
    x,
    bins=20,
    label="Histogram ",
    zorder=5,
    edgecolor="k",
    density=True,
    alpha=0.5,
)

# Plot the KDE for various bandwidths
# for bandwidth in [0.1, 0.2, 0.4]:
#     kde.fit(bw=bandwidth)  # Estimate the densities
#     ax.plot(
#         kde.support,
#         kde.density,
#         "--",
#         lw=2,
#         color="k",
#         zorder=10,
#         label="KDE from samples, bw = {}".format(round(bandwidth, 2)),
#     )

ax.legend(loc="best")
5.在图中显示核密度函数的label
g = sns.distplot(x,
                 bins=20,
                 kde = False,
                 norm_hist=True,#If True, the histogram height shows a density rather than a count
                 # fit = norm,
                 # color='b',
                 # rug=True,
                 label = 'mean')
plt.legend()
显示的为直方图的label,要想显示核密度函数的label,这里我利用sns.kdeplot(x, label="u"),重新绘制核密度函数。其实是sns.distplot调用了sns.kdeplot这个函数。
sns.kdeplot函数语法:
seaborn.kdeplot(data, data2=None, shade=False, vertical=False, kernel=’gau’, bw=’scott’, gridsize=100, cut=3, clip=None, legend=True, cumulative=False, shade_lowest=True, cbar=False, cbar_ax=None, cbar_kws=None, ax=None, **kwargs)
sns.kdeplot函数参数:
-
kernel:默认高斯内核。
kernel:{‘gau’ | ‘cos’ | ‘biw’ | ‘epa’ | ‘tri’ | ‘triw’ },可选参数 -
bw:{‘scott’ | ‘silverman’ | scalar | pair of scalars },可选参数,用于确定双变量图的每个维的核大小、标量因子或标量的参考方法的名称。
6.完整代码:
#test
df = pd.read_excel('./1.xlsx')
x = df['var']
var_mean = x.mean()
var_std = x.std()
plt.figure(figsize=(12/2.54,10/2.54))
g = sns.distplot(x,
                 bins=20,
                 kde = False,
                 norm_hist=True,#If True, the histogram height shows a density rather than a count
                 # fit = norm,
                 # color='b',
                 # rug=True,
                 # label = 'mean',
                 axlabel = r'$\Delta$ var (m)' )
sns.kdeplot(x, label=r'$\mu$ = %.2f,$\sigma$ = %.2f'%(var_mean,var_std),color = 'k')
plt.ylabel('Density')
# plt.axvline(ice_mean)
plt.legend()
plt.show()
# plt.savefig("cdf.png", bbox_inches = "tight",dpi = 300)
x=[10,20,30,50,40,20]
fig = plt.figure(figsize=(10,6))
sns.distplot(x,kde_kws={"label":"KDE"},axlabel='123',label='321')
plt.legend()


