安全开发-PHP应用&模版引用&Smarty渲染&MVC模型&数据联动&RCE安全&TP框架&路由访问&对象操作&内置过滤绕过&核心漏洞
文章目录
- 自写模版引用
- Smarty模版引用
- 代码RCE安全测试
- TP框架-开发-配置架构&路由&MVC模型
- TP框架-安全-不安全写法&版本过滤绕过
自写模版引用
1、页面显示样式编排
include 'config.php';
$template=file_get_contents('new.html');

$id=$_GET['id'] ?' ':'1';
$sql="select * from news where id=$id";
$data=mysqli_query($con,$sql);
while ($row=mysqli_fetch_row($data)) {
    $page_title=$row['1'];
    $heading=$row['2'];
    $subheading=$row['3'];
    $content=$row['4'];
    $item=$row['5'];
    //echo $page_title;
}
echo "$page_title
$page_title";

$template=str_replace('{page_title}',$page_title,$template);
$template=str_replace('{heading}',$subheading,$template);
$template=str_replace('{subheading}',$subheading,$template);
$template=str_replace('{content}',$content,$template);
$template=str_replace('{$item}',$item,$template);
eval('?>' . $template);
?>
2、显示数据插入页面
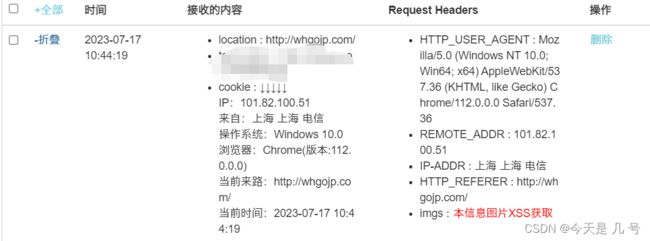
3、引用模版调用触发

解析执行成功获取到cookie值

Smarty模版引用
下载:https://github.com/smarty-php/smarty/releases
使用:
1、创建一个文件夹,命名为smarty-demo。
2、下载Smarty对应版本并解压缩到该文件夹中。
3、创建一个PHP文件,命名为index.php,并在文件中添加以下代码:
// 引入 Smarty 类文件
require('smarty-demo/libs/Smarty.class.php');
// 创建 Smarty 实例
$smarty = new Smarty;
// 设置 Smarty 相关属性
$smarty->template_dir = 'smarty-demo/templates/';
$smarty->compile_dir = 'smarty-demo/templates_c/';
$smarty->cache_dir = 'smarty-demo/cache/';
$smarty->config_dir = 'smarty-demo/configs/';
// 赋值变量到模板中
$smarty->assign('title', '欢迎使用 Smarty');
// 显示模板
$smarty->display('index.tpl');
?>
4、创建一个名为index.tpl的模板文件,并将以下代码复制到上述点定义文件夹中
DOCTYPE html>
<html>
<head>
<title>{$title}title>
head>
<body>
<h1>{$title}h1>
<p>这是一个使用 Smarty 的例子。p>
body>
html>
代码RCE安全测试
1、自写模版的安全隐患
define('SMARTY_ROOT_DIR', str_replace('\\', '/', __DIR__));

define('SMARTY_COMPILE_DIR', SMARTY_ROOT_DIR.'/smarty3/templates_c');

define('SMARTY_CACHE_DIR', SMARTY_ROOT_DIR.'/smarty3/cache');

include_once(SMARTY_ROOT_DIR . '/smarty3/libs/Smarty.class.php');

class testSmarty extends Smarty_Resource_Custom
{
    protected function fetch($name, &$source, &$mtime)
    {
        $template = "CVE-2017-1000480 smarty PHP code injection";
        $source = $template;
        $mtime = time();
    }
}

$smarty = new Smarty();
$smarty->setCacheDir(SMARTY_CACHE_DIR);
$smarty->setCompileDir(SMARTY_COMPILE_DIR);
$smarty->registerResource('test', new testSmarty);
$smarty->display('test:'.$_GET['x']);
?>
2、第三方Smarty的安全隐患

关于CVE-2017-1000480参考:https://blog.csdn.net/qq_33020901/article/details/79150260
TP框架-开发-配置架构&路由&MVC模型
参考:https://www.kancloud.cn/manual/thinkphp5_1
1、配置架构-导入使用

2、路由访问-URL访问

没有启用路由的情况下典型的URL访问规则是:http://serverName/index.php(或者其它应用入口文件)/模块/控制器/操作/[参数名/参数值…]
http://www.tp5.com/index.php/index/index/whgojp

参数传递格式

其他的访问规则感兴趣的朋友可以自行尝试
3、数据库操作-应用对象
    public function testsql()
    {
        //使用tp框架操作mysql数据
//        SELECT * FROM `think_user` WHERE  `id` = 1 LIMIT 1

        //1、使用TP框架操作数据库 默认是受到框架内置过滤保护
        // 安全写法=推荐写法 不安全写法=原生写法(不会受到保护)
        // 1、安全写法 2、用一半安全写法 3、纯原生写法(完全不是用TP语法)
        //2、原生态的数据库操作如果没有过滤就会受到SQL注入攻击

        //规矩写法:不是绝对安全 看两点
        //看版本的内置绕过漏洞 同样也有漏洞
//        $id=request()->param('x');
//        $data=Db::table('news')->where('id',$id)->find();

        //用一半安全写法 有安全隐患
//        $id=request()->param('x');
//        $data=Db::query("select * from news where id=$id");

        //纯原生写法 有安全隐患
//        $id=$_GET['id'] ?? '1';
//        $sql="select * from news where id=$id";
//        $data=mysqli_query($con,$sql);
//        while ($row=mysqli_fetch_row($data)) {
        $username = request()->get('username/a');
        db('admin')->where("id")->update(['username' => $username]);
        //return json($data);
    }
4、文件上传操作-应用对象
    public function upload(){
        // 获取表单上传文件 例如上传了001.jpg
        $file = request()->file('image');
        // 移动到框架应用根目录/uploads/ 目录下
        $info = $file->validate(['ext'=>'jpg,png,gif'])->move( '../uploads');
        if($info){
            // 成功上传后 获取上传信息
            // 输出 jpg
            echo $info->getExtension();
            // 输出 20160820/42a79759f284b767dfcb2a0197904287.jpg
            echo $info->getSaveName();
            // 输出 42a79759f284b767dfcb2a0197904287.jpg
            echo $info->getFilename();
        }else{
            // 上传失败获取错误信息
            echo $file->getError();
        }
    }
5、前端页面渲染-MVC模型
TP框架-安全-不安全写法&版本过滤绕过
1、内置代码写法
例子:不合规的代码写法-TP5-自写
2、框架版本安全
例子1:写法内置安全绕过-TP5-SQL注入
例子2:内置版本安全漏洞-TP5-代码执行