springboot启动之配置文件秘密
我们如果要从springboot的环境中获取到配置文件的属性,只要注入一个Environment,然后直接调用getProperty(),方法就可以获取到。
	@Autowired
	Environment environment;

	....
	environment.getProperty("pro");
那么environment是怎么读取到我们定义的配置文件(例如application.properties、application-active.properties、application.yml、application-active.yml、nacos配置等)中的属性的呢?他们的顺序又是怎么样的呢?
接下来进入解密时刻,见证奇迹,额。有点长。
当我们调用environment.getProperty(“pro”)时候,具体执行的方法是PropertySourcesPropertyResolver 中的getProperty,不要问我为啥是它,反正就是!
public class PropertySourcesPropertyResolver extends AbstractPropertyResolver {
	...
	@Nullable
	protected <T> T getProperty(String key, Class<T> targetValueType, boolean resolveNestedPlaceholders) {
		if (this.propertySources != null) {
			//会循环propertySources
			for (PropertySource<?> propertySource : this.propertySources) {
				if (logger.isTraceEnabled()) {
					logger.trace("Searching for key '" + key + "' in PropertySource '" +
							propertySource.getName() + "'");
				}
				Object value = propertySource.getProperty(key);
				if (value != null) {
					if (resolveNestedPlaceholders && value instanceof String) {
						value = resolveNestedPlaceholders((String) value);
					}
					logKeyFound(key, propertySource, value);
					return convertValueIfNecessary(value, targetValueType);
				}
			}
		}
		if (logger.isTraceEnabled()) {
			logger.trace("Could not find key '" + key + "' in any property source");
		}
		return null;
	}
	...
}
所以我们只要搞清楚 属性propertySources是怎么赋值的,就可以知道读取配置文件的秘密了!
刚才说environment.getProperty(“pro”)时候,具体执行的方法是PropertySourcesPropertyResolver 中的getProperty,刷了流氓,还是要看下为啥是执行这个方法,我是怎么知道的呢?对就是它,debug出来的
@Component
public class PropertyCommand implements CommandLineRunner {


    @Autowired
    Environment environment;

    @Override
    public void run(String... args) throws Exception {
    	//来 搞个断点
        System.out.println(environment.getProperty("pro"));
    }
}
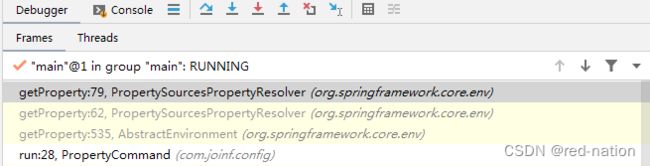
执行的是AbstractEnvironment中的getProperty(),那他是怎么跑到PropertySourcesPropertyResolver 中的呢?
public abstract class AbstractEnvironment implements ConfigurableEnvironment {

	//还是只看我们关注的
	private final MutablePropertySources propertySources = new MutablePropertySources();

	private final ConfigurablePropertyResolver propertyResolver =
			new PropertySourcesPropertyResolver(this.propertySources);

	...
	@Override
	@Nullable
	public String getProperty(String key) {
		return this.propertyResolver.getProperty(key);
	}
	...
}
来到我们的要讲的重点对象了AbstractEnvironment ,想要知道这个对象是啥时候作用的,还是要看springboot的启动流程,哇重点了,跟写作文一样的点睛!
SpringApplication.run(xxx.class, args);,必须加粗,我们在main方法中都会执行这个方法,然后它就起来了,进入看下流程,重点关注SpringApplication 类
public class SpringApplication {

	//还是只贴我们关注的
	//1: 执行这个方法
	public static ConfigurableApplicationContext run(Class<?> primarySource, String... args) {
		return run(new Class<?>[] { primarySource }, args);
	}

	//2: 执行这个方法
	public static ConfigurableApplicationContext run(Class<?>[] primarySources, String[] args) {
		//要去构造一个SpringApplication,再run起来
		return new SpringApplication(primarySources).run(args);
	}

	//3: 执行它,注意这个参数是我们传进来的xxx.class,后面有大作用
	public SpringApplication(Class<?>... primarySources) {
		this(null, primarySources);
	}

	//4: 看看都构造了哪些东西
	public SpringApplication(ResourceLoader resourceLoader, Class<?>... primarySources) {
		this.resourceLoader = resourceLoader;
		Assert.notNull(primarySources, "PrimarySources must not be null");
		this.primarySources = new LinkedHashSet<>(Arrays.asList(primarySources));
		//根据当前加载的类,判断对类型是 SERVLET(目前是我)、REACTIVE、NONE
		this.webApplicationType = WebApplicationType.deduceFromClasspath();
		//看到了啥,getSpringFactoriesInstances,之前都让我们去META-INF/spring.factories下定义写东西,springboot就认识你了
		//这里加载了ApplicationContextInitializer.class,ApplicationListener.class,会在启动的各个时候执行
		setInitializers((Collection) getSpringFactoriesInstances(ApplicationContextInitializer.class));
		setListeners((Collection) getSpringFactoriesInstances(ApplicationListener.class));
		this.mainApplicationClass = deduceMainApplicationClass();
	}
}

//放在一起看下吧,
public final class SpringFactoriesLoader {

	public static final String FACTORIES_RESOURCE_LOCATION = "META-INF/spring.factories";

	private static Map<String, List<String>> loadSpringFactories(@Nullable ClassLoader classLoader) {
		MultiValueMap<String, String> result = cache.get(classLoader);
		if (result != null) {
			return result;
		}

		try {
			Enumeration<URL> urls = (classLoader != null ?
					classLoader.getResources(FACTORIES_RESOURCE_LOCATION) :
					ClassLoader.getSystemResources(FACTORIES_RESOURCE_LOCATION));
			result = new LinkedMultiValueMap<>();
			while (urls.hasMoreElements()) {
				URL url = urls.nextElement();
				UrlResource resource = new UrlResource(url);
				Properties properties = PropertiesLoaderUtils.loadProperties(resource);
				for (Map.Entry<?, ?> entry : properties.entrySet()) {
					String factoryTypeName = ((String) entry.getKey()).trim();
					for (String factoryImplementationName : StringUtils.commaDelimitedListToStringArray((String) entry.getValue())) {
						result.add(factoryTypeName, factoryImplementationName.trim());
					}
				}
			}
			cache.put(classLoader, result);
			return result;
		}
		catch (IOException ex) {
			throw new IllegalArgumentException("Unable to load factories from location [" +
					FACTORIES_RESOURCE_LOCATION + "]", ex);
		}
	}
}
讲了这么多还没到刚才要讲的 AbstractEnvironment,是有点啰嗦,但是还是要讲的跟我们加载配置有关系的,赶紧继续吧,也请看下去会给你讲明白的
赶紧run起来吧
public class SpringApplication {

	public ConfigurableApplicationContext run(String... args) {
		StopWatch stopWatch = new StopWatch();
		stopWatch.start();
		ConfigurableApplicationContext context = null;
		Collection<SpringBootExceptionReporter> exceptionReporters = new ArrayList<>();
		configureHeadlessProperty();
		SpringApplicationRunListeners listeners = getRunListeners(args);
		listeners.starting();
		try {
			ApplicationArguments applicationArguments = new DefaultApplicationArguments(args);
			// 看这里。。。,准备环境
			ConfigurableEnvironment environment = prepareEnvironment(listeners, applicationArguments);
			...
			//后续步骤先不看
		}
		catch (Throwable ex) {
			handleRunFailure(context, ex, exceptionReporters, listeners);
			throw new IllegalStateException(ex);
		}
		return context;
	}

	private ConfigurableEnvironment prepareEnvironment(SpringApplicationRunListeners listeners,
		ApplicationArguments applicationArguments) {
		// Create and configure the environment,对就是这里 描述是原话
		ConfigurableEnvironment environment = getOrCreateEnvironment();
		configureEnvironment(environment, applicationArguments.getSourceArgs());
		ConfigurationPropertySources.attach(environment);
		listeners.environmentPrepared(environment);
		bindToSpringApplication(environment);
		if (!this.isCustomEnvironment) {
			environment = new EnvironmentConverter(getClassLoader()).convertEnvironmentIfNecessary(environment,
					deduceEnvironmentClass());
		}
		ConfigurationPropertySources.attach(environment);
		return environment;
	}

	private ConfigurableEnvironment getOrCreateEnvironment() {
		if (this.environment != null) {
			return this.environment;
		}
		switch (this.webApplicationType) {
		//是我
		case SERVLET:
			return new StandardServletEnvironment();
		case REACTIVE:
			return new StandardReactiveWebEnvironment();
		default:
			return new StandardEnvironment();
		}
	}
}
妈呀! 终于到了,你们会说哪里有AbstractEnvironment? 是的没错了,StandardServletEnvironment继承了StandardEnvironment,它又继承了AbstractEnvironment。
既然是继承,那么new StandardServletEnvironment();就会执行它爹、爷的构造函数,配置文件初始构造就要出来了,看
// AbstractEnvironment 构造函数
public AbstractEnvironment() {
customizePropertySources(this.propertySources);
}
// StandardEnvironment 重载
@Override
protected void customizePropertySources(MutablePropertySources propertySources) {
propertySources.addLast(
new PropertiesPropertySource(SYSTEM_PROPERTIES_PROPERTY_SOURCE_NAME, getSystemProperties()));
propertySources.addLast(
new SystemEnvironmentPropertySource(SYSTEM_ENVIRONMENT_PROPERTY_SOURCE_NAME, getSystemEnvironment()));
}
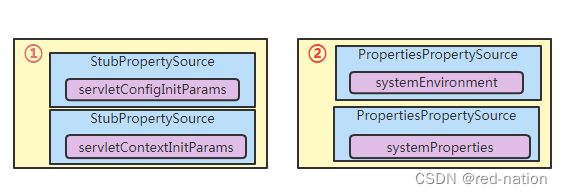
// StandardServletEnvironment
@Override
protected void customizePropertySources(MutablePropertySources propertySources) {
propertySources.addLast(new StubPropertySource(SERVLET_CONFIG_PROPERTY_SOURCE_NAME));
propertySources.addLast(new StubPropertySource(SERVLET_CONTEXT_PROPERTY_SOURCE_NAME));
if (JndiLocatorDelegate.isDefaultJndiEnvironmentAvailable()) {
propertySources.addLast(new JndiPropertySource(JNDI_PROPERTY_SOURCE_NAME));
}
super.customizePropertySources(propertySources);
}
看下这个时候propertysource的小火车
来,我们继续看看这个火车的怎么一节节变长的,构造出environment对象后,会执行configureEnvironment方法,都在SpringApplication 类中
private ConfigurableEnvironment prepareEnvironment(SpringApplicationRunListeners listeners,
		ApplicationArguments applicationArguments) {
		// Create and configure the environment
		ConfigurableEnvironment environment = getOrCreateEnvironment();
		//到这里了
		configureEnvironment(environment, applicationArguments.getSourceArgs());
		ConfigurationPropertySources.attach(environment);
		listeners.environmentPrepared(environment);
		bindToSpringApplication(environment);
		if (!this.isCustomEnvironment) {
			environment = new EnvironmentConverter(getClassLoader()).convertEnvironmentIfNecessary(environment,
					deduceEnvironmentClass());
		}
		ConfigurationPropertySources.attach(environment);
		return environment;
	}

	protected void configureEnvironment(ConfigurableEnvironment environment, String[] args) {
		if (this.addConversionService) {
			ConversionService conversionService = ApplicationConversionService.getSharedInstance();
			environment.setConversionService((ConfigurableConversionService) conversionService);
		}
		//
		configurePropertySources(environment, args);
		configureProfiles(environment, args);
	}

	//来到了加长小火车的地方了
	protected void configurePropertySources(ConfigurableEnvironment environment, String[] args) {
		MutablePropertySources sources = environment.getPropertySources();
		//默认属性,我们启动没配置
		if (this.defaultProperties != null && !this.defaultProperties.isEmpty()) {
			sources.addLast(new MapPropertySource("defaultProperties", this.defaultProperties));
		}
		//命令行属性,是不是,我们在idea启动加写配置,就能读取出来
		if (this.addCommandLineProperties && args.length > 0) {
			String name = CommandLinePropertySource.COMMAND_LINE_PROPERTY_SOURCE_NAME;
			if (sources.contains(name)) {
				PropertySource<?> source = sources.get(name);
				CompositePropertySource composite = new CompositePropertySource(name);
				composite.addPropertySource(
						new SimpleCommandLinePropertySource("springApplicationCommandLineArgs", args));
				composite.addPropertySource(source);
				sources.replace(name, composite);
			}
			else {
				//看这里放到第一个,优先级目前第一,火车头
				sources.addFirst(new SimpleCommandLinePropertySource(args));
			}
		}
	}
还是来看下目前的propertysource小火车,注意 commandLineArgs的格式是 --p1=csdn

小火车继续开,看看还有谁还没上车? 我们熟悉的application.yml、application.properties等是在哪里上车的呢?
在执行configureEnvironment方法后会执行 ,ConfigurationPropertySources.attach(environment);代码就不贴了,怕太长了!看看具体执行的就好
	public static void attach(Environment environment) {
		Assert.isInstanceOf(ConfigurableEnvironment.class, environment);
		MutablePropertySources sources = ((ConfigurableEnvironment) environment).getPropertySources();
		PropertySource<?> attached = sources.get(ATTACHED_PROPERTY_SOURCE_NAME);
		if (attached != null && attached.getSource() != sources) {
			sources.remove(ATTACHED_PROPERTY_SOURCE_NAME);
			attached = null;
		}
		// 来就这里
		if (attached == null) {
			sources.addFirst(new ConfigurationPropertySourcesPropertySource(ATTACHED_PROPERTY_SOURCE_NAME,
					new SpringConfigurationPropertySources(sources)));
		}
	}

这里我不标准序号,是个特殊的property,它的值存的是当前所有的propertysource,而且会在很多时候改变他,那么它的作用是啥,为什么要存所有的对象呢。它是给springboot新特性Binder使用的,具体怎么使用就不展开了。
走~~继续往前开! 下一步要执行的是listeners.environmentPrepared(environment);
还记得为了看AbstractEnvironment怎么来的时候,看了构造 new StandardServletEnvironment()从spring.factories文件中读取的配置信息吗?这里具体加载的是EventPublishingRunListener ,会发布一个事件 ApplicationEnvironmentPreparedEvent
我们聚焦在springboot默认提供的listeners
- BootstrapApplicationListener (spring cloud包下)
- ConfigFileApplicationListener
首先执行的是BootstrapApplicationListener,他会重新生成一个environment,并执行run,是当前环境的父容器,具体不展开,做个TODO吧!但是我们要关注一个重点,他启动的并执行run的source是BootstrapImportSelectorConfiguration.class(会在springapplication中的load方法加载到spring容器),还记得我们开始的是谁吗?xxx.class;
BootstrapImportSelectorConfiguration有个注解@Import(BootstrapImportSelector.class),实现了DeferredImportSelector,会加载相应的类到spring容器中,这个要看springbean加载流程了!
public class BootstrapImportSelector implements EnvironmentAware, DeferredImportSelector {
	@Override
	public String[] selectImports(AnnotationMetadata annotationMetadata) {
		ClassLoader classLoader = Thread.currentThread().getContextClassLoader();
		// Use names and ensure unique to protect against duplicates
		//重点是这里 会加载BootstrapConfiguration实现类
		List<String> names = new ArrayList<>(SpringFactoriesLoader
				.loadFactoryNames(BootstrapConfiguration.class, classLoader));
		names.addAll(Arrays.asList(StringUtils.commaDelimitedListToStringArray(
				this.environment.getProperty("spring.cloud.bootstrap.sources", ""))));

		List<OrderedAnnotatedElement> elements = new ArrayList<>();
		for (String name : names) {
			try {
				elements.add(
						new OrderedAnnotatedElement(this.metadataReaderFactory, name));
			}
			catch (IOException e) {
				continue;
			}
		}
		AnnotationAwareOrderComparator.sort(elements);

		String[] classNames = elements.stream().map(e -> e.name).toArray(String[]::new);

		return classNames;
	}
}
这里会出现第一个springboot提供自定义扩展propertysource加载入口,在spring.factories中key = org.springframework.cloud.bootstrap.BootstrapConfiguration,我们的Nacos就是这里拓展的。注意这里只是加载到spring容器中没有加载到propertysources中,什么时候加载的呢?等下看
org.springframework.cloud.bootstrap.BootstrapConfiguration=\
com.alibaba.cloud.nacos.NacosConfigBootstrapConfiguration
我们再来看看 ConfigFileApplicationListener,重点来了,提供了又一种自定义扩展propertysource加载入口
- 实现接口EnvironmentPostProcessor,并在spring.factories中key = org.springframework.boot.env.EnvironmentPostProcessor,例如spring提供的HostInfoEnvironmentPostProcessor等,当然ConfigFileApplicationListener本身也继承了
- 实现接口PropertySourceLoader.class,并在spring.factories中key = org.springframework.boot.env.PropertySourceLoader, 常见的配置application.properties、application.yml都是通过加载, 具体实现YamlPropertySourceLoader, PropertiesPropertySourceLoader; 我们可以自定义一个txt后缀的文件,就会加载application.txt。 还会根据当前启动环境加载application-active.properties,不展开
@Order(-1)
public class TxtPropertySource implements PropertySourceLoader {


    @Override
    public String[] getFileExtensions() {
        return new String[]{"txt"};
    }

    @Override
    public List<PropertySource<?>> load(String name, Resource resource) throws IOException {
        InputStream inputStream = resource.getInputStream();
        InputStreamReader inputStreamReader = new InputStreamReader(inputStream);
        BufferedReader bufferedReader = new BufferedReader(inputStreamReader);
        String s ;
        Map<String, Object> source = new HashMap<>();
        while ((s = bufferedReader.readLine())!=null){
            String[] split = new String(s).split("--");
            source.put(split[0],split[1]);
        }
        return Collections.singletonList(new MapPropertySource("s1",source));
    }
}
看看目前的小火车吧
![]()
也差不多完了吧,哦,还有个之前我们说的nacos扩展点还没加入队列,那他是什么时候上车的呢?
继续,SpringApplication在环境准备好后,会准备上下文context。这时候会执行prepareContext中的
applyInitializers(context);是个循环,会初始化所有ApplicationContextInitializer类型的。
我们看下spring提供的PropertySourceBootstrapConfiguration类
org.springframework.cloud.bootstrap.BootstrapConfiguration=\
com.alibaba.cloud.nacos.NacosConfigBootstrapConfiguration

public class PropertySourceBootstrapConfiguration implements
		ApplicationContextInitializer<ConfigurableApplicationContext>, Ordered {
	//获取到容器中的propertySourceLocators
	@Autowired(required = false)
	private List<PropertySourceLocator> propertySourceLocators = new ArrayList<>();

	private void insertPropertySources(MutablePropertySources propertySources,
			List<PropertySource<?>> composite) {
		MutablePropertySources incoming = new MutablePropertySources();
		List<PropertySource<?>> reversedComposite = new ArrayList<>(composite);
		// Reverse the list so that when we call addFirst below we are maintaining the
		// same order of PropertySources
		// Wherever we call addLast we can use the order in the List since the first item
		// will end up before the rest
		Collections.reverse(reversedComposite);
		for (PropertySource<?> p : reversedComposite) {
			incoming.addFirst(p);
		}
		PropertySourceBootstrapProperties remoteProperties = new PropertySourceBootstrapProperties();
		Binder.get(environment(incoming)).bind("spring.cloud.config",
				Bindable.ofInstance(remoteProperties));
		if (!remoteProperties.isAllowOverride() || (!remoteProperties.isOverrideNone()
				&& remoteProperties.isOverrideSystemProperties())) {
			for (PropertySource<?> p : reversedComposite) {
				//会加到小火车头部,商务座
				propertySources.addFirst(p);
			}
			return;
		}
		...
}
你有没有遇到,用了nacos本地怎么也覆盖(严格讲不是覆盖是读取不到)不了属性了,应该明白了吧!
提供个例子吧
//order 重要 要比nacos的小
@Order(-1)
public class SystemPropertySource implements PropertySourceLocator {


    @Override
    public PropertySource<?> locate(Environment environment) {
        Map<String, Object> source = new HashMap<>();
        source.put("pro.test","rednation");
        MapPropertySource mapPropertySource = new MapPropertySource("systemproperties",source);
        return mapPropertySource;
    }
}
终于。。完了!写作文总结下吧
向springboot容器中注入属性的方式有几种
- 在spring.factories中key = org.springframework.cloud.bootstrap.BootstrapConfiguration,实现类要实现接口PropertySourceLocator或者在对应的类里注入实现PropertySourceLocator的bean
- 实现接口EnvironmentPostProcessor.class,并在spring.factories中key = org.springframework.boot.env.EnvironmentPostProcessor
- 实现接口PropertySourceLoader.class,并在spring.factories中key = org.springframework.boot.env.PropertySourceLoader
- @Configuration +@PropertySource组合,这个怎么实现待续。。。