Dockerfile镜像制作+本地私有仓库(docker Registry和Docker Harbor最新版V2.0.0)搭建及排错
Dockerfile镜像制作
- 1.28 Dockerfile企业案例演练
- 1.29 Dockerfile语法命令详解一
- 1.30 Dockerfile语法命令详解二
- 1.31 Dockerfile制作规范及技巧
- 1.32 Dockerfile企业案例一
-
- 制作centos_yum_passwd_ssh镜像
- 1.33 Dockerfile企业案例二(ssh_redis)
- 1.34 Dockerfile企业案例三(部署lamp源码)
- 1.35 Dockerfile企业案例四(tomcat_jdk_二进制)
- 1.36 Dockerfile本地私有仓库实战
-
- 1)Docker镜像
- 2)Docker容器:
- 3)Docker仓库:
- 1.36.1 Docker阿里云镜像加速下载镜像实战
-
- 4)修改Docker默认镜像源方法:
- 5)修改完成,重启Docker引擎服务即可;
- 1.36.2 Docker Registry仓库源实战
-
- 1)登陆Docker仓库服务器,下载Docker registry镜像,命令如下:
- 2) 启动私有仓库容器,启动命令如下:
- 3) 上传镜像至本地私有仓库:
- 4)docker配置从私有仓库拉取镜像
-
- 5) 检测本地私有仓库:
- 6) 客户端使用本地私有仓库:
-
- Tips小提示
- 1.36.3 Docker Harbor仓库源实战
-
- Harbor仓库部署两种方式,一种是off-ine,一种是on-line,即离线和在线安装,此处选择离线安装:
-
- 1)安装Docker-Compose快速编排工具
- 2)下载Habor并且解压:
- 3)修改Habor配置文件harbor.yml.tmpl
- 4)安装Habor,命令如下
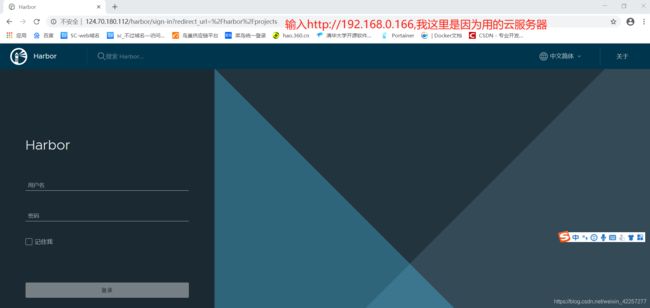
- 5)登陆Habor web平台,默认用户:admin 默认密码:Harbor12345 可在第三步修改
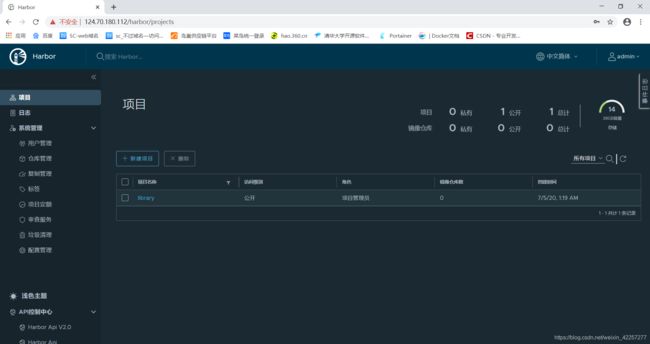
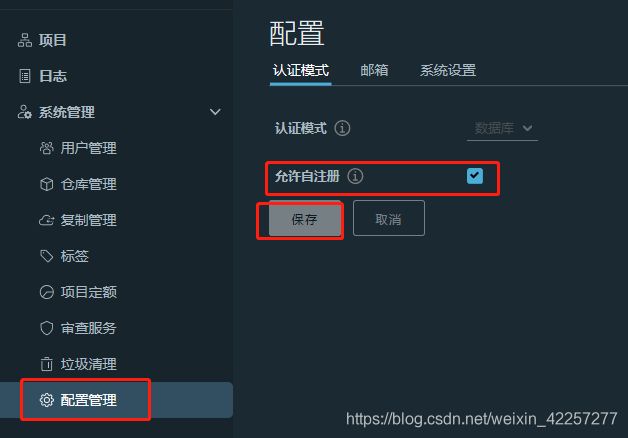
- 6)登陆Habor web控制台进一步设置
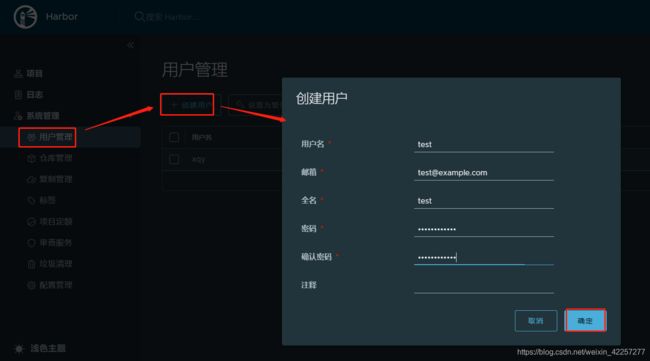
- 7)创建私有仓库用户名xqy,并且设置密码,并且绑定library库
- 8)修改docker客户端仓库地址为192.168.0.166,同时将tag修改为如下格式在上传到仓库
- 报错处理
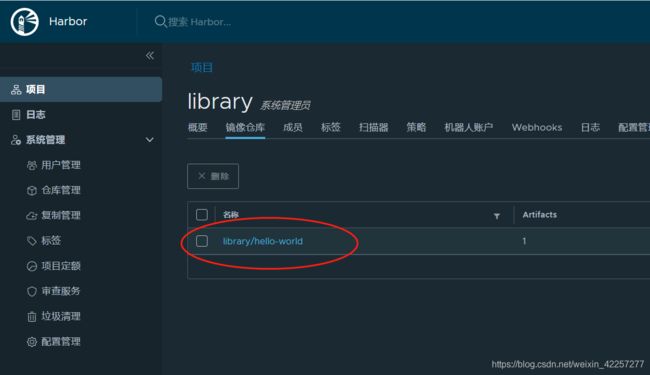
- 9)测试docker push 192.168.0.166/library/hello-world 测试成功
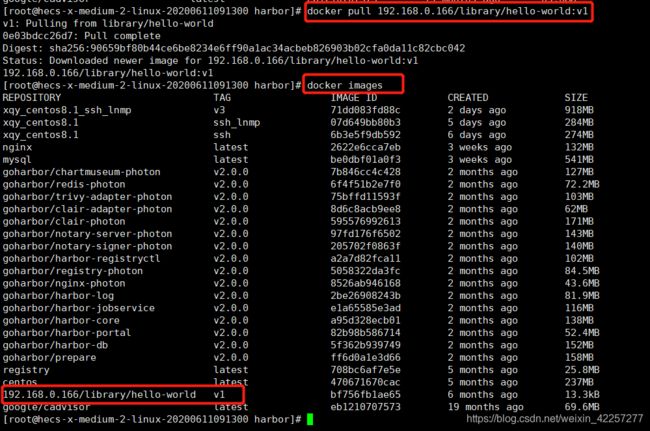
- 10)测试docker pull 192.168.0.166/library/hello-world 测试成功
1.28 Dockerfile企业案例演练
由于Docker官网公共仓库镜像大多不完整,无法真正满足企业的生产环境系统,此时
需要我们自行定制镜像或者重新打包镜像
Docker镜像制作是管理员的必备工作之一, Docker镜像制作的方法主要有两种,制作
方法如下:
- Docker commit|export将新容器提交至Images列表;
- 编写Dockerfile, bulid新的镜像至镜像列表;(企业用的最多)
1.29 Dockerfile语法命令详解一
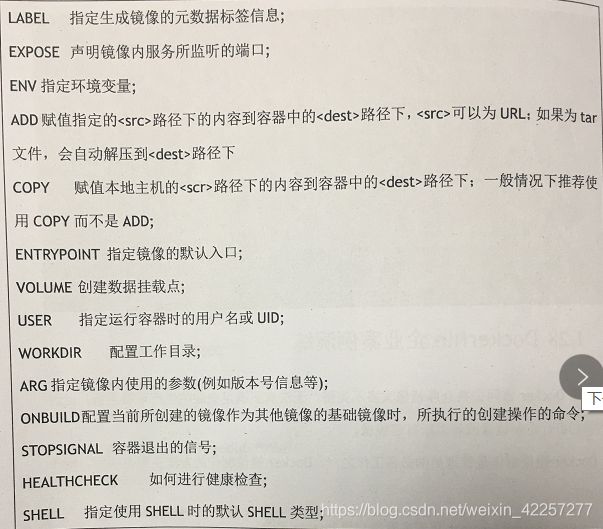
企业生产环境推荐使用Dockerfile制作镜像, Dockerfile制作原理,将基于一个基础镜
像,通过编写Dockerfile方式,将各个功能进行叠加,最终形成新的Docker镜像,是目前
互联网企业中打包镜像最为推荐的方式。
Dockerfile是一个镜像的表示,也是一个镜像的原材料,可以通过Dockerfile来描述构
建镜像,并自动构建一个容器。
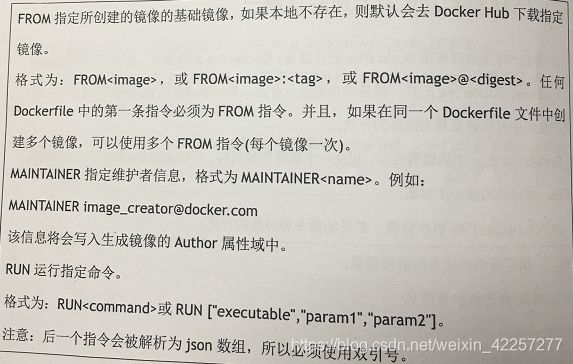
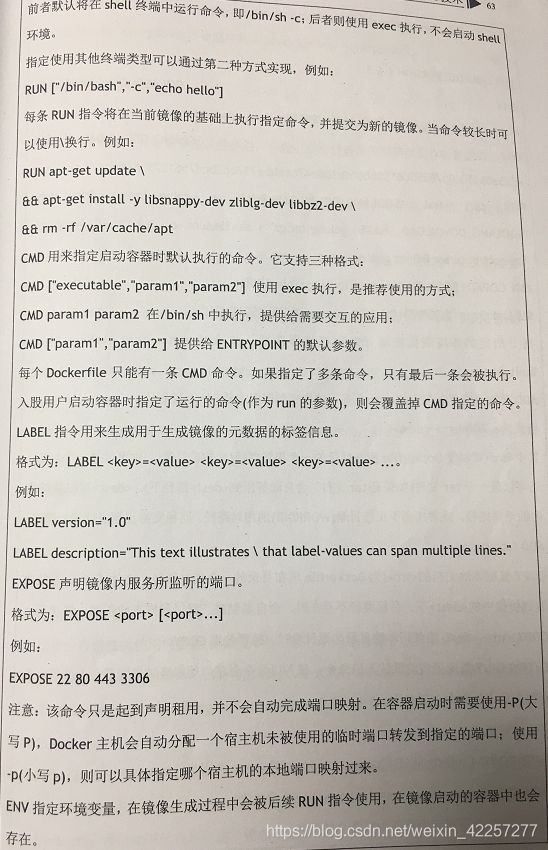
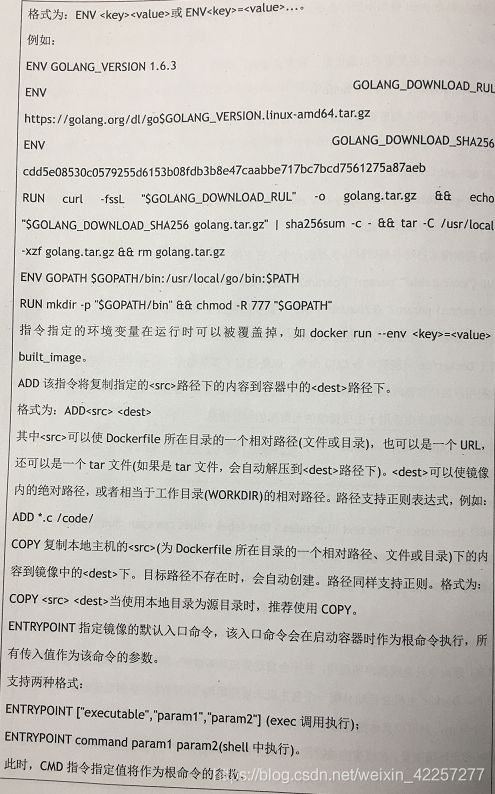
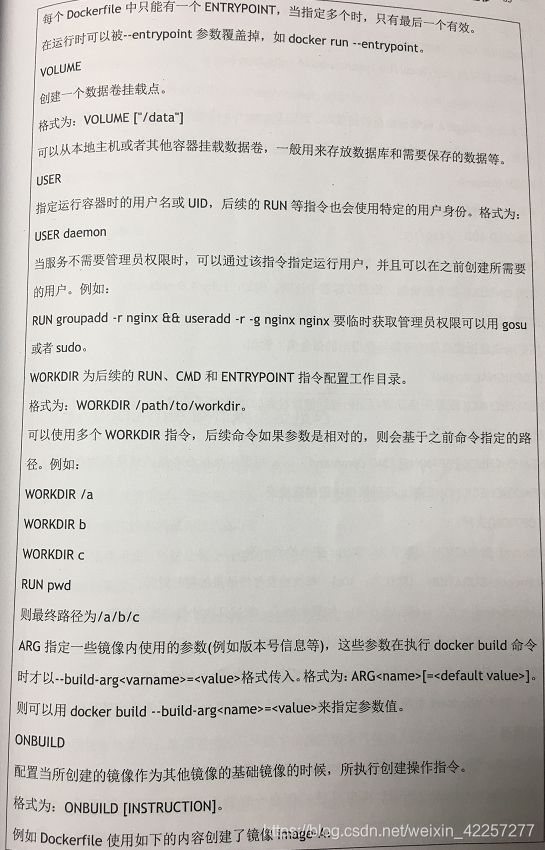
如下为DockerFile制作镜像,必备的指令和参数的详解;不用全记,记住一些常用关键的参数
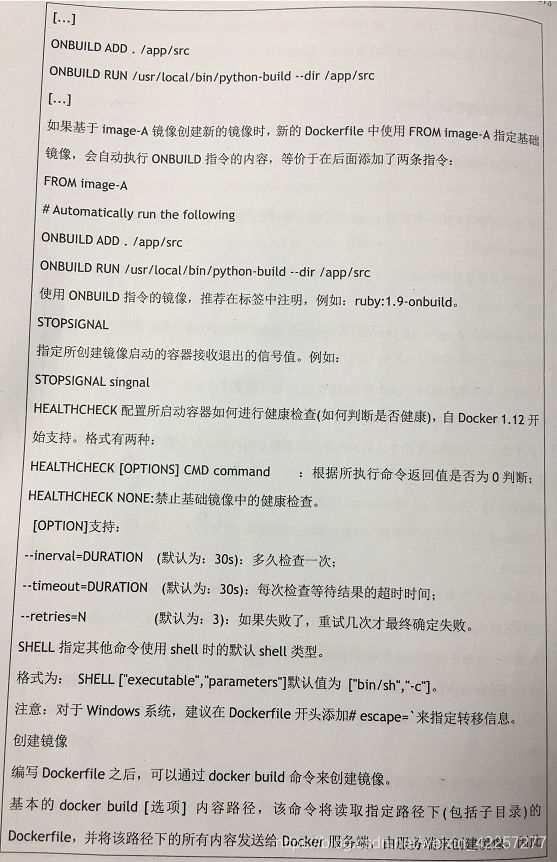
1.30 Dockerfile语法命令详解二
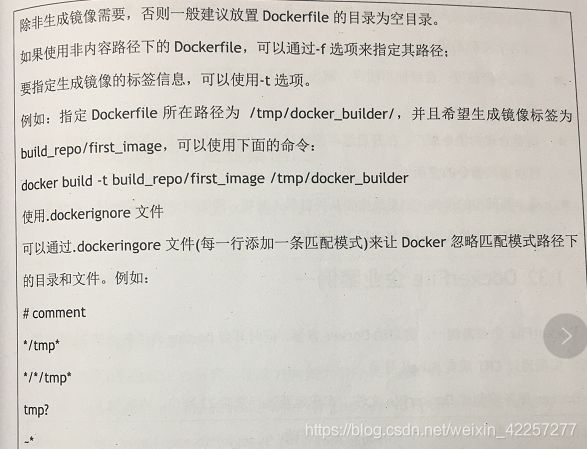
1.31 Dockerfile制作规范及技巧
从企业需求出发,定制适合自己需求、高效方便的镜像,可以参考官方Dockerfile文
件,也可以根据自身的需求,逐步的完善,在构建中不断优化Dockerfile文件;
Dockerfile制作镜像规范和技巧如下:
- 精简镜像用途:尽量让每个镜像的用途都比较集中、单一,避免构造大而复杂、多
功能的镜像; - 选用合适的基础镜像:过大的基础镜像会造成构建出臃肿的镜像,一般推荐比较小
巧的镜像作为基础镜像; - 提供详细的注释和维护者信息: Dockerfile也是一种代码,需要考虑方便后续扩
展和他人使用; - 正确使用版本号:使用明确的具体数字信息的版本号信息,而非latest,可以避免
无法确认具体版本号,统一环境; - 减少镜像层数:减少镜像层数建议尽量合并RUN指令,可以将多条RUN指令的内
容通过&&连接; - 及时删除临时和缓存文件:这样可以避免构造的镜像过于臃肿,并且这些缓存文件
并没有实际用途; - 提高生产速度:合理使用缓存、减少目录下的使用文件,使用.dockeringore文件
等; - 调整合理的指令顺序:在开启缓存的情况下,内容不变的指令尽量放在前面,这样
可以提高指令的复用性; - 减少外部源的干扰:如果确实要从外部引入数据,需要制定持久的地址,并带有版
本信息,让他人可以重复使用而不出错。
1.32 Dockerfile企业案例一
DockerFile企业案例一,将启动Docker容器,同时开启Docker容器对外的22端口的监听,实现通过CRT或者Xshell登录。
Docker服务端创建Dockerfile文件,实现容器运行开启22端口,内容如下:
创建一个目录,touch Dockerfile文件
注意:CMD只能写一条,有多条的情况只会运行最后一条CDM一定要写,就是为了有进程挂着不退出
vim Dockerfile
#设置基本的镜像,后续命令都以这个镜像为基础
FROM centos
#作者信息
MAINTAINER  WWW.JFEDU.NET
#安装依赖工具&删除默认YUM源,使用YUM源为国内163 YUM源;
RUN rpm --rebuilddb;yum install make wget tar gzip passwd openssh-server gcc -y
RUN rm -rf /etc/yum.repos.d/*;wget -P /etc/yum.repos.d/ http://mirrors.163.com/.help/CentOS7-Base-163.repo
#配置SSHD&修改root密码为1qaz@WSX
RUN yes|ssh-keygen -q -t rsa -b 2048 -f /etc/ssh/ssh_host_rsa_key -N ''
RUN yes|ssh-keygen -q -t ecdsa -f /etc/ssh/ssh_host_ecdsa_key -N ''
RUN yes|ssh-keygen -q -t ed25519 -f /etc/ssh/ssh_host_ed25519_key -N ''
RUN echo '1qaz@WSX' | passwd --stdin root
#启动SSHD服务进程,对外暴露22端口;
EXPOSE  22
CMD /usr/sbin/sshd -D
基于Dockerfile来创建生成镜像,命令如下:
用docker build根据Dockerfile创建镜像(centos:ssh):
docker build --help -t指定名称:tag号 -c指定cpu -f指定非Dockerfile文件会用到
docker build -t centos:ssh - < Dockerfile
docker images
docker run -itd centos:ssh
检查没有问题即可保存提供了
docker save centos:ssh > centos6_v2.tar
目标机器使用
docker load -i centos6_v2.tar #加载到镜像列表名称为centos:ssh
制作centos_yum_passwd_ssh镜像
Dockerfile目录下执行创建镜像
docker build -t centos .
Dockerfile文件内容如下
##制作centos_yum_passwd_ssh镜像
#Config Docker File 2020
From centos
MAINTAINER XQY 2020
RUN rm -rf /etc/yum.repos.d/*
COPY Centos-8-al.repo /etc/yum.repos.d/
RUN echo 123456|passwd --stdin root
RUN yum install net-tools -y openssh-server -y
RUN sed -i '/DNS/S/#//g' /etc/ssh/sshd_config
RUN sed -i '/DNS/S/yes/no/g' /etc/ssh/sshd_config
#把宿主机的当前目录文件加载到容器内的指定目录,ssh.tar可在宿主机去打包一个
ADD ssh.tar /tec/ssh
RUN chmod 600 /etc/ssh/*
VOLUME /var/www/html/
WORKDIR /root/
CMD /usr/sbin/sshd;/bin/bash
1.33 Dockerfile企业案例二(ssh_redis)
DockerFile企业案例二,开启SSH 6379端口,让Redis端口对外访问,Dockerfile内容如下:
FROM centos:latest
#作者信息
MAINTAINER  WWW.JFEDU.NET
#安装依赖工具&删除默认YUM源,使用YUM源为国内163 YUM源;
RUN rpm --rebuilddb;yum install make wget tar gzip passwd openssh-server gcc -y
RUN rm -rf /etc/yum.repos.d/*;wget -P /etc/yum.repos.d/ http://mirrors.163.com/.help/CentOS7-Base-163.repo
#配置SSHD&修改root密码为1qaz@WSX
RUN ssh-keygen -q -t rsa -b 2048 -f /etc/ssh/ssh_host_rsa_key -N ''
RUN ssh-keygen -q -t ecdsa -f /etc/ssh/ssh_host_ecdsa_key -N ''
RUN ssh-keygen -q -t ed25519 -f /etc/ssh/ssh_host_ED25519_key -N ''
RUN echo '1qaz@WSX' | passwd --stdin root
#Redis官网下载Redis最新版本软件;
RUN wget -P /tmp/ http://download.redis.io/releases/redis-5.0.2.tar.gz
#解压Redis软件包,并且基于源码安装,创建配置文件;
RUN cd /tmp/;tar xzf redis-5.0.2.tar.gz;cd redis-5.0.2;make;make PREFIX=/usr/local/redis install;mkdir -p /usr/local/redis/etc/;cp redis.conf /usr/local/redis/etc/
#创建用于存储应用数据目录/data/redis&修改redis配置文件dir路径;
RUN mkdir -p /data/redis/
RUN sed -i 's#^dir.*#dir /data/redis#g' /usr/local/redis/etc/redis.conf
#将应用数据存储目录/data/进行映射,可以实现数据持久化保存;
VOLUME ["/data/redis"]
#修改Redis.conf监听地址为bind:0.0.0.0;
RUN sed -i '/^bind/s/127.0.0.1/0.0.0.0/g' /usr/local/redis/etc/redis.conf
#启动Redis数据库服务进程,对外暴露22和6379端口;
EXPOSE  22
EXPOSE  6379
CMD /usr/sbin/sshd;/usr/local/redis/bin/redis-server /usr/local/redis/etc/redis.conf
1.34 Dockerfile企业案例三(部署lamp源码)
# 设置基本的镜像,后续命令都以这个镜像为基础
FROM docker.io/centos6:latest
# 作者信息
MAINTAINER  JFEDU.NET
# RUN命令会在上面指定的镜像里执行任何命令
RUN rpm --rebuilddb;yum install rpm-build -y
RUN rpm --rebuilddb;yum install httpd httpd-devel php php-devel php-mysql mysql-server mysql my
sql-devel -y
RUN echo -e "">/var/www/html/index.php
RUN echo 1|passwd --stdin root
RUN cp /etc/skel/.bash* /root/
RUN mkdir -p /tmp/20501111
WORKDIR /root/
#处理进入容器后显示bash4.1的错误cp /etc/skel/.bash* /root/
后还要sh -处理一下
RUN su -
#暴露HTTP端口81
EXPOSE 80 3306 22
# 设定运行镜像时的默认命令:输出ip,并以daemon方式启动sshd
CMD service httpd start;service mysqld start;service sshd start;/bin/bash
1.35 Dockerfile企业案例四(tomcat_jdk_二进制)
# 设置基本的镜像,后续命令都以这个镜像为基础
FROM docker.io/lemonbar/centos6-ssh
MAINTAINER  JFEDU.NET
WORKDIR /root
RUN cp /etc/skel/.bash* /root/
RUN mkdir -p /usr/local/tomcat/ /usr/java/
ADD tomcat/ /usr/local/tomcat/
ADD edu.war /usr/local/tomcat/webapps/ROOT/
ADD jdk1.8.0_131.tar.gz /usr/java/
RUN rpm --rebuilddb;yum install tar gzip* bzip* wget -y
RUN echo -e 'export JAVA_HOME=/usr/java/jdk1.8.0_131\nexport CLASSPATH=$CLASSPATH:$JAVA_HOME/li
b:$JAVA_HOME/jre/lib\nPATH=$JAVA_HOME/bin:$JAVA_HOME/jre/bin:$PATH:$HOMR/bin' >>/etc/profile
RUN source /etc/profile;cd /usr/local/tomcat/webapps/ROOT/;jar -xf edu.war
RUN echo '123456' | passwd --stdin root
EXPOSE  22 8080
# 设定运行镜像时的默认命令:输出ip,并以daemon方式启动sshd
#CMD /usr/local/tomcat/bin/startup.sh;/usr/sbin/sshd -D
CMD set -m;source /etc/profile;/usr/local/tomcat/bin/startup.sh;/usr/sbin/sshd -D
1.36 Dockerfile本地私有仓库实战
Docker虚拟化有三个基础概念:Docker镜像、Docker容器、Docker仓库,三个概念详解如下:
1)Docker镜像
Docker虚拟化最基础的组件为镜像,镜像跟我们常见的Linux ISO镜像类似,但是Docker镜像是分层结构的,是由多个层级组成,每个层级分别存储各种软件实现某个功能,Docker镜像是静止的、只读的,不能对镜像进行写操作。
2)Docker容器:
Docker容器是Docker虚拟化的产物,也是最早在生产环境使用的对象,Docker容器的底层是Docker镜像,是基于镜像运行,并且在镜像最上层添加一层容器层之后的实体,容器层是可读、可写的,容器层如果需用到镜像层中的数据,可以通过JSON文件读取镜像层中的软件和数据,对整个容器进行修改,只能作用于容器层,不能直接对镜像层进行写操作。
3)Docker仓库:
Docker仓库是用于存放Docker镜像的地方,Docker仓库分为两类,分别是:公共仓库(Public)和私有仓库(Private),国内和国外有很多默认的公共仓库,对外开放、免费或者付费使用,企业测试环境和生产环境推荐自建私有仓库,私有仓库的特点:安全、可靠、稳定、高效,能够更加自身的业务体系进行灵活升级和管理。
纵观Docker镜像、容器、仓库,其中最重要的,最基础的属Docker镜像,没有镜像的概念就没有容器,而且镜像是静止的、只读的模板文件层,是存储在Docker仓库中。
Docker默认连接的国外官方镜像,通常根据网络情况不同,访问时快时慢,大多时候获取速度非常慢,为了提示效率可以自建仓库或者先修改为国内仓库源,提升拉取镜像的速度。
Docker可以配置的国内镜像有很多可供选择,例如:Docker中国区官方镜像、阿里云、网易蜂巢、DaoCloud等,这些都是国内比较快的镜像仓库。
1.36.1 Docker阿里云镜像加速下载镜像实战
4)修改Docker默认镜像源方法:
vim /etc/docker/daemon.json,修改为如下内容:
{
  "registry-mirrors": ["https://rjdk23vc.mirror.aliyuncs.com"]
}
5)修改完成,重启Docker引擎服务即可;
systemctl daemon-reload
systemctl restart docker
1.36.2 Docker Registry仓库源实战
Docker仓库分为公共仓库和私有仓库,在企业测试环境、生产环境推荐自建内部私有仓库,使用私有仓库的优点:
节省网络带宽,针对于每个镜像不用去Docker官网仓库下载;
下载Docker镜像从本地私有仓库中下载;
组件公司内部私有仓库,方便各部门使用,服务器管理更加统一;
可以基于GIT或者SVN、Jenkins更新本地Docker私有仓库镜像版本。
官方提供Docker Registry来构建本地私有仓库,目前最新版本为v2,最新版的docker已不再支持v1,Registry v2使用Go语言编写,在性能和安全性上做了很多优化,重新设计了镜像的存储格式。
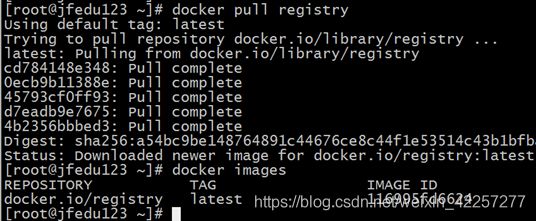
1)登陆Docker仓库服务器,下载Docker registry镜像,命令如下:
2) 启动私有仓库容器,启动命令如下:
mkdir -p /data/registry/
docker run -itd -p 5000:5000 -v /data/registry:/var/lib/registry docker.io/registry
netstat -tnlp|grep -w 5000
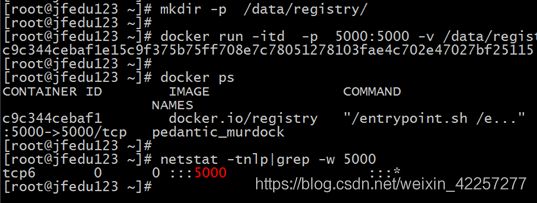
默认情况下,会将仓库存放于容器内的/var/lib/registry目录下,这样如果容器被删除,则存放于容器中的镜像也会丢失,所以我们一般情况下会指定本地一个目录挂载到容器内的/data/registry下。
3) 上传镜像至本地私有仓库:
客户端上传镜像至本地私有仓库,如下以busybox镜像为例,将busybox上传至私有仓库服务器。
docker pull busybox #外网下载
docker tag busybox 192.168.1.123:5000/busybox
docker push 192.168.1.123:5000/busybox #上传本地仓库源
docker pull busybox:latest #配置生效的情况是从本地源下载,下载时测试

默认往Docker仓库,报错解决方法:
[root@hecs-x-medium-2-linux-20200611091300 ~]# docker push 192.168.0.166:5000/xqy_ng
The push refers to repository [192.168.0.166:5000/xqy_ng]
Get https://192.168.0.166:5000/v2/: http: server gave HTTP response to HTTPS client
4)docker配置从私有仓库拉取镜像
处理办法:
①创建/etc/docker/daemon.json文件
添加如下内容:
**192.168.0.166为镜像仓库的地址
5000为镜像仓库的默认端口
**
{
  "insecure-registries": ["192.168.0.166:5000"],
  "registry-mirrors": ["http://192.168.0.166:5000"]
}
systemctl daemon-reload
systemctl restart docker
docker info 查看Registry仓库地址是否修改
curl http://192.168.0.166:5000/v2/_catalog #查看私有镜像仓库内容
②老的版本docker可以用如下处理
vim /etc/sysconfig/docker配置文件:
注释或者删除以OPTION开头的行,然后加入如下两行代码:
OPTIONS=’–selinux-enabled --log-driver=journald --signature-verification=false –insecure-registry 192.168.1.123:5000’ #主要是增加颜色部分,解决上传到仓库是https认证的问题
ADD_REGISTRY=’–add-registry 192.168.1.123:5000’ #这条是docker pull时要用到,否则会去读外网哦
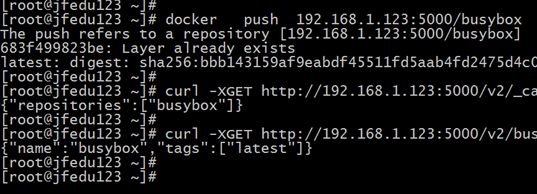
5) 检测本地私有仓库:
curl -XGET http://192.168.0.166:5000/v2/_catalog #抓取仓库中镜像的名称
curl -XGET http://192.168.0.166:5000/v2/busybox/tags/list #根据名称抓取tag号
6) 客户端使用本地私有仓库:
登陆Docker客户端,在/etc/docker目录下增加daemon.json文件增加如下配置
{
  "insecure-registries": ["192.168.0.166:5000"],
  "registry-mirrors": ["http://192.168.0.166:5000"]
}
注释:"insecure-registries": ["192.168.0.166:5000"],#处理docker push上传https认证失败问题如上
 "registry-mirrors": ["http://192.168.0.166:5000"] #处理docker pull从外网下载
systemctl restart docker #重启后容器都会丢失,只保留registry
老的版本docker可以用如下处理
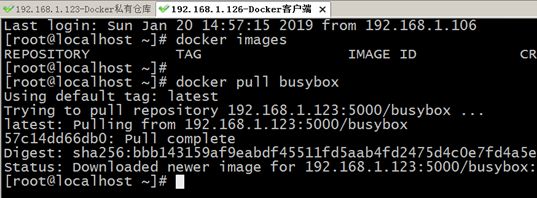
同样在其/etc/sysconfig/docker配置文件添加如下代码,同时重启docker服务,获取本地私有仓库如图24-3所示:
OPTIONS=’–selinux-enabled --log-driver=journald --signature-verification=false –insecure-registry 192.168.1.123:5000’ #主要是增加颜色部分,解决上传到仓库是https认证的问题
ADD_REGISTRY=’–add-registry 192.168.1.123:5000’ #这条是docker pull时要用到,否则会去读外网哦
重启Docker服务,然后从Docker仓库下载busybox镜像,如图所示:
Tips小提示
docker存放数据的目录是/var/lib/docker/包括镜像、网络、磁盘等等
/usr/lib/systemd/system/docker.service 为docker启动的主配文件
[root@hecs]# cd /var/lib/docker/
[root@hecs]# ls
builder  buildkit  containers  image  network  overlay2  plugins  runtimes  swarm  tmp  trust  volumes
1.36.3 Docker Harbor仓库源实战
安装参考博客地址
构建Docker仓库方式除了使用Registry之外,还可以使用Harbor,如下为Registry
方式缺点:
-
缺少认证机制,任何人都可以随意拉取及上传镜像,安全性缺失;
-
缺乏镜像清理机制,镜像可以push却不能删除,日积月累,占用空间会越来越
大; -
缺乏相应的扩展机制
-
鉴于以上缺点,我们通常在生产环境中,不会直接使用docker registry来实现
提供镜像服务。Harbor是一个用于存储和分发Docker镜像的企业级Registry服务器,通过添加一些企
业必需的功能特性,例如安全、标识和管理等,扩展了开源Docker Distribution.作为一个企业级私有Registry服务器, Harbor提供了更好的性能和安全。提升
用户使用Registry构建和运行环境传输镜像的效率。Harbor支持安装在多个
Registry节点的镜像资源复制,镜像全部保存在私有Registry中,确保数据和知识
产权在公司内部网络中管控。另外, Harbor也提供了高级的安全特性,诸如用户管
理,访问控制和活动审计等。
Harbor仓库部署两种方式,一种是off-ine,一种是on-line,即离线和在线安装,此处选择离线安装:
1)安装Docker-Compose快速编排工具
建议参考博客1
建议参考博客2
yum install epel-release -y
yum install python-pip-y
pip install --upgrade pip #可能超时,但必须安装
[root@hecs-x-medium-2-linux-20200611091300 local]# pip install --upgrade pip
Collecting pip
  Downloading https://files.pythonhosted.org/packages/43/84/23ed6a1796480a6f1a2d38f2802901d078266bda38388954d01d3f2e821d/pip-20.1.1-py2.py3-none-any.whl (1.5MB)
    100% |████████████████████████████████| 1.5MB 13kB/s
Installing collected packages: pip
  Found existing installation: pip 7.1.2
    Uninstalling pip-7.1.2:
      Successfully uninstalled pip-7.1.2
Successfully installed pip-20.1.1
[root@hecs-x-medium-2-linux-20200611091300 local]#
pip install docker-compose #可能失败,多次执行
2)下载Habor并且解压:
wget -c https://storage.googleapis.com/harbor-releases/release-2.0.0/harbor-offline-installer-v2.0.0.tgz
tar -xzf harbor-offline-installer-v2.0.0.tgz
cd harbor
3)修改Habor配置文件harbor.yml.tmpl
修改Habor配置文件harbor.yml.tmpl
修改hostname为本机IP地址,
增加ui_url_protocol: http
同时注释https相关配置
参考https://www.cnblogs.com/linuxws/p/12838273.html
然后 cp harbor.yml.tmpl harbor.yml
内容如下
# Configuration file of Harbor

# The IP address or hostname to access admin UI and registry service.
# DO NOT use localhost or 127.0.0.1, because Harbor needs to be accessed by external clients.
hostname: 192.168.0.166
ui_url_protocol: http
# http related config
http:
  # port for http, default is 80. If https enabled, this port will redirect to https port
  port: 80

# https related config
#https:
  # https port for harbor, default is 443
#  port: 443
  # The path of cert and key files for nginx
#  certificate: /your/certificate/path
#  private_key: /your/private/key/path

# # Uncomment following will enable tls communication between all harbor components
# internal_tls:
#   # set enabled to true means internal tls is enabled
#   enabled: true
#   # verify_client_cert used to decide whether verify client certificate
#   verify_client_cert: false
#   # put your cert and key files on dir
#   dir: /etc/harbor/tls/internal

# Uncomment external_url if you want to enable external proxy
# And when it enabled the hostname will no longer used
# external_url: https://reg.mydomain.com:8433

# The initial password of Harbor admin
# It only works in first time to install harbor
# Remember Change the admin password from UI after launching Harbor.
harbor_admin_password: Harbor12345

# Harbor DB configuration
database:
  # The password for the root user of Harbor DB. Change this before any production use.
  password: root123
  # The maximum number of connections in the idle connection pool. If it <=0, no idle connections are retained.
"harbor.yml.tmpl" 207L, 7917C
4)安装Habor,命令如下
./install.sh
安装成功如图
[Step 5]: starting Harbor ...
Creating network "harbor_harbor" with the default driver
Creating harbor-log ... done
Creating redis         ... done
Creating harbor-db     ... done
Creating registry      ... done
Creating harbor-portal ... done
Creating registryctl   ... done
Creating harbor-core   ... done
Creating harbor-jobservice ... done
Creating nginx             ... done
✔ ----Harbor has been installed and started successfully.----
5)登陆Habor web平台,默认用户:admin 默认密码:Harbor12345 可在第三步修改
6)登陆Habor web控制台进一步设置
7)创建私有仓库用户名xqy,并且设置密码,并且绑定library库
8)修改docker客户端仓库地址为192.168.0.166,同时将tag修改为如下格式在上传到仓库
192.168.0.166/library/hello-world
docker login 输入创建的用户名和密码,登陆成功,然后通过docker push 192.168.0.166/library/hello-world将镜像上传至Hrbor仓库即可
报错处理
[root@hecs-x-medium-2-linux-20200611091300 harbor]# docker push 192.168.0.166/library/hello-world:v1
The push refers to repository [192.168.0.166/library/hello-world]
Get https://192.168.0.166/v2/: dial tcp 192.168.0.166:443: connect: connection refused
处理办法:
1、清理掉和Harbor无关的registry容器
2、修改vim /etc/docker/daemon.json把地址端口改成192.168.0.166
2、重启docker和docker-compose
$ systemctl daemon-reload
$ systemctl restart docker
$ docker-compose down -v
$ docker-compose up -d
3、docker login 192.168.0.166 #登陆新建的用户并登陆成功
4、docker push 192.168.0.166/library/hello-world 测试
还有报错如下
[root@hecs-x-medium-2-linux-20200611091300 harbor]# docker push 192.168.0.166/library/hello-world:v1
The push refers to repository [192.168.0.166/library/hello-world]
9c27e219663c: Preparing
unauthorized: unauthorized to access repository: library/hello-world, action: push: unauthorized to access repository: library/hello-world, action: push
处理办法:
docker login 192.168.0.166 #登陆新建的用户


