基于mybatis和druid 连接池的shardingJdbc分库分表实战
Apache ShardingSphere 是一款分布式的数据库生态系统, 可以将任意数据库转换为分布式数据库,并通过数据分片、弹性伸缩、加密等能力对原有数据库进行增强。
Apache ShardingSphere 设计哲学为 Database Plus,旨在构建异构数据库上层的标准和生态。 它关注如何充分合理地利用数据库的计算和存储能力,而并非实现一个全新的数据库。 它站在数据库的上层视角,关注它们之间的协作多于数据库自身。
ShardingSphere-JDBC 定位为轻量级 Java 框架,在 Java 的 JDBC 层提供的额外服务。 它使用客户端直连数据库,以 jar 包形式提供服务,无需额外部署和依赖,可理解为增强版的 JDBC 驱动,完全兼容 JDBC 和各种 ORM 框架。
- 适用于任何基于 JDBC 的 ORM 框架,如:JPA, Hibernate, Mybatis, Spring JDBC Template 或直接使用 JDBC;
- 支持任何第三方的数据库连接池,如:DBCP, C3P0, BoneCP, HikariCP 等;
- 支持任意实现 JDBC 规范的数据库,目前支持 MySQL,PostgreSQL,Oracle,SQLServer 以及任何可使用 JDBC 访问的数据库。
下面讲解一下shardingJdbc的实战部分
1.分表操作
话说,我现在有个课程表,需要按照cid基数和偶数放在不同的表中。当然实际使用中规则,可能不一样。表的数量也不一样,这里举一个简单的例子。
两个表的表结构如下
CREATE TABLE `course_1` (
  `cid` bigint(20) NOT NULL,
  `cname` varchar(50) NOT NULL,
  `user_id` bigint(20) NOT NULL,
  `cstatus` varchar(10) NOT NULL,
  PRIMARY KEY (`cid`)
) ENGINE=InnoDB DEFAULT CHARSET=utf8mb4;
CREATE TABLE `course_2` (
`cid` bigint(20) NOT NULL,
`cname` varchar(50) NOT NULL,
`user_id` bigint(20) NOT NULL,
`cstatus` varchar(10) NOT NULL,
PRIMARY KEY (`cid`)
) ENGINE=InnoDB DEFAULT CHARSET=utf8mb4;在pom.xml引入依赖
            mysql
            mysql-connector-java
            runtime


            org.apache.shardingsphere
            sharding-jdbc-spring-boot-starter
            4.0.0-RC1


            org.mybatis.spring.boot
            mybatis-spring-boot-starter
            2.2.2
application.properties中配置规则数据源和规则
这里我们只是需要连接一个数据库,所以只要配置一个数据源就可以了。
spring.shardingsphere.datasource.names =m1
spring.shardingsphere.datasource.m1.type = com.alibaba.druid.pool.DruidDataSource
spring.shardingsphere.datasource.m1.driver-class-name=com.mysql.jdbc.Driver
spring.shardingsphere.datasource.m1.url=jdbc:mysql://localhost:3306/course_db?serverTimerzone=GMT%2B8
spring.shardingsphere.datasource.m1.username=root
spring.shardingsphere.datasource.m1.password=abc
#配置表的规则  m1.course_1,m1.course_2
spring.shardingsphere.rules.sharding.tables.course.actual-data-nodes=m1.course_$->{1..2}
#配置主键字段
spring.shardingsphere.sharding.tables.course.key-generator.column=cid
#主键字段的生成规则,这里是雪花算法
spring.shardingsphere.sharding.tables.course.key-generator.type=SNOWFLAKE
spring.main.allow-bean-definition-overriding=true
#配置分片策略的字段
spring.shardingsphere.sharding.tables.course.table-strategy.inline.sharding-column=cid
spring.shardingsphere.sharding.tables.course.table-strategy.inline.algorithm-expression=course_$->{cid % 2 +1}
#打印sql
spring.shardingsphere.props.sql.show=true
这里使用mybatis作为数据持久层框架。
@Mapper
public interface CourseMapper {

    void  insertCourse(Course c);
}
insert into course (cid,cname,user_id,cstatus) values (#{cid}, #{cname},#{userId},#{cstatus})
实体类
package com.keelon.zsimall.usedmall.entity

class Course {

    private Long cid;
    private String cname;
    private Long userId;
    private String cstatus;

    Long getCid() {
        return cid
    }

    void setCid(Long cid) {
        this.cid = cid
    }

    String getCname() {
        return cname
    }

    void setCname(String cname) {
        this.cname = cname
    }

    Long getUserId() {
        return userId
    }

    void setUserId(Long userId) {
        this.userId = userId
    }

    String getCstatus() {
        return cstatus
    }

    void setCstatus(String cstatus) {
        this.cstatus = cstatus
    }


    @Override
    public String toString() {
        return "Course{" +
                "cid=" + cid +
                ", cname='" + cname + '\'' +
                ", userId=" + userId +
                ", cstatus='" + cstatus + '\'' +
                '}';
    }
}
@SpringBootTest
class UsedMallApplicationTests {
@Autowired
private CourseMapper courseMapper;
@Test
void testData() {
Course course = new Course();
course.setCname("zhangsan");
course.setUserId(100L);
course.setCid(5L);
course.setCstatus("Nomarl");
courseMapper.insertCourse(course);
}
}通过执行测试数据库,就可以将数据按照我们配置的落表到2个表中。
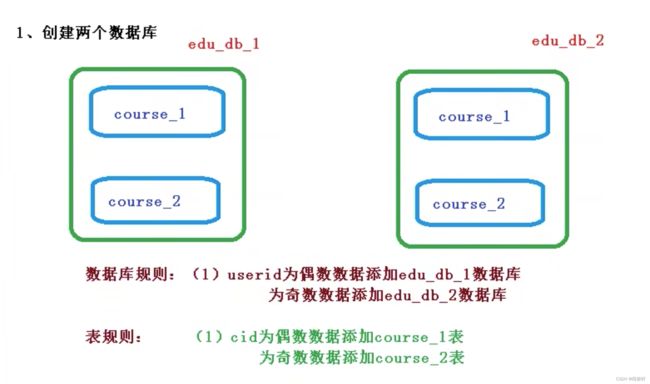
2.分库分表
我现在有个需求,需要根据user_id这个字段,插入到2个库中,然后再根据cid这个字段,落在两个库中。这个时候我就需要2个数据源了。这个时候,我们需要再配置上做一些改变了。
spring.shardingsphere.datasource.names =m1,m2
#配置数据源1
spring.shardingsphere.datasource.m1.type = com.alibaba.druid.pool.DruidDataSource
spring.shardingsphere.datasource.m1.driver-class-name=com.mysql.jdbc.Driver
spring.shardingsphere.datasource.m1.url=jdbc:mysql://localhost:3306/edu_db_1?serverTimerzone=GMT%2B8
spring.shardingsphere.datasource.m1.username=root
spring.shardingsphere.datasource.m1.password=abc
#配置数据源2
spring.shardingsphere.datasource.m2.type = com.alibaba.druid.pool.DruidDataSource
spring.shardingsphere.datasource.m2.driver-class-name=com.mysql.jdbc.Driver
spring.shardingsphere.datasource.m2.url=jdbc:mysql://localhost:3306/edu_db_2?serverTimerzone=GMT%2B8
spring.shardingsphere.datasource.m2.username=root
spring.shardingsphere.datasource.m2.password=abc


#配置数据有几个。这里是m1和m2 m1.course_1,m1.course_2
spring.shardingsphere.rules.sharding.tables.course.actual-data-nodes=m$->{1..2}.course_$->{1..2}
spring.shardingsphere.sharding.tables.course.key-generator.column=cid
spring.shardingsphere.sharding.tables.course.key-generator.type=SNOWFLAKE
#配置数据分片字段,按照那个字段作为规则插入对应的表
spring.shardingsphere.sharding.tables.course.table-strategy.inline.sharding-column=cid
spring.shardingsphere.sharding.tables.course.table-strategy.inline.algorithm-expression=course_$->{cid % 2 +1}
#配置数据源分片的字段,根据user_id选择使用哪个数据源
spring.shardingsphere.sharding.tables.course.database-strategy.inline..sharding-column=user_id
spring.shardingsphere.sharding.tables.course.database-strategy.inline.algorithm-expression=m$->{user_id % 2 +1}
spring.main.allow-bean-definition-overriding=true
#配置sql输出打印
spring.shardingsphere.props.sql.show=true
测试类
@SpringBootTest
class UsedMallApplicationTests {

    @Autowired
    private CourseMapper courseMapper;

    @Test
    void tableData() {
        Course course = new Course();
        course.setCname("zhangsan");
        course.setUserId(100L);
        course.setCid(21L);
        course.setCstatus("Nomarl");
        courseMapper.insertCourse(course);

        Course course1 = new Course();
        course1.setCname("zhangsan");
        course1.setUserId(101L);
        course1.setCid(20L);
        course1.setCstatus("Nomarl");
        courseMapper.insertCourse(course1);
    }


    @Test
    void  queryData() {
        Map map = new HashMap();
        map.put("cid",20);
        map.put("userId",101L);
        Course course = courseMapper.queryCoursee(map);
        System.out.println(course.toString());
    }

}
总体来说,我们实现分库还是分表插入的数据,对于mybatis的持久层是没有区别的,只是在配置文件有所差异,对于分库操作, 我们需要配置多个数据源,shardingjdbc根据我们配置去选择我们需要的数据源。