springsecurity整合oauth2+JWT,数据库配置客户端
目录
一、先创建一个项目,并整合mybatis-plus
二、整合springsecurity+oauth2
1、导入springsecurity和oauth依赖
2、引入依赖后,先创建2个controller,方便后续测试
3、自定义用户配置类,实现UserDetails
4、自定义登录认证的逻辑
5、配置springsecurity配置类
6、配置认证服务器
7、配置资源服务器
三、测试
1.授权码模式
2、用户名密码模式
四、使用redis存储token
1、添加依赖
2、修改认证服务配置类
3、此时访问接口获取令牌,使用redis可视化工具,可以看到token的值
五、整合jwt
1、创建配置类JwtTokenStoreConfig
2、注释掉认证服务配置AuthorizationServerConfig中,注册的TokenStore
3、修改认证服务器配置类
4、此时获取的token,就是jwt格式的token
六、使用数据库保存客户端
1、添加数据源配置类 DataSourceConfig
2、修改认证服务器的配置,添加如下代码:
3、添加表oauth_client_details
springsecurity和oauth2的概念都很熟悉了,不在这里细说,本次主要记录一下整合的过程
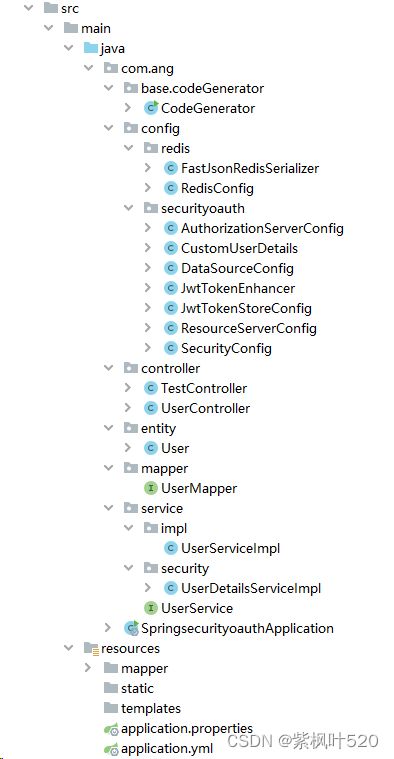
先看一下整个代码的结构
一、先创建一个项目,并整合mybatis-plus
因为整合mybatis-plus不是本次记录的重点,所以过程省略,可以参考:
springboot整合mybatis-plus
二、整合springsecurity+oauth2
1、导入springsecurity和oauth依赖
            org.springframework.cloud
            spring-cloud-starter-oauth2


            org.springframework.cloud
            spring-cloud-starter-security
因为是用的cloud的依赖,要添加cloud
                org.springframework.cloud
                spring-cloud-dependencies
                Greenwich.SR3
                pom
                import
2、引入依赖后,先创建2个controller,方便后续测试
UserController,/user
@RestController
@RequestMapping("/user")
public class UserController {
    @RequestMapping("/getUserInfo")
    public Object getUserInfo(Authentication authentication){
        return authentication.getPrincipal();
    }
}
TestController,/test
@RestController
@RequestMapping("/test")
public class TestController {
    @RequestMapping("/getStr")
    public String getStr(){
        return "test";
    }
}
因为要使用springsecurity的认证,要配置springsecurity相关的配置
3、自定义用户配置类,实现UserDetails
public class CustomUserDetails implements UserDetails {
    private String username;

    private String password;

    private List authorities;

    // 构造方法
    public CustomUserDetails(String username, String password, List authorities) {
        this.username = username;
        this.password = password;
        this.authorities = authorities;
    }
    @Override
    public Collection getAuthorities() {
        return authorities;
    }

    @Override
    public String getPassword() {
        return password;
    }

    @Override
    public String getUsername() {
        return username;
    }

    @Override
    public boolean isAccountNonExpired() {
        return true;
    }

    @Override
    public boolean isAccountNonLocked() {
        return true;
    }

    @Override
    public boolean isCredentialsNonExpired() {
        return true;
    }

    @Override
    public boolean isEnabled() {
        return true;
    }
}
4、自定义登录认证的逻辑
这里的登录,是用户授权的时候需要登录的。先登录认证之后,才能给请求授权
这里为了方便,没有从数据库取用户,直接代码中写死,用admin登录,密码:123456
@Service
public class UserDetailsServiceImpl implements UserDetailsService {
    @Autowired
    private PasswordEncoder passwordEncoder;

    @Override
    public UserDetails loadUserByUsername(String username) throws UsernameNotFoundException {
        //实际是根据用户名去数据库查,这里就直接用静态数据了
        if(!username.equals("admin")) {
            throw new UsernameNotFoundException("用户名不存在!");
        }
        // 密码加密
        String password = passwordEncoder.encode("123456");
        //创建User用户,自定义的User
        CustomUserDetails user = new CustomUserDetails(username,password, AuthorityUtils.
                commaSeparatedStringToAuthorityList("admin"));
        return user;
    }
}
5、配置springsecurity配置类
@Configuration
@EnableWebSecurity
public class SecurityConfig extends WebSecurityConfigurerAdapter {
    @Override
    protected void configure(HttpSecurity http) throws Exception{
        http
            .authorizeRequests()
            .antMatchers("/oauth/**","/login/**","/logout/**").permitAll()//放行
            .anyRequest().authenticated()//其他路径拦截
            .and()
            .formLogin().permitAll()//表单提交放行
            .and()
            .csrf().disable();//csrf关闭
    }

    //注册解码器
    @Bean
    public PasswordEncoder passwordEncoder(){
        return new BCryptPasswordEncoder();
    }

    //注册AuthenticationManager
    @Bean
    public AuthenticationManager getAuthenticationManager() throws Exception {
        return super.authenticationManager();
    }
}
配置完springsecurity,下面配置oauth2相关配置
6、配置认证服务器
@Configuration
@EnableAuthorizationServer
public class AuthorizationServerConfig extends AuthorizationServerConfigurerAdapter {
    @Autowired
    private PasswordEncoder passwordEncoder;

    @Autowired
    UserDetailsServiceImpl userDetailsServiceImpl;

    @Autowired
    AuthenticationManager authenticationManager;

    /**
     * 配置客户端
     */
    @Override
    public void configure(ClientDetailsServiceConfigurer clients) throws Exception {
        clients.inMemory()//内存中
                .withClient("client")//客户端ID
                .secret(passwordEncoder.encode("111111"))//秘钥
                .redirectUris("https://www.baidu.com")//重定向到的地址
                .scopes("all")//授权范围
                .autoApprove(true)//自动授权,返回验证码
                .authorizedGrantTypes("authorization_code","password");//授权类型
    }

    /**
     * 配置授权端点
     * 密码模式必须配置
     */
    @Override
    public void configure(AuthorizationServerEndpointsConfigurer endpoints) throws Exception {
        endpoints
                //密码模式需要配置(可能是因为直接根据用户名密码登录)
                .authenticationManager(authenticationManager)
                .userDetailsService(userDetailsServiceImpl);
    }
}
7、配置资源服务器
@Configuration
@EnableResourceServer
public class ResourceServerConfig extends ResourceServerConfigurerAdapter {
    @Override
    public void configure(HttpSecurity http) throws Exception {
        http.authorizeRequests()
                .anyRequest().authenticated()
                .and()
                .requestMatchers()
                .antMatchers("/user/**");
    }
}
至此,一个简单版本的springsecurity+oauth整合完成,先测试一波
三、测试
1.授权码模式
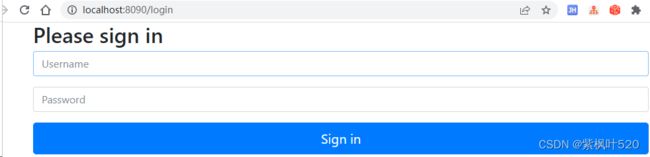
1)、浏览器访问地址,注意,参数必须和配置的一样
http://localhost:8090/oauth/authorize?response_type=code&client_id=client&secret=111111&redirect_uri=https://www.baidu.com&scope=all此时,会跳转到登录页面,需要使用用户名密码先登录,注意,使用的是admin 123456
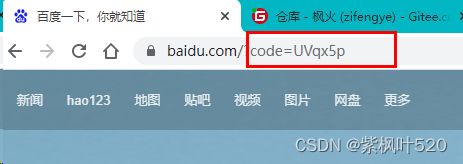
2)、因为设置了.autoApprove(true),所以跳过点击授权的步骤,直接携带code跳转到百度页面
3)、获取token,因为是post请求,使用postman工具,调用接口:
http://localhost:8090/oauth/token参数如下:注意,要在Authorization中输入客户端的id和秘钥(代码中写死的部分)
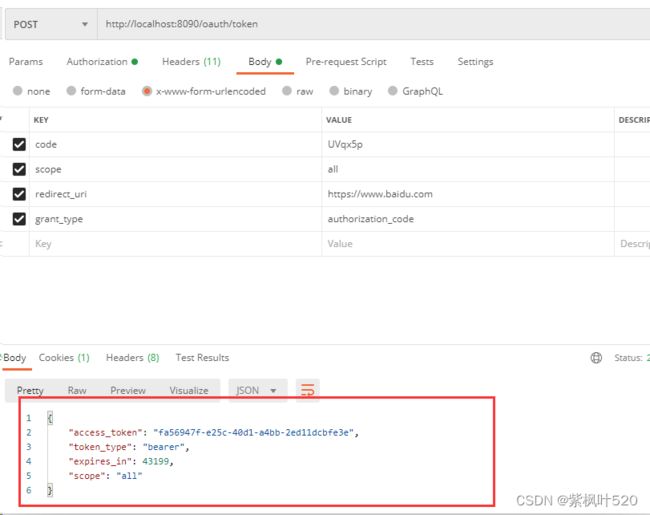
可以看到,返回了token
4)、访问资源
直接访问会报错

携带token,就可以成功访问资源

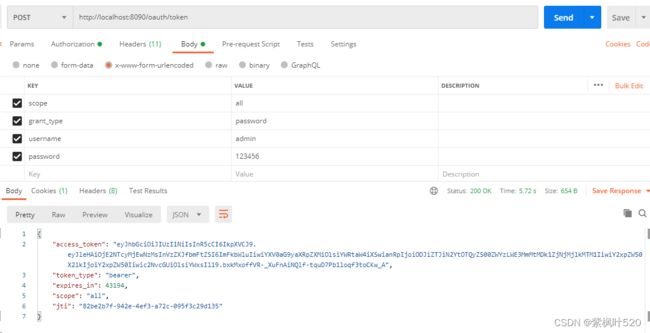
2、用户名密码模式
用户名密码模式,grant_type是password,成功获取token

以上,一个简单版的springsecurity整合oauth2完成了,存储token使用的是内存模式,现在改为redis
四、使用redis存储token
1、添加依赖
    com.alibaba
    fastjson
    1.2.79


    org.springframework.boot
    spring-boot-starter-redis
    1.4.7.RELEASE
2、修改认证服务配置类
AuthorizationServerConfig,添加如下代码:
@Autowired
public RedisConnectionFactory redisConnectionFactory;

/**
 * 使用RedisStore存储token
 * @return
 */
@Bean
public TokenStore redisTokenStore(){
    RedisTokenStore redisTokenStore = new RedisTokenStore(redisConnectionFactory);
    redisTokenStore.setPrefix("oauth-token:");
    return redisTokenStore;
}

/**
 * 配置授权端点
 * 密码模式必须配置
 */
@Override
public void configure(AuthorizationServerEndpointsConfigurer endpoints) throws Exception {
    endpoints
            //密码模式需要配置(可能是因为直接根据用户名密码登录)
            .authenticationManager(authenticationManager)
            .userDetailsService(userDetailsServiceImpl)
            .tokenStore(redisTokenStore());
}
3、此时访问接口获取令牌,使用redis可视化工具,可以看到token的值

普通的token太短,不太安全,下面使用jwt来生成token
五、整合jwt
1、创建配置类JwtTokenStoreConfig
@Configuration
public class JwtTokenStoreConfig {
    //JwtAccessTokenConverter
    @Bean
    public JwtAccessTokenConverter jwtAccessTokenConverter(){
        JwtAccessTokenConverter jwtAccessTokenConverter = new JwtAccessTokenConverter();
        jwtAccessTokenConverter.setSigningKey("test");//设置签名秘钥

        return jwtAccessTokenConverter;
    }

    @Bean("jwtTokenStore")
    public TokenStore jwtTokenStore(){
        JwtTokenStore jwtTokenStore = new JwtTokenStore(jwtAccessTokenConverter());

        return jwtTokenStore;
    }
}
2、注释掉认证服务配置AuthorizationServerConfig中,注册的TokenStore
    /**
     * 使用RedisStore存储token
     * @return
     */
//    @Bean
//    public TokenStore redisTokenStore(){
//        RedisTokenStore redisTokenStore = new RedisTokenStore(redisConnectionFactory);
//        redisTokenStore.setPrefix("oauth-token:");
//        return redisTokenStore;
//    }
3、认证服务器配置类,添加代码:
@Autowired
@Qualifier("jwtTokenStore")
TokenStore jwtTokenStore;

@Autowired
JwtAccessTokenConverter jwtAccessTokenConverter;

@Override
public void configure(AuthorizationServerEndpointsConfigurer endpoints) throws Exception {
    endpoints
            //密码模式需要配置(可能是因为直接根据用户名密码登录)
            .authenticationManager(authenticationManager)
            .userDetailsService(userDetailsServiceImpl)
//                .tokenStore(redisTokenStore())//设置为redis存储
            .tokenStore(jwtTokenStore)//设置为jwt存储
            .accessTokenConverter(jwtAccessTokenConverter)
    ;
}
4、此时获取的token,就是jwt格式的token
上面代码,客户端是写死在代码中的,加入要添加客户端,还要去改代码
六、使用数据库保存客户端
1、添加数据源配置类 DataSourceConfig
@Configuration
@ConfigurationProperties(prefix = "spring.datasource")
@Data
public class DataSourceConfig {
    private String url;
    private String username;
    private String password;

    @Bean(name = "oauth2DataSource")
    public DataSource getOauth2DataSource() {
        DruidDataSource dataSource = new DruidDataSource();
        dataSource.setUrl(url);
        dataSource.setUsername(username);// 用户名
        dataSource.setPassword(password);// 密码
        return dataSource;
    }
}
2、修改认证服务器的配置,添加如下代码:
    @Autowired
    @Qualifier("oauth2DataSource")
    private DataSource dataSource;

    /**
     * 配置客户端
     */
    @Override
    public void configure(ClientDetailsServiceConfigurer clients) throws Exception {
        clients.jdbc(dataSource);
//        注释掉原来的配置
//        clients.inMemory()//内存中
//                .withClient("client")//客户端ID
//                .secret(passwordEncoder.encode("111111"))//秘钥
//                .redirectUris("https://www.baidu.com")//重定向到的地址
//                .scopes("all")//授权范围
//                .autoApprove(true)//自动授权,返回验证码
//                .authorizedGrantTypes("authorization_code","password","refresh_token");//授权类型
    }
3、添加表oauth_client_details
CREATE TABLE `oauth_client_details`  (
  `client_id` varchar(255) CHARACTER SET utf8 COLLATE utf8_general_ci NOT NULL,
  `resource_ids` varchar(255) CHARACTER SET utf8 COLLATE utf8_general_ci DEFAULT NULL,
  `client_secret` varchar(255) CHARACTER SET utf8 COLLATE utf8_general_ci DEFAULT NULL,
  `scope` varchar(255) CHARACTER SET utf8 COLLATE utf8_general_ci DEFAULT NULL,
  `authorized_grant_types` varchar(255) CHARACTER SET utf8 COLLATE utf8_general_ci DEFAULT NULL,
  `web_server_redirect_uri` varchar(255) CHARACTER SET utf8 COLLATE utf8_general_ci DEFAULT NULL,
  `authorities` varchar(255) CHARACTER SET utf8 COLLATE utf8_general_ci DEFAULT NULL,
  `access_token_validity` int(11) DEFAULT NULL,
  `refresh_token_validity` int(11) DEFAULT NULL,
  `additional_information` text CHARACTER SET utf8 COLLATE utf8_general_ci,
  `create_time` timestamp(0) NOT NULL DEFAULT CURRENT_TIMESTAMP,
  `trusted` tinyint(1) DEFAULT 0,
  `autoapprove` varchar(255) CHARACTER SET utf8 COLLATE utf8_general_ci DEFAULT 'false',
  PRIMARY KEY (`client_id`) USING BTREE
) ENGINE = InnoDB CHARACTER SET = utf8 COLLATE = utf8_general_ci ROW_FORMAT = Dynamic;
并添加数据如下:
![]()
注意:秘钥是经过加密的