Python实现人脸识别功能
Python实现人脸识别功能
闲来没事,记录一下前几天学习的人脸识别小项目。
要想实现人脸识别,我们首先要搞明白,人脸识别主要分为哪些步骤?为了提高人脸识别的准确性,我们首先要把图像或视频中的人脸检测出来,然后使用分类网络,对检测到的人脸进行分类。
概括起来,主要包括:人脸检测和人脸分类两个部分。
人脸检测
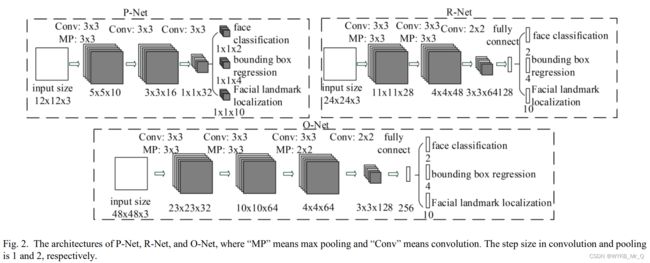
人脸检测部分我们直接使用现成的 MTCNN,它的模型结构如下图所示,主要由三个级联的简单网络组成。
首先将图像重新缩放为不同尺度的图像,然后第一个网络负责提出候选框,第二个网络对候选框进行过滤,留下更加精准的候选框,第三个网络进一步回归和过滤,输出预测的面部边界框和特征点位置。
下图是该网络的模型结构参数,可以发现该网络结构由简单的若干个卷积层组成,结构简单,运行十分快速,因此适用于在线的人脸识别。
import cv2
from mtcnn_cv2 import MTCNN

# 加载模型(MTCNN)
mtcnn = MTCNN()

# 打开摄像头
cap = cv2.VideoCapture(0)

while True:
    # 读取一帧图像
    ret, img = cap.read()

    # 如果读取成功
    if ret:
        # 将图像转为RGB格式
        img_rgb = cv2.cvtColor(src=img, code=cv2.COLOR_BGR2RGB)

        # 人脸检测(检测图像中是否存在人脸)
        faces = mtcnn.detect_faces(img=img_rgb)
人脸识别
在人脸识别部分,我们首先将想要识别的人脸图片存入文件夹,然后计算视频中检测到的人脸与文件夹内人脸的差异,根据阈值判断检测到的人脸是已知的,还是陌生人。
import cv2
from mtcnn_cv2 import MTCNN
from img_mark import mark_face
from img_mark import rec_face

# 加载模型(MTCNN)
mtcnn = MTCNN()

# 打开摄像头
cap = cv2.VideoCapture(0)

while True:
    # 读取一帧图像
    ret, img = cap.read()

    # 如果读取成功
    if ret:
        # 将图像转为RGB格式
        img_rgb = cv2.cvtColor(src=img, code=cv2.COLOR_BGR2RGB)

        # 人脸检测(检测图像中是否存在人脸)
        faces = mtcnn.detect_faces(img=img_rgb)

        if faces:
            # 人脸标注(box, landmark)
            mark_face(img=img, faces=faces)

            # 人脸识别(识别身份)
            rec_face(img=img, faces=faces)

        # 显示图像
        cv2.imshow(winname="love", mat=img)
        cv2.waitKey(delay=1)

    else:
        # 读取失败,退出循环
        break

# 释放资源
cap.release()
cv2.destroyAllWindows()
还有一个 img_mark.py 文件定义了人脸识别的功能部分。
from torchvision import transforms
from PIL import Image
import numpy as np
import os
import cv2
from res_facenet.models import model_921

# 加载模型(FaceNet)
model921 = model_921()


def reg_faces(root="../faces"):
    """
    使用 FaceNet 录入人脸
    :param root: 存储的人脸仓库
    :return:
    """
    # 定义空字典,存放录入的人脸
    faces = {}
    # 预处理
    preprocess = [transforms.Resize(224),
                  transforms.CenterCrop(224),
                  transforms.ToTensor(),
                  transforms.Normalize(mean=[0.485, 0.456, 0.406],
                                       std=[0.229, 0.224, 0.225])]
    trans = transforms.Compose(preprocess)

    # 读取带录入的人脸
    for file in os.listdir(root):
        if file.endswith(".jpg"):
            # 拼接完整路径
            file_path = os.path.join(root, file)
            # 读取图像内容并预处理
            img = trans(Image.open(file_path)).unsqueeze(0)
            # 使用FaceNet模型,将人脸变成128维向量
            embed = model921(img)
            # 将录入的脸存储在字典中
            faces[file.split(".")[0]] = embed.detach().numpy()[0]

    return faces


def embed_faces(img=None):
    """
    将人脸图像变成一个向量
    """

    preprocess = [transforms.Resize(224),
                  transforms.CenterCrop(224),
                  transforms.ToTensor(),
                  transforms.Normalize(mean=[0.485, 0.456, 0.406],
                                       std=[0.229, 0.224, 0.225])]
    trans = transforms.Compose(preprocess)
    img = trans(Image.fromarray(obj=img)).unsqueeze(0)
    embed = model921(img).detach().numpy()[0]

    return embed


def get_dist(face, faces):
    """
       求解欧氏距离
    :param face: 预测的结果
    :param faces: 库中的结果
    :return:
    """
    result = []
    for n, f in faces.items():
        result.append((n, np.sqrt(((f - face) ** 2).sum())))
    result.sort(key=lambda ele: ele[1])

    return result

# 获取人脸库
face_db = reg_faces()


def mark_face(img=None, faces=None):
    for face in faces:
        x, y, w, h = face["box"]
        confidence = face["confidence"]
        keypoints = face["keypoints"]

        if confidence > 0.9:
            cv2.rectangle(img=img, pt1=(x, y), pt2=((x+w), (y+h)), color=(0, 0, 200))
            # 左眼
            cv2.circle(img=img, center=keypoints["left_eye"], radius=2, color=(200, 0, 0))
            # 右眼
            cv2.circle(img=img, center=keypoints["right_eye"], radius=2, color=(200, 0, 0))
            # 鼻子
            cv2.circle(img=img, center=keypoints["nose"], radius=2, color=(200, 0, 0))
            # 左嘴角
            cv2.circle(img=img, center=keypoints["mouth_left"], radius=2, color=(200, 0, 0))
            # 右嘴角
            cv2.circle(img=img, center=keypoints["mouth_right"], radius=2, color=(200, 0, 0))


def rec_face(img, faces):
    """
       人脸识别
    :param img:
    :param faces:
    :return:
    """
    # 将图像转为RGB格式
    img_rgb = cv2.cvtColor(src=img, code=cv2.COLOR_BGR2RGB)

    for face in faces:
        x, y, w, h = face["box"]
        confidence = face["confidence"]
        # 通过置信度,过滤部分人脸
        if confidence > 0.9:
            # 截取人脸
            data = img_rgb[y:y+h, x:x+w, :]
            # 嵌入向量
            vec = embed_faces(img=data)
            # 计算距离
            result = get_dist(vec, face_db)
            # 求最短距离
            name, distance = result[0]
            print(distance)
            # 超过距离的阈值,则认为是陌生人
            if distance > 1.5:
                name = "Stranger"
            # 将名字打印到图像中
            cv2.putText(img=img, text=name, org=(x, y+h+30), color=(0, 200, 0),
                        fontFace=cv2.FONT_HERSHEY_SIMPLEX,
                        fontScale=1)
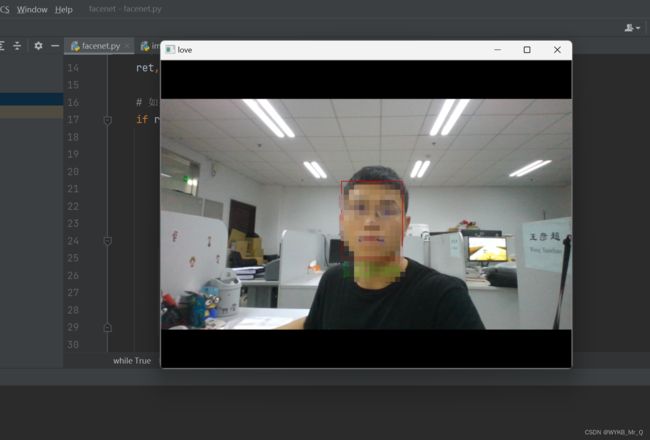
放张简单的效果图。
完整的代码文件见百度网盘:链接:https://pan.baidu.com/s/15q69SjVFEhfJ9WpgWSyhbg
提取码:pymx
日常学习记录,一起交流讨论吧!侵权联系~


