SpringBoot2整合WebSocket,实现后端实时推送数据
首先声明,本文只是一个demo,演示WebSocket推送流程,不能简单用于生产,需要改造
最近在做的很多项目中,涉及到非常多的实时数据图表展示,采用axios或ajax长轮询的方式,非常的消耗资源。于是有了这一篇,本文主要演示的是WebSocket的API使用,如果要实现服务端主动推送实时数据的功能,需要进行重新设计和编码实现,保证推送的唯一可达性和具备容错机制。
本文在“Moshow郑锴”大佬的教程上,进行了一些微小的改动,比如使用JUC的原子类代替了手动加锁来记录在线人数,亦能保证线程安全,又比如log打印日志,依照阿里巴巴编码规范要求使用占位符,而不是采用字符串拼接的形式,因为每一次拼接都需要new一个StringBuilder,而占位符只是替换,都是一些小细节,大佬的原文在最后给出,可以详细学习一下。
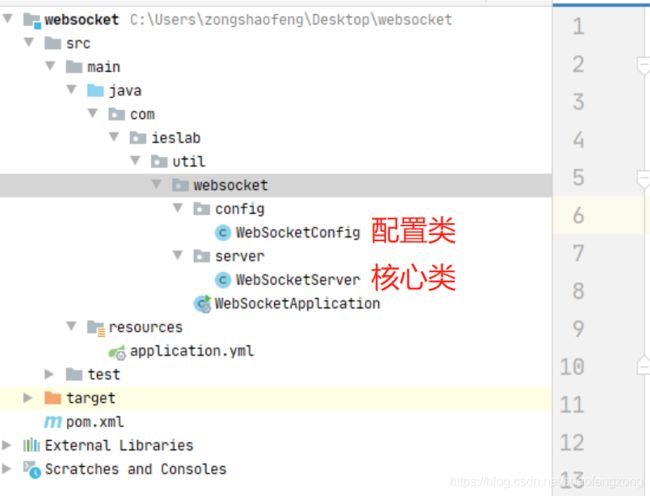
1. 项目目录很简单
2. POM文件-最少依赖
<project xmlns="http://maven.apache.org/POM/4.0.0" xmlns:xsi="http://www.w3.org/2001/XMLSchema-instance"
         xsi:schemaLocation="http://maven.apache.org/POM/4.0.0 https://maven.apache.org/xsd/maven-4.0.0.xsd">
    <modelVersion>4.0.0modelVersion>
    <parent>
        <groupId>org.springframework.bootgroupId>
        <artifactId>spring-boot-starter-parentartifactId>
        <version>2.2.6.RELEASEversion>
        <relativePath/>
    parent>
    <groupId>com.ieslab.utilgroupId>
    <artifactId>websocketartifactId>
    <version>0.0.1-SNAPSHOTversion>
    <packaging>jarpackaging>
    <name>websocketname>
    <description>WebSocket Utildescription>
    <properties>
        <java.version>1.8java.version>
        <commons-lang3.version>3.11commons-lang3.version>
        <fastJson.version>1.2.75fastJson.version>
    properties>
    <dependencies>

        <dependency>
            <groupId>org.springframework.bootgroupId>
            <artifactId>spring-boot-starter-websocketartifactId>
        dependency>

        <dependency>
            <groupId>org.apache.commonsgroupId>
            <artifactId>commons-lang3artifactId>
            <version>${commons-lang3.version}version>
        dependency>

        <dependency>
            <groupId>com.alibabagroupId>
            <artifactId>fastjsonartifactId>
            <version>${fastJson.version}version>
        dependency>


        <dependency>
            <groupId>org.springframework.bootgroupId>
            <artifactId>spring-boot-devtoolsartifactId>
            <scope>runtimescope>
            <optional>trueoptional>
        dependency>
        <dependency>
            <groupId>org.projectlombokgroupId>
            <artifactId>lombokartifactId>
            <optional>trueoptional>
        dependency>
        <dependency>
            <groupId>org.springframework.bootgroupId>
            <artifactId>spring-boot-starter-testartifactId>
            <scope>testscope>
        dependency>
    dependencies>

    <build>
        <plugins>
            <plugin>
                <groupId>org.springframework.bootgroupId>
                <artifactId>spring-boot-maven-pluginartifactId>
                <configuration>
                    <excludes>
                        <exclude>
                            <groupId>org.projectlombokgroupId>
                            <artifactId>lombokartifactId>
                        exclude>
                    excludes>
                configuration>
            plugin>
        plugins>
    build>

project>
3.WebSocket配置类
package com.ieslab.util.websocket.config;

import org.springframework.context.annotation.Bean;
import org.springframework.context.annotation.Configuration;
import org.springframework.web.socket.server.standard.ServerEndpointExporter;

/**
 * @version V1.0
 * @Title: WebSocket配置类
 * @Package com.ieslab.util.websocket.config
 * @Description: 开启WebSocket支持
 * @author: zongshaofeng
 * @date 2021/6/26
 */
@Configuration
public class WebSocketConfig {

    @Bean
    public ServerEndpointExporter serverEndpointExporter(){
        return new ServerEndpointExporter();
    }
}
4.创建WebSocketServer,这是核心类
package com.ieslab.util.websocket.server;

import com.alibaba.fastjson.JSON;
import com.alibaba.fastjson.JSONObject;
import lombok.extern.slf4j.Slf4j;
import org.apache.commons.lang3.StringUtils;
import org.springframework.stereotype.Component;

import javax.websocket.*;
import javax.websocket.server.PathParam;
import javax.websocket.server.ServerEndpoint;
import java.io.IOException;
import java.util.concurrent.ConcurrentHashMap;
import java.util.concurrent.atomic.AtomicInteger;

/**
 * @version V1.0
 * @Title: WebSocket核心类
 * @Package com.ieslab.util.websocket.server
 * @Description: 指定WebSocket服务端所有核心处理
 * @author: zongshaofeng
 * @date 2021/6/26
 */
@Component
@ServerEndpoint(value = "/websocket/{userId}")
@Slf4j
public class WebSocketServer {

    /**
     * 用来记录当前的在线连接数,采用JUC的原子类来保证线程安全
     */
    private final static AtomicInteger onlineCount = new AtomicInteger(0);
    /**
     * 创建Map存放每个连接对应的WebSocket对象,采用JUC的ConcurrentHashMap并发Map保证线程安全
     */
    private final static ConcurrentHashMap<String, WebSocketServer> webSocketMap = new ConcurrentHashMap<>();
    /**
     * 与某个客户端的连接会话,需要通过它来推送数据
     */
    private Session session;
    /**
     * 接收userId
     */
    private String userId;

    /**
     * 连接建立成功调用的方法
     *
     * @param session
     * @param userId
     */
    @OnOpen
    public void onOpen(Session session, @PathParam("userId") String userId) {
        this.session = session;
        this.userId = userId;
        //记录当前的在线连接数
        int nowOnlineCount = 0;
        if (webSocketMap.containsKey(userId)) {
            webSocketMap.remove(userId);
            //加入到Map中
            webSocketMap.put(userId, this);
        } else {
            webSocketMap.put(userId, this);
            //在线数加1
            nowOnlineCount = onlineCount.incrementAndGet();
        }
        log.info("ID为{}的用户连接成功,当前在线人数为:{}", userId, nowOnlineCount);
        try {
            //发送消息,检验是否连接成功
            sendMessage("来自服务端的提示消息,ID为" + userId + "的用户连接成功!");
        } catch (Exception e) {
            log.error("ID为{}的用户连接失败,失败原因:{}", userId, e.getMessage());
        }
    }

    /**
     * 连接关闭时调用的方法
     */
    @OnClose
    public void onClose() {
        //记录当前的在线连接数
        int nowOnlineCount = 0;
        if (webSocketMap.containsKey(this.userId)) {
            //移除对应的WebSocket对象,相应的在线连接数减1
            webSocketMap.remove(this.userId);
            nowOnlineCount =onlineCount.decrementAndGet();
        }
        log.info("ID为{}的用户断开连接,当前在线人数为:{}", this.userId, nowOnlineCount);
    }

    @OnMessage
    public void onMessage(String message, Session session) {
        log.info("用户ID:{},报文:{}", this.userId, message);
        if (StringUtils.isNotBlank(message)) {
            try {
                //解析发送的报文
                JSONObject jsonObject = JSON.parseObject(message);
                //追加发送人(防止串改)
                jsonObject.put("fromUserId", this.userId);
                String toUserId = jsonObject.getString("toUserId");
                //传送给对应toUserId用户的websocket
                if (StringUtils.isNotBlank(toUserId) && webSocketMap.containsKey(toUserId)) {
                    webSocketMap.get(toUserId).sendMessage(jsonObject.toJSONString());
                } else {
                    log.error("请求的userId:{}不在该服务器上", toUserId);
                    //否则不在这个服务器上,发送到mysql或者redis
                }
            } catch (Exception e) {
                e.printStackTrace();
            }
        }
    }

    /**
     * 发生错误时调用的方法
     *
     * @param session
     * @param error
     */
    @OnError
    public void onError(Session session, Throwable error) {
        log.error("用户错误:{},原因:{}", this.userId, error.getMessage());
        error.printStackTrace();
    }

    /**
     * 实现服务器主动推送的方法
     *
     * @param message
     * @throws IOException
     */
    public void sendMessage(String message) throws IOException {
        this.session.getBasicRemote().sendText(message);
    }


    /**
     * 发送自定义消息
     *
     * @param message 消息内容
     * @param userId
     * @throws IOException
     */
    public static void sendInfo(String message, @PathParam("userId") String userId) throws IOException {
        log.info("发送消息到:{},报文:{}", userId, message);
        if (StringUtils.isNotBlank(userId) && webSocketMap.containsKey(userId)) {
            webSocketMap.get(userId).sendMessage(message);
        } else {
            log.error("用户{},不在线!", userId);
        }
    }

}
5.application.yml
server:
  port: 8081
  servlet:
    context-path: /
6. 测试页面
<html>
<head>
    <meta charset="utf-8">
    <title>websocket通讯title>
head>
<script src="https://cdn.bootcss.com/jquery/3.3.1/jquery.js">script>
<script>
    var socket;
    function openSocket() {
        if(typeof(WebSocket) == "undefined") {
            console.log("您的浏览器不支持WebSocket");
        }else{
            console.log("您的浏览器支持WebSocket");
            //实现化WebSocket对象,指定要连接的服务器地址与端口  建立连接
            var socketUrl="http://localhost:8081/websocket/"+$("#userId").val();
            socketUrl=socketUrl.replace("https","ws").replace("http","ws");
            console.log(socketUrl);
            if(socket!=null){
                socket.close();
                socket=null;
            }
            socket = new WebSocket(socketUrl);
            //打开事件
            socket.onopen = function() {
                console.log("websocket已打开");
                //socket.send("这是来自客户端的消息" + location.href + new Date());
            };
            //获得消息事件
            socket.onmessage = function(msg) {
                console.log(msg.data);
                //发现消息进入    开始处理前端触发逻辑
            };
            //关闭事件
            socket.onclose = function() {
                console.log("websocket已关闭");
            };
            //发生了错误事件
            socket.onerror = function() {
                console.log("websocket发生了错误");
            }
        }
    }
    function sendMessage() {
        if(typeof(WebSocket) == "undefined") {
            console.log("您的浏览器不支持WebSocket");
        }else {
            console.log("您的浏览器支持WebSocket");
            console.log('{"toUserId":"'+$("#toUserId").val()+'","contentText":"'+$("#contentText").val()+'"}');
            socket.send('{"toUserId":"'+$("#toUserId").val()+'","contentText":"'+$("#contentText").val()+'"}');
        }
    }
script>
<body>
<p>【userId】:<div><input id="userId" name="userId" type="text" value="10">div>
<p>【toUserId】:<div><input id="toUserId" name="toUserId" type="text" value="20">div>
<p>【toUserId】:<div><input id="contentText" name="contentText" type="text" value="hello websocket">div>
<p>【操作】:<div><a onclick="openSocket()">开启socketa>div>
<p>【操作】:<div><a onclick="sendMessage()">发送消息a>div>
body>

html>
7. 测试
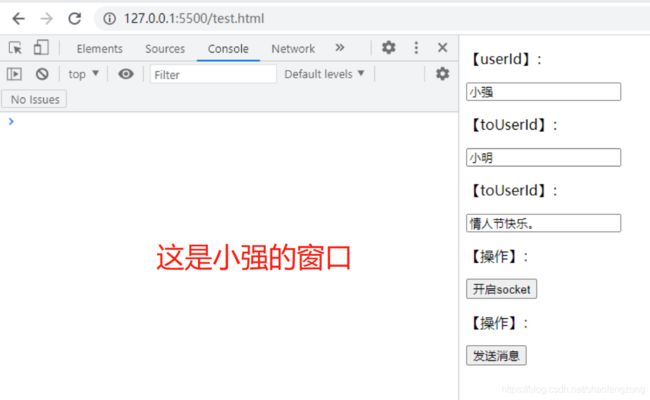
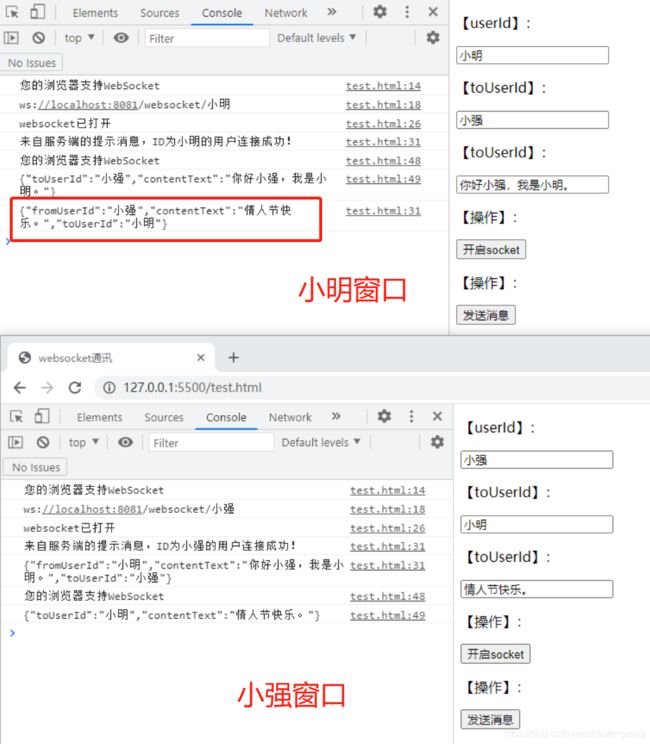
浏览器打开两个一模一样的测试页面


首先在各自的页面中点击开启Socket,就是模拟上线呗

在小明窗口点击发送消息,查看结果

反向操作

再看看后台打印的日志消息

当前台页面关闭时,后端亦能实时感知

这不就好了嘛
完事手工
参考文章:SpringBoot2.0集成WebSocket,实现后台向前端推送信息
感谢上述大佬的教程,非常详细。
