通过Jenkins实现Unity多平台自动打包以及相关问题解决

简介

        通过本文可以了解到如何在windows和mac上部署Jenkins。并且通过Jenkins实现Unity在IOS,安卓和PC等多平台自动打包的功能,并且可以将打包结果通过飞书机器人同步到飞书群内。优化工作流,提高团队的开发效率。文末记录了实际使用Jenkins时遇到的各种问题,以及对应的解决方法。

        我们团队工作中配置了专门的mac设备,用于处理打包任务,各个职能的人可以根据自己的需要登录到Jenkins后台执行对应的打包指令。并且工作日会根据git提交情况定时自动构建,每天将各个平台的构建包,通过Testflight等方式同步给组内的成员。

Windows平台Jenkins安装

Jenkins下载地址和官网

官网:Jenkins

官方文档说明:Jenkins User Documentation

安装步骤

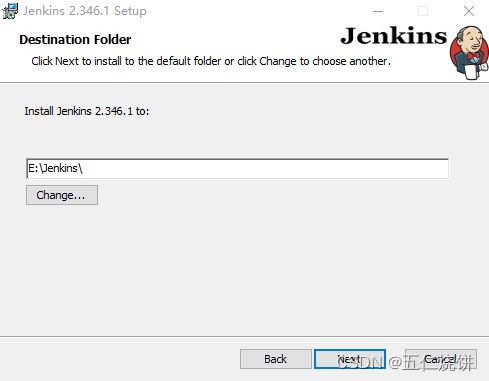
选择指定目录

通过Jenkins实现Unity多平台自动打包以及相关问题解决_第1张图片

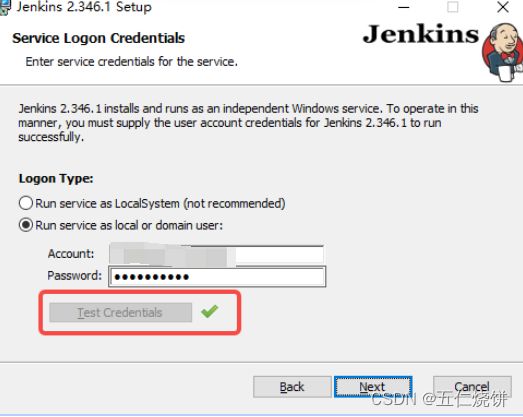
选择域访问

填写账号和开机密码(如果不知道自己的账号,可以查看下方win10无法安装的问题处理,查看自己的账号),点击Test credentials确保账号正确

通过Jenkins实现Unity多平台自动打包以及相关问题解决_第2张图片

选择端口号

通过Jenkins实现Unity多平台自动打包以及相关问题解决_第3张图片

选择jdk目录

安装相关问题

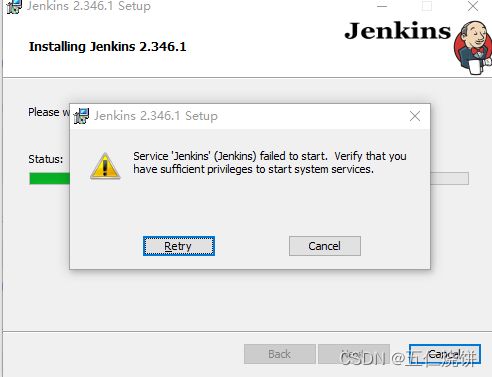
报错 service jenkins failed to start

通过Jenkins实现Unity多平台自动打包以及相关问题解决_第4张图片

进入服务选择jenkins

通过Jenkins实现Unity多平台自动打包以及相关问题解决_第5张图片

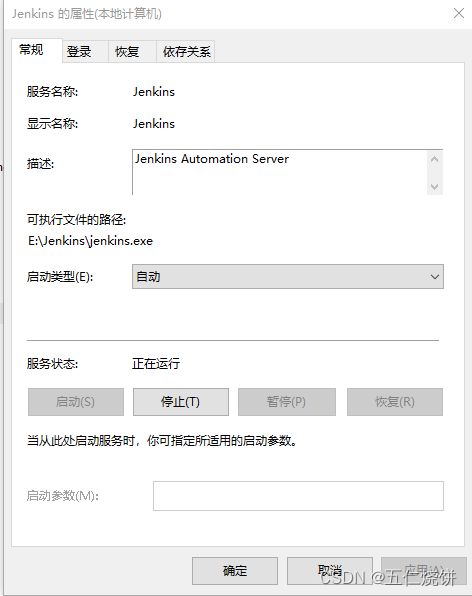
双击Jenkins,启动类型设置为自动。

通过Jenkins实现Unity多平台自动打包以及相关问题解决_第6张图片

登录页签,输入当前的开机密码。回到上个页面点击启动

通过Jenkins实现Unity多平台自动打包以及相关问题解决_第7张图片

启动成功后,点击之前报错界面的retry

Windows10无法安装问题处理

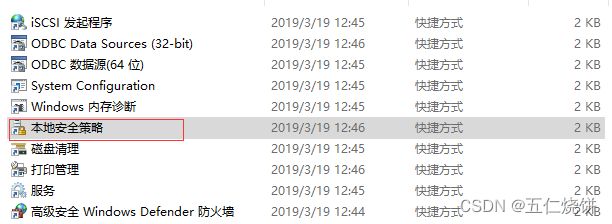
1.搜索栏搜索管理工具

通过Jenkins实现Unity多平台自动打包以及相关问题解决_第8张图片

2.本地安全策略

通过Jenkins实现Unity多平台自动打包以及相关问题解决_第9张图片

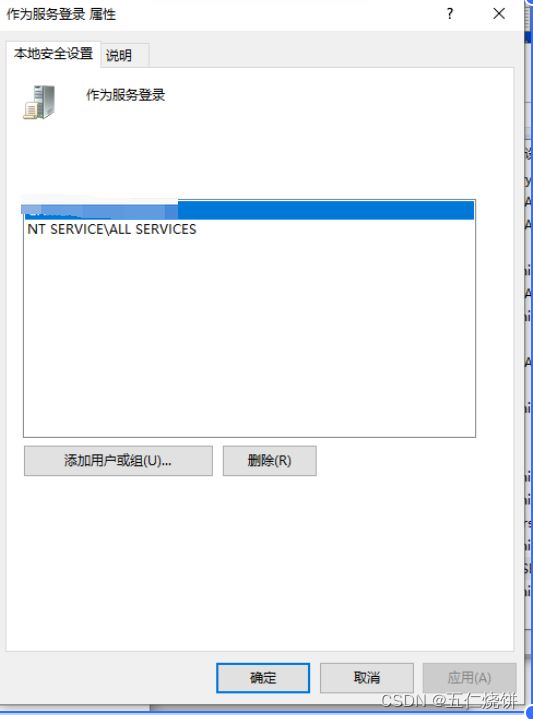
3本地策略->用户权限分配->右键作为服务登录->属性

通过Jenkins实现Unity多平台自动打包以及相关问题解决_第10张图片

通过Jenkins实现Unity多平台自动打包以及相关问题解决_第11张图片

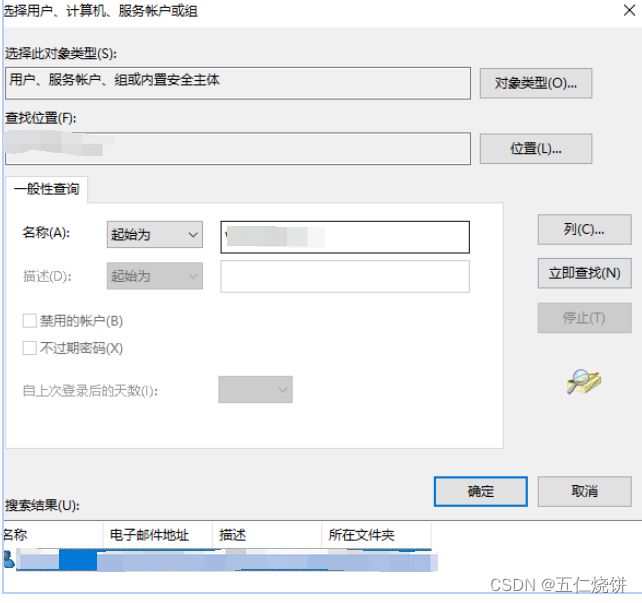
添加用户组->高级->输入名字->立即查找->选中账户点确定

通过Jenkins实现Unity多平台自动打包以及相关问题解决_第12张图片

安装界面account为下图的用户名,必须包含域。密码为开机密码

通过Jenkins实现Unity多平台自动打包以及相关问题解决_第13张图片

Mac安装Jenkins

命令行执行 brew install jenkins

修改Jenkins工作目录

启动Jenkins

输入一开始设置的端口号

http://127.0.0.1:8080/

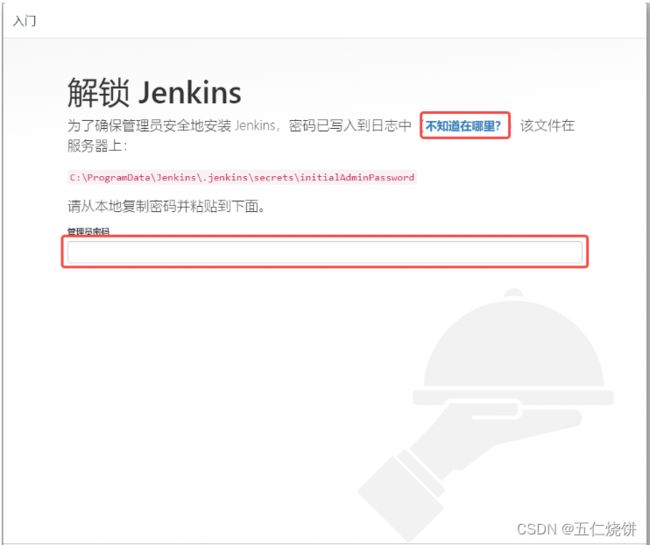
初次需要输入密码

通过Jenkins实现Unity多平台自动打包以及相关问题解决_第14张图片

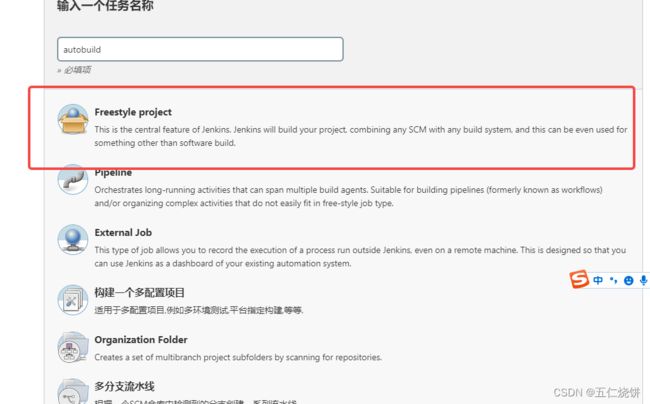
创建Unity工程

通过Jenkins实现Unity多平台自动打包以及相关问题解决_第15张图片

Git配置

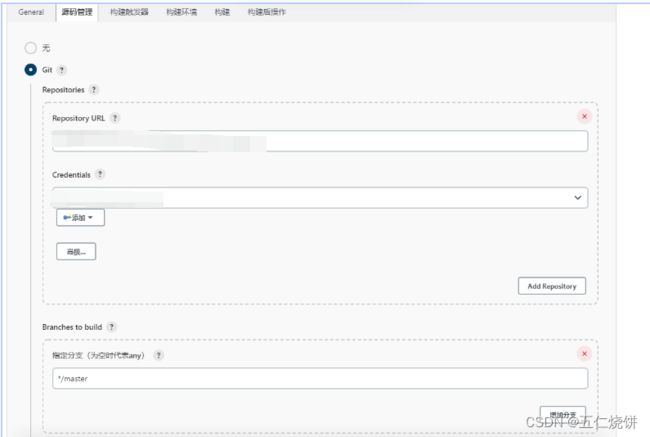
选择源码管理

填入对应git地址,选择配置好的ssh key

通过Jenkins实现Unity多平台自动打包以及相关问题解决_第16张图片

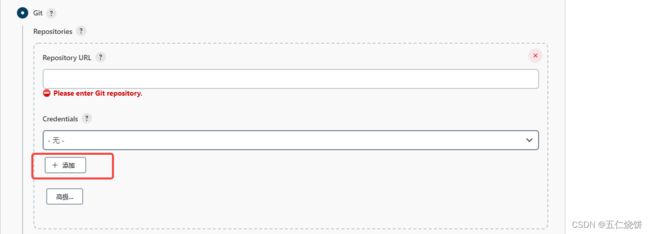
如果未创建ssh key,按照下面的步骤创建ssh key

添加SSH key

通过Jenkins实现Unity多平台自动打包以及相关问题解决_第17张图片

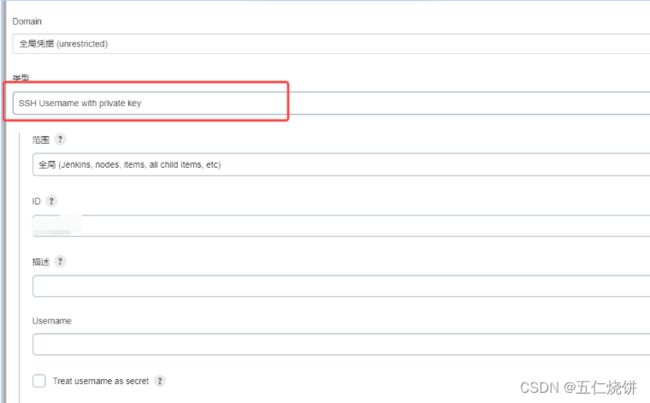
选择Ssh username with private key,

通过Jenkins实现Unity多平台自动打包以及相关问题解决_第18张图片

把private key 填入就可以了 (注意这里填的是私钥-----BEGIN RSA PRIVATE KEY-----  xxx -----END RSA PRIVATE KEY----- )

通过Jenkins实现Unity多平台自动打包以及相关问题解决_第19张图片

构建工程

尝试build,成功说明git配置正确

通过Jenkins实现Unity多平台自动打包以及相关问题解决_第20张图片

Windows Jenkins常用命令

启动

net start jenkins

关闭 

net stop jenkins

Mac Jenkins常用命令

启动

brew services start jenkins

停止

brew services stop jenkins

重启

brew services restart jenkins

Jenkins配置

设置默认工作目录

Windows

1.修改环境变量JENKINS_HOME E:\JenkinsHome

通过Jenkins实现Unity多平台自动打包以及相关问题解决_第21张图片

2.修改jenkins.xml

在jenkins的安装目录下修改JENKINS_HOME


之后重启jenkins

Mac

Mac下Jenkins的默认安装路径为

/Users/xxx/.jenkins

对应的配置文件config.xml也放置在该目录下

默认的workspace

  ${JENKINS_HOME}/workspace/${ITEM_FULL_NAME}

Unity插件安装

ManageJenkins->Manage plugins->可选插件->搜索unity 安装对应插件

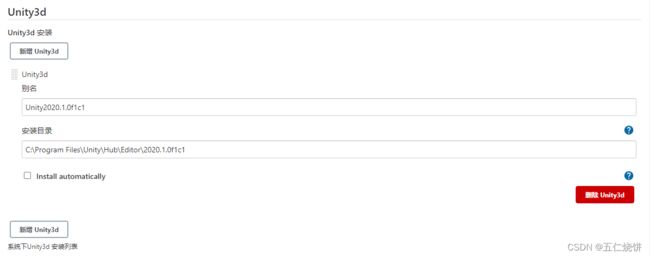
配置Unity安装地址

Manage Jenkins->Global ToolConfiguration

添加对应的引擎地址

通过Jenkins实现Unity多平台自动打包以及相关问题解决_第22张图片

设置unity 地址C:\Program Files\Unity\Hub\Editor\2020.1.0f1c1

这里特别注意mac配置unity的话,路径最后要以Unity.app为结尾。

在项目配置里构建,添加unity命令

1.先创建editor脚本

先在unity的editor文件夹创建BuildTools

TypeScript

public class BuildTools
{
    [MenuItem("Build/Build APK")]
    public static void BuildApk()
    {
        BuildPlayerOptions opt = new BuildPlayerOptions();
        opt.scenes = new string[] { "Assets/Scenes/SampleScene.unity" };
        opt.locationPathName = Application.dataPath + "/../Bin/test.apk";
        opt.target = BuildTarget.Android;
        opt.options = BuildOptions.None;

        BuildPipeline.BuildPlayer(opt);

        Debug.Log("Build App Done!");
    }
}

确保可以正常运行

Unity相关命令行

https://docs.unity3d.com/Manual/CommandLineArguments.html

2.jenkins工程添加editor配置

添加Invoke Unity3D Editor

选择对应版本

添加命令

通过Jenkins实现Unity多平台自动打包以及相关问题解决_第23张图片

C++
-projectPath autobuild/  -quit -batchmode -executeMethod BuildTools.BuildApk
//BuildTools 是editor脚本类名 BuildApk是对应的函数

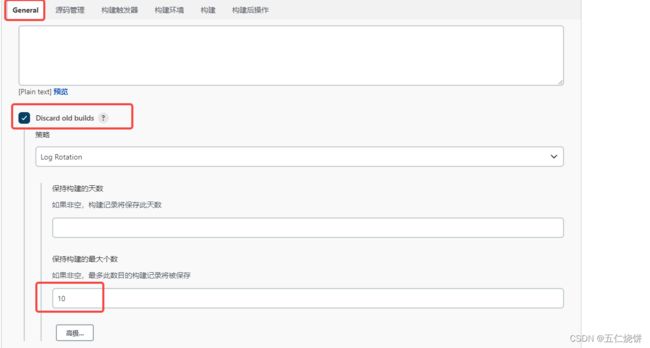
设置构建文件删除规则

通过Jenkins实现Unity多平台自动打包以及相关问题解决_第24张图片

参数化构建

安装插件 Extended Choice Parameter

添加参数

通过Jenkins实现Unity多平台自动打包以及相关问题解决_第25张图片

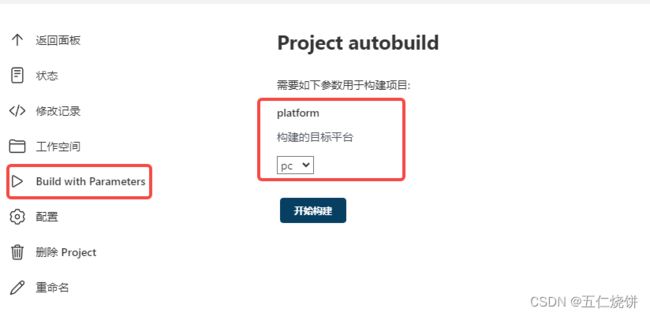
注意设置名称,之后会作为参数。这里选的是选项型参数,一行代表一个选项,第一个代表默认选项

选择Build with parameters

通过Jenkins实现Unity多平台自动打包以及相关问题解决_第26张图片

在之后的脚本里可以通过${platform}  获取参数(这里的platform就是上面的参数名称)

例子一,shell脚本直接

Bash
echo ${platform}

例子二,unity3Deditor命令调用。这里--platform是自定义的参数可以自定义其他任意参数

Bash
-projectPath autobuild/  -quit -batchmode -executeMethod BuildTools.AutoBuild --platform:${platform}

之后在unity内的editor可以通过System.Environment.GetCommandLineArgs()获取该参数

C#
   public static void AutoBuild()
    {
        string[] args = System.Environment.GetCommandLineArgs();


        foreach (var s in args)
        {
            Debug.Log("AutoBuild params:" + s);
            if (s.Contains("--platform:"))
            {
                string platform = s.Split(':')[1];
                if (platform == "apk")
                {
                    BuildApk();
                }
                else if (platform == "pc")
                {
                    BuildPc();
                }
            }

        }

    }

根据条件构建

安装Conditional BuildStep

通过Jenkins实现Unity多平台自动打包以及相关问题解决_第27张图片

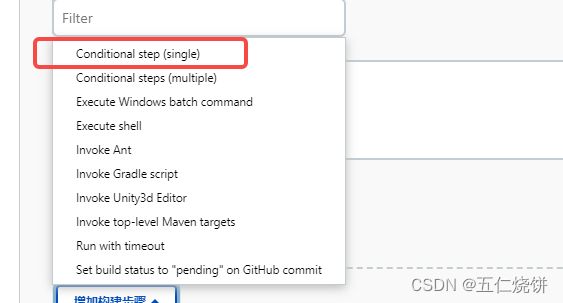
在构建步骤的时候,可以添加Conditional Step

通过Jenkins实现Unity多平台自动打包以及相关问题解决_第28张图片

这里添加了一个String match的条件,满足条件(platform字段为pc时)才会执行对应的构建步骤.

通过Jenkins实现Unity多平台自动打包以及相关问题解决_第29张图片

后续的构建步骤可以像之前的普通步骤一样添加

通过Jenkins实现Unity多平台自动打包以及相关问题解决_第30张图片

Xcode构建步骤

安装Xcode integration 插件

在插件界面安装Xcode integration 插件

配置登录凭证

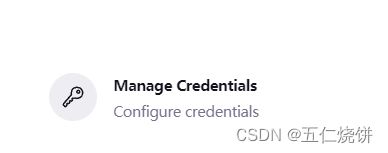
Manage Credentials界面,配置全局凭证

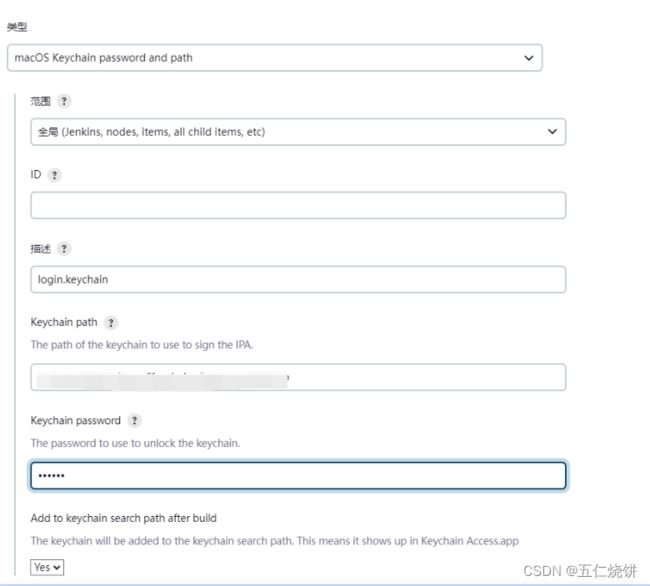
通过Jenkins实现Unity多平台自动打包以及相关问题解决_第31张图片

通过Jenkins实现Unity多平台自动打包以及相关问题解决_第32张图片

  • 选择MacOs Keychain password and path
  • 描述名为login.keychain
  • 路径为/Users/{username}/Library/Keychains/login.keychain-db
  • (打包机地址为/Users/xxx/Library/Keychains/login.keychain-db)
  • 密码为开机密码

通过Jenkins实现Unity多平台自动打包以及相关问题解决_第33张图片

添加Xcode编译步骤

这里先按照前面的根据条件构建,当平台名为ios时再进行此操作

  • 填写Development Team ID(TeamID需要到后台填写)

  • 勾选Use Legacy Build System

通过Jenkins实现Unity多平台自动打包以及相关问题解决_第34张图片

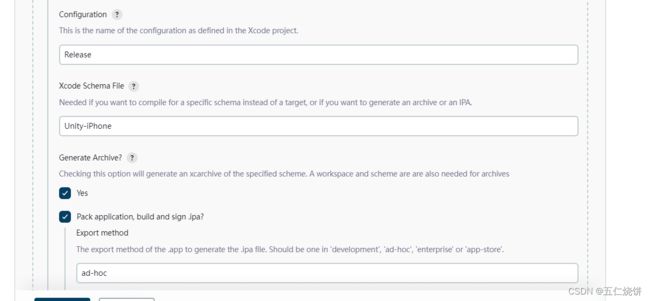
  • Configuration填Release
  • Xcode Schema File 填 Unity-iPhone
  • 勾选Generate Archive
  • Export method填ad-hoc

通过Jenkins实现Unity多平台自动打包以及相关问题解决_第35张图片

  • 点开CodeSigning
  • 选择Automatic Signing

通过Jenkins实现Unity多平台自动打包以及相关问题解决_第36张图片

Automatic Signing如果失败的话,可以使用ManualSigning

需要先去develop后台生成一个新的profile,下载之后双击启用。

然后在manualSigning的uuid填入新的profile证书的uuid

通过Jenkins实现Unity多平台自动打包以及相关问题解决_第37张图片

uuid的查看方式是在安装完profile之后 ,在 资源库/MobileDevice/Provisioning Profiles/xxx.mobileprovision

这里mobileprovision文件名就是对应的uuid可以根据安装时间进行查看。

  • 勾选Unlock Keychain
  • keyChain选择之前设置的login.keyChain
  • path填/Users/xingye/Library/Keychains/login.keychain-db
  • 密码填开机密码

通过Jenkins实现Unity多平台自动打包以及相关问题解决_第38张图片

  • 点开Advanced XcodeBuild options
  • Xcode Project Directory填Build/XcodeProj
  • Build output directory填${WORKSPACE}/Build/Ipa/

TestFlight配置

TestFlight上传需要用到altool

Bash
/Applications/Xcode.app/Contents/Developer/usr/bin/altool --upload-app -f ${WORKSPACE}/outputs/xx.ipa --type ios --apiKey xxx --apiIssuer "xxx"

注意这里的Apikey是在appstore connect的用户和访问界面的秘钥界面生成的。生成秘钥后可以下载对应的p8秘钥文件,需要将该文件放置在 users/xxx/private_keys 目录下

apiIssuer 的id就是在用户和访问界面issuer id

通过Jenkins实现Unity多平台自动打包以及相关问题解决_第39张图片

组内人员需要进行测试时请按照下方指南进行操作

TestFlight使用指南

另外补充一些后台需要进行的操作

一个是需要在用户和访问界面,添加需要使用testflight的测试人员的apple id

通过Jenkins实现Unity多平台自动打包以及相关问题解决_第40张图片

添加后会向该测试人员发送一个邮件邀请,对方同意之后需要到应用的TestFlight界面。

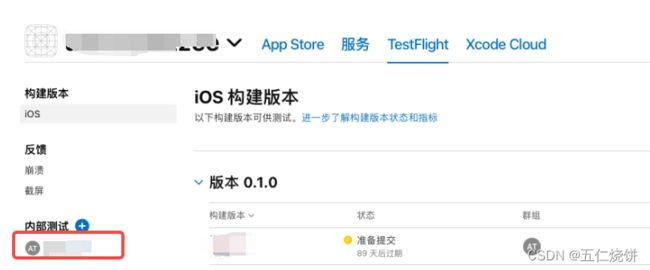
如果还没有内部测试组,可以先添加测试组。如果已经存在测试组,就点击已有的测试组,将新加入的开发人员加入到测试组中

通过Jenkins实现Unity多平台自动打包以及相关问题解决_第41张图片

飞书机器人

添加飞书机器人

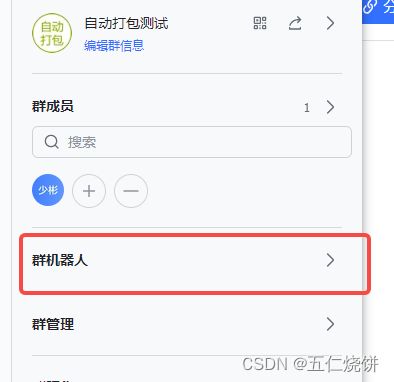
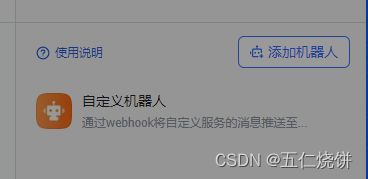
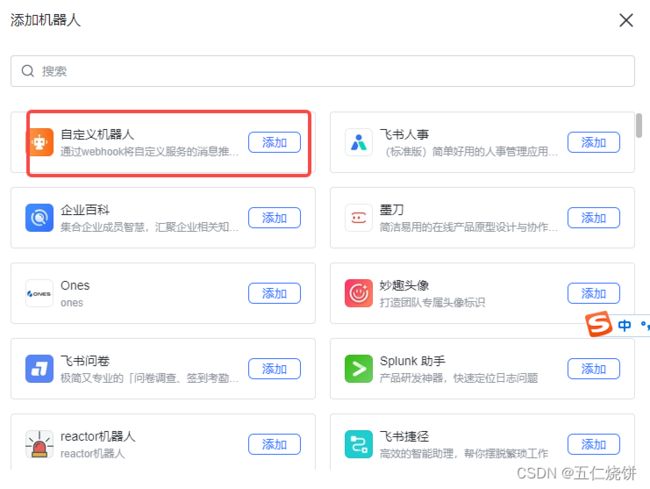
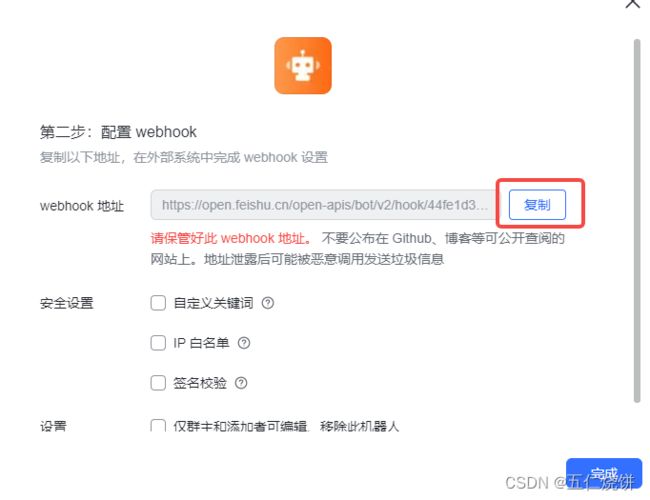
在群聊的设置中根据如下步骤添加机器人

通过Jenkins实现Unity多平台自动打包以及相关问题解决_第42张图片

通过Jenkins实现Unity多平台自动打包以及相关问题解决_第43张图片

通过Jenkins实现Unity多平台自动打包以及相关问题解决_第44张图片

通过Jenkins实现Unity多平台自动打包以及相关问题解决_第45张图片

通过Jenkins实现Unity多平台自动打包以及相关问题解决_第46张图片

创建消息发送脚本

在工程指定目录创建一个python脚本feishumsg.py(这里的目录地址为 ./toolscripts/feishumsg.py), 复制webhook地址 填到url内

Python

#!/usr/bin/env python

#-*- encoding:utf-8 -*-


import sys


import requests


import time


JOB_URL = sys.argv[1]

JOB_NAME = sys.argv[2]

BUILD_NUMBER = sys.argv[3]

currenttime = time.strftime("%Y-%m-%d %H:%M:%S", time.localtime())

url = '你的webhook地址'

method = 'post'

headers = {

    'Content-Type': 'application/json'

}

json = {

    "msg_type": "interactive",

    "card": {

        "config": {

            "wide_screen_mode": True,

            "enable_forward": True

        },

        "elements": [{

            "tag": "div",

            "text": {

                "content": "项目名称:" + JOB_NAME + "\n构建编号:第" + BUILD_NUMBER + "次构建\n运行时间:" + currenttime,

                "tag": "lark_md"

            }

        }, {

            "actions": [{

                "tag": "button",

                "text": {

                    "content": "查看报告",

                    "tag": "lark_md"

                },

                "url": JOB_URL,

                "type": "default",

                "value": {}

            }],

            "tag": "action"

        }],

        "header": {

            "title": {

                "content": JOB_NAME + " 构建报告",

                "tag": "plain_text"

            }

        }

    }

}

requests.request(method=method, url=url, headers=headers, json=json)

添加构建步骤

在Jenkins后台添加构建步骤

通过Jenkins实现Unity多平台自动打包以及相关问题解决_第47张图片

填入如下命令

PowerShell
python toolscripts/feishumsg.py $JOB_URL $JOB_NAME $BUILD_NUMBER

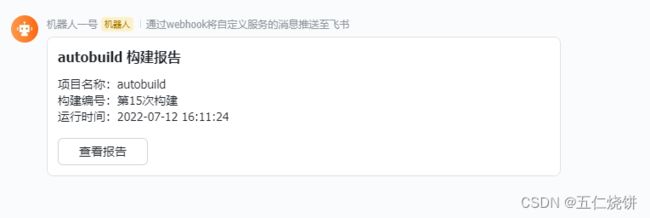
运行成功之后可以在对应群聊收到消息

通过Jenkins实现Unity多平台自动打包以及相关问题解决_第48张图片

多用户管理

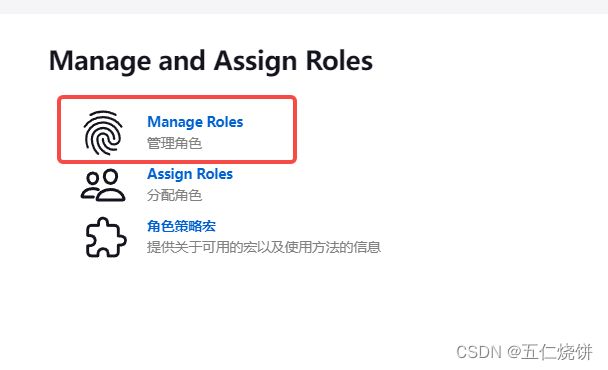
安装Role based Authorization Strategy插件

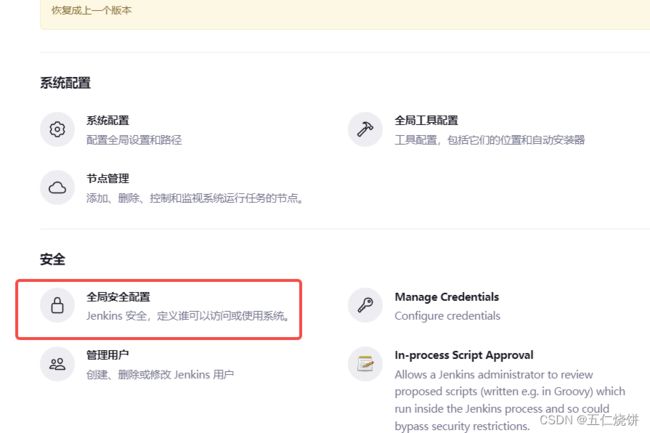
通过Jenkins实现Unity多平台自动打包以及相关问题解决_第49张图片

通过Jenkins实现Unity多平台自动打包以及相关问题解决_第50张图片

通过Jenkins实现Unity多平台自动打包以及相关问题解决_第51张图片

通过Jenkins实现Unity多平台自动打包以及相关问题解决_第52张图片

通过Jenkins实现Unity多平台自动打包以及相关问题解决_第53张图片

通过Jenkins实现Unity多平台自动打包以及相关问题解决_第54张图片

通过Jenkins实现Unity多平台自动打包以及相关问题解决_第55张图片

报错处理和问题处理

1.Could not determine the dependencies of task ':launcher:compileReleaseJavaWithJavac'.> Installed Build Tools revision 31.0.0 is corrupted. Remove and install again using the SDK Manager.

原因是缺少 dx.bat  和 dx.jar ,实际上31.0.0有d8.bat和d8.jar

进入对应unity的sdk目录 C:\Program Files\Unity\Hub\Editor\2020.1.0f1c1\Editor\Data\PlaybackEngines\AndroidPlayer\SDK\build-tools\31.0.0

命令行运行 mklink dx.bat d8.bat

C:\Program Files\Unity\Hub\Editor\2020.1.0f1c1\Editor\Data\PlaybackEngines\AndroidPlayer\SDK\build-tools\31.0.0\lib

命令行运行 mklink dx.jar d8.jar

或者直接复制对应文件

相关处理链接

2.Filename too long

命令行运行如下指令

C#
git config --system core.longpaths true

3. Couldn't set project path to  xxx xxx

这是jenkins的Unity3d Editor工具,在不传-projectPath 参数的时候会把当前的目录作为参数传入。如果传入后拼接的地址,不是unity工程所在的目录,就会报错。所以,需要在editor脚本上添加

-projectPath xx 参数,最后拼接的地址为unity工程所在地址

4.An error occurred while resolving packages:One or more packages could not be added to the local file system:com.unity.ide.visualstudio: EBUSY: resource busy or locked, open 'E:\JenkinsHome\workspace\autobuild\autobuild\Library\PackageCache\.tmp9488BBGAK4gS5D9k\copy\Editor\COMIntegration\Release\COMIntegration.exe'

这个是由于Unity工程打开的时候,出现的问题。把Unity工程都关闭就行

5.ModuleNotFoundError: No module named 'requests'

运行脚本时出现上面的报错,原因是没有对应的requests模块,在命令行输入

 pip install requests,安装requests模块

mac上运行 python3 -m pip install requests

相关处理链接

6.局域网其他设备无法连接Jenkins(jenkins安装在mac)

进入/usr/local/opt/jenkins/homebrew.mxcl.jenkins.plist文件中的httpListenAddress修改为0.0.0.0 重启,就能连接了

如果还不行查看是否存在 ~/Library/LaunchAgents/homebrew.mxcl.jenkins.plist文件,进行同样修改

7.Jenkins detected that you appear to be running more than one instance of Jenkins that share the same home directory '/Users/XXX/.jenkins’. This greatly confuses Jenkins and you will likely experience strange behaviors, so please correct the situation.

删除 /Users/XXX/.jenkins 下的.owner文件

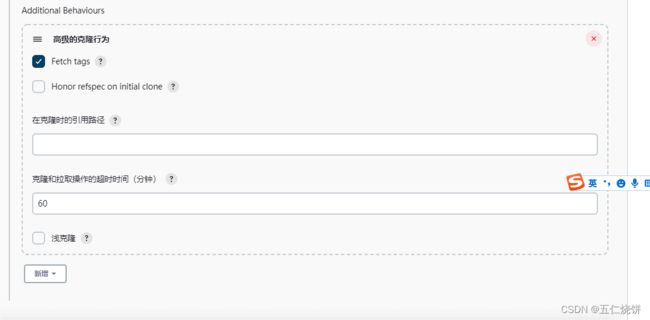
8.ERROR: Timeout after 10 minutes ERROR: Error fetching remote repo 'origin'

这是因为默认的git拉取超时是10分钟,在clone大的项目的时候可能出现超时的情况。在源码管理里面添加高级克隆行为参数,设置超时时间即可

通过Jenkins实现Unity多平台自动打包以及相关问题解决_第56张图片

9.路径问题:在执行bash的时候,执行bash targetDir/xxx.sh时由于xxx.sh使用了相对路径导致出错

通过括号+cd对应路径的方式可以解决该问题 ,修改后的指令如下

Bash
(cd targetDir;bash ./xxx.sh)

10.Jenkins执行bash时报错,cmake: command not found

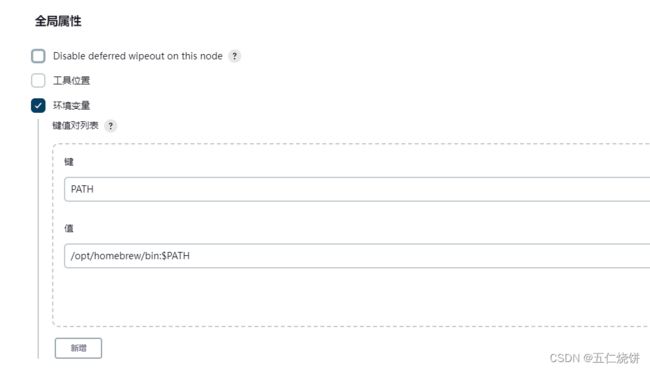
直接在bash 命令行下执行cmake --version,没有报错,说明cmake其实已经安装了。是环境变量的问题。bash命令行下执行which cmake。查看到cmake的路径为 /opt/homebrew/bin/cmake。之后在Jenkins后台 系统管理->系统配置->全局属性部分的环境变量添加对应变量

通过Jenkins实现Unity多平台自动打包以及相关问题解决_第57张图片

11. 无法连接仓库:Command "git ls-remote -h -- xxx.git HEAD" returned status code 128:

Bash
无法连接仓库:Command "git ls-remote -h --XXX.git HEAD" returned status code 128:
stdout:
stderr: @@@@@@@@@@@@@@@@@@@@@@@@@@@@@@@@@@@@@@@@@@@@@@@@@@@@@@@@@@@
@    WARNING: REMOTE HOST IDENTIFICATION HAS CHANGED!     @
@@@@@@@@@@@@@@@@@@@@@@@@@@@@@@@@@@@@@@@@@@@@@@@@@@@@@@@@@@@
IT IS POSSIBLE THAT SOMEONE IS DOING SOMETHING NASTY!
Someone could be eavesdropping on you right now (man-in-the-middle attack)!
It is also possible that a host key has just been changed.
The fingerprint for the ED25519 key sent by the remote host is
SHA256:xxx/xx.
Please contact your system administrator.
Add correct host key in /Users/xxx/.ssh/known_hosts to get rid of this message.
Offending ECDSA key in /Users/xxx/.ssh/known_hosts:3
Host key for XXX.com has changed and you have requested strict checking.
Host key verification failed.
fatal: Could not read from remote repository.

Please make sure you have the correct access rights
and the repository exists.

用以下命令刷新sshkey,底下的targetAddress替换成实际的仓库地址(或者ip)

Bash
ssh-keygen -R targetAddress

刷新完之后,找到/Users/qsgdmj/.ssh/的 id_rsa(私钥)和id_rsa_pub(公钥),在jenkins后台添加对应的私钥,在仓库账户上添加公钥。之后可能会出现下方12.No ED25519 的问题。继续按下方解决方式处理

12.No ED25519 host key is known for git.xxx.com and you have requested strict checking

在命令行执行git.exe ls-remote -h -- [email protected]:xxx/xxx.git,弹出提示之后输入yes

13.Jenkins更换ip地址后,本地访问localhost:8080 和通过ip访问均无法访问jenkins后台

命令行执行一下指令

Bash
brew services list

可以看到homebrew.mxcl.jenkins.plist配置所在的位置,打开后修改ProgramArguments里的--httpListenAddress=本机ip。

ProgramArguments的第一个项为jenkins所在地址,用finder 打开该地址/opt/homebrew/opt/jenkins/bin/jenkins

上一级目录同样有一个文件homebrew.mxcl.jenkins.plist。把该文件的httpListenAddress也改成本机ip(如果这一步不执行可能出现每次restart jenkins时,ip又被重新修改了)

还有就是修改.jenkins/目录下的jenkins.model.JenkinsLocationConfiguration.xml,将jenkinsUrl改成新的本机地址,之后调用brew services restart jenkins

14.Jenkins 执行时,有时候出现构建失败,但是实际却显示成功的情况

比如下面的构建日志,中途出现报错"Build Finished, Result: Failure." 但是最后的构建结果却是"Finished: SUCCESS"

C#
//省略部分内容
Unloading 288 Unused Serialized files (Serialized files now loaded: 0)
Unloading 1538 unused Assets / (1.1 MB). Loaded Objects now: 8442.
Memory consumption went from 286.7 MB to 285.6 MB.
Total: 25.471792 ms (FindLiveObjects: 4.789042 ms CreateObjectMapping: 0.391709 ms MarkObjects: 16.866416 ms  DeleteObjects: 3.421000 ms)

Build Finished, Result: Failure.
Unloading 0 Unused Serialized files (Serialized files now loaded: 0)
//省略部分内容
Exiting batchmode successfully now!
[Package Manager] Server::Kill -- Server was shutdown
Finished: SUCCESS

添加Text Finder插件

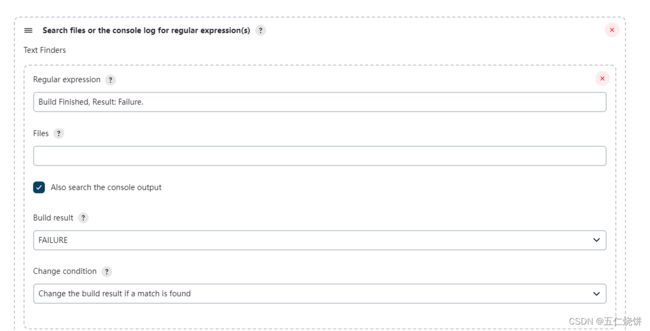
之后添加构建后步骤,Search files or the console log for regular expression(s)

填入之前出现的报错

通过Jenkins实现Unity多平台自动打包以及相关问题解决_第58张图片

15.修改Jenkins工作路径到移动硬盘的问题与解决

前置工作

由于打包机为Mac,所以需要先将移动硬盘的格式修改为APFS

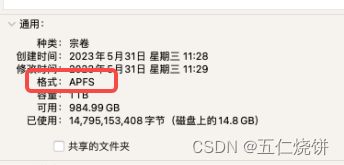
移动硬盘的格式可以右键->显示简介 查看。如果已经是APFS格式可以跳过这个步骤

通过Jenkins实现Unity多平台自动打包以及相关问题解决_第59张图片

具体操作是命令行输入diskutil list

可以看到所有的硬盘信息

YAML
/dev/disk0 (internal, physical):
   #:                       TYPE NAME                    SIZE       IDENTIFIER
   0:      GUID_partition_scheme                        *251.0 GB   disk0
   1:             Apple_APFS_ISC Container disk1         524.3 MB   disk0s1
   2:                 Apple_APFS Container disk3         245.1 GB   disk0s2
   3:        Apple_APFS_Recovery Container disk2         5.4 GB     disk0s3

/dev/disk3 (synthesized):
   #:                       TYPE NAME                    SIZE       IDENTIFIER
   0:      APFS Container Scheme -                      +245.1 GB   disk3
                                 Physical Store disk0s2
   1:                APFS Volume Macintosh HD            11.9 GB    disk3s1
   2:              APFS Snapshot com.apple.os.update-... 11.9 GB    disk3s1s1
   3:                APFS Volume Preboot                 9.8 GB     disk3s2
   4:                APFS Volume Recovery                1.6 GB     disk3s3
   5:                APFS Volume Data                    213.2 GB   disk3s5
   6:                APFS Volume VM                      3.2 GB     disk3s6

/dev/disk6 (external, physical):
   #:                       TYPE NAME                    SIZE       IDENTIFIER
   0:     FDisk_partition_scheme                        *1.0 TB     disk6
   1:                  Apple_HFS T7                      1.0 TB     disk6s1


可以看到信息/dev/disk6 (external, physical)

external代表移动硬盘,disk6为该移动硬盘的编号

之后命名行输入

diskutil eraseDisk JHFS+ T7 disk6

T7为新的硬盘名称,disk6为对应编号

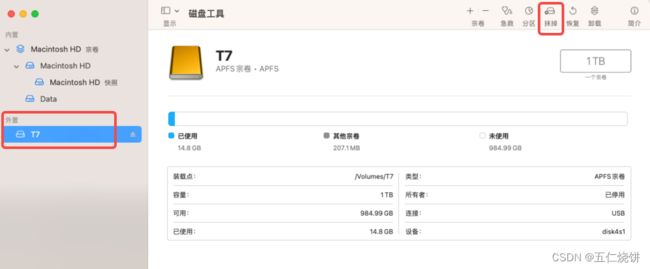
之后在程序坞打开磁盘工具,选择该移动硬盘,选择抹掉

通过Jenkins实现Unity多平台自动打包以及相关问题解决_第60张图片

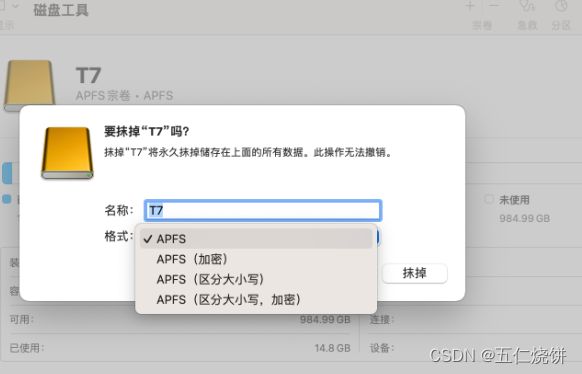
之后选择对应的文件格式

通过Jenkins实现Unity多平台自动打包以及相关问题解决_第61张图片

至此硬盘设置工作完成。

工作路径的修改

工作路径修改到移动硬盘会遇到一些权限问题。具体操作为

(1)将jenkins的配置config.xml的workSpace修改为

  Volumes/T7/Workspace/JenkinsWorkspace/${ITEM_FULL_NAME}

(移动硬盘名称为T7,对应路径为Volumes/T7)

之后执行 brew services restart jenkins 重启jenkins

这时直接运行会报错"Operation not permitted",原因是由于mac本身权限管理,导致Jenkins无法直接对移动硬盘进行操作。

(2)参照该网址内的权限修改操作,设置完全磁盘权限。https://stackoverflow.com/questions/61248588/jenkins-unable-to-start-jenkins-on-an-external-hard-drive

  • open terminal
  • brew services stop jenkins
  • System Preferences -> Security and Privacy -> Full Disk Access
  • Click the lock to enable changes
  • Drag and drop java_home from the finder window into the allowed list.
  • brew services start jenkins

这里需要注意用which java时,显示的/usr/bin/java 实际上是一个映射,并不是正在java_home的位置

需要执行/usr/libexec/java_home -V 可以看到真正的java_home路径

通过Jenkins实现Unity多平台自动打包以及相关问题解决_第62张图片

之后重启jenkins

(3)修改完磁盘访问权限,如果jenkins还是无法对移动硬盘进行操作,可以关闭Mac的sip设置

具体操作为

  • 重启mac,并长按command+r 直到重启进度条出现。这时会进入Mac的恢复模式
  • 选择左上角的实用工具->终端

通过Jenkins实现Unity多平台自动打包以及相关问题解决_第63张图片

  • 命令行执行 csrutil disable 之后重启mac

(4)拥有磁盘权限之后,jenkins执行任务时还可能出现如下问题:未受保护的ssh key。

Plain Text
stderr: @@@@@@@@@@@@@@@@@@@@@@@@@@@@@@@@@@@@@@@@@@@@@@@@@@@@@@@@@@@
@         WARNING: UNPROTECTED PRIVATE KEY FILE!          @
@@@@@@@@@@@@@@@@@@@@@@@@@@@@@@@@@@@@@@@@@@@@@@@@@@@@@@@@@@@

Permissions 0777 for '/Volumes/T7/Workspace/JenkinsWorkspace/xxx/jenkins-gitclient-sshxxx.key' are too open.

这时候需要到Jenkins后台,将对应的ssh key的范围由全局修改为系统

通过Jenkins实现Unity多平台自动打包以及相关问题解决_第64张图片

至此,问题全部解决,可以正常执行Jenkins任务

16.unity console 报错Library/Bee/artifacts/mvdfrm/Unity.RenderPipeline.Universal.ShaderLibrary.ref.dll_FD8EDE77A08A7963.mvfrm

删除Library下的Bee目录,然后重新启动Unity

17.because this command failed to write the following output files: library/bee/artifacts/mvdfrm/unityengine.testrunner.ref.dll

在MacOs系统上,当Unity工程放在移动硬盘上进行安卓打包的时候会出现这个问题。原因是移动硬盘的格式问题。可以参照问题15的前置工作,将移动硬盘格式修改为APFS

18. TestFlight上传时出现A required agreement is missing or has expired的报错

详细报错内容如下

Ada
 NSUnderlyingError = "Error Domain=IrisAPI Code=-19241 \"A required agreement is missing or has expired.\" UserInfo={status=403, detail=This request requires an in-effect agreement that has not been signed or has expired., id=xxxx, code=FORBIDDEN.REQUIRED_AGREEMENTS_MISSING_OR_EXPIRED, title=A required agreement is missing or has expired., links={\n    see = \"/agreements\";\n}, NSLocalizedDescription=A required agreement is missing or has expired., NSLocalizedFailureReason=This request requires an in-effect agreement that has not been signed or has expired.}";
    "iris-code" = "FORBIDDEN.REQUIRED_AGREEMENTS_MISSING_OR_EXPIRED";

登录appstore后台,发现是因为有新的许可证协议

点击协议上的链接同意协议即可
你可能感兴趣的:(Unity开发方案和知识,jenkins,unity)