janus-Gateway的服务端部署
janus-Gateway
需求是前后端的webRTC推拉流,但是后端用的是c++,于是使用了这个库做视频流的推送和拉取,记录踩坑过程。
如果你也需要自己部署janus的服务端并在前端拉流测试,希望对你有所帮助。
由于janus的服务器搭建需要linux环境,源码并不支持windows,因此需要准备局域网下的另一台ubantu电脑通过ssh连接。
服务端的搭建本人并不熟悉,参考的是newchenxf大佬的这篇文章,由于版本更新,有些报错的地方会在下文指正。
服务端搭建
1.下载源码
通过 github 下载源码,也可以在 官网 查看详细的api和在线demo 。
2.安装Janus依赖库
部分直接命令行安装,部分需要通过源码安装。
2.1 命令行安装
sudo aptitude install libmicrohttpd-dev libjansson-dev \
	libssl-dev libsrtp-dev libsofia-sip-ua-dev libglib2.0-dev \
	libopus-dev libogg-dev libcurl4-openssl-dev liblua5.3-dev \
	libconfig-dev pkg-config gengetopt libtool automake
请注意安装结果,如果有某一个安装失败,又是官网要求必须装的,则需要手动下载安装,方法参照下面的源码安装↓
2.2 源码安装libnice
libnice是一个建立ice连接必须的库,官方推荐方法依赖比较多,需要Python 3 Meson and Ninja(我直接用的第二种方法)
git clone https://gitlab.freedesktop.org/libnice/libnice
cd libnice
meson --prefix=/usr build && ninja -C build && sudo ninja -C build install
第二种方法,下载 libnice_0.1.16.orig.tar.gz,下载完后将压缩文件移动到usr/local下
cd /usr/local
tar -zxvf libnice_0.1.16.orig.tar.gz
cd /usr/local/libnice_0.1.16
./configure && make && sudo make install
2.3 源码安装libwebsocket
webSocket不是必须的,但是最好装一下,因为websocket也很常用,网页Demo也会用。
下载 libwebsockets (蓝奏云)压缩包,将压缩文件移动到/usr/local下
 sudo tar -zxvf libwebsockets.tar.gz
 cd /usr/local/libwebsockets
 mkdir build
 cd build/
 cmake ..
 make && make install
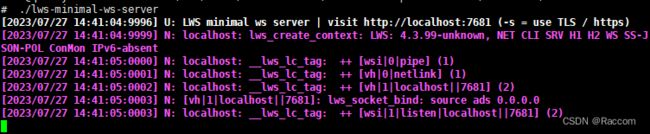
如无报错情况下,build/bin目录下,将生成 example类文件, 此时还需要进入example的源码目录:libwebsockets/minimal-examples-lowlevel/ws-server/minimal-ws-server二次编译。
 cd /usr/local/libwebsockets/minimal-examples-lowlevel/ws-server/minimal-ws-server
 cmake .
 make
 ./lws-minimal-ws-server
终端执行结果应该是这样:
此时便可以通过本机ip加7681端口(如果本机ip为1.1.1.1 则访问 1.1.1.1:7681),访问websocket网页查看服务是否启动↓(网页应该如下图所示)。

在编译 janus 时,janus 默认会增加对 WebSocket 的集成,或者通过增加编译参数 –enable-websockets 打开 WebSocket 开关。
2.4 源码安装libsrtp
这一个不是绝对必须的,因为前面通过命令行也安装了libsrtp-dev。事实上运行起demo是没有问题的,如果只跑demo可以跳过。只不过Janus官网建议,如果你的libsrtp版本低于1.5,建议升级到最新的,比如2.2,因为之前的版本可能有bug,会引入问题。
sudo apt-get install libsrtp-dev
如果是按步骤来,会提示已经安装过了(安装的是老版本,终端执行结果应该是这样)
Reading package lists... Done
Building dependency tree
Reading state information... Done
Note, selecting 'libsrtp0-dev' instead of 'libsrtp-dev'
libsrtp0-dev is already the newest version (1.4.5~20130609~dfsg-2ubuntu1).
安装新版本,更新到2.2后,不需要pkg-config来修改版本,因为这个库名字和老版本不一样,叫做libsrtp2,不会冲突。如果有libsrtp2,Janus会自动选这个库。
wget https://github.com/cisco/libsrtp/archive/v2.2.0.tar.gz
tar xfv v2.2.0.tar.gz
cd libsrtp-2.2.0
./configure --prefix=/usr --enable-openssl
make shared_library && sudo make install
2.5 源码安装usrsctp
这个也是非必须,如果要起Data Channel才需要,简单来说就是推拉流运行起来后,如果需要文本互相发送会用到。
装好以后,编译janus会默认启用他
git clone https://github.com/sctplab/usrsctp
cd usrsctp
./bootstrap
./configure --prefix=/usr --disable-programs --disable-inet --disable-inet6
make && sudo make install
3. 编译Janus
依赖都准备好了,可以编译janus了
git clone https://github.com/meetecho/janus-gateway.git
sh autogen.sh
./configure --prefix=/opt/janus --enable-websockets
make
sudo make install
如果还想生成帮助文档,可以加一个–enable-docs,编译前,还需要装一下doxygen等辅助工具(可选)
aptitude install doxygen graphviz
执行configure
./configure
此时终端的执行结果应该为 ↓ ,没有配置Data Channel不影响demo运行
Compiler:                  gcc
libsrtp version:           2.x
SSL/crypto library:        OpenSSL
DTLS set-timeout:          not available
Mutex implementation:      GMutex (native futex on Linux)
DataChannels support:      yes
Recordings post-processor: no
TURN REST API client:      yes
Doxygen documentation:     no
Transports:
    REST (HTTP/HTTPS):     yes
    WebSockets:            yes
    RabbitMQ:              no
    MQTT:                  no
    Unix Sockets:          yes
    Nanomsg:               no
Plugins:
    Echo Test:             yes
    Streaming:             yes
    Video Call:            yes
    SIP Gateway:           yes
    NoSIP (RTP Bridge):    yes
    Audio Bridge:          yes
    Video Room:            yes
    Voice Mail:            yes
    Record&Play:           yes
    Text Room:             yes
    Lua Interpreter:       no
    Duktape Interpreter:   no
Event handlers:
    Sample event handler:  yes
    WebSocket ev. handler: yes
    RabbitMQ event handler:no
    MQTT event handler:    no
    Nanomsg event handler: no
    GELF event handler:    yes
External loggers:
    JSON file logger:      no
JavaScript modules:        no
4. 运行Janus
Janus运行需要参数配置,安装目录(/opt/janus/etc/janus/)已经有配置的sample。
进入以后,发现有很多jcfg.sample文件,比如janus.jcfg.sample, janus.transport.websockets.jcfg.sample。
需要把这些都复制成可被读取的文件(即去掉.sample结尾),要全部复制。
所以需要复制第一个文件名称,替换命令里面的名字,执行命令,再复制第二个文件名称,替换命令里面的名字,再执行…直到复制完文件夹下的十几个.sample文件。
文件名均为 xxx.jcfg.sample 后面的文件名就是xxx.jcfg(即 前面的删掉 .sample )
sudo cp -rf 文件名 文件名(去掉最后的sample)
所以假如复制的文件名为 janus.jcfg.sample ,命令就是 ↓ 这条
sudo cp -rf janus.jcfg.sample janus.jcfg
全部完成后,需要生成ssl证书。
5. ssl证书
Janus默认的配置,是没有enable SSL的,意味着,https和wss不支持。而有些浏览器,要拉起摄像头,必须是加密协议下的。所以,如果你Demo运行不起来,可以服务端配置一下SSL。
cd ~
mkdir ssl
cd ssl
# Gen ssl certs:
openssl req -new -newkey rsa:4096 -nodes -keyout key.pem -out cert.csr
openssl x509 -req -sha256 -days 365 -in cert.csr -signkey key.pem -out cert.pem
chmod 600 cert.csr
chmod 600 cert.pem
chmod 600 key.pem
生成的过程中会让你输入信息,姓名密码之类的,直接enter跳过即可,不能跳过的随便填。
注意:如果填密码的时候是输入了密码的,那么要记住它,改配置文件需要填密码。
这个是私人证书,访问时会报不安全,如果公司性质的需要另外申请。
5.1 配置文件修改ssl信息
打开刚才改.sample文件的目录 /opt/janus/etc/janus/
使用文本编辑janus.jcfg,注意这里的证书路径需要在文件夹中找一下,不同的用户生成不同
比如我的是root用户,我的ssl证书生成在/root/ssl, 并且由于我填密码时enter跳过了,所以pwd为空
注意前面的#要去掉,填完之后前面三行复制即可
certificates: {
        cert_pem = "/root/ssl/cert.pem"
        cert_key = "/root/ssl/key.pem"
        cert_pwd = ""
        #dtls_accept_selfsigned = false
        #dtls_ciphers = "your-desired-openssl-ciphers"
        #rsa_private_key = false
}
再编辑同目录下的janus.transport.http.jcfg,把https改为true,去掉secure_port的注释#,certificates配置跟上面一样
general: {
        #events = true                                  # Whether to notify event handlers about transport events (default=true)
        json = "indented"                               # Whether the JSON messages should be indented (default),
                                                                        # plain (no indentation) or compact (no indentation and no spaces)
        base_path = "/janus"                    # Base path to bind to in the web server (plain HTTP only)
        http = true                                             # Whether to enable the plain HTTP interface
        port = 8088                                             # Web server HTTP port

        https = true                                    # Whether to enable HTTPS (default=false)
        secure_port = 8089                              # Web server HTTPS port, if enabled

}


certificates: {
        cert_pem = "/root/ssl/cert.pem"
        cert_key = "/root/ssl/key.pem"
        cert_pwd = ""
        #ciphers = "PFS:-VERS-TLS1.0:-VERS-TLS1.1:-3DES-CBC:-ARCFOUR-128"
}
再编辑同目录下的janus.transport.websockets.jcfg,把wss改为true,去掉wss_port的注释#,certificates配置跟上面一样
general: {

        ws = true                                               # Whether to enable the WebSockets API
        ws_port = 8188                                  # WebSockets server port
        #ws_interface = "eth0"                  # Whether we should bind this server to a specific interface only
        #ws_ip = "192.168.0.1"                  # Whether we should bind this server to a specific IP address only
        wss = true                                              # Whether to enable secure WebSockets
        wss_port = 8989                         # WebSockets server secure port, if enabled
}

certificates: {
        cert_pem = "/root/ssl/cert.pem"
        cert_key = "/root/ssl/key.pem"
        cert_pwd = ""
        #ciphers = "PFS:-VERS-TLS1.0:-VERS-TLS1.1:-3DES-CBC:-ARCFOUR-128"
}
注意:改的这三个文件均为.jcfg结尾的文件(刚才4. 运行Janus时转化的),如果改到了.sample结尾的文件,配置就不生效了。
6. 运行
所有的准备和配置都搞定了,接下来就是启动服务。
/opt/janus/bin/janus --debug-level=7
终端的执行结果
libwebsockets logging: 0
Websockets server started (port 8188)...
Using certificates:
        /root/ssl/cert.pem
        /root/ssl/key.pem
Secure Websockets server started (port 8989)...
Admin Websockets server disabled
Secure Admin Websockets server disabled

JANUS WebSockets transport plugin initialized!    <---JANUS websocket初始化

        Version: 1 (0.0.1)
           [janus.transport.websockets] JANUS WebSockets transport plugin
           This transport plugin adds WebSockets support to the Janus API via libwebsockets.
           Plugin API version: 8
           Janus API: enabled
           Admin API: disabled

WebSockets thread started     <---JANUS websocket启动成功
如果是这样说明启动成功了!
检查运行端口
lsof -i | grep janus
终端运行结果
janus   32306 chenxiaofeng    5u  IPv6  887081      0t0  UDP *:rfe
janus   32306 chenxiaofeng    6u  IPv6  887082      0t0  UDP *:5004
janus   32306 chenxiaofeng   13u  IPv6  884414      0t0  TCP *:omniorb (LISTEN)
janus   32306 chenxiaofeng   16u  IPv6  884415      0t0  TCP *:8089 (LISTEN)
janus   32306 chenxiaofeng   21u  IPv4  884417      0t0  TCP *:8188 (LISTEN)
janus   32306 chenxiaofeng   24u  IPv4  884418      0t0  TCP *:8989 (LISTEN)
8089是https, 8188是ws, 8989是wss(websocket secure)
STUN server警告
[WARN] Janus is deployed on a private address (192.168.1.107) but you didn't specify any STUN server! Expect trouble if this is supposed to work over the internet and not just in a LAN...
启动的时候还会有STUN警告信息,对于我们运行Demo是没问题的。因为一般运行在局域网,没有P2P打通的需要。
但如果你是正式使用则需要解决这个警告,需要安装STUN server, 也就是coturn。
打开/opt/janus/etc/janus/janus.jcfg,修改配置
nat: {
        #stun_server = "stun.voip.eutelia.it"
        #stun_port = 3478
..
        #turn_server = "myturnserver.com"
        #turn_port = 3478
        #turn_type = "udp"
        #turn_user = "myuser"
        #turn_pwd = "mypassword"
安装coturn
git clone https://github.com/coturn/coturn
cd coturn
./configure
make
sudo make install
安装coturn服务器不一定和janus一起,也可以一起。总之装好后把信息写到janus的配置文件中。
7. 在线demo
我们可以在服务端通过http-server将demo的html发布到本地服务器,方便我们使用
首先我们需要在ubantu中安装nodejs,参考ubantu下nodejs安装
安装完成后,全局安装http-server
npm -g install http-server
安装好以后,进入janus源码的html目录。
cd /usr/local/janus-gateway/html
然后执行http-server
注意:web的demo,默认都是走http的,这在有些环境下的浏览器,是无法拉起摄像头的(权限问题),推荐使用https
这里/root/ssl是ssl证书生成的目录
http-server --ssl --cert /root/ssl/cert.pem --key /root/ssl/key.pem
启动后访问即可,由于是私人ssl证书,浏览器会有警告,继续前往即可。

此时就可以访问在线的demo了。
服务端的部署到这里就结束了,接下来是前端模块