DevOps-GitHub/GitLab
DevOps-GitHub/GitLab
GitHub是一个开源代码托管平台。基于web的Git仓库,提供共有仓库和私有仓库(私有仓库收费)。
GitLab可以创建免费私有仓库。
GitHub
为了快速操作,这里对创建仓库以及注册不做说明。
使用GitHub远程仓库
-
在github上获取克隆地址(注意,这个地址是你仓库的地址,不是我的地址)
https://github.com/rkun0068/github_test.git -
克隆项目到本地linux,默认克隆到当前目录(如果出现无法连接github的情况,可以在https://github.com/521xueweihan/GitHub520 查找方法,一般在
/etc/hosts文件下配置DNS,刷新即可)[root@workstation ~]# git clone https://github.com/rkun0068/github_test.git Cloning into 'github_test'... remote: Enumerating objects: 3, done. remote: Counting objects: 100% (3/3), done. remote: Total 3 (delta 0), reused 0 (delta 0), pack-reused 0 Unpacking objects: 100% (3/3), done. [root@workstation ~]# cd github_test/ [root@workstation github_test]# ls README.md [root@workstation github_test]# cat README.md # github_test GitHub测试 -
提交代码文件
[root@workstation github_test]# vi hello.py [root@workstation github_test]# cat hello.py print("hello,github") [root@workstation github_test]# git add hello.py [root@workstation github_test]# git commit -m "提交hello.py" [main 9408d5c] 提交hello.py 1 file changed, 1 insertion(+) create mode 100644 hello.py -
使用
git push推送到github[root@workstation github_test]# git push -u origin main Counting objects: 4, done. Compressing objects: 100% (2/2), done. Writing objects: 100% (3/3), 308 bytes | 0 bytes/s, done. Total 3 (delta 0), reused 0 (delta 0) remote: To git@github.com:rkun0068/github_test.git 253eb95..a5196f7 main -> main Branch main set up to track remote branch main from origin.
设置免密
- 本地尝试空密码密钥对
- 本地保留私钥,公钥给对方
- 实现本地到远程免密
[root@workstation ~]# ssh-keygen -t rsa -f /root/.ssh/id_rsa -C "root@workstation"  -N ""
Generating public/private rsa key pair.
Created directory '/root/.ssh'.
Your identification has been saved in /root/.ssh/id_rsa.
Your public key has been saved in /root/.ssh/id_rsa.pub.
The key fingerprint is:
SHA256:ic2UQovuX1DlWRLaY4yWM9+L1UKIeHa4mCHZXMBV65M root@workstation
The key's randomart image is:
+---[RSA 2048]----+
|     .ooo.=..    |
|     *.+ % *     |
|    + B / @ .    |
|   . . # X = .   |
|    . = S E + .  |
|   .   .   + o   |
|    .   . . .    |
|     . .         |
|      .          |
+----[SHA256]-----+

[root@workstation ~]# cat ~/.ssh/id_rsa.pub
ssh-rsa AAAAB3NzaC1yc2EAAAADAQABAAABAQCq/MCM/q8ipB4lsmOSzve25/pPr+FjdxnMM857/cwdqtttcJLID7vnzsgxo/W/bZXg+3h0r4P+VjLR3QLdR2XI/TSEvHdHQxB6Pi8lzbDYaUqTi14RrP5fJIC48pJwArBVMWNGQireXjynQ4Urgy7YJIwQNi1SgFxxrOpxk8PuKCo/ZmKKdS37mJA/rGmMV0xMvqKWgOAm0hrnXKpX1f7YRUeRJfGpN6o73stExbSEd4kas+LAnu++UQ/PNBo+s15Uw9Sm70Vr7mJ9pjLa0swtE6GrX2CbgnOcYg7LS7ngQbeS3KEB+dk7j/j5q0y8o+x6lbIhWWGlOFPGadxADPtF root@workstation
将密钥添加到GitHub设置里的SSH KEYS里
https://github.com/settings/keys
GitLab
下载地址
https://mirrors.tuna.tsinghua.edu.cn/gitlab-ce/yum/el7/
安装与配置
[root@workstation ~]# rpm -ivh gitlab-ce-10.0.0-ce.0.el7.x86_64.rpm
[root@workstation ~]# vi /etc/gitlab/gitlab.rb

[root@workstation ~]# cat  /etc/gitlab/gitlab.rb | grep 'external_url'
##! For more details on configuring external_url see:
external_url 'http://192.168.182.130'
# registry_external_url 'https://registry.gitlab.example.com'
# pages_external_url "http://pages.example.com/"
# mattermost_external_url 'http://mattermost.example.com'

#修改成gitlab服务器IP地址,对外服务大约在13行
初始化(时间较久,需要3分钟左右,会自动帮助配置各个组件,并启动)
gitlab-ctl reconfigure
查看状态
[root@workstation ~]# gitlab-ctl status
run: gitaly: (pid 9745) 65s; run: log: (pid 9109) 171s
run: gitlab-monitor: (pid 9781) 63s; run: log: (pid 9445) 136s
run: gitlab-workhorse: (pid 9759) 64s; run: log: (pid 9215) 165s
run: logrotate: (pid 9320) 153s; run: log: (pid 9319) 153s
run: nginx: (pid 9274) 159s; run: log: (pid 9273) 159s
run: node-exporter: (pid 9395) 142s; run: log: (pid 9394) 142s
run: postgres-exporter: (pid 9837) 62s; run: log: (pid 9600) 113s
run: postgresql: (pid 8774) 231s; run: log: (pid 8773) 231s
run: prometheus: (pid 9824) 62s; run: log: (pid 9544) 124s
run: redis: (pid 8651) 237s; run: log: (pid 8650) 237s
run: redis-exporter: (pid 9494) 130s; run: log: (pid 9493) 130s
run: sidekiq: (pid 9048) 178s; run: log: (pid 9047) 178s
run: unicorn: (pid 8980) 184s; run: log: (pid 8979) 184s
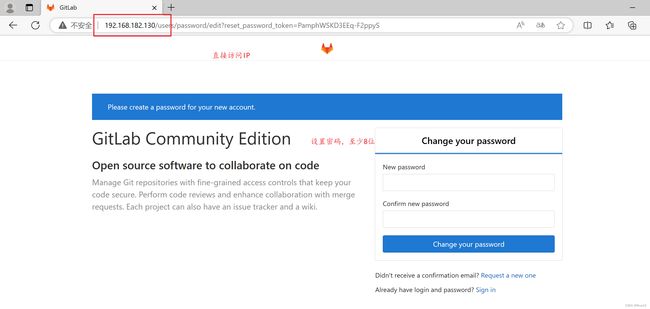
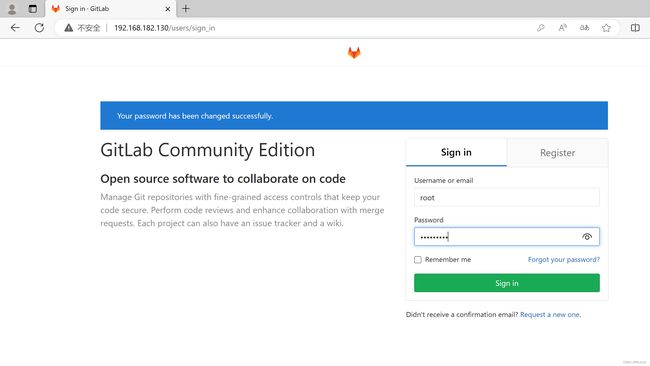
登录
访问IP,设置密码
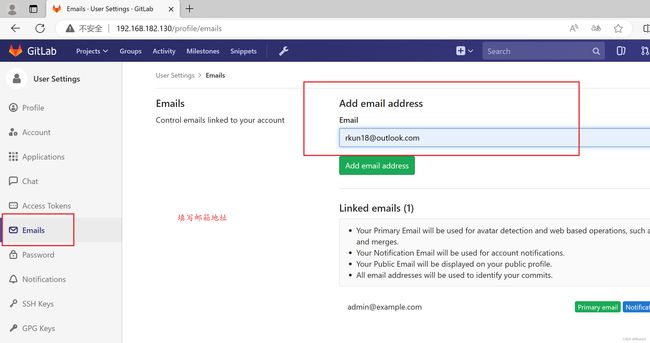
GitLab设置
- 账号注册时,邮箱验证
- 有合并请求,邮箱通知
- 修改密码时,通过邮件修改
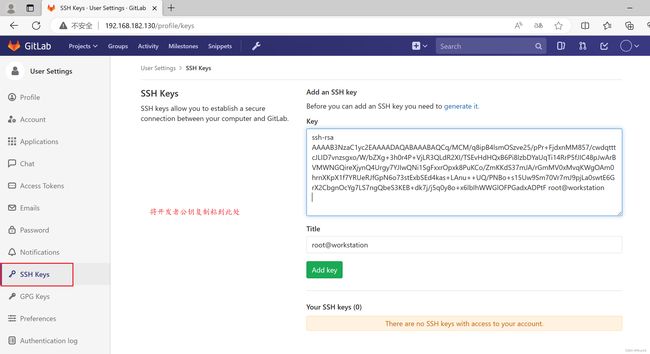
开发者设置SSH密钥
-
在开发者电脑设置空密码密钥(你可以使用上文中的,也可以创建新密钥)
ssh-keygen -t rsa -f /root/.ssh/id_rsa -C "root@workstation" -N "" -
查看密钥
[root@workstation ~]# cat ~/.ssh/id_rsa.pub ssh-rsa AAAAB3NzaC1yc2EAAAADAQABAAABAQCq/MCM/q8ipB4lsmOSzve25/pPr+FjdxnMM857/cwdqtttcJLID7vnzsgxo/W/bZXg+3h0r4P+VjLR3QLdR2XI/TSEvHdHQxB6Pi8lzbDYaUqTi14RrP5fJIC48pJwArBVMWNGQireXjynQ4Urgy7YJIwQNi1SgFxxrOpxk8PuKCo/ZmKKdS37mJA/rGmMV0xMvqKWgOAm0hrnXKpX1f7YRUeRJfGpN6o73stExbSEd4kas+LAnu++UQ/PNBo+s15Uw9Sm70Vr7mJ9pjLa0swtE6GrX2CbgnOcYg7LS7ngQbeS3KEB+dk7j/j5q0y8o+x6lbIhWWGlOFPGadxADPtF root@workstation -
将密钥粘贴
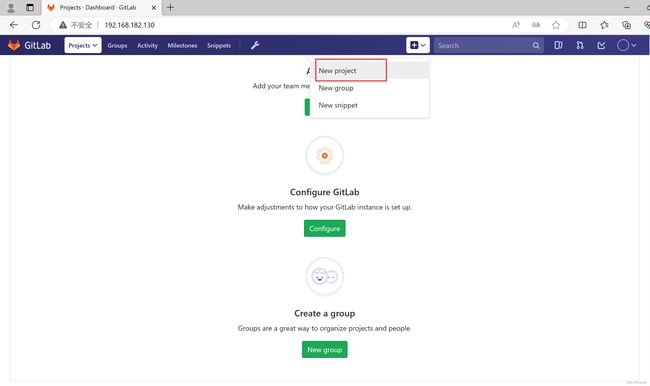
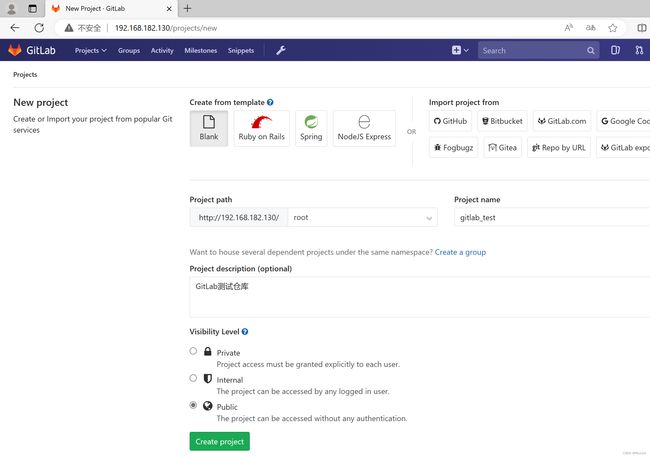
GitLab创建仓库
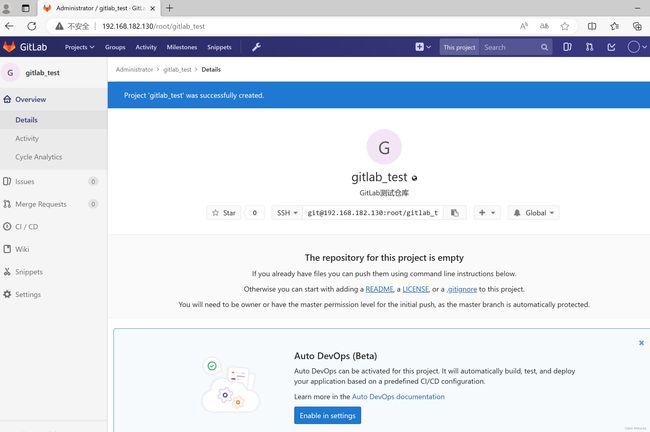
克隆远程仓库到本地
-
查看gitlab上帮助
-
开发者电脑设置身份标识
[root@workstation ~]# git config --global user.name "rkun18" [root@workstation ~]# git config --global user.email "[email protected]" [root@workstation ~]# git clone [email protected]:root/gitlab_test.git -
开发者电脑使用git命令clone,并上传项目
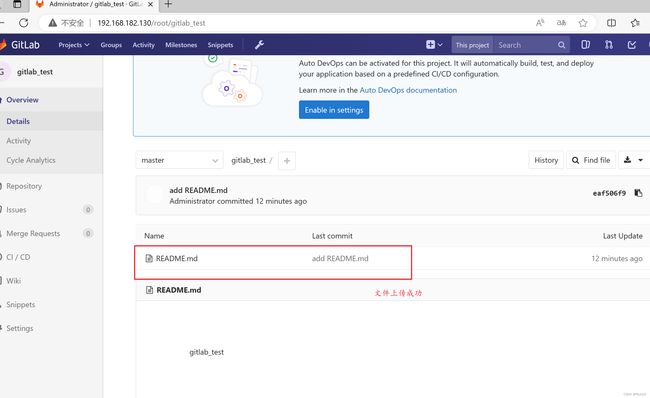
[root@workstation ~]# cd gitlab_test/ [root@workstation gitlab_test]# echo "gitlab_test" > README.md [root@workstation gitlab_test]# git add . [root@workstation gitlab_test]# git commit -m "add README.md" [master (root-commit) eaf506f] add README.md 1 file changed, 1 insertion(+) create mode 100644 README.md [root@workstation gitlab_test]# git branch * master [root@workstation gitlab_test]# git push -u origin master Counting objects: 3, done. Writing objects: 100% (3/3), 224 bytes | 0 bytes/s, done. Total 3 (delta 0), reused 0 (delta 0) To git@192.168.182.130:root/gitlab_test.git * [new branch] master -> master Branch master set up to track remote branch master from origin. -
验证
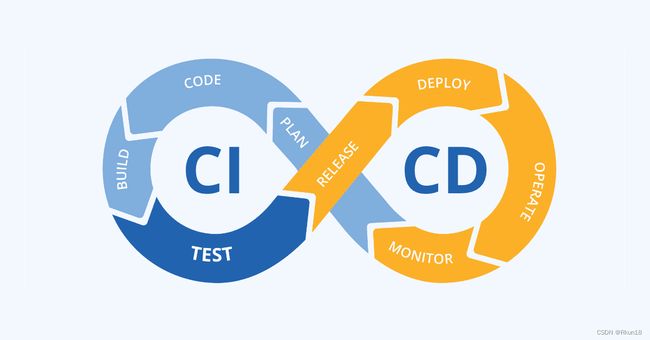
持续集成(CI)
Continuous integration,CI
是一种软件开发实践,团队开发人员经常集成他们的工作,通常每个成员每天至少集成一次,意味每天可能会发生多次集成。每次集成通过自动化构建(编译,测试,发布)验证,从而尽快地发现集成错误。
持续部署(CD)
基于持续交付的基础上,把功能稳定,符合产品需求的版本有方法地部署至生产环境中。可以看作持续交付的最后一环。
持续发布
Continuous Release (CR)
发布是周期性或不定性地对项目在部署后,进行整体软件版本的更新,例如,更新新功能或展示页面框架。
持续测试
Continuous Testing (CT)
持续测试贯穿整个软件开发过程,验证程序员提交代码,检验合规性及降低Bug,减少最终错误,实现敏捷及精益开发。
代码更新方法
蓝绿部署
保证系统在不间断提供服务的情况下上线代码的部署方式。
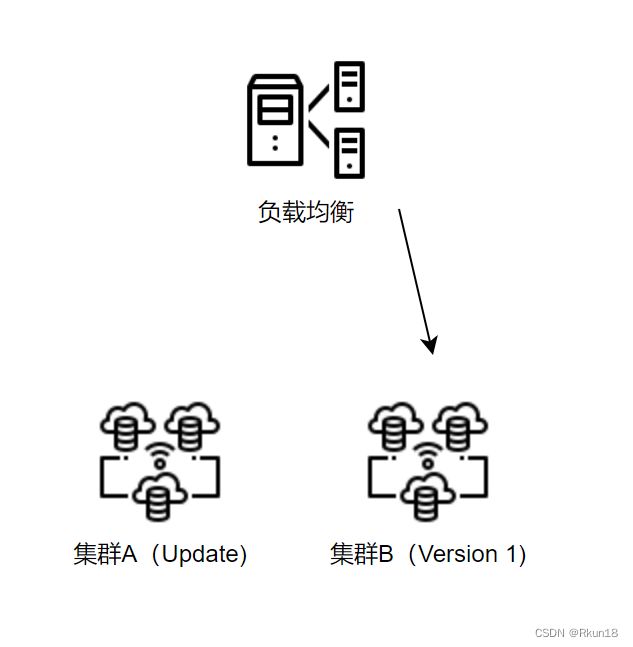
蓝绿部署的模型中包含两个集群。
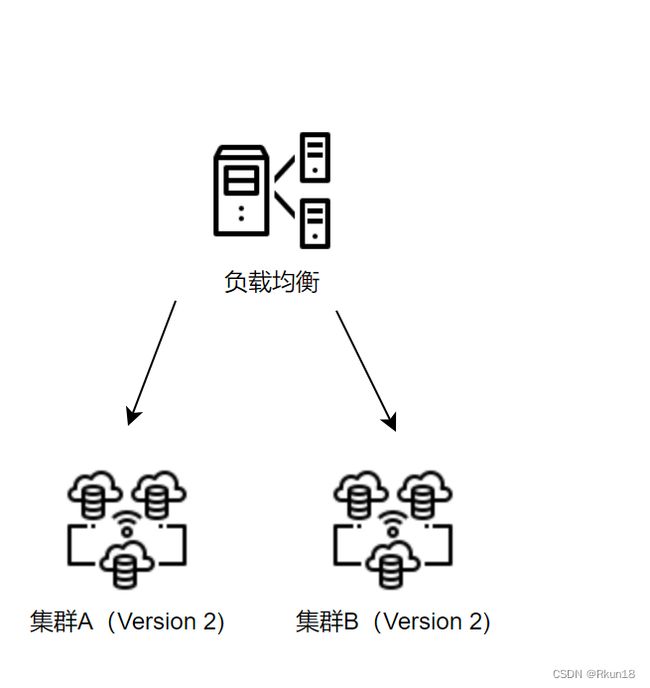
正常情况下(无上限操作),集群A和集群B代码版本相同,同时对外提供服务
在项目上线时,首先把一个集群(比如集群A)从负载列表中摘除,进行版本部署。集群B仍然继续提供服务。
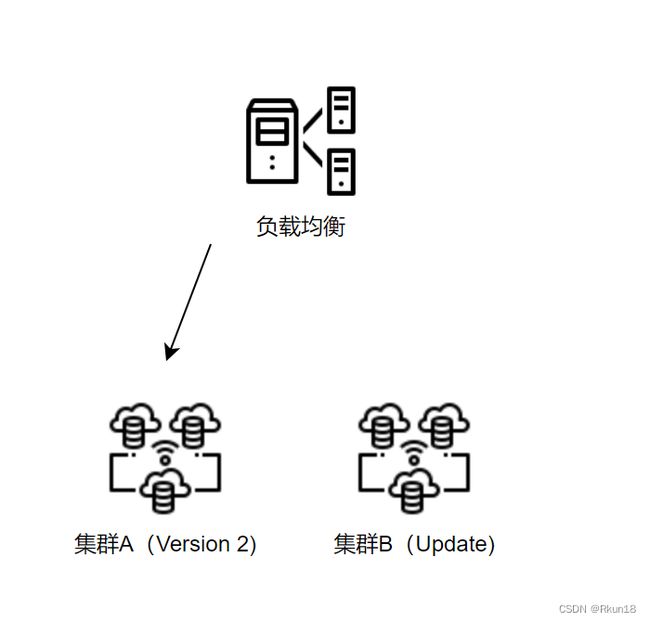
当集群A升级完成,我们把负载均衡重新指向集群A,再把集群B从负载列表中摘除,进行新版本部署。集群A重新提供服务。
当集群B也升级完成,集群B也恢复负载列表中。这个时候两个集群版本都已经升级,并且对外的服务几乎没有间断过。
