三.开发记录之移动硬盘装ubuntu系统的配置、环境、各类软件安装和备份等
专栏系列文章如下:
一.开发记录之AHRS、惯导传感器SBG-Ellipse-N传感器配置和使用_goldqiu的博客-CSDN博客
二.开发记录之派勤工控机远程使用和ubuntu和ROS环境配置_goldqiu的博客-CSDN博客
安装系统
- 备份移动硬盘数据然后进行格式化,或者拿一个全新的移动硬盘。
- 使用DiskGenius软件将移动硬盘更改为GPT格式。
- 如果主板启动方式是legacy,则磁盘分区成四个区,其中分别容量为512MB(存放引导)、200G(安装ubuntu系统,容量自定义)、32G(swap交换区,一般是内存的2倍),剩余空间为移动硬盘,可存文件。如果是UEFI启动的主板,移动硬盘需要有ESP分区,512MB的分区不需要了。
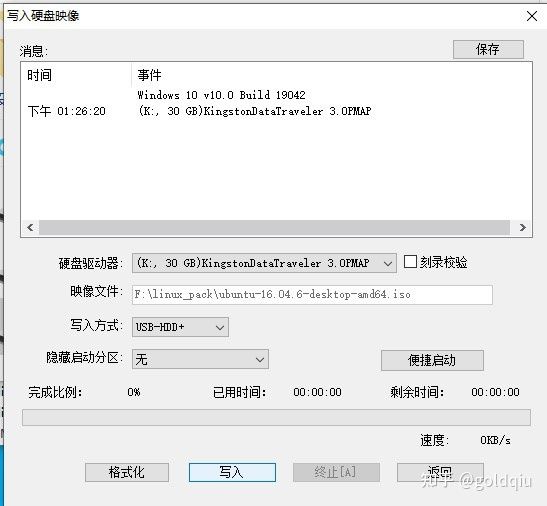
- 下载ubuntu系统镜像,用UltraISO制作系统启动盘(要用一个U盘)。
将移动硬盘和U盘插入电脑,开启电脑,进入bios,修改bios启动项为U盘。
安装ubuntu系统,选择something else。
如果是legacy,刚刚分好的512MB的空间选择为efi分区,如果是UEFI启动方式,则不需要选择efi分区,自动选择好了;32G空间选择为swap分区;200G选择为EXT4文件格式,挂载直接为根目录,即/,最后要注意ubuntu引导安装的盘要选择你的移动硬盘。
安装完成后就可以起飞了,后面就是安装各个环境了。
安装环境
googlepinyin的安装:
安装汉语语言包:
sudo apt-get install language-pack-zh-hans安装谷歌拼音输入法:
sudo apt-get install fcitx-googlepinyin打开SystemSettings-->Language Support,系统会进行语言包搜索,照系统提示安装语言包。 如图所示,选择“键盘输入方式系统”为:fcitx。
重启电脑或者注销用户。进入界面后可以看到fcitx输入法框架已经运行,系统状态栏的输入法图标已经改变。
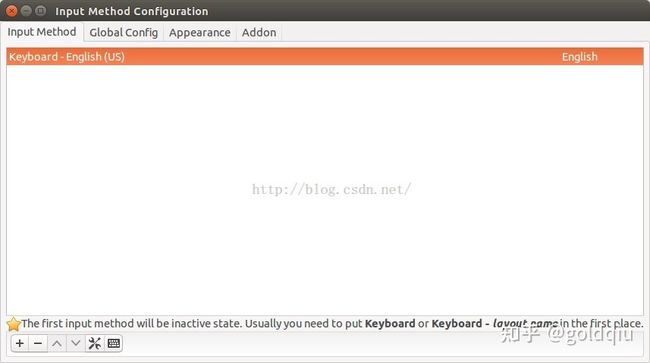
打开终端,执行“fcitx-configtool”命令,在如图界面进行输入法配置。
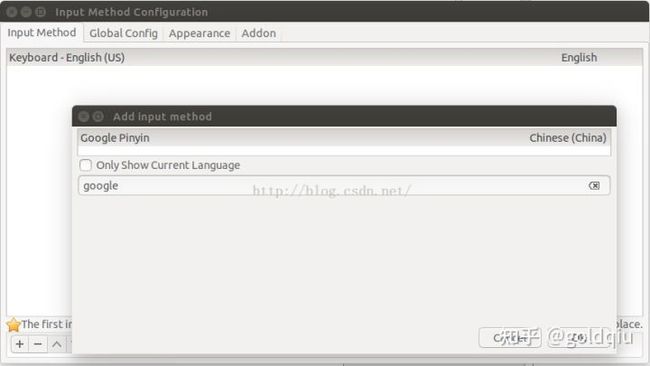
如图增加谷歌拼音输入法:
官网下载谷歌浏览器并安装
https://www.google.cn/chrome/
科学上网
https://ikuuu.co/auth/login 这里注册帐号,白嫖或者冲钱。
下载v2ray
https://github.com/Qv2ray/Qv2ray/releases/download/v1.99.6/Qv2ray-refs.tags.v1.99.6-linux.AppImage 或者打开网站:https://github.com/Qv2ray/Qv2ray/releases/tag/v1.99.6 选择下图文件
下载核心文件,下载链接:
https://github.com/v2ray/v2ray-core/releases/download/v4.22.1/v2ray-linux-64.zip
或者打开网站:https://github.com/v2ray/v2ray-core/releases/ 选择下图文件
进入v2ray下载的根目录,执行以下命令:
sudo chmod +x ./Qv2ray-refs.tags.v1.99.6-linux.AppImage仍然在v2ray根目录下打开终端,输入以下命令(非root用户执行):
./Qv2ray-refs.tags.v1.99.6-linux.AppImage打开软件后点击Preferences
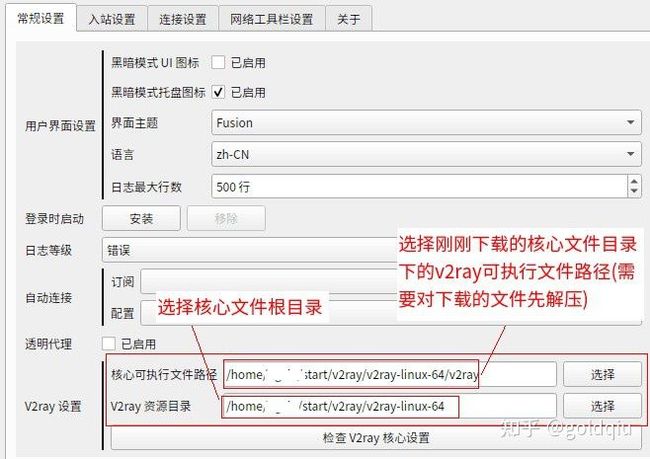
在常规设置里面按照图示操作,最后点击ok保存:
回到主界面,点击订阅:
输入订阅的名字:iKuuu
链接为iKuuu网站上得到的链接。
点击update后有了VPN。
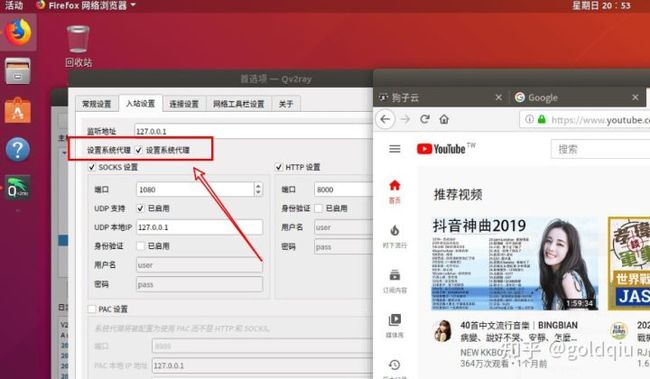
将软件的代理模式打开,如下图所示;
安装录屏软件
sudo add-apt-repository ppa:maarten-baert/simplescreenrecorder sudo apt-get update sudo apt-get install simplescreenrecorder
ubuntu16.04下面安装ROS
sudo sh -c 'echo "deb http://packages.ros.org/ros/ubuntu $(lsb_release -sc) main" > /etc/apt/sources.list.d/ros-latest.list'
sudo apt-key adv --keyserver 'hkp://keyserver.ubuntu.com:80' --recv-key C1CF6E31E6BADE8868B172B4F42ED6FBAB17C654
or
curl-sSL 'http://keyserver.ubuntu.com/pks/lookup?op=get&search=0xC1CF6E31E6BADE8868B172B4F42ED6FBAB17C654' | sudo apt-key add -sudo apt-get update
sudo apt-get install ros-kinetic-desktop-full
echo "source /opt/ros/kinetic/setup.bash" >> ~/.bashrc
source ~/.bashrc
sudo apt install python-rosdep python-rosinstall python-rosinstall-generator python-wstool build-essential
sudo rosdep init
rosdep update或者直接参考ros-wiki安装。
sudo rosdep init 出现
ERROR: cannot download default sources list from:第一步:
首先进入https://github.com/ros/rosdistro
去把这个包下载下来。
第二步:
修改这个包中rosdep/source.list.d/下的文件20-default.list,将这个文件中指向http://raw.githubusercontent.com的url地址全部修改为指向本地文件的地址,也就是该下载好的包的地址,以下是改好的样例:
# os-specific listings first
yaml file:///home/xxx/rosdistro/rosdep/osx-homebrew.yaml osx
\# generic
yaml file:///home/xxx/rosdistro/rosdep/base.yaml
yaml file:///home/xxx/rosdistro/rosdep/python.yaml
yaml file:///home/xxx/rosdistro/rosdep/ruby.yaml
gbpdistro file:///home/xxx/rosdistro/releases/fuerte.yaml fuerte
\# newer distributions (Groovy, Hydro, ...) must not be listed anymore, they are being fetched from the rosdistro index.yaml instead注意:在py语言中:url本地文件地址格式是:file://+文件地址,后面更改其他文件中地址的时候也一样。
第三步:
修改/usr/lib/python2.7/dist-packages/rosdep2该文件夹下面的sources_list.py文件,如下:
# default file to download with 'init' command in order to bootstrap
\# rosdep
DEFAULT_SOURCES_LIST_URL = 'file:///home/xxx/rosdistro/rosdep/sources.list.d/20-default.list'
\# seconds to wait before aborting download of rosdep data第四步
修改以下两个文件里面的代码:
/usr/lib/python2.7/dist-packages/rosdep2/rep3.py
/usr/lib/python2.7/dist-packages/rosdistro/init.py
下面是分别修改后的样例:
/usr/lib/python2.7/dist-packages/rosdep2/rep3.py文件:
# location of targets file for processing gbpdistro files
REP3_TARGETS_URL = 'file:///home/xxx/rosdistro/releases/targets.yaml'
\# seconds to wait before aborting download of gbpdistro data/usr/lib/python2.7/dist-packages/rosdistro/init.py的文件:
# index information
DEFAULT_INDEX_URL = 'file:///home/xxx/rosdistro/index-v4.yaml'
def get_index_url():然后进行sudo rosdep init :
安装QT
官网下载QT http://download.qt.io/archive/qt/ 安装后
sudo apt-get install qt5-default安装clion
官网下载软件后,解压后运行./clion.sh 如果忘记创建快捷方式,则 sudo touch命令创建一个clion.desktop文件
用sudo vim打开这个文件
输入:(更改为自己的clion路径)
[Desktop Entry]
Encoding=UTF-8
Name=CLion
Comment=clion-2018.1.1
Exec=/home/sqwlly/Downloads/clion-2018.1.1/bin/clion.sh
Icon=/home/sqwlly/Downloads/clion-2018.1.1/bin/clion.svg
Categories=Application;Development;Java;IDE
Version=2018.1.1
Type=Application
#Terminal=1系统备份
tar cvpzf backup.tgz --exclude=/proc --exclude=/lost+found --exclude=/backup.tgz --exclude=/mnt --exclude=/sys /恢复
tar xvpfz backup.tgz -C /