Spring系列一:spring的安装与使用
文章目录
-
- 官方资料
-
- Spring5下载
- 文档介绍
- Spring5
-
- 内容介绍
- 重要概念
- 快速入门
-
- Spring操作演示
- 类加载路径
- Debug配置
- Spring容器结构剖析
- 实现简单基于XML配置程序
-
- Spring原生容器结构梳理
- 作业布置
- 基于XML配置Bean
-
- 通过类型获取bean
- 通过指定构造器配置bean
- 通过p名称空间配置bean
- 通过ref配置bean
- 通过内部bean配置属性
- 对集合数组属性进行配置
- 使用utillist进行配置
- 属性级联赋值配置
- 通过静态工厂获取bean
- bean配置信息重用
- bean创建顺序
- bean的单例和多实例
- bean的生命周期
- 配置bean后置处理器
- 通过属性文件配置bean
- 基于XML的bean的自动装配
- Spring El 表达式配置Bean
官方资料


Spring5下载
- 进入官网: https://spring.io/
- 这里的版本是Spring5 (Spring框架就是一系列jar包. 即引入jar包, 就可以使用spring)

- 进入Spring5的github(Spring本身也是GitHub的开源项目)
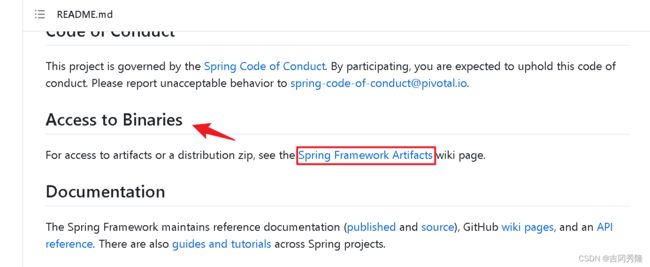
 下拉找到Access to Binaries, 进入Spring Framework Artifacts
 进入到Spring的仓库(这里有Spring的各个版本的jar包)
 具体路径 snapshot->org->springframework->spring
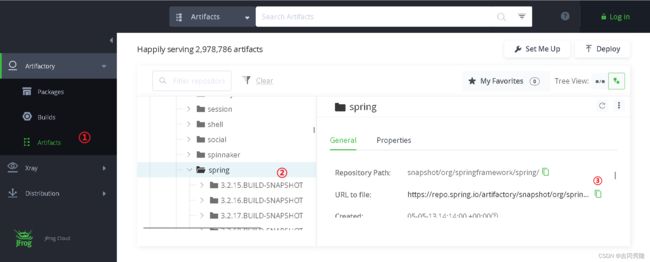 下载网址 https://repo.spring.io/artifactory/snapshot/org/springframework/spring/

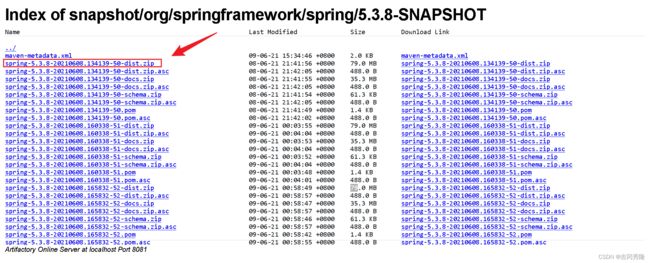 这里博主已把所有资源上传, 无需再去官网下载, 资料如下

各个jar包的含义

文档介绍
| 在线文档 | https://docs.spring.io/spring-framework/reference/ |
|---|---|
| 离线文档 | spring-framework-5.3.8\docs\reference\html\index.html |
| 离线API | spring-framework-5.3.8\docs\javadoc-api\index.html |
Spring5
内容介绍
Spring核心学习内容 IOC, AOP, jdbcTemplate, 声明式事务
- IOC: 控制反转, 可以管理java对象
- AOP: 切面编程
- JDBCTemplate: 是spring提供的一套访问数据库的技术. 应用性强, 相对好理解
- 声明式事务: 基于ioc/aop实现事务管理
- IOC, AOP 是重点同时是难点, 需要时间理解
重要概念
-
Spring可以整合其它的框架(解读: Spring是管理框架的框架)
-
Spring有两个核心的概念: IOC 和 AOP
-
IOC [Inversion Of Control 反转控制]
-
传统的开发模式[JDbcUtils / 反射], 程序------>环境 //程序读取环境配置, 然后自己创建对象
以连接到数据库为例
程序员编写程序, 在程序中读取配置信息
创建对象, 使用对象完成任务 -
Spring方式
Spring根据配置文件xml / 注解, 创建对象, 并放入到容器(ConcurrentHashMap). 并且可以完成对象之间的依赖
当需要使用某个对象实例的时候, 就直接从容器中获取即可
这样程序员可以更加关注如何使用对象完成相应的业务(以前是new -> 现在是注解 / 配置) -
DI - Dependency Injection依赖注入, 可以理解成是IOC的别称
Spring最大的价值是 通过配置, 给程序员提供需要使用的对象web层[Servlet (Action/Controller)/ Service / Dao / JavaBean(entity)]对象
这是核心价值所在, 也是ioc的具体体现, 实现解耦
快速入门
Spring操作演示
需求: 通过Spring的方式[配置文件], 获取JavaBean-Monster的对象, 并给该对象的属性赋值, 输出该对象的信息
- 下载Spring5开发包, Spring5开发包资源博主已上传
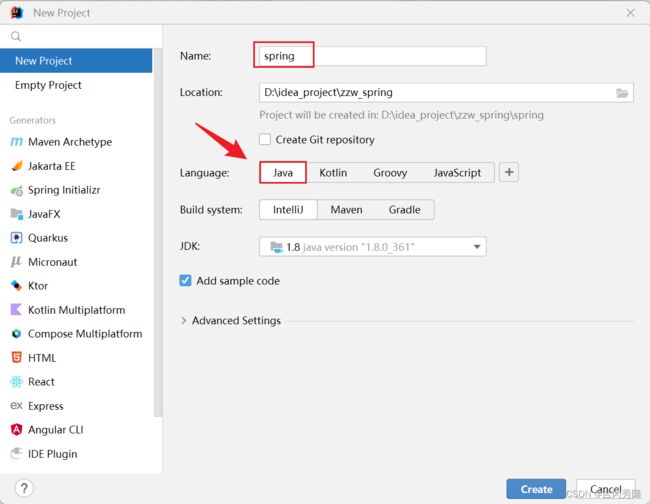
- 创建Java工程, Spring5
- 新建lib目录, 引入开发Spring5的基本包

- 创建JavaBean, 一定要有无参构造器. Spring底层反射创建对象时, 需要使用
package com.zzw.spring.bean;
public class Monster {
    private String monsterId;
    private String name;
    private String skill;

    //无参构造器: Spring底层反射创建对象时, 需要使用
    public Monster() {
    }
	//有参构造器, setter, getter, toString()
}
- src目录下: 新建一个容器配置文件beans.xml

创建好之后, 右上角进行配置, 不难

说明: xmlns表示xml namespace, 即xml命名空间
<beans xmlns="http://www.springframework.org/schema/beans"
xmlns:xsi="http://www.w3.org/2001/XMLSchema-instance"
xsi:schemaLocation="http://www.springframework.org/schema/beans http://www.springframework.org/schema/beans/spring-beans.xsd">
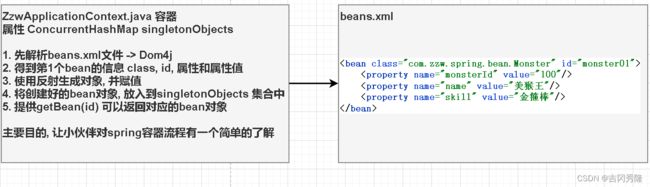
<bean class="com.zzw.spring.bean.Monster" id="monster01">
<property name="monsterId" value="100"/>
<property name="name" value="美猴王"/>
<property name="skill" value="金箍棒"/>
bean>
beans>
测试
package com.zzw.spring.test;

public class SpringBeanTest {

    @Test
    public void getMonster() {
        //解读
        //1.创建容器 ApplicationContext
        //2.该容器和容器配置文件关联
        //3.习惯用接口的形式接收
        ApplicationContext ioc =
                new ClassPathXmlApplicationContext("beans.xml");
        //3.通过getBean获取对应的对象
        //  默认返回的是Object, 但是运行类型是Monster
        //Object monster01 = ioc.getBean("monster01");
        Monster monster01 = (Monster) ioc.getBean("monster01");

        //4.输出
        System.out.println("monster01" + monster01 + ", monster01运行类型" + monster01.getClass());
        System.out.println("monster01" + monster01 + ", 属性name=" + monster01.getName() + ", monsterId="+ monster01.getMonsterId());

        //5.也可以在获取的时候, 直接指定Class类型, 可以再次获取
        Monster monster011 = ioc.getBean("monster01", Monster.class);
        System.out.println("monster011=" + monster011);
        System.out.println("monster011.name=" + monster011.getName());

        System.out.println("ok~~~");
    }
}
类加载路径
解释类加载路径
ApplicationContext ioc = new ClassPathXmlApplicationContext(“beans.xml”);
//验证类加载路径
@Test
public void classPath() {
    File file = new File(this.getClass().getResource("/").getPath());
    //看到类的加载路径
    System.out.println("file=" + file);
}

Debug配置
小技巧分享


![]()
Spring容器结构剖析
判断是否是懒加载: 是事先创建好, 还是等到用户使用的时候再创建.
lazyInit: false. 说明beans.xml中对象的创建不是懒加载.
用Debug的方式, 看一下Spring容器的处理机制
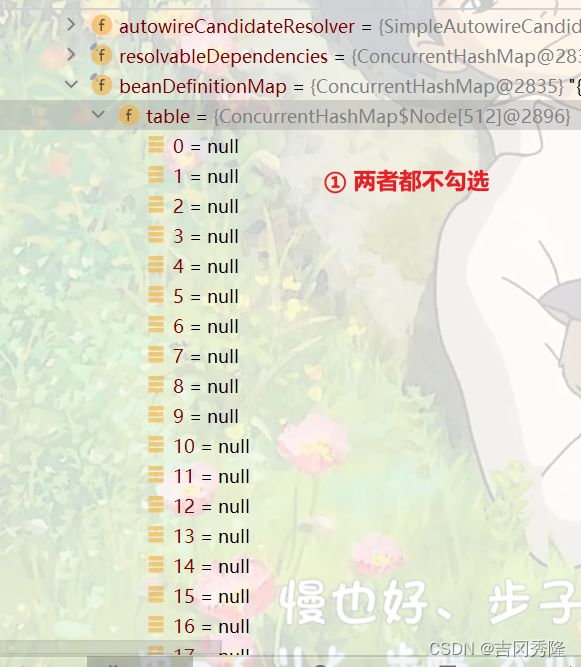
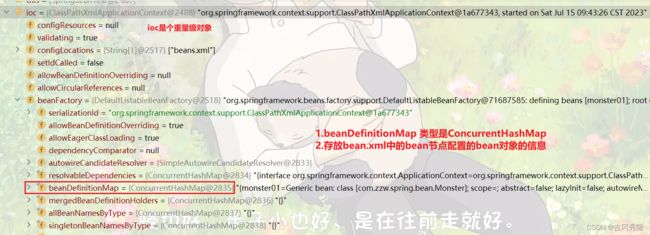
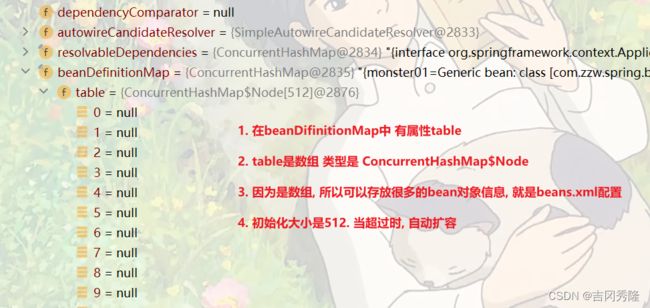
![]()
ioc->beanFactory->beanDefinitionMap
beanDefinitionMap / table
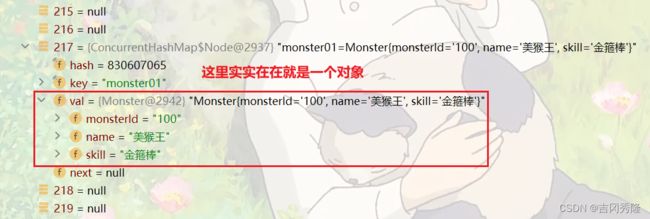
index=217
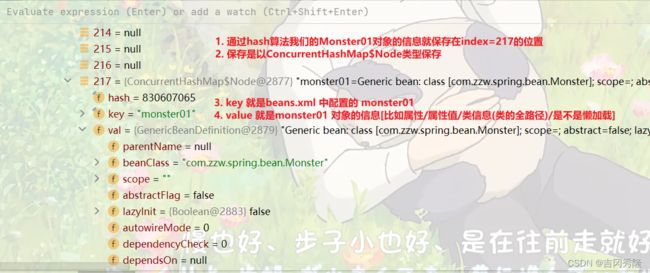
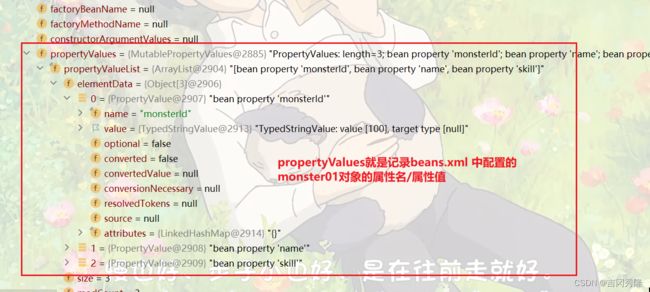
table / propertyValues
beanFactory->singletonObjects
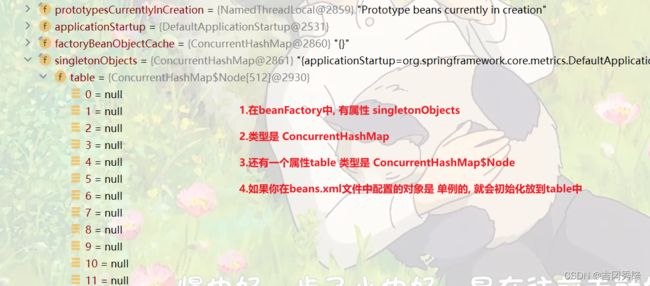
singletonObjects / table
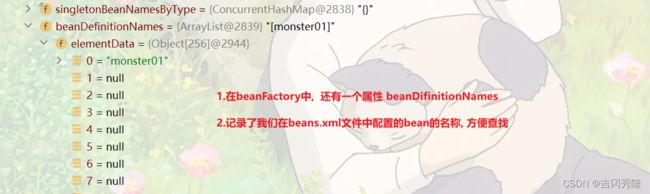
beanFactory / beanDefinitionNames
题目: 查看容器注入了哪些bean对象, 输出bean的id
String[] beanDefinitionNames = ioc.getBeanDefinitionNames();
for (String beanDefinitionName : beanDefinitionNames) {
    System.out.println("beanDefinitionName=" + beanDefinitionName);
}
实现简单基于XML配置程序
需求说明
- 自己写一个简单的Spring容器, 通过读取beans.xml, 获取第1个JavaBean: Monster的对象, 并给该对象的属性赋值, 放入到容器中, 并输出该对象信息
- 也就是说, 不使用Spring原生框架, 我们自己简单模拟实现
- 了解Spring容器的简单机制
思路分析
实现
引入dom4j-1.6.1.jar包
ZzwApplicationContext.java
package com.zzw.spring.zzwapplicationcontext;

/**
 * @author 赵志伟
 * @version 1.0
 * 1.这个程序用于实现Spring的一个简单容器机制
 * 2.后面还会详细实现
 * 3.这里我们实现如何将beans.xml文件进行解析, 并生成对象, 放入容器中
 * 4.提供一个方法 getBean(id) 返回对应的对象
 * 5.这里就是一个开胃小点心, 理解Spring容器的机制
 */
@SuppressWarnings({"all"})
public class ZzwApplicationContext {
    private ConcurrentHashMap<String, Object> singletonObjects = new ConcurrentHashMap<>();

    //构造器
    //接收一个容器的配置文件 比如 beans.xml, 该文件默认在src目录下
    public ZzwApplicationContext(String iocBeanXmlFile) throws Exception {
        //1.得到类加载路径:
        // /D:/idea_project/zzw_spring/spring/out/production/spring/
        String path = this.getClass().getResource("/").getPath();

        //2.创建解析器
        SAXReader reader = new SAXReader();

        //3.得到document对象
        Document document = reader.read(new File(path + iocBeanXmlFile));

        //4.获取rootElement
        Element rootElement = document.getRootElement();

        //5.得到第1个bean-monster01
        Element bean = (Element) rootElement.elements("bean").get(0);

        //6.获取第一个bean-monster01的相关属性 => beanDefinitionMap
        String id = bean.attributeValue("id");
        String ClassFullPath = bean.attributeValue("class");

        List<Element> properties = bean.elements("property");
        //这里不再遍历, 直接获取
        Integer monsterId = Integer.parseInt(properties.get(0).attributeValue("value"));
        String name = properties.get(1).attributeValue("value");
        String skill = properties.get(2).attributeValue("value");

        //7.使用反射创建对象 => 回顾反射机制
        Class<?> aClass = Class.forName(ClassFullPath);
        //这里instance就是Monster对象
        Monster o = (Monster) aClass.newInstance();
        //给o对象通过反射来赋值 => 这里先简化
        o.setMonsterId(monsterId);
        o.setName(name);
        o.setSkill(skill);

        //8.将创建好的对象放入到singletonObjects
        singletonObjects.put(id, o);
    }

    public Object getBean(String id) {
        //这里可以再处理一下
        return singletonObjects.get(id);
    }
}
测试 ZzwApplicationContextTest
package com.zzw.spring.zzwapplicationcontext;

public class ZzwApplicationContextTest {
    public static void main(String[] args) throws Exception {
        ZzwApplicationContext ioc = new ZzwApplicationContext("beans.xml");
        Monster monster01 = (Monster) ioc.getBean("monster01");
        System.out.println("monster01=" + monster01);
        System.out.println("monster01.name=" + monster01.getName());

        System.out.println("ok~");
    }
}
Spring原生容器结构梳理

作业布置
在beans.xml中, 注入两个Monster对象, 但是不指定id, 运行会不会报错?
如果不会报错, 如果知道id, 并获取Monster对象.
- 不会报错, 会正常运行
- 系统会默认分配id. 分配id的规则是: 全类名#0, 全类名#1 这样的规则来分配id的. 例如 com.zzw.spring.bean.Monster#0, com.zzw.spring.bean.Monster#1
- 通过debug方式来查看

public class homework01 {
    @Test
    public void getMonster() {
        //1.创建容器, 习惯用接口的形式接收
        ApplicationContext ioc = new ClassPathXmlApplicationContext("beans.xml");

        Monster monster1 = ioc.getBean("com.zzw.spring.bean.Monster#0", Monster.class);
        System.out.println("monster1=" + monster1);
        Monster monster2 = ioc.getBean("com.zzw.spring.bean.Monster#1", Monster.class);
        System.out.println("monster2=" + monster2);

        System.out.println("ok~");
    }
}
创建一个Car类, 要求
- 创建ioc容器文件(配置文件), 并配置一个Car对象(bean).
- 通过java程序到ioc容器获取该bean对象, 并输出
public class Car {
    private Integer id;
    private String name;
    private Double price;

    public Car() {
        System.out.println("car对象 无参构造器被执行");
    }
    //有参构造器, setter, getter, toString()
beans1.xml
<beans xmlns="http://www.springframework.org/schema/beans"
       xmlns:xsi="http://www.w3.org/2001/XMLSchema-instance"
       xsi:schemaLocation="http://www.springframework.org/schema/beans http://www.springframework.org/schema/beans/spring-beans.xsd">


    <bean class="com.zzw.spring.bean.Car" id="car01">
        <property name="id" value="100"/>
        <property name="name" value="奔驰"/>
        <property name="price" value="120000.00"/>
    bean>
beans>
public class homework02 {
    public static void main(String[] args) {
        //1.创建容器对象
        ApplicationContext ioc = new ClassPathXmlApplicationContext("beans1.xml");

        Car car01 = ioc.getBean("car01", Car.class);

        System.out.println("car01=" + car01);
        System.out.println("car01.name=" + car01.getName());
        System.out.println("ok~");
    }
}
基于XML配置Bean
Bean管理包括两方面: 创建bean对象, 给bean注入属性
通过类型获取bean
案例: 通过spring的ioc容器, 获取一个bean对象, 获取方式: 按类型.
<bean class="com.zzw.spring.bean.Monster">

    <property name="monsterId" value="100"/>
    <property name="name" value="孙悟空"/>
    <property name="skill" value="火眼金睛"/>
bean>
演示通过bean的类型获取对象
@Test
public void getBeanByType() {
    ApplicationContext ioc = new ClassPathXmlApplicationContext("beans.xml");
    //直接传入class对象/类型
    Monster bean = ioc.getBean(Monster.class);
    System.out.println("bean=" + bean);
}
细节
按照类型获取bean, 要求ioc容器中的同一个类的bean只能有一个, 否则会抛出异常 NoUniqueBeanDefinationException
这种方式的应用场景: 比如XxxAction / Servlet / Controller, 或XxxService在一个线程中只需要一个对象实例(单例)的情况
在容器配置文件(比如beans.xml)中给属性赋值. 底层是通过setter方法完成的. 所以需要提供setter方法.
通过指定构造器配置bean
<bean class="com.zzw.spring.bean.Monster" id="monster03">
   <constructor-arg value="100" index="0"/>
   <constructor-arg value="齐天大圣" index="1"/>
   <constructor-arg value="如意金箍棒" index="2"/>
bean>

<bean class="com.zzw.spring.bean.Monster" id="monster04">
   <constructor-arg value="200" name="monsterId"/>
   <constructor-arg value="斗战胜佛" name="name"/>
   <constructor-arg value="无法无天" name="skill"/>
bean>

<bean class="com.zzw.spring.bean.Monster" name="monster05">
   <constructor-arg value="300" type="java.lang.Integer"/>
   <constructor-arg value="猪悟能" type="java.lang.String"/>
   <constructor-arg value="追嫦娥~" type="java.lang.String"/>
bean>
演示通过构造器来设置属性
@Test
public void setBeanByConstructor() {
    ApplicationContext ioc = new ClassPathXmlApplicationContext("beans.xml");

    Monster monster03 = ioc.getBean("monster03", Monster.class);
    System.out.println("monster03=" + monster03);
}

通过index属性来区分是第几个参数;
通过type属性来区分是什么类型(按照顺序, 这是可以的)
通过p名称空间配置bean
xmlns:p=“http://www.springframework.org/schema/p”
<bean class="com.zzw.spring.bean.Monster" id="monster06"
      p:monsterId="400"
      p:name="天蓬元帅"
      p:skill="掌管十万天军"
/>
演示通过p名称空间来设置属性
public class SpringBeanTest {
    @Test
    public void setBeanByP() {
        ApplicationContext ioc = new ClassPathXmlApplicationContext("beans.xml");
        Monster monster06 = ioc.getBean("monster06", Monster.class);
        System.out.println("monster06=" + monster06);
    }
}
通过ref配置bean
引用注入其它bean对象
在spring的ioc容器, 可以通过ref来实现bean对象的相互引用[ref全称: reference]
<bean class="com.zzw.spring.dao.MemberDaoImpl" id="memberDao"/>

<bean class="com.zzw.spring.service.MemberServiceImpl" id="memberService">
    <property name="memberDao" ref="memberDao"/>
bean>
package com.zzw.spring.service;

public class MemberServiceImpl {
    private MemberDaoImpl memberDao;

    public MemberDaoImpl getMemberDao() {
        return memberDao;
    }

    public void setMemberDao(MemberDaoImpl memberDao) {
        this.memberDao = memberDao;
    }

    public void add() {
        System.out.println("MemberServiceImpl add方法被调用...");
        memberDao.add();
    }
}
package com.zzw.spring.dao;

public class MemberDaoImpl {
    public MemberDaoImpl() {
        System.out.println("MemberDaoImpl 构造器...");
    }

    public void add() {
        System.out.println("MemberDaoImpl add方法被执行");
    }
}
通过ref来设置bean属性
public class SpringBeanTest {
    @Test
    public void setBeanByRef() {
        ApplicationContext ioc = new ClassPathXmlApplicationContext("beans.xml");
        MemberServiceImpl memberService = ioc.getBean("memberService", MemberServiceImpl.class);
        memberService.add();
    }
}

通过内部bean配置属性
引用/注入内部bean对象
在spring的ioc容器, 可以直接配置内部bean对象
<bean class="com.zzw.spring.service.MemberServiceImpl" id="memberService2">

    <property name="memberDao">
        <bean class="com.zzw.spring.dao.MemberDaoImpl"/>
    property>
bean>
通过内部bean, 设置属性
public class SpringBeanTest {
    @Test
    public void setBeanByPro() {
        ApplicationContext ioc = new ClassPathXmlApplicationContext("beans.xml");
        MemberServiceImpl memberService2 = ioc.getBean("memberService2", MemberServiceImpl.class);
        memberService2.add();
    }
}
对集合数组属性进行配置
引用/注入 集合/数据类型
- 主要掌握List / Map / Properties 三种集合的使用
- Properties是Hashtable的子类, 是key-value的形式
- 这里的properties的k-v, 都是String类型
在spring的ioc容器中, 如何给bean对象的 集合/数组 类型的属性赋值
public class Master {
    private String name;//主人名字
    private List<Monster> monsterList;
    private Map<String, Monster> monsterMap;
    private Set<Monster> monsterSet;

    //数组
    private String[] monsterName;

    //Java基础
    //这个Properties 是HashMap的子类, 是key-value的存放形式
    //这里Properties key和value 都是String
    private Properties properties;

	//getter, setter方法
}
给集合/数组属性进行赋值
public class SpringBeanTest {
    @Test
    public void setBeanByCollection() {
        ApplicationContext ioc = new ClassPathXmlApplicationContext("beans.xml");
        Master master = ioc.getBean("master", Master.class);
        System.out.println("master=" + master);
    }
}
对List属性进行配置
<bean class="com.zzw.spring.bean.Master" id="master">
    <property name="name" value="太上老君"/>

    <property name="monsterList">
        <list>

            <ref bean="monster03"/>
            <ref bean="monster04"/>

            <bean class="com.zzw.spring.bean.Monster"
                  p:monsterId="300"
                  p:name="狮驼岭"
                  p:skill="紫金葫芦"
            />
        list>
    property>
bean>
对Map属性进行配置
<bean class="com.zzw.spring.bean.Master" id="master">
    <property name="name" value="太上老君"/>

    <property name="monsterMap">
        <map>
            <entry>
                <key>
                    <value>monster04value>
                key>

                <ref bean="monster04"/>
            entry>
            <entry>
                <key>
                    <value>monster03value>
                key>

                <bean class="com.zzw.spring.bean.Monster"
                      p:monsterId="300"
                      p:name="狮驼岭"
                      p:skill="紫金葫芦~"
                />
            entry>
        map>
    property>
bean>
对Set属性进行配置
<bean class="com.zzw.spring.bean.Master" id="master">
    <property name="name" value="太上老君"/>

    <property name="monsterSet">
        <set>

            <ref bean="monster05"/>
            <ref bean="monster06"/>

            <bean class="com.zzw.spring.bean.Monster"
                  p:monsterId="300"
                  p:name="狮驼岭"
                  p:skill="紫金葫芦~"
            />
        set>
    property>
bean>
对Array属性进行配置
<bean class="com.zzw.spring.bean.Master" id="master">
    <property name="name" value="太上老君"/>

    <property name="monsterName">
        <array>
            <value>六耳猕猴value>
            <value>东海龙王value>
            <value>红孩儿value>
        array>
    property>
bean>
对Properties属性进行配置
<bean class="com.zzw.spring.bean.Master" id="master">
    <property name="name" value="太上老君"/>

    <property name="properties">
        <props>
            <prop key="username">rootprop>
            <prop key="password">123456prop>
            <prop key="email">[email protected]prop>
        props>
    property>
bean>
使用utillist进行配置
spring的ioc容器, 可以通过util名称空间来创建list集合
public class BookStore {
    //书
    private List<String> bookList;

    //无参构造器, 如果没有其它的构造器, 该无参构造器可以不写
    //如果有其它的构造器, 则必须显示地定义一下无参构造器
    public BookStore() {
    }

	//getter, setter方法
}
beans.xml
<util:list id="myBookList">
    <value>三体value>
    <value>时间简史value>
    <value>梦的解析value>
    <value>福尔摩斯探案集value>
util:list>


<bean class="com.zzw.spring.bean.BookStore" id="bookStore">
    <property name="bookList" ref="myBookList"/>
bean>
使用util:list名称空间给属性赋值
public class SpringBeanTest {
    @Test
    public void setBeanByUtilList() {
        ApplicationContext ioc = new ClassPathXmlApplicationContext("beans.xml");
        BookStore bookStore = ioc.getBean("bookStore", BookStore.class);
        System.out.println("bookStore=" + bookStore);
    }
}
属性级联赋值配置
spring的ioc容器, 可以直接给对象属性的属性赋值, 即级联属性赋值
部门
public class Dept {
    private String name;

    public Dept() {
    }

	//getter, setter方法
员工
public class Employee {
    private String name;
    private Dept dept;

    public Employee() {
    }

	//getter, setter方法
}
beans.xml
<bean class="com.zzw.spring.bean.Dept" id="dept"/>

<bean class="com.zzw.spring.bean.Employee" id="employee">
    <property name="name" value="tom"/>
    <property name="dept" ref="dept"/>

    <property name="dept.name" value="java开发"/>
bean>
给属性进行级联赋值
public class SpringBeanTest {
    @Test
    public void setBeanByRelation() {
        ApplicationContext ioc = new ClassPathXmlApplicationContext("beans.xml");
        Employee employee = ioc.getBean("employee", Employee.class);
        System.out.println("employee=" + employee);
    }
}
通过静态工厂获取bean
在spring的ioc容器, 可以通过静态工厂获取bean对象
这是一个静态工厂类-可以返回Monster对象
package com.zzw.spring.factory;

public class MyStaticFactory {
    private static Map<String, Monster> monsterMap;

    //使用static代码块进行初始化 - java基础
    static {
        monsterMap = new HashMap<>();
        monsterMap.put("monster01", new Monster(100, "齐天大圣", "如意金箍棒"));
        monsterMap.put("monster02", new Monster(200, "天蓬元帅", "九齿钉耙"));
    }

    //提供一个方法, 返回Monster对象
    public static Monster getMonster(String key) {
        return monsterMap.get(key);
    }
}
<bean class="com.zzw.spring.factory.MyStaticFactory" id="myMonster01"
      factory-method="getMonster">
    <constructor-arg value="monster02"/>
bean>
通过静态工厂获取bean
public class SpringBeanTest {
    @Test
    public void getBeanByStaticFactory() {
        ApplicationContext ioc = new ClassPathXmlApplicationContext("beans.xml");
        Monster myMonster01 = ioc.getBean("myMonster01", Monster.class);
        Monster myMonster02 = ioc.getBean("myMonster01", Monster.class);
        System.out.println("myMonster01=" + myMonster01);
        System.out.println(myMonster01 == myMonster02);//true. myMonster01和myMonster02是同一个对象
    }
}
bean配置信息重用
在spring的ioc容器, 提供了一种继承的方式来实现bean配置信息的重用
<bean class="com.zzw.spring.bean.Monster" id="monster10"
      p:monsterId="10"
      p:name="蜘蛛侠"
      p:skill="吐丝"
/>

<bean class="com.zzw.spring.bean.Monster" id="monster11" parent="monster10"/>


<bean class="com.zzw.spring.bean.Monster" id="monster12" abstract="true"
      p:monsterId="12"
      p:name="蜘蛛侠~"
      p:skill="吐丝~"
/>
<bean id="monster13" class="com.zzw.spring.bean.Monster" parent="monster12"/>
通过继承, 配置bean
public class SpringBeanTest {
    @Test
    public void getBeanByExtends() {
        ApplicationContext ioc = new ClassPathXmlApplicationContext("beans.xml");

        Monster monster11 = ioc.getBean("monster11", Monster.class);
        System.out.println("monster11=" + monster11);

        Monster monster13 = ioc.getBean("monster13", Monster.class);
        System.out.println("monster13=" + monster13);
    }
}
bean创建顺序
在spring的ioc容器, 默认是按照配置的顺序创建bean对象
测试bean创建顺序
public class SpringBeanTest {
    @Test
    public void testBeanCreateOrder() {
        ApplicationContext ioc = new ClassPathXmlApplicationContext("beans.xml");

        System.out.println("ok~");
    }
}
实验1
public class Department {
    public Department() {
        System.out.println("Department构造器 被执行");
    }
}
public class Student {
    public Student() {
        System.out.println("Student构造器 被执行");
    }
}
※会先创建student01这个bean对象, 然后创建department01这个bean对象
执行结果:
Student构造器 被执行
Department构造器 被执行
ok~
<bean class="com.zzw.spring.bean.Student" id="student01"/>
<bean class="com.zzw.spring.bean.Department" id="department01"/>
※如果这样配置, 会先创建department01对象, 再创建student01对象
执行结果:
Department构造器 被执行
Student构造器 被执行
ok~
<bean class="com.zzw.spring.bean.Student" id="student01" depends-on="department01"/>
<bean class="com.zzw.spring.bean.Department" id="department01"/>
实验2
1.先看下面的配置, 请问两个bean创建的顺序是什么? 并分析执行流程
- 先创建 id=memberDao
- 再创建 id=memberService
- 调用 memberService.setMemberDao() 完成引用
运行结果:
MemberDaoImpl 构造器…
MemberServiceImpl 构造器被执行
setMemberDao()…
<bean class="com.zzw.spring.dao.MemberDaoImpl" id="memberDao"/>

<bean class="com.zzw.spring.service.MemberServiceImpl" id="memberService">
    <property name="memberDao" ref="memberDao"/>
bean>
2.先看下面的配置, 请问两个bean创建的顺序是什么? 并分析执行流程
- 先创建 id=memberService
- 再创建 id=memberDao
- 调用 memberService.setMemberDao() 完成引用
运行结果:
MemberServiceImpl 构造器被执行
MemberDaoImpl 构造器…
setMemberDao()…
<bean class="com.zzw.spring.service.MemberServiceImpl" id="memberService">
    <property name="memberDao" ref="memberDao"/>
bean>


<bean class="com.zzw.spring.dao.MemberDaoImpl" id="memberDao"/>
bean的单例和多实例
在spring的ioc容器中, 默认情况下是按照单例创建的. 即配置一个bean对象后, ioc容器只会创建一个bean对象
如果我们希望ioc容器配置的某个bean对象, 是以多个实例形式创建的. 则可以通过配置 scope=“prototype” 来指定
public class Cat {
    private Integer id;
    private String name;

    public Cat() {
    //getter, setter方法
}
<bean class="com.zzw.spring.bean.Cat" id="cat" scope="prototype" lazy-init="true">
    <property name="id" value="100"/>
    <property name="name" value="花喵"/>
bean>
测试Scope
@Test
public void testBeanScope() {
    ApplicationContext ioc = new ClassPathXmlApplicationContext("beans.xml");
    Cat cat1 = ioc.getBean("cat", Cat.class);
    Cat cat2 = ioc.getBean("cat", Cat.class);
    Cat cat3 = ioc.getBean("cat", Cat.class);
    System.out.println("cat1=" + cat1);
    System.out.println("cat2=" + cat2);
    System.out.println("cat3=" + cat3);
}
使用细节
1)bean默认是单例singleton; 在启动容器时, bean默认就会创建, 并放入到singletonObjects
2) 当
3) 如果是单例singleton, 同时希望在getBean时才创建, 可以指定懒加载 lazy-init="true"(注意默认是false)
4) 通常情况下, lazy-init 就使用默认值false. 在开发看来, 空间换时间是值得的, 除非有特殊要求
5) 如果scope=“prototype”, 这时你的lazy-init 属性的值不管是true还是false, 都是在getBean的时候才创建这个对象
bean的生命周期
bean对象创建是由JVM完成的, 然后执行如下方法
- 执行构造器
- 执行set相关方法
- 调用bean的初始化方法(需要配置)
- 使用bean
- 当容器关闭的时候, 调用bean的销毁方法(需要配置)
public class House {
    private String name;

    public House() {
        System.out.println("House构造器 被执行...");
    }

    public void setName(String name) {
        System.out.println("House setName()=" + name);
        this.name = name;
    }

    //解读
    //1.这个方法是由程序员来编写的
    //2.根据自己的业务逻辑来写.
    //3.名字也不是固定的
    public void init() {
        System.out.println("House init()....");
    }

    //解读
    //1.这个方法是由程序员来编写的
    //2.根据自己的业务逻辑来写.
    //3.名字也不是固定的
    public void destroy() {
        System.out.println("House destroy()...");
    }
}
<bean class="com.zzw.spring.bean.House" id="house"
      init-method="init" destroy-method="destroy">
    <property name="name" value="上海豪宅"/>
bean>
测试bean的生命周期
public class SpringBeanTest {
    @Test
    public void testBeanLife() {
        ApplicationContext ioc = new ClassPathXmlApplicationContext("beans.xml");
        House house = ioc.getBean("house", House.class);
        System.out.println("house=" + house);

        //关闭容器
        //1.ioc的编译类型 ApplicationContext, 运行类型 ClassPathXmlApplicationContext
        //2.因为ClassPathXmlApplicationContext 实现了 ConfigurableApplicationContext
        //3.ClassPathXmlApplicationContext 是由close()
        //4.将ioc 转成ClassPathXmlApplicationContext, 再调用close()
        //ioc.close()
        //5.关闭ioc容器
        ((ClassPathXmlApplicationContext) ioc).close();
    }
}
输出
House构造器 被执行...
House setName()=上海豪宅
House init()....
setMemberDao()...
house=com.zzw.spring.bean.House@327bcebd
House destroy()...
使用细节
1.初始化init方法和destroy方法, 由程序员来指定
2.销毁方法就是当关闭容器时, 才会被调用
配置bean后置处理器
1在spring的ioc容器, 可以配置bean的后置处理器
2.该 处理器/对象 会在bean初始化方法调用前和初始化方法调用后被调用
3.程序员可以在后置处理器中编写自己的代码
package com.zzw.spring.bean;

//ctrl+h 可以查看类的继承关系
//这是一个后置处理器, 需要实现 BeanPostProcessor接口
public class MyBeanPostProcessor implements BeanPostProcessor {
    /**
     * 什么时候被调用: 在Bean的init方法前被调用
     * @param bean     传入在IOC容器中 创建/配置 的bean
     * @param beanName 传入在IOC容器中 创建/配置 的bean的id
     * @return Object 是程序员对传入的bean进行修改/处理[如果有需要的话], 返回
     * @throws BeansException
     */
    @Override
    public Object postProcessBeforeInitialization(Object bean, String beanName) throws BeansException {
        System.out.println("postProcessBeforeInitialization()... bean="
                + bean + " beanName=" + beanName);
        return bean;
    }

    /**
     * 什么时候被调用: 在Bean的init方法后被调用
     * @param bean     传入在IOC容器中 创建/配置 的bean
     * @param beanName 传入在IOC容器中 创建/配置 的bean的id
     * @return Object 是程序员对传入的bean进行修改/处理[如果有需要的话], 返回
     * @throws BeansException
     */
    @Override
    public Object postProcessAfterInitialization(Object bean, String beanName) throws BeansException {
        System.out.println("postProcessAfterInitialization()... bean="
                + bean + " beanName=" + beanName);
        return bean;
    }
}
新建beans02.xml配置文件
<bean class="com.zzw.spring.bean.House" id="house"
      init-method="init"
      destroy-method="destroy">
    <property name="name" value="大豪宅"/>
bean>


<bean class="com.zzw.spring.bean.MyBeanPostProcessor" id="beanPostProcessor"/>
测试
package com.zzw.spring.test;

public class SpringBeanTest {

    @Test
    public void testBeanPostProcessor() {
        ApplicationContext ioc =
                new ClassPathXmlApplicationContext("beans02.xml");
        House house = ioc.getBean("house", House.class);
        System.out.println("使用house=" + house);
        //关闭容器
        //ioc不能调用子类的特有的成员
        //因为在编译阶段, 能调用哪些成员, 是由编译类型来决定的
        //ioc编译类型 ApplicationContext, 运行类型 ClassPathXmlApplicationContext
        ((ClassPathXmlApplicationContext) ioc).close();//向下转型
    }
}
其它说明
1.怎么执行到这个方法? => 使用AOP(反射+动态代理+IO+容器+注解)
2.有什么用? => 可以对IOC容器中所有的对象进行统一处理, 比如日志处理/权限校验/安全验证/事务管理.
-初步体验案例: 如果类型是House的同意改成 上海豪宅
3.针对容器的所有对象吗? 是的=>切面编程
4.后面我们会自己实现这个底层机制
5.这是一个比较难以理解的知识点.
<bean class="com.zzw.spring.bean.House" id="house"
      init-method="init"
      destroy-method="destroy">
    <property name="name" value="大豪宅"/>
bean>

<bean class="com.zzw.spring.bean.House" id="house02"
      init-method="init"
      destroy-method="destroy">
    <property name="name" value="宫殿"/>
bean>


<bean class="com.zzw.spring.bean.MyBeanPostProcessor" id="beanPostProcessor"/>
public class MyBeanPostProcessor implements BeanPostProcessor {

    @Override
    public Object postProcessBeforeInitialization(Object bean, String beanName) throws BeansException {
        System.out.println("postProcessBeforeInitialization()... bean="
                + bean + " beanName=" + beanName);
        //对多个对象进行处理/编程=>切面编程
        if (bean instanceof House) {
            ((House) bean).setName("上海豪宅~");
        }
        return bean;
    }

    @Override
    public Object postProcessAfterInitialization(Object bean, String beanName) throws BeansException {
        System.out.println("postProcessAfterInitialization()... bean="
                + bean + " beanName=" + beanName);
        return bean;
    }
}
public class SpringBeanTest {
    @Test
    public void testBeanPostProcessor() {
        ApplicationContext ioc =
                new ClassPathXmlApplicationContext("beans02.xml");
        House house = ioc.getBean("house", House.class);
        House house02 = ioc.getBean("house02", House.class);
        System.out.println("使用house=" + house);
        System.out.println("使用house=" + house02);
        //关闭容器
        //ioc不能调用子类的特有的成员
        //因为在编译阶段, 能调用哪些成员, 是由编译类型来决定的
        //ioc编译类型 ApplicationContext, 运行类型 ClassPathXmlApplicationContext
        ((ClassPathXmlApplicationContext) ioc).close();//向下转型
    }
}
测试结果
House构造器 被执行...
House setName()=大豪宅
postProcessBeforeInitialization()... bean=House{name='大豪宅'} beanName=house
House setName()=上海豪宅~
House init()....
postProcessAfterInitialization()... bean=House{name='上海豪宅~'} beanName=house
House构造器 被执行...
House setName()=宫殿
postProcessBeforeInitialization()... bean=House{name='宫殿'} beanName=house02
House setName()=上海豪宅~
House init()....
postProcessAfterInitialization()... bean=House{name='上海豪宅~'} beanName=house02
使用house=House{name='上海豪宅~'}
使用house=House{name='上海豪宅~'}
House destroy()...
House destroy()...
通过属性文件配置bean
在spring的ioc容器, 通过属性文件给bean注入值
在src目录下, 新建配置文件my.properties [配置文件都要写在src目录下]
monsterId=1000
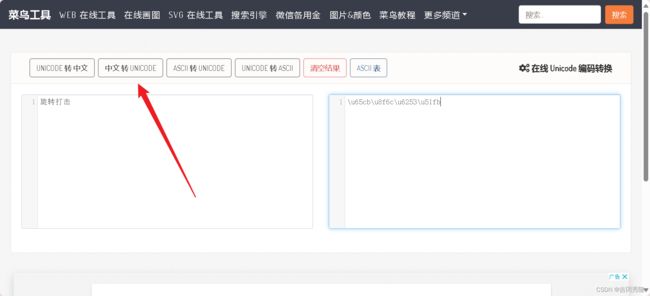
name=\u5343\u5e74\u9f9f
skill=\u65cb\u8f6c\u6253\u51fb
解决中文乱码问题
<context:property-placeholder location="classpath:my.properties"/>


<bean class="com.zzw.spring.bean.Monster" id="monster100">
    <property name="monsterId" value="${monsterId}"/>
    <property name="name" value="${name}"/>
    <property name="skill" value="${skill}"/>
bean>
public class SpringBeanTest {

    //通过属性文件给bean属性赋值
    @Test
    public void setBeanByFile() {
        ApplicationContext ioc = new ClassPathXmlApplicationContext("beans03.xml");
        Monster monster100 = ioc.getBean("monster100", Monster.class);
        System.out.println("monster100=" + monster100);
    }
}
基于XML的bean的自动装配
在spring的ioc容器, 可以实现自动装配bean
这里说的Action就是我们前面学习过的Servlet -> 充当Controller
Dao
package com.zzw.spring.dao;

public class OrderDao { //DAO类
    public void saveOrder() {
        System.out.println("保存一个订单....");
    }
}
Service
package com.zzw.spring.service;

public class OrderService { //Service类

    //OrderDao属性
    private OrderDao orderDao;

    //getter方法
    public OrderDao getOrderDao() {
        return orderDao;
    }

    //setter方法
    public void setOrderDao(OrderDao orderDao) {
        this.orderDao = orderDao;
    }
}
Action
package com.zzw.spring.web;

public class OrderAction { //Servlet就是Controller
    //OrderService属性
    private OrderService orderService;

    //getter方法
    public OrderService getOrderService() {
        return orderService;
    }

    //setter方法
    public void setOrderService(OrderService orderService) {
        this.orderService = orderService;
    }
}
bean03.xml
<bean class="com.zzw.spring.dao.OrderDao" id="orderDao"/>

<bean autowire="byType" class="com.zzw.spring.service.OrderService"
      id="orderService"/>

<bean autowire="byType" class="com.zzw.spring.web.OrderAction" id="orderAction"/>
通过自动装配来对属性赋值
//通过自动装配来对属性赋值
public class SpringBeanTest {
    @Test
    public void setBeanByAutowire() {
        ApplicationContext ioc =
                new ClassPathXmlApplicationContext("beans03.xml");

        OrderAction orderAction = ioc.getBean("orderAction", OrderAction.class);

        //验证是否自动装配上OrderService
        System.out.println(orderAction.getOrderService());
        //验证是否自动装配上OrderDao
        System.out.println(orderAction.getOrderService().getOrderDao());
    }
}
byName方式讲解
<bean autowire="byName" class="com.zzw.spring.service.OrderService"
      id="orderService"/>

<bean autowire="byName" class="com.zzw.spring.web.OrderAction"
      id="orderAction"/>
Spring El 表达式配置Bean
1.Spring Expression Language, Spring表达式语言, 简称SpEL. 支持运行时查询并可以操作对象.
2.和EL表达式一样, SpEL根据JavaBean风格的getXxx(), setXxx()方法定义的属性访问对象
3.SpEL使用#{…}作为界定符, 所有在大括号中的字符都被认为是SpEL表达式
4.不是重点, 能看懂即可.
public class SpELBean {
    private String name;
    private Monster monster;
    private String monsterName;
    private String crySound;
    private String bookName;
    private Double reuslt;

    public SpELBean() {
    }

    //普通方法, 返回字符串
    public String cry(String crySound) {
        return "发出 " + " 的声音";
    }

    //静态方法 返回字符串
    public static String read(String bookName) {
        return "正在读" + bookName;
    }

	//getter方法, setter方法

    @Override
    public String toString() {
        return "SpELBean{" +
                "name='" + name + '\'' +
                "\nmonster=" + monster +
                "\nmonsterName='" + monsterName + '\'' +
                "\ncrySound='" + crySound + '\'' +
                "\nbookName='" + bookName + '\'' +
                "\nreuslt=" + reuslt +
                '}';
    }
}
beans04.xml
<bean class="com.zzw.spring.bean.Monster" id="monster01"
      p:monsterId="001"
      p:name="齐天大圣"
      p:skill="金箍棒"
/>


<bean class="com.zzw.spring.bean.SpELBean" id="spELBean">

    <property name="name" value="#{'赵志伟'}"/>

    <property name="monster" value="#{monster01}"/>

    <property name="monsterName" value="#{monster01.name}"/>

    <property name="crySound" value="#{spELBean.cry('小猫')}"/>

    <property name="bookName" value="#{T(com.zzw.spring.bean.SpELBean).read('安乐传')}"/>

    <property name="reuslt" value="#{72+53*33.8}"/>
bean>
//通过spring el 对属性赋值
public class SpringBeanTest {
    @Test
    public void setBeanBySpEl() {
        ApplicationContext ioc = new ClassPathXmlApplicationContext("beans04.xml");
        SpELBean spELBean = ioc.getBean("spELBean", SpELBean.class);
        System.out.println("spELBean=" + spELBean);
    }
}
测试结果
spELBean=SpELBean{name='赵志伟'
monster=Monster{monsterId='1', name='齐天大圣', skill='金箍棒'}
monsterName='齐天大圣'
crySound='发出 小猫 的声音'
bookName='正在读安乐传'
reuslt=1863.3999999999999}
下乘: Spring系列二:基于注解配置bean. 未完待续…