MicroPython for ESP32
MicroPython for ESP32
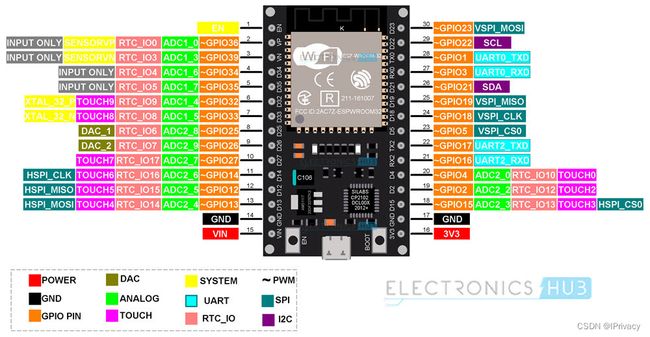
开发板引脚图
环境搭建
参考资料
https://zhuanlan.zhihu.com/p/587027345
官方资料
https://docs.micropython.org/en/latest/
http://vcc-gnd.com/rtd/html/esp32/quickref.html#i2c
创建一个虚拟环境,
conda create -n esp32 python=3.8
激活环境
conda activate esp32
下载固件
https://micropython.org/download/esp32/
下载esp32-20230426-v1.20.0.bin是当前最新版本,
在环境中 安装烧录工具,这里安装有点问题所以用了代理。
pip install git+https://github.com/espressif/esptool.git --proxy=127.0.0.1:11520
擦除flash
esptool --port com4 erase_flash
执行结果
esptool.py v4.7-dev
Serial port com4
Connecting...
Failed to get PID of a device on com4, using standard reset sequence.
........
Detecting chip type... Unsupported detection protocol, switching and trying again...
Connecting...
Failed to get PID of a device on com4, using standard reset sequence.
..
Detecting chip type... ESP32
Chip is ESP32-D0WDQ6 (revision v1.0)
Features: WiFi, BT, Dual Core, 240MHz, VRef calibration in efuse, Coding Scheme None
WARNING: Detected crystal freq 41.01MHz is quite different to normalized freq 40MHz. Unsupported crystal in use?
Crystal is 40MHz
MAC: 08:3a:f2:52:35:84
Uploading stub...
Running stub...
Stub running...
Erasing flash (this may take a while)...
Chip erase completed successfully in 5.6s
Hard resetting via RTS pin...
进入到下载固件的目录,烧录
esptool --chip esp32 --port com4 write_flash -z 0x1000 .\esp32-20230426-v1.20.0.bin
执行结果
esptool.py v4.7-dev
Serial port com4
Connecting...
Failed to get PID of a device on com4, using standard reset sequence.
......
Chip is ESP32-D0WDQ6 (revision v1.0)
Features: WiFi, BT, Dual Core, 240MHz, VRef calibration in efuse, Coding Scheme None
Crystal is 40MHz
MAC: 08:3a:f2:52:35:84
Uploading stub...
Running stub...
Stub running...
Configuring flash size...
Flash will be erased from 0x00001000 to 0x0017ffff...
Compressed 1566528 bytes to 1034676...
Wrote 1566528 bytes (1034676 compressed) at 0x00001000 in 91.8 seconds (effective 136.6 kbit/s)...
Hash of data verified.

Leaving...
Hard resetting via RTS pin...
执行完成,通过串口工具即可使用。
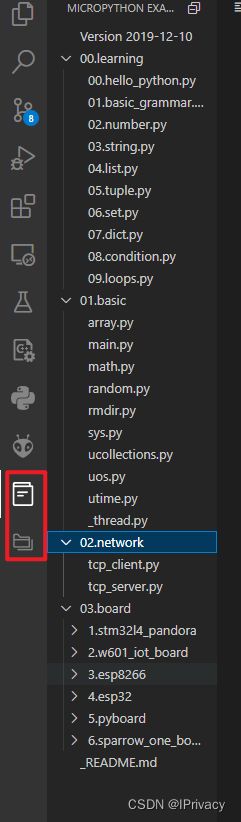
使用vscode开发,需要安装插件RT-Thread MicroPython

安装完插件,可以在侧边栏看到示例程序,
创建新工程,通过空白或者demo创建都可以,
连接开发板

通过,alt+q或者运行
![]()
连接网络
ssid = "FSE"
password = "123456789"
def main():
    print("Main hello")
    #开始连接wifi
    do_connect(ssid,password)
    print("Main end")

def do_connect(ssid,password):
    import network
    # 设置为station模式
    wlan = network.WLAN(network.STA_IF)
    wlan.active(True)
    if not wlan.isconnected():
        print('connecting to network...')
        wlan.connect(ssid, password)
        # 如果连接成功才退出
        while not wlan.isconnected():
            pass
    print('network config:', wlan.ifconfig())
if __name__ == '__main__':
    main()
网络连接成功,即可发起http请求了,
def do_request(url):
    import urequests
    r = urequests.get(url)
    print(r.text)
    r.close()
ssd1306
驱动来源https://randomnerdtutorials.com/micropython-oled-display-esp32-esp8266/
使用,
#MicroPython SSD1306 OLED driver, I2C and SPI interfaces created by Adafruit

import time
import framebuf

# register definitions
SET_CONTRAST        = const(0x81)
SET_ENTIRE_ON       = const(0xa4)
SET_NORM_INV        = const(0xa6)
SET_DISP            = const(0xae)
SET_MEM_ADDR        = const(0x20)
SET_COL_ADDR        = const(0x21)
SET_PAGE_ADDR       = const(0x22)
SET_DISP_START_LINE = const(0x40)
SET_SEG_REMAP       = const(0xa0)
SET_MUX_RATIO       = const(0xa8)
SET_COM_OUT_DIR     = const(0xc0)
SET_DISP_OFFSET     = const(0xd3)
SET_COM_PIN_CFG     = const(0xda)
SET_DISP_CLK_DIV    = const(0xd5)
SET_PRECHARGE       = const(0xd9)
SET_VCOM_DESEL      = const(0xdb)
SET_CHARGE_PUMP     = const(0x8d)


class SSD1306:
    def __init__(self, width, height, external_vcc):
        self.width = width
        self.height = height
        self.external_vcc = external_vcc
        self.pages = self.height // 8
        # Note the subclass must initialize self.framebuf to a framebuffer.
        # This is necessary because the underlying data buffer is different
        # between I2C and SPI implementations (I2C needs an extra byte).
        self.poweron()
        self.init_display()

    def init_display(self):
        for cmd in (
            SET_DISP | 0x00, # off
            # address setting
            SET_MEM_ADDR, 0x00, # horizontal
            # resolution and layout
            SET_DISP_START_LINE | 0x00,
            SET_SEG_REMAP | 0x01, # column addr 127 mapped to SEG0
            SET_MUX_RATIO, self.height - 1,
            SET_COM_OUT_DIR | 0x08, # scan from COM[N] to COM0
            SET_DISP_OFFSET, 0x00,
            SET_COM_PIN_CFG, 0x02 if self.height == 32 else 0x12,
            # timing and driving scheme
            SET_DISP_CLK_DIV, 0x80,
            SET_PRECHARGE, 0x22 if self.external_vcc else 0xf1,
            SET_VCOM_DESEL, 0x30, # 0.83*Vcc
            # display
            SET_CONTRAST, 0xff, # maximum
            SET_ENTIRE_ON, # output follows RAM contents
            SET_NORM_INV, # not inverted
            # charge pump
            SET_CHARGE_PUMP, 0x10 if self.external_vcc else 0x14,
            SET_DISP | 0x01): # on
            self.write_cmd(cmd)
        self.fill(0)
        self.show()

    def poweroff(self):
        self.write_cmd(SET_DISP | 0x00)

    def contrast(self, contrast):
        self.write_cmd(SET_CONTRAST)
        self.write_cmd(contrast)

    def invert(self, invert):
        self.write_cmd(SET_NORM_INV | (invert & 1))

    def show(self):
        x0 = 0
        x1 = self.width - 1
        if self.width == 64:
            # displays with width of 64 pixels are shifted by 32
            x0 += 32
            x1 += 32
        self.write_cmd(SET_COL_ADDR)
        self.write_cmd(x0)
        self.write_cmd(x1)
        self.write_cmd(SET_PAGE_ADDR)
        self.write_cmd(0)
        self.write_cmd(self.pages - 1)
        self.write_framebuf()

    def fill(self, col):
        self.framebuf.fill(col)

    def pixel(self, x, y, col):
        self.framebuf.pixel(x, y, col)

    def scroll(self, dx, dy):
        self.framebuf.scroll(dx, dy)

    def text(self, string, x, y, col=1):
        self.framebuf.text(string, x, y, col)


class SSD1306_I2C(SSD1306):
    def __init__(self, width, height, i2c, addr=0x3c, external_vcc=False):
        self.i2c = i2c
        self.addr = addr
        self.temp = bytearray(2)
        # Add an extra byte to the data buffer to hold an I2C data/command byte
        # to use hardware-compatible I2C transactions.  A memoryview of the
        # buffer is used to mask this byte from the framebuffer operations
        # (without a major memory hit as memoryview doesn't copy to a separate
        # buffer).
        self.buffer = bytearray(((height // 8) * width) + 1)
        self.buffer[0] = 0x40  # Set first byte of data buffer to Co=0, D/C=1
        self.framebuf = framebuf.FrameBuffer1(memoryview(self.buffer)[1:], width, height)
        super().__init__(width, height, external_vcc)

    def write_cmd(self, cmd):
        self.temp[0] = 0x80 # Co=1, D/C#=0
        self.temp[1] = cmd
        self.i2c.writeto(self.addr, self.temp)

    def write_framebuf(self):
        # Blast out the frame buffer using a single I2C transaction to support
        # hardware I2C interfaces.
        self.i2c.writeto(self.addr, self.buffer)

    def poweron(self):
        pass


if __name__ == '__main__':
    from machine import Pin,I2C
    i2c = I2C(-1,scl=Pin(22), sda=Pin(21))
    oled = SSD1306_I2C(128, 64, i2c, addr=0x3c)
    oled.text('Hello, world!', 0, 0)
    oled.text('Hello, world!', 0, 10)
    oled.show()
