微信小程序
目录
-
- 1.小程序的目录结构
-
-
- 小程序目录描述
- 允许上传的文件类型
-
- 2.小程序的配置
-
-
- 5.1全局配置
-
- 5.1.1pages
- 5.1.2entryPagePath
- 5.1.3window
- 5.1.4tabbar配置
- 5.2页面配置
- 5.3sitemap配置(了解)
-
- 5.3.1在小程序管理的后台配置是否允许被搜索到
- 5.3.2配置sitemap.json
- 配置项
- rules
-
- 3.小程序场景值
-
-
- 6.1概念
- 6.2应用
- 6.3获取场景值的方式
-
- 1小程序的逻辑层
-
-
- 1.1逻辑层的概念
- 1.2注册小程序
-
- 1.2.1小程序的生命周期监听方法
- 1.2.2其他
- 1.2.3getApp的使用
- 1.2.4使用getapp的注意事项
- 1.3注册页面
-
- 1.3.1页面的生命周期监听函数
- 1.3.2关于data
- 1.3.3getCurrentPages
- 1.4小程序的页面生命周期
-
- 2小程序的视图层
-
-
- 2.1视图层的概念
- 2.2wxml(小程序的结构)
-
- 数据绑定
- 绑定属性
- 关键字的处理
- 运算
- 2.2.2列表渲染
- block是包裹元素
- wx:key
- 2.2.3条件渲染
- wx:if vs hidden
- 2.2.4模板(了解)
- 定义模板
- 使用模板
- 使用模板并且向模板中传值
- import
- include
- 2.3wxss(小程序的样式)
-
- 2.3.1wxss的概念
- 2.3.2尺寸单位
- 2.3.3样式导入
- 2.3.4内联样式
- 2.3.5选择器
- 2.3.6全局样式和局部样式
-
- 3事件系统
-
-
- 3.1事件的概念
- 3.2事件的基本的使用
-
- 3.2.1事件的绑定
- 事件函数中的this
- 3.2.2事件的类型
- 3.2.3事件的绑定和冒泡
- 3.2.4事件对象
- 3.2.4.1小程序传递[参数](https://so.csdn.net/so/search?q=参数&spm=1001.2101.3001.7020)
-
- 1组件基础
-
-
- 1.1基础组件
- 1.2属性的类型
- 1.3公共的属性
- 1.4私有属性
-
- 2基础内容
-
-
- icon(图标)
- progress
- text
- rich-text(富文本)
-
- 3容器组件
-
-
- view(视图容器)
- swiper
-
- swiper
-
-
-
- 封装指示点
- 自定义指示点的形状
- scroll-view
-
- scroll-view
- scroll-view基本使用
- 使用scroll-view模拟京东分类页
-
-
- 4媒体组件
-
-
- image
-
- 5表单组件
- 6导航组件
-
-
- navigator
-
- target
- open-type
- api跳转方式
-
- 传递参数
- navigator传参
- api跳转传参
- API路由接收参数
- 打开其他小程序
-
- 7模块化
-
-
- 7.1模块化的概念
- 7.2模块化的好处
- 7.3模块化的规范
-
- es6规范
- commonjs规范
- es6的规范
-
- 分别暴露(export)
- 使用
- 默认暴露
- 使用
- commonJs的规范
- 暴露
-
- 使用
-
- 8组件化
-
-
- 8.1组件化的概念
- 8.2组件化的优点
- 8.3小程序组件的使用
-
- 2注册组件
- 3 使用组件
- 8.4小程序组件的传值
-
- 父组件往子组件传值
- 子组件往父组件传值
- 8.5组件中的slot
- 8.6生命周期
- 8.7样式隔离
- 8.8自定义封装swiper组件
-
- 1小程序中的Api
-
-
- 1.1概念
- 1.2小程序的三种类型
-
- 同步api
- 异步api
- 1.3获取系统信息
- 1.4交互的api
- 1.5导航的api
- 1.6路由的api
- 1.7缓存api
- 1.8网络请求
-
- get请求
- post请求
- data 参数说明
- 总结
- 网络请求的封装
-
- 2weui的使用
-
-
- 2.1概念
- 2.2项目背景
- 2.3weui快速上手
-
- 2.3.1引入weui
- 2.3.2weui组件的使用
- 2.4使用weui完成订单页面
-
- 3分包机制
-
-
- 3.1基础分包
-
-
- 优点
-
- 3.2独立分包
-
- 2云开发
-
-
- 2.1云开发的概述
- 2.2传统开发模式vs云开发模式
- 2.3云开发好处
- 2.4开通云环境
- 2.5云环境的管理后台
- 2.6云开发能力的介绍
-
- 2.6.1数据库
- 2.6.2云存储
- 2.6.3云函数
- 2.7小程序云开发api的使用
-
- 2.7.1初始化云环境
- 2.7.2使用api操作数据库
- 2.7.3使用api操作存储空间
- 2.7.4云函数的使用
-
1.小程序的目录结构
- 目录和文件组成
- 小程序包含一个描述整体程序的
app和多个描述各自页面的page组成
目录
-
pages:小程序的页面放在该目录,一般一个目录就是一个页面
- **.js :放置的该页面的逻辑
- **.json:放置该文件的配置
- **.wxss 对标css,该文件中放置的是页面的样式
- **.wxml 对标html,该文件中放置的是该页面结构
-
utils:放置的是项目模块化的公共代码(模块文件,可以做一些功能模块封装) -
common:公共的样式, -
components:公共的组件 -
static:公共的资源,图片,视屏,音频文件
文件
- app.js :放置的整个小程序的逻辑。(项目的入口js文件)
- app.json : 放置的是整个小程序的配置(项目的配置文件)
- app.wxss:放置的是小程序整体的样式结构(全局的css样式文件)
- project.config.json:项目配置文件,不要手动修改里面的配置,记录用户配置的喜好,即使换了小程序的运行环境,不用重新配置了。
- sitemap.json:配置微信能不能搜索到该小程序(栈点索引)
小程序目录描述
- 小程序包含一个描述整体程序的
app和多个描述各自页面的page。 - 一个小程序主体部分由三个文件组成,必须放在项目的根目录,如下:
| 文件 | 必需 | 作用 |
|---|---|---|
| app.js | 是 | 小程序逻辑 |
| app.json | 是 | 小程序公共配置 |
| app.wxss | 否 | 小程序公共样式表 |
- 一个小程序页面由四个文件组成,分别是:
| 文件类型 | 必需 | 作用 |
|---|---|---|
| js | 是 | 页面逻辑 |
| wxml | 是 | 页面结构 |
| json | 否 | 页面配置 |
| wxss | 否 | 页面样式表 |
允许上传的文件类型
在项目目录中,以下文件会经过编译,因此上传之后无法直接访问到:.js、app.json、.wxml、*.wxss(其中 wxml 和 wxss 文件仅针对在 app.json 中配置了的页面)。除此之外,只有后缀名在白名单内的文件可以被上传,不在白名单列表内文件在开发工具能被访问到,但无法被上传。具体白名单列表如下:
- wxs
- png
- jpg
- jpeg
- gif
- svg
- json
- cer
- mp3
- aac
- m4a
- mp4
- wav
- ogg
- silk
2.小程序的配置
5.1全局配置
- 小程序根目录下的app.json文件用来对微信小程序进行全局配置,决定页面文件的路径(配置路由及)、窗口表现、设置网络超时时间、设置多 tab 等。
- 1 是一个json格式的数据
- 2 语法格式很严格
- 3 不允许写注释
5.1.1pages
- 页面路径列表
- 页面路径不能以/ ./ …/ 开头
- 数组中的每一项都要用逗号隔开,最后不加逗号
- 不能使用单引号
- 配置小程序的路由,必填,里面放置的小程序的页面
 "pages": [

    "pages/index/index",

    "pages/cart/cart",

    "pages/my/my",

    "pages/cate/cate"

  ],
5.1.2entryPagePath
- 设置小程序的默认启动的页面。
- 如果有entryPagePath属性,默认启动的首页就是该选项配置的
- 如果没有entryPagePath属性,默认启动的页面使用pages属性中的第一个页面
- 一般开发者习惯将index页面作为首页
"entryPagePath": "pages/index/index",
5.1.3window
- 用于设置小程序的状态栏、导航条、标题、窗口背景色。
{
  "pages": [
    "pages/index/index",
    "pages/a/a",
    "pages/logs/logs",
    "pages/b/b"
  ],
  "window": {
    "navigationBarBackgroundColor": "#f00",
    "navigationBarTitleText": "我的",
    "navigationBarTextStyle": "black",
     //  下拉刷新界面的背景颜色,需要开启enablePullDownRefresh,才能看见效果
    "backgroundColor": "#ccc",
    "enablePullDownRefresh": true,
    "backgroundTextStyle": "light",
     //  设置导航栏  如果设置custom 设置自定义导航栏   之前做的导航栏样式都不会再有效果
    "navigationStyle": "custom"
  },
  "style": "v2",
  "sitemapLocation": "sitemap.json"
}
5.1.4tabbar配置
"tabBar": {
    "color":"#ccc",
    "selectedColor": "#f00",
    "backgroundColor": "#fff",
    "borderStyle": "white",
    "position": "top",
    "custom": false,
    "list": [
        {
          "pagePath": "pages/index/index",
          "text":"首页",
          "iconPath": "./images/index.png",
          "selectedIconPath": "./images/indexFull.png"
        },
        {
          "pagePath": "pages/car/car",
          "text":"购物车",
          "iconPath": "./images/cart.png",
          "selectedIconPath": "./images/cartFull.png"
        }
        ,
        {
          "pagePath": "pages/mine/mine",
          "text":"个人中心",
          "iconPath": "./images/my.png",
          "selectedIconPath": "./images/myFull.png"
        }
    ]
  },
注意
- 至少设置2个,最多5个tab
- position设置为top的时候 iconpath和selectedIconpath没有效果
- iconpath和selectedIconpath图片40kb 不能使用网络图片
- pagePath的页面文件路径不能以/ …/ ./ 开头
5.2页面配置
- 页面配置文件高于全局配置文件,只能配置window项
- 每一个小程序页面也可以使用同名
.json文件来对本页面的窗口表现进行配置,页面中配置项会覆盖app.json的window中相同的配置项。页面配置的作用范围只作用于该页面。
  "navigationBarBackgroundColor": "#ff0000",

  "navigationBarTextStyle": "white",

  "navigationBarTitleText": "小u商城",

   "backgroundColor": "#00ff00",

   "backgroundTextStyle": "dark",

   "enablePullDownRefresh": true
5.3sitemap配置(了解)
- 栈点索引
- 微信现已开放小程序内搜索,开发者可以通过
sitemap.json配置,或者管理后台页面收录开关来配置其小程序页面是否允许微信索引。当开发者允许微信索引时,微信会通过爬虫的形式,为小程序的页面内容建立索引。当用户的搜索词条触发该索引时,小程序的页面将可能展示在搜索结果中
5.3.1在小程序管理的后台配置是否允许被搜索到
打开小程序的管理后台----页面内容收录
5.3.2配置sitemap.json
- 虽然在小程序的管理后台配置了希望被微信搜索到,要配置搜索规则。
- 默认规则:如果sitemap中的规则没有一个命中的画则使用默认规则,所有的页面都将被搜索得到
- 小程序根目录下的 sitemap.json 文件用于配置小程序及其页面是否允许被微信索引,文件内容为一个 JSON 对象,如果没有 sitemap.json ,则默认为所有页面都允许被索引;sitemap.json 有以下属性:
配置项
| 属性 | 类型 | 必填 | 描述 |
|---|---|---|---|
| rules | Object[] | 是 | 索引规则列表 |
- 一个对象就是一个访问规则
{

 "rules": [{

  "action": "disallow",

  "page":"/pages/cart/cart"

 },{

  "action": "disallow",

  "page":"/pages/my/my"

 },{

  "action": "allow",

  "page":"/pages/detail/detail",

  "params": ["price","info"],

  "matching": "partial"

 }]

}
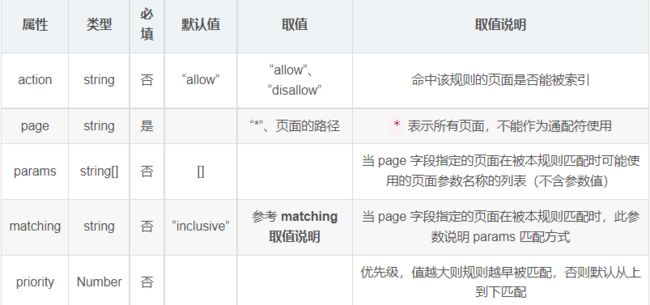
rules
- rules 配置项指定了索引规则,每项规则为一个JSON对象,属性如下所示:
- matching 取值说明
- 对于没有参数的页面使用action和page就能完成配置,对于有参数的页面,需要params和matching配合使用,根据页面的需求.
- 一般项目完成后在进行配置。
3.小程序场景值
6.1概念
- 场景值用来描述用户进入小程序的路径。完整场景值的含义请查看,用户怎么进入小程序。
6.2应用
- 不同场景值做不同的业务。
- kfc:通过扫码进入的小程序,跳转到点餐页面,通过公众号菜单,进入到发放优惠券的界面。
onLaunch: function (option) {

  if(option.scene==1035){

   console.log("发放优惠券")

  }

  if(option.scene==1011){

   console.log("点餐")

  }

 },
6.3获取场景值的方式
- 对于小程序,可以在
App的onLaunch和onShow,或wx.getLaunchOptionsSync 中获取上述场景值。
App({
  // 小程序初始化完成走的生命周期
  onLaunch(a){
      // console.log("onlaunch",a)
      // 同步
      let b = wx.getLaunchOptionsSync();
      console.log(b)
      if(b.scene==1011){
        console.log("活动详情")
      }
  },
  onShow(e){
    console.log("onshow",e)
    }

})
-
对于小游戏,可以在 wx.getLaunchOptionsSync 和 wx.onShow 中获取上述场景值
-
小程序的配置
- 全局配置—app.json–所有页面----路由–全局窗口–tabBar–分包–注册全局组件
- 局部配置–页面对应的json文件–当前页面生效—页面窗口–局部注册组件
- 局部配置–覆盖全局
1小程序的逻辑层
- 小程序开发框架的逻辑层使用
JavaScript引擎为小程序提供开发者JavaScript代码的运行环境以及微信小程序的特有功能。
1.1逻辑层的概念
- 逻辑层将数据进行处理后发送给视图层,同时接受视图层的事件反馈。
- 开发者写的所有代码最终将会打包成一份 JavaScript 文件,并在小程序启动的时候运行,直到小程序销毁。这一行为类似 ServiceWorker,所以逻辑层也称之为 App Service。
- 在 JavaScript 的基础上,我们增加了一些功能,以方便小程序的开发:
- 增加 App 和 Page 方法,进行程序注册和页面注册。
- 增加 getApp 和 getCurrentPages 方法,分别用来获取 App 实例和当前页面栈。
- 提供丰富的 API,如微信用户数据,扫一扫,支付等微信特有能力。
- 提供模块化能力,每个页面有独立的作用域。
- 注意:小程序框架的逻辑层并非运行在浏览器中,因此 JavaScript 在 web 中一些能力都无法使用,如 window,document 等。
1.2注册小程序
- 每个小程序都需要在 app.js 中调用 App 方法注册小程序实例,绑定生命周期回调函数、错误监听和页面不存在监听函数等。
- 注册小程序。接受一个 Object 参数,其指定小程序的生命周期回调等。
- App() 必须在 app.js 中调用,必须调用且只能调用一次。不然会出现无法预期的后果。
1.2.1小程序的生命周期监听方法
App({
	 /**
	  \* 当小程序初始化完成时,会触发 onLaunch(全局只触发一次)
	  */
	 onLaunch: function () {
	  console.log("app launch")
	 },
	 /**
	  \* 当小程序启动,或从后台进入前台显示,会触发 onShow
	  */
	 onShow: function (options) {
	  console.log("app show")
	 },
	 /**
	  \* 当小程序从前台进入后台,会触发 onHide
	  */
	 onHide: function () {
	  console.log("app hide")
	 },
	 /**
	  \* 当小程序发生脚本错误,或者 api 调用失败时,会触发 onError 并带上错误信息(当小程序有报错信息,无论是页面文件还是全局文件,只要有报错信息,就会触发onerror函数)
	  */
	 onError: function (msg) {
	  //调用记录日志接口
	 },
	 onPageNotFound:function(){
	  wx.navigateTo({
	   url: './pages/notfound/notfound',
	  })
	 }
})
1.2.2其他
- 用户可以在App中自定义一些属性和方法,然后通过this.属性/方法去调用,
App({
	 globalData:{
	  token:"",
	  userinfo:""
	 },
	 /**
	  \* 当小程序初始化完成时,会触发 onLaunch(全局只触发一次)
	  */
	 onLaunch: function () {
	  this._login()
	 },
	 _login:function(){
	  //判断用户有没有登录过
	  //如果登录过
	  //调用登录的接口,返回对应的token
	  //将token存储到缓存中,再将token放到globalData中,这里globalData就是全局变量
	  console.log("login ok")
	  this.globalData.token="abcdefgh124343242"
	  this.globalData.userInfo={
	  	name:"zhangsan"
	  }
	  console.log(this.globalData)
	 },
	 /**
	  \* 当小程序启动,或从后台进入前台显示,会触发 onShow
	  */
	 onShow: function (options) {
	  console.log("app show")
	 },
	 /**
	  \* 当小程序从前台进入后台,会触发 onHide
	  */
	 onHide: function () {
	  console.log("app hide")
	 },
	 /**
	  \* 当小程序发生脚本错误,或者 api 调用失败时,会触发 onError 并带上错误信息
	  */
	 onError: function (msg) {
	  //调用记录日志接口
	 },
	 onPageNotFound:function(){
	  wx.navigateTo({
	   url: './pages/notfound/notfound',
	  })
	 }
})
- 在App.js获取全局变量和函数
//app.js
App({

  // 小程序启动或者切前台
  onShow(){
    console.log("onshow")

  },
  // 小程序初始化完成 全局只触发一次
  onLaunch(){
    console.log("onlaunch")
    console.log(this.userInfo.name)
    console.log(this.userInfo.age)
    console.log(this.say())
  },
  // 小程序切后台的时候触发
  onHide(){
    console.log("onhide")
  },
  // 当小程序有报错信息,无论是页面文件还是全局文件,只要有报错信息,就会触发onerror函数
  onError(err){
    console.log("错误信息",err)
  },
  onPageNotFound(){
    console.log("页面不存在")
    wx.navigateTo({
      url: '/pages/logs/logs',
    })
  },
  // 全局的变量
  userInfo:{
    name:"张三",
    age:20
  },
  // say(){
  //     return  "正在吃东西"
  // }
  // 全局的函数
  say:function(){
    // console.log(this.userInfo,"函数")
    // 在函数内部访问全局变量
    return  this.userInfo.name +  "正在吃东西"
  }
})
- 在其他页面的js获取全局变量和函数
// 获取app实例唯一的方法
let app = getApp();
console.log(app.userInfo.name)

// 注意事项:不要在页面中调用app的生命周期
Page({

})
1.2.3getApp的使用
- 整个小程序只有一个 App 实例,是全部页面共享的。开发者可以通过
getApp方法获取到全局唯一的 App 实例,获取App上的数据或调用自定义函数开发者注册在App上的函数。
// xxx.js
const appInstance = getApp()
console.log(appInstance.globalData) // I am global data
1.2.4使用getapp的注意事项
- 不要在定义于
App()内的函数中,或调用App前调用getApp(),使用this就可以拿到 app 实例。 - 通过
getApp()获取实例之后,不要私自调用生命周期函数。
1.3注册页面
- 对于小程序中的每个页面,都需要在页面对应的
js文件中使用Page构造方法进行注册,指定页面的初始数据、生命周期回调、事件处理函数等。
1.3.1页面的生命周期监听函数
Page({
	 /**
	  \* 页面的初始数据
	  */
	 data: {
	 },
	 /**
	  \* 生命周期函数--监听页面加载
	  */
	 onLoad: function (options) {
	  console.log("index load")
	 },
	 /**
	  \* 生命周期函数--监听页面初次渲染完成
	  */
	 onReady: function () {
	  console.log("index ready")
	 },
	 /**
	  \* 生命周期函数--监听页面显示
	  */
	 onShow: function () {
	  console.log("index show")
	 },
	 /**
	  \* 生命周期函数--监听页面隐藏
	  */
	 onHide: function () {
	  console.log("index hide")
	 },
	 /**
	  \* 生命周期函数--监听页面卸载
	  */
	 onUnload: function () {
	  console.log("index unload")
	 },
	 /**
	  \* 页面相关事件处理函数--监听用户下拉动作
	  */
	 onPullDownRefresh: function () {
	  console.log("下拉刷新")
	 },
	 /**
	  \* 页面上拉触底事件的处理函数
	  */
	 onReachBottom: function () {
	  console.log("加载更多")
	 },
	 /**
	  \* 用户点击右上角分享
	  */
	 onShareAppMessage: function () {
	 }
})
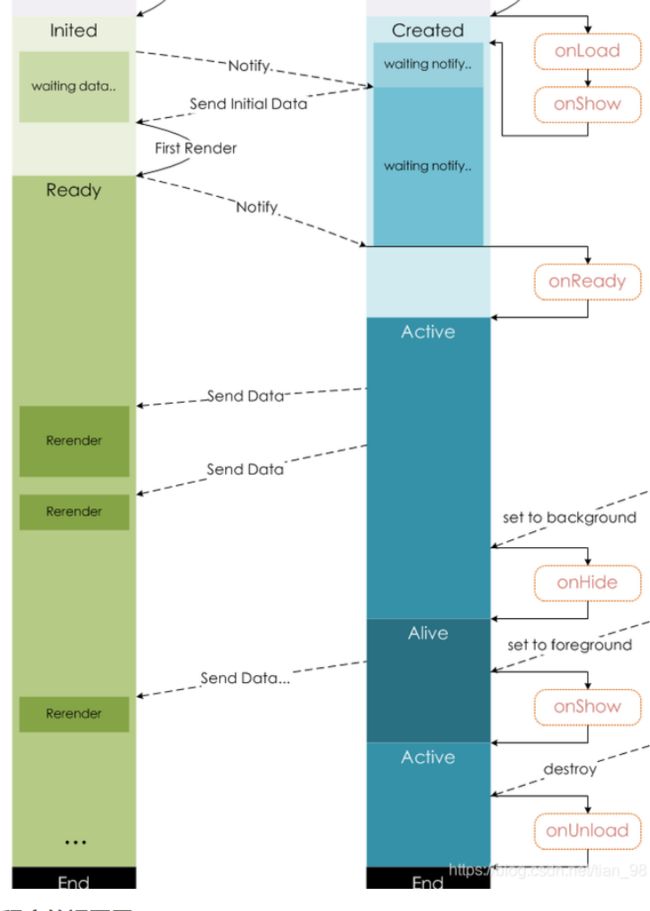
- 生命周期顺序(不含异步):
- 进入的时候:app.js的onLaunch—onshow 页面的onLoad—页面的onShow
- 离开的时候:页面的onHide—app.js的onHide
1.3.2关于data
- data 是页面第一次渲染使用的初始数据。
- 页面加载时,data 将会以JSON字符串的形式由逻辑层传至渲染层,因此data中的数据必须是可以转成JSON的类型:字符串,数字,布尔值,对象,数组。
- 渲染层可以通过 WXML 对数据进行绑定。
//修改数据
this.setData({
  num:2
})
- 里面放置页面初始化的数据.初始化的数据可以展示在视图层。
- this.data.键名:获取
- this.setData( {键名:new键值}):设置
	data: {
	  name:"zhangsan",
	  age:"18"
	 },
	 /**
	  \* 生命周期函数--监听页面加载
	  */
	 onLoad: function (options) {
	  this._login()
	 },
	 _login:function(){
	  console.log("login ok")
	 },
	 _fn:function(){
	  this.setData({
	    age:2
	  })
	 },
- 页面的处理函数
// pages/demo1/demo1.js
Page({

  /**
   * 页面的初始数据
   */
  data: {
      num:1,
  },
  //页面的下拉刷新,必须先把enablePullDownRef开启才可以出发该事件函数
  onPullDownRefresh(){
    console.log("demo1的下拉刷新")
    this.setData({
      num:2
    })
    console.log(this)
  },
  //默认是距离底部有50px的时候,触发该函数,如果想改变距离,设置onReachBottomDistance就可以
    onReachBottom(){
    console.log("demo1的上拉刷新")
  },

  // 页面滑动事件
  onPageScroll(e){
    console.log("页面的滚动事件",e)
  }

})
1.3.3getCurrentPages
- 获取当前的页面栈,页面栈是一个数组,用户访问过的页面都记录在这个数组里,方便用户返回
- 数组中第一个元素为首页,最后一个元素为当前页面。
- 不要尝试修改页面栈,会导致路由以及页面状态错误。
- 不要在 App.onLaunch 的时候调用 getCurrentPages(),此时 page 还没有生成。
1.4小程序的页面生命周期
2小程序的视图层
2.1视图层的概念
- 框架的视图层由 WXML 与 WXSS 编写,由组件来进行展示。
- 将逻辑层的数据反映成视图,同时将视图层的事件发送给逻辑层。
- WXML(WeiXin Markup language) 用于描述页面的结构。
- WXSS(WeiXin Style Sheet) 用于描述页面的样式。
- 组件(Component)是视图的基本组成单元。
2.2wxml(小程序的结构)
- 放置组件+要渲染的数据
- 数据绑定
 {{msg}}


主人下马客在船


{{1+2+num}}


{{1+2+"3"}}

{{1+"2"+3}}

{{ store>=60?"及格":"不及格" }}


 {{arr[0]}}
 {{arr[1]}}
 {{arr[2]}}

   {{obj.name}}------{{obj.text}}
- 注意:无论是普通的数据绑定,还是属性绑定,或者是其他的,只要进行数据渲染,都需要加{{}}
- 列表渲染
      {{index}}-------{{item}}


   {{index1}}-------{{item1}}
   {{index}}


  {{index}}-----{{item}}
pages/demo2/demo2.wxml

   {{index}}------ {{item}}


  {{index}}-----{{item.id}}-----{{item.name}}------{{item.price}}


  {{item}}


  {{item}}


      {{item}}
- 条件渲染
pages/demo3/demo3.wxml


 及格


 优秀
 中等
 不及格


 内容

 内容一
数据绑定
{{name}}
{{age}}
绑定属性
{{age}}
关键字的处理
- true和false是关键字,使用时也要使用
{{}}
运算
- 算术运算
{{age+1}}
- 逻辑运算
- 字符串运算
{{name+"三"}}
- 路径运算
{{arr[0]}}
{{user.height}}
- 三元运算符
{{user.height}}
2.2.2列表渲染
  data: {
    name:"zhangsan",
    age:17,
    title:"我是标题",
    arr:[1,2,3],
    user:{
        height:180,
        weight:"150"
    },
    goods:[{
        id:1,
        name:"小米"
    },{
        id:2,
        name:"华为"
    }],
    string:"abcdefg"
  },
--------遍历数组-----------

  {{index}}---{{item}}


  {{key}}---{{vo}}

--------遍历对象-----------

  {{index}}---{{item}}


  {{key}}---{{vo}}

--------遍历数组对象-----------

  {{index}}---{{item.id}}---{{item.name}}

--------遍历字符串-----------

  {{index}}---{{item}}

--------遍历数字-----------

  {{index}}---{{item}}


  {{item.id}}
  {{item.name}}
block是包裹元素
- 不会渲染到页面上,不能在上面写属性
wx:key
-
如果列表中项目的位置会动态改变或者有新的项目添加到列表中,并且希望列表中的项目保持自己的特征和状态(如 input 中的输入内容,switch 的选中状态),需要使用 wx:key 来指定列表中项目的唯一的标识符。
-
wx:key 的值以两种形式提供
- 字符串,代表在 for 循环的 array 中 item 的某个 property,该 property 的值需要是列表中唯一的字符串或数字,且不能动态改变。
- 保留关键字 *this 代表在 for 循环中的 item 本身,这种表示需要 item 本身是一个唯一的字符串或者数字。
-
当数据改变触发渲染层重新渲染的时候,会校正带有 key 的组件,框架会确保他们被重新排序,而不是重新创建,以确保使组件保持自身的状态,并且提高列表渲染时的效率。
-
如不提供 wx:key,会报一个 warning, 如果明确知道该列表是静态,或者不必关注其顺序,可以选择忽略。
2.2.3条件渲染
- 使用判断时也可以使用block包裹元素
成年

成年
未成年

成年
青少年
少年
wx:if vs hidden
- 因为 wx:if 之中的模板也可能包含数据绑定,所以当 wx:if 的条件值切换时,框架有一个局部渲染的过程,因为它会确保条件块在切换时销毁或重新渲染。
- 同时 wx:if 也是惰性的,如果在初始渲染条件为 false,框架什么也不做,在条件第一次变成真的时候才开始局部渲染。
- 相比之下,hidden 就简单的多,组件始终会被渲染,只是简单的控制显示与隐藏。
- 一般来说,wx:if 有更高的切换消耗而 hidden 有更高的初始渲染消耗。因此,如果需要频繁切换的情景下,用 hidden 更好,如果在运行时条件不大可能改变则 wx:if 较好。
2.2.4模板(了解)
- 什么是模板
- WXML提供模板(template),可以在模板中定义代码片段,然后在不同的地方调用。
- 如何定义模板
name="名字"
- 如何使用模板
is="相对应的模板名字"
- 在其他页面使用模板
- 模板的传参
要在模板中定义

pages/demo4/demo4.wxml


  姓名:{{name}}
  年龄:{{age}}
- 在页面文件中使用
- 引用
- import和inclue引入
include 可以将目标文件除了 - wxss
- WXSS (WeiXin Style Sheets)是一套样式语言,用于描述 WXML 的组件样式。
- 尺寸单位
- 设计稿尺寸 750 640
设计稿的元素宽度2px/设计稿的宽度750px = 设计布局的宽度2rpx/设备的宽度750rpx

设计稿的元素宽度2px/设计稿的宽度640px = 设计布局的宽度2rpx/设备的宽度750rpx
- 样式导入
/* pages/demo6/demo6.wxss */
@import "/common/my.wxss";

.box{
  width: 100rpx;
  height: 100rpx;
  background-color: red;
}
- 内联样式
- 选择器
- 全局样式和局部样式
定义模板
  我是页面的头部


  我是页面的底部
使用模板
我是cate
使用模板并且向模板中传值
- js
data: {
    style:"style1",
    temp:{
      nav:[{
        id:1,
        name:"男装"
      },{
        id:2,
        name:"女装"
      }],
      name:"aaa"
    }
  },
- wxml
    {{item.name}}
    {{name}}
import
- import可以在该文件中使用目标文件定义的template,import
只引入目标文件中的template模板,其余的一概不引入
- C import B,B import A,在C中可以使用B定义的
template,在B中可以使用A定义的template,但是C不能使用A定义的template。
include
include可以将目标文件除了include位置
2.3wxss(小程序的样式)
2.3.1wxss的概念
- WXSS (WeiXin Style Sheets)是一套样式语言,用于描述 WXML 的组件样式。
- WXSS 用来决定 WXML 的组件应该怎么显示。
- 为了适应广大的前端开发者,WXSS 具有 CSS 大部分特性。同时为了更适合开发微信小程序,WXSS 对 CSS 进行了扩充以及修改。
- 与 CSS 相比,WXSS 扩展的特性有:
- 尺寸单位
- 样式导入
2.3.2尺寸单位
- rpx(responsive pixel): 可以根据屏幕宽度进行自适应。
规定屏幕宽为750rpx。如在 iPhone6 上,屏幕宽度为375px,共有750个物理像素,则750rpx = 375px = 750物理像素,1rpx = 0.5px = 1物理像素。
| 设备 | rpx换算px (屏幕宽度/750) | px换算rpx (750/屏幕宽度) |
|---|---|---|
| iPhone5 | 1rpx = 0.42px | 1px = 2.34rpx |
| iPhone6 | 1rpx = 0.5px | 1px = 2rpx |
| iPhone6 Plus | 1rpx = 0.552px | 1px = 1.81rpx |
- 建议: 开发微信小程序时设计师可以用 iPhone6 作为视觉稿的标准。
- 注意: 在较小的屏幕上不可避免的会有一些毛刺,请在开发时尽量避免这种情况。
2.3.3样式导入
- 使用
@import语句可以导入外联样式表,@import后跟需要导入的外联样式表的相对路径,用;表示语句结束。
@import "../../common/cart.wxss";
2.3.4内联样式
- style:静态的样式统一写到 class 中。style 接收动态的样式,在运行时会进行解析,请尽量避免将静态的样式写进 style 中,以免影响渲染速度
nihao
- class:用于指定样式规则,其属性值是样式规则中类选择器名(样式类名)的集合,样式类名不需要带上
.,样式类名之间用空格分隔。
nihao
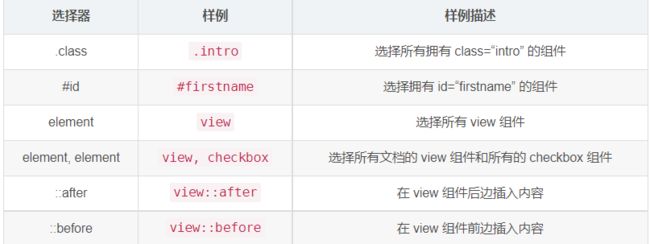
2.3.5选择器
- 目前支持的选择器有:(尽量使用class,因为组件有一个样式隔离)
2.3.6全局样式和局部样式
- 定义在 app.wxss 中的样式为全局样式,作用于每一个页面。在 page 的 wxss 文件中定义的样式为局部样式,只作用在对应的页面,并会覆盖 app.wxss 中相同的选择器。
3事件系统
3.1事件的概念
- 事件是视图层到逻辑层的通讯方式。
- 事件可以将用户的行为反馈到逻辑层进行处理。
- 事件可以绑定在组件上,当达到触发事件,就会执行逻辑层中对应的事件处理函数。
- 事件对象可以携带额外信息,如 id, dataset, touches。
3.2事件的基本的使用
3.2.1事件的绑定
- 我们可以使用
bind+事件类型 = "函数名"或者使用catch+事件类型 = "函数名"来绑定事件 - wxml
事件1
事件1
- js
  箭头函数拿不到this  建议在写事件函数的不要用箭头函数

  _fn1:function(){
    console.log("我被触发了fn1")
  },
  _fn2(){
    console.log("我被触发了fn2")
  },
事件函数中的this
//将this重新赋值
let money=[10,20,30]
    let that=this
    let new_money=money.map(function(item){
      return item+that.data.add
    })
    console.log(new_money)
//使用箭头函数
let money=[10,20,30]
    let new_money=money.map((item)=>{
      return item+this.data.add
    })
    console.log(new_money)
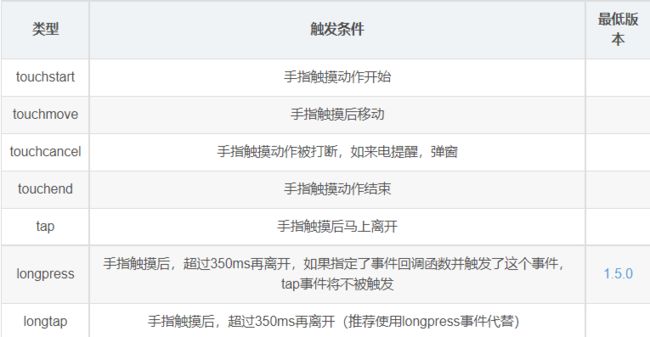
3.2.2事件的类型
-
冒泡事件,非冒泡事件
- 冒泡事件:当一个组件上的事件被触发后,该事件会向父节点传递。
- 非冒泡事件:当一个组件上的事件被触发后,该事件不会向父节点传递。
-
冒泡事件
- 除上表之外的其他组件自定义事件如无特殊声明都是非冒泡事件,如 form 的
submit事件,input 的input事件,scroll-view 的scroll事件
3.2.3事件的绑定和冒泡
- 使用catch绑定事件会阻止事件冒泡,使用bind绑定的事件不会阻止冒泡,在哪里阻止事件冒泡,就绑定在哪个元素上
3.2.4事件对象
- 在触发事件时会产生一个事件对象,事件对象中包含很多信息
- 事件对象中的值
type:什么事件触发的。touches:事件发生的位置,detail:子组件传递过来的数据就放在detail。currentTarget:事件绑定的元素。target:事件触发的元素。
3.2.4.1小程序传递参数
- 事件如何传参和接参(重要)
- 传参
id
	接参  e.target.id
		 e.currentTaget.id

data-*(自定义的参数名)
		接参  e.target.dataset.id
			 e.currentTarget.dataset.id
- 小程序传递参数可以通过id,通过data-参数名称=“参数的值”这个数据进行传参,获取参数通过事件对象获取。
- 通过id传参,可以使用事件对象e.currentTarget.id 进行获取,只能传递一个参数。
- 通过==data-参数名称=“参数的值”==这个数据进行传参,使用事件对象中的e.currentTarget.dataset获取
//推荐使用的传参方式,参数名称比如data-user-sex====>userSex//传递的参数可以是对象/数组
总结:
- 如果事件没有冒泡,触发的元素也是绑定的元素target和currentTarget的值是一样的,使用哪一个都可以。
- 如果事件有冒泡,触发的元素和绑定的元素是不一样的target和currentTarget的值是不一样的,使用时要慎重。
- 以后在哪个元素上绑定事件,就在哪个元素上传参数,获取参数统一都是用currentTarget去获取参数
- 注意事项
- bind和catch有什么区别?
- bind是冒泡
- catch是阻止冒泡
- target和currentTarget有什么区别?
- target 是触发事件的事件源
- currentTarget 是事件触发的当前组件
1组件基础
1.1基础组件
- 框架为开发者提供了一系列基础组件,开发者可以通过组合这些基础组件进行快速开发。详细介绍请参考组件文档。
- 什么是组件:
- 组件是视图层的基本组成单元。
- 组件自带一些功能与微信风格一致的样式。
- 一个组件通常包括
开始标签和结束标签,属性用来修饰这个组件,内容在两个标签之内。
Content goes here ...
- 注意:所有组件与属性都是小写,以连字符
-连接
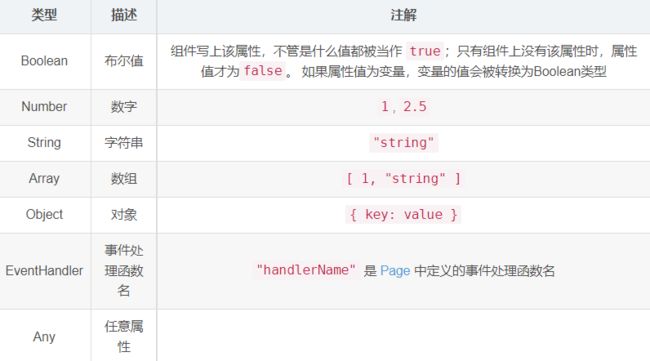
1.2属性的类型
1.3公共的属性
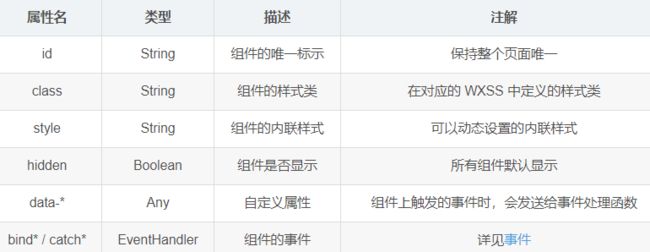
- 任何一个组件上都可以写的属性
1.4私有属性
- 几乎所有组件都有各自定义的属性,可以对该组件的功能或样式进行修饰,一般会将这些属性写成一个文档
2基础内容
icon(图标)
progress
text
  文本 内容


  文本 内容


  文本>内容
{{goods_info}}
rich-text(富文本)
nodes 节点列表string/array
string形式
二级标题数组
// 标签名是节点node 标签内容是text
//节点类型
type:"node",
name:"h2", //标签名
attrs:{class:"box1"}, //标签身上的属性
children:[
{
type:"text",
text:"二级标题数组"
}
]
}
]
3容器组件
view(视图容器)
我是son
swiper
swiper的基础使用
swiper
pages/demo04/demo04.wxml
封装指示点
pages/demo05/demo05.wxml
/* pages/demo05/demo05.wxss */
image{
  width: 100%;
  height: 100%;
}
.banner{
  position: relative;
}
.dots{
  position: absolute;
  left: 0;
  bottom: 0;
  width: 100%;
  text-align: center;
}
.dots text{
  width: 40rpx;
  height: 20rpx;
  display: inline-block;
  background: #ccc;
  margin-left: 10rpx;
}

.dots .active{
  background-color: red;
}
// pages/demo05/demo05.js
Page({

  /**
   * 页面的初始数据
   */
  data: {

    arr:[
      "/logo/1.jpg",
      "/logo/2.jpg",
      "/logo/3.jpg",
    ],
    _currentIndex:0,
    num:1
  },

  _change(e){
      // console.log(e.detail.current)
     // 异步
      this.setData({
        _currentIndex:e.detail.current,

      },function(){
        // console.log(this.data.num++)
      })

      // 如果变量经过赋值改变之后,要渲染在视图层,建议写setdata进行改变值
      // 如果变量只在js文件中使用,可以直接进行赋值,不需要再setdata里面改变

      console.log( this.data.num++)
  }
})
自定义指示点的形状
- wxml文件
- wxss文件
/* pages/swiper/swiper.wxss */

.container{

  position: relative;

}

.container .dots{

  width: 100%;

  position: absolute;

  bottom: 20rpx;

  text-align: center;

}

.dots text{

  display: inline-block;

  width:20rpx;

  height:8rpx;

  margin-left:10rpx;

  background-color:#333;

}

text.active{

  background-color: blue;

}

.img{

  width: 100%;

}
- js文件
 /**

   \* 页面的初始数据

   */

  data: {

    banner:["1.jpg","2.jpg","3.jpg"],

    currentIndex:0

  },

  _changeImg:function(e){

    this.setData({

      currentIndex:e.detail.current

    })

  },
scroll-view
scroll-view
- 可滚动视图区域
pages/demo06/demo06.wxml


         {{item.title}}


      {{item.title}}
        {{item1.text}}
_change(e){

    console.log(e.target.dataset.index)
    this.setData({
        _currentIndex:e.target.dataset.index
    })

  },
scroll-view基本使用
  分类1

  分类1

  分类1

  分类1

  分类1

  分类1

  分类1

  分类1

  分类1

  分类1

  分类1


  分类1

  分类1

  分类1

  分类1

  分类1

  分类1

  分类1

  分类1

  分类1

  分类1

  分类1
- wxss
/* pages/scroll/scroll.wxss */

.scroll-x{

  white-space: nowrap;

}

.scroll-x view {

  display: inline-block;

  padding:10rpx;

  background-color: #ccc;

  margin:0rpx 10rpx;

}

.scroll-y{

  height:600rpx;

  width:400rpx;

  border:1rpx solid #ccc

}

.scroll-y view {

  width: 400rpx;

  height:270rpx;

  background-color: #ccc;

  margin-bottom: 10rpx;

}
使用scroll-view模拟京东分类页
- wxml文件
    分类1

    分类2

    分类3

    分类4

    分类5

    分类6

    分类7

    分类8


      分类1子分类

      分类1子分类

      分类1子分类

      分类1子分类


      分类2子分类

      分类2子分类

      分类2子分类

      分类2子分类


      分类3子分类

      分类3子分类

      分类3子分类

      分类3子分类


      分类4子分类

      分类4子分类

      分类4子分类

      分类4子分类


      分类5子分类

      分类5子分类

      分类5子分类

      分类5子分类


      分类6子分类

      分类6子分类

      分类6子分类

      分类6子分类


      分类7子分类

      分类7子分类

      分类7子分类

      分类7子分类


      分类8子分类

      分类8子分类

      分类8子分类

      分类8子分类
- js文件
  data: {

    view:"cate1"

  },

  _scrollview:function(e){

    let {cate}=e.currentTarget.dataset

    this.setData({

      view:cate

    })

  },
- wxss文件
/* pages/scroll-view/scroll-view.wxss */

.container{

  display: flex;

  height:800rpx;

}

.left{

  width:200rpx;

  height:800rpx;

}

.left view{

  height:120rpx;

  line-height: 120rpx;

  text-align: center;

  margin-bottom:20rpx;

  background-color: #ccc;

}

.right{

  width:550rpx;

  height:800rpx;

}

.right view{

  width: 550rpx;

  height:400rpx;

  background-color: #ccc;

  margin-bottom:20rpx;

}

.right view text{

  display: inline-block;

  padding: 20rpx;

  margin:10rpx;

  background-color: #fff;

}
4媒体组件
image
- 图片,支持 JPG、PNG、SVG、WEBP、GIF 等格式(支持网络图片和在线资源图片)
5表单组件
注意
-
radio-group需要和radio组件一起使用
-
checkbox-group需要和checkbox一起使用
-
switch组件也有checkbox,值为true和false
-
怎么区分button中的提交和重置 利用button组件的form-type属性
-
如何一次获取全部表单数据 button按钮的form-type属性和form组件的bindsubmit事件一起使用,还需要在每个表单组件身上绑定name属性
- wxss
/* pages/form/form.wxss */

.page{

  padding: 10rpx;

}

.page view{

  margin:15rpx;

}

.title{

  height:80rpx;

  line-height: 80rpx;

  padding-left: 10rpx;

  font-weight: bold;

  color:#fff;

  background-color: orangered;

}

view label{

  font-size: 36rpx;

  font-weight: bold;

}

.input{

  height:80rpx;

  border:1rpx solid #ccc;

  margin-top:10rpx;

  border-radius: 10rpx;

  padding-left: 10rpx;

}
- js
data: {
name:"",
tel:"",
sex:"男",
hobby:[],
agree:false,
score:60,
arr:[{
id:1,
name:"有氧运动"
},{
id:2,
name:"无氧运动"
}],
index:0
},
_submit:function(e){
console.log(e)
},
_inputSport:function(e){
this.setData({
index:e.detail.value
})
},
_inputName:function(e){
this.setData({
name:e.detail.value
})
},
_inputPhone:function(e){
this.setData({
tel:e.detail.value
})
},
_inputSex:function(e){
this.setData({
sex:e.detail.value
})
},
_inputHobby:function(e){
this.setData({
hobby:e.detail.value
})
},
_inputAgree:function(e){
this.setData({
agree:e.detail.value
})
},
_inputScore:function(e){
this.setData({
score:e.detail.value
})
},
6导航组件
- 类似于H5中的a标签(可以进行页面跳转和页面链接)
navigator
target
open-type
pages/demo1/demo1.wxml
- navigate:保留当前的页面到页面栈。新的页面也会入栈。
跳转到商品详情
- 应用场景:登录,注册
- switchTab:所有页面会出栈,tarbar页面入栈,跳转到tabbar页面
跳转cart
- 应用场景:只能用于跳转tabbar页面
- reLaunch永久重定向),所有的页面会出栈,新页面入栈
跳转列表
- 应用场景:支付完成后跳转。
- navigateBack:返回的页面,返回一次,页面就出栈一次。
返回
api跳转方式
- API
_goHome(){
wx.navigateTo({
url: '/pages/homework/homework',
success:(res)=>{
console.log(res)
// 逻辑
},
fail:(err)=>{
console.log(err)
},
// 无论成功或者失败,都会执行的回调函数
complete:(res)=>{
console.log(res)
}
})
},
传递参数
navigator传参
小米手机
api跳转传参
  _goDetail:function(){

    wx.navigateTo({

     url: '../detail/detail?id=2&name=华为&price=80000',

    })

  },
API路由接收参数
- 在对应页面中的onload中的参数中可以拿到传递的参数
  onLoad: function (options) {

    console.log(options)

  },
- 注意:switchTab的跳转方式不能够传参
打开其他小程序
星座和运势
7模块化
7.1模块化的概念
- 可以将一些公共的代码抽离成为一个单独的 js 文件,作为一个模块,使用es6规范或者使用commonjs规范进行暴露,使用使用引入就可以使用了
7.2模块化的好处
- 代码的复用性较高
- 避免了变量污染
- 提高了开发效率
7.3模块化的规范
es6规范
- 一般用于前端的比较多些。
commonjs规范
- 一般用于后端的比较多些。
es6的规范
分别暴露(export)
const name='swk'

const say=()=>{

  console.log("say")

}

export {

  name,

  say

}
使用
import {name,say} from '../../utils/tool'
默认暴露
const name='swk'

const say=()=>{

  console.log("saying")

}

export default {

  name,

  say

}
使用
import tool from '../../utils/tool'

console.log(tool.name)
commonJs的规范
暴露
const name='swk'

const say=()=>{

  console.log("saying")

}

module.exports={

  name,

  say

}
使用
const tool=require("../../utils/tool")

console.log(tool.name)

tool.say()
- 小程序两种规范都支持,建议使用es6方式。
8组件化
8.1组件化的概念
- 开发者可以将页面内的功能模块抽象成自定义组件,以便在不同的页面中重复使用;也可以将复杂的页面拆分成多个低耦合的模块,有助于代码维护。自定义组件在使用时与基础组件非常相似
8.2组件化的优点
- 代码的结构复用性高
- 有利提高开发效率
- 有利于测试和后期维护
8.3小程序组件的使用
1定义组件
- 在小程序的项目目录下,新建一个文件夹components,为了方便管理一个组件就是一个目录,右击新建component,生成组件文件
- **.js:组件的逻辑
// components/test/test.js

Component({

  /**

   \* 组件的属性列表,外部传递的值

   */

  properties: {

  },

  /**

   \* 组件的初始数据,组件的内部的值

   */

  data: {

  },

  /**

   \* 组件的方法列表,组件的方法

   */

  methods: {

  }

})
- **.json: 组件的配置
{

  "component": true,  //说明这是一个组件

  "usingComponents": {}  //注册组件用的

}
- **.wxss:组件的样式
- **.wxml:组件的结构
2注册组件
全局注册
- 在app.json中使用userComponents进行注册,注册完成后在所有的页面都可以使用
 "usingComponents": {
  "my-test":"/components/test/test"
 },
局部注册
- 在页面对应的配置文件中使用userComponents进行注册,注册完成后只能在本页面使用
3 使用组件
8.4小程序组件的传值
父组件往子组件传值
- 在组件逻辑层
properties: {
name:{
type:'String',
value:""
},
age:{
type:'Number',
value:18
}
},
- 组件的视图层
我是{{name}}我的年龄:{{age}}
- 使用组件时
子组件往父组件传值
- 组件的wxml
- 组件的js
methods: {
_hander:function()
this.triggerEvent("get",{name:"hello"+this.properties.name,age:this.properties.age+1})
}
}
- 父组件调用组件wxml
- 父组件的逻辑层
_getUser:function(e){
console.log(e)
},
8.5组件中的slot
- 那么我们要在定义组件时指定这个插槽插在哪里如下:
我是{{name}}我的年龄:{{age}}
- 指定完插槽后可以在使用组件时写组件的内容
我是默认的插槽
- 如果有多个内容显示到组件的不同的地方则使用具名插槽
- 在组件的逻辑中,说明使用具名插槽
Component({
  options: {
    multipleSlots: true // 在组件定义时的选项中启用多slot支持
  },
  properties: { /* ... */ },
  methods: { /* ... */ }
})
- 定义组件结构时使用具名插槽
  我是{{name}}


  我的年龄:{{age}}
- 使用组件时
  我是头部的插槽

  我是默认的插槽

  我是底部的插槽
8.6生命周期
Component({
  lifetimes: {
    attached: function() {
      // 在组件实例进入页面节点树时执行
    },
    detached: function() {
      // 在组件实例被从页面节点树移除时执行
    },
  },
  // 以下是旧式的定义方式,可以保持对 <2.2.3 版本基础库的兼容
  attached: function() {
    // 在组件实例进入页面节点树时执行
  },
  detached: function() {
    // 在组件实例被从页面节点树移除时执行
  },
  // ...
})
- 主要注意基础调试库版本
8.7样式隔离
- 默认情况下,自定义组件的样式只受到自定义组件 wxss 的影响。除非以下两种情况:
- app.wxss 或页面的 wxss 中使用了标签名选择器(或一些其他特殊选择器)来直接指定样式,这些选择器会影响到页面和全部组件。通常情况下这是不推荐的做法。尽量使用class选择器
- 指定特殊的样式隔离选项 styleIsolation 默认就使用样式隔离。
8.8自定义封装swiper组件
- 小程序中的组件
- 基础组件–容器组件–媒体组件—导航组件–表单
- 模块化
- es6
- 分别暴露(export { }) import { } from " "
- 默认暴露(export default { }) import 取名 from " "
- commonjs
- module.exports require
- 组件化
- 组件的定义----组件注册----组件的使用----组件的传值
- api–weui—分包—小程序的运行机制----小程序更新机制—小程序的兼容性
1小程序中的Api
https://developers.weixin.qq.com/miniprogram/dev/framework/app-service/api.html
- 微信小程序框架给开发者提供的 接口 函数,方法
1.1概念
- 小程序开发框架提供丰富的微信原生 API,可以方便的调起微信提供的能力,如获取用户信息,本地存储,支付功能等。详细介绍请参考 API 文档。
1.2小程序的三种类型
-
从接口的风格分成三种类型
-
我们约定,以
on开头的 API 用来监听某个事件是否触发,如:wx.onSocketOpen,wx.onCompassChange 等。 -
这类 API 接受一个回调函数作为参数,当事件触发时会调用这个回调函数,并将相关数据以参数形式传入。
-
代码示例
wx.onCompassChange(function (res) {
  console.log(res.direction)
})
同步api
- 我们约定,以 Sync 结尾的 API 都是同步 API, 如 wx.setStorageSync,wx.getSystemInfoSync 等。此外,也有一些其他的同步 API,如 wx.createWorker,wx.getBackgroundAudioManager 等,详情参见 API 文档中的说明。
- 同步 API 的执行结果可以通过函数返回值直接获取,如果执行出错会抛出异常。
- 代码示例
try {
  wx.setStorageSync('key', 'value')
} catch (e) {
  console.error(e)
}
异步api
- 大多数 API 都是异步 API,如 wx.request,wx.login 等。这类 API 接口通常都接受一个
Object类型的参数,这个参数都支持按需指定以下字段来接收接口调用结果: - Object 参数说明
| 参数名 | 类型 | 必填 | 说明 |
|---|---|---|---|
| success | function | 否 | 接口调用成功的回调函数 |
| fail | function | 否 | 接口调用失败的回调函数 |
| complete | function | 否 | 接口调用结束的回调函数(调用成功、失败都会执行) |
| 其他 | Any | - | 接口定义的其他参数 |
1.3获取系统信息
- 同步写法
 let info=wx.getSystemInfoSync()

 console.log(info)
- 异步写法
wx.getSystemInfo({
success:res=>{
console.log(res)
},
fail:err=>{
}
})
1.4交互的api
 _show:function(){

  wx.showToast({

   title: '显示成功',

   icon:"none",

   duration:5000

  })

 },

 _hide:function(){

  wx.hideToast()

 },
wx.showLoading({
      title:"加载中"
})
wx.hideLoading()
wx.showModal({

   title:"系统提示",

   content:"请先完善个人信息",

   confirmText:"前往",

   cancelText:"放弃",

   success:res=>{
    console.log(res)
   }
  })
wx.showActionSheet({

   alertText:"请选择",

   itemList:["订单查询","联系客服","联系商家"],

   success:res=>{
    if(res.tapIndex==0){
    }
    if(res.tapIndex==1){
    }
   }
})
1.5导航的api
wx.setNavigationBarTitle({

   title: '首页',

  })

  wx.setNavigationBarColor({

   backgroundColor: '#00ff00',

   frontColor: '#ffffff',

   animation: {

    duration: 400,

    timingFunc: 'easeIn'

   }

  })
wx.showTabBarRedDot({

   index: 2,

  })

  wx.setTabBarBadge({

   index: 1,

   text: '5',

  })

  wx.setBackgroundColor({

   backgroundColor: '#0000ff',

  })
1.6路由的api
- wx.switchTab:只能跳转到tabbar页面,所有的页面出栈,新页面入栈
- reLaunch:所有的页面出栈,新页面入栈
- redirectTo:当前的页面出栈,新页面入栈
- navigateTo:新页面入栈
- navigateBack:页面不断出栈
1.7缓存api
- 浏览器存储
- localstorage cookie sessionstorage
- localstorage:只能存储基本数据,不能存储数组和对象 ,可以使用将数组和对象转成json字符串存进去,没有时间限制,手动删除和卸载浏览器消失。
- 小程序中的缓存:能存各种格式数组对象,手动删除,删除小程序
- 添加
wx.setStorageSync('name', "zhangsan")

    wx.setStorageSync('userinfo',{

      age:18,

      sex:1

    })

   wx.setStorage({

     data:{

       id:1,

       goods_name:"小米"

     },

     key: 'goods',

    })
- 删除
wx.clearStorage()

wx.clearStorageSync()
wx.getStorage({

     key: 'userinfo',

     success:res=>{

       console.log(res)

     }

    })

let goods= wx.getStorageSync('goods')

console.log(goods)
- 获取
wx.getStorage({
 key: 'userinfo',

 success:res=>{

   console.log(res)

 }

})

let goods= wx.getStorageSync('goods')

console.log(goods)
- 修改
- 重新存数据就相当覆盖
1.8网络请求
- http协议(客户端【浏览器,小程序】和服务器共同遵守的约定)
- http请求
- 请求地址
- 请求方式
- 携带的数据
- 发送数据的格式
- 请求的数据格式
http响应
-
响应的状态码
- 100:请求还没有完成
- 200:请求成功
- 302:请求重定向
- 304:使用客户端的缓存
- 403:没有权限访问
- 404:没有找到资源
- 500:服务的问题。
-
响应的内容
- json
get请求
_getProduct:function(){
wx.request({

 url: 'http://localhost:3000/product',

 method:"get",

 data:{

   id:1,

   name:"zhansan"

 },

 header:{

  "content-type":"application/x-www-form-urlencoded",

 },

 success:res=>{

  console.log(res)

 },

})
post请求
wx.request({
url: 'http://localhost:3000/login',
method:"post",
header:{
"content-type":"application/x-www-form-urlencoded",
},
data:{
tel:"12345",
pwd:"123"
},
success:res=>{
console.log(res)
}
})
},
data 参数说明
-
最终发送给服务器的数据是 String 类型,如果传入的 data 不是 String 类型,会被转换成 String 。转换规则如下:
-
对于 GET 方法的数据,会将数据转换成 query string(encodeURIComponent(k)=encodeURIComponent(v)&encodeURIComponent(k)=encodeURIComponent(v)…)
-
对于 POST 方法且 header[‘content-type’] 为 application/json 的数据,会对数据进行 JSON 序列化
-
对于 POST 方法且 header[‘content-type’] 为 application/x-www-form-urlencoded 的数据,会将数据转换成 query string (encodeURIComponent(k)=encodeURIComponent(v)&encodeURIComponent(k)=encodeURIComponent(v)…)
总结
- 对于get请求,请求header设置成什么类型不行影响get请求,因为get携带参数是在url地址后面且使用的是query string的形式。
- 对post请求 如果header设置成application/josn 传输的数据会json序列化,后端得解析才能拿到数据。
- 对post请求 如果header设置成application/x-www-form-urlencoded 传输的数据会querystring,后端不用解析就能拿到数据。
网络请求的封装
const baseUrl="http://localhost:3000"
const http=(option)=>{
return new Promise((resolve,reject)=>{
wx.request({
url:baseUrl+option.url,
method:option.method||"get",
data:option.data||{},
header:option.header||{
"content-type":"application/x-www-form-urlencoded",
},
success:resolve,
fail:reject
})
})
}
export {
http
}
2weui的使用
2.1概念
https://developers.weixin.qq.com/community/develop/article/doc/000ecc775a86807f7ba9b7dc956c13
- 这是一套基于样式库weui-wxss开发的小程序扩展组件库,同微信原生视觉体验一致的UI组件库,由微信官方设计团队和小程序团队为微信小程序量身设计,令用户的使用感知更加统一。
2.2项目背景
随着小程序的普及,微信也有很多内部小程序在开发,每个小程序都需要从零到1进行开发设计,而这个过程中,有大量的UI交互是重复的,另外,微信内部已经有一套H5版本的WeUI样式库。综合考虑,我们基于WeUI样式库开发了小程序版本的UI组件库,在内部多个小程序项目已经使用OK的情况下,我们把这套组件库开源让外部开发者也可以使用,欢迎大家Star以及提Issue。
2.3weui快速上手
2.3.1引入weui
1使用扩展库的方式(推荐)
- 优点:不占用小程序的代码量,缺点,看不到组件在哪里,目录比较难写
- 在app.json 中引入下面的配置
 "useExtendedLib": {

    "weui": true

   },
- 使用扩展库的方式引入weui不需要引入样式
2 使用npm的方式进行构建
- 缺点:占小程序的代码量。
- 开发者工具中开启使用npm模块----详情—本地设置—勾选使用npm模块
- 在小程序目录下初始化npm包 npm init -y
- 下载weui组件库 npm install weui-miniprogram
- 在开发者工具中进行构建npm,上线时node_module不会上传上去 工具----构建npm 构建完成后生成一个miniprogram_npm 目录,该目录下就放置weui组件
2.3.2weui组件的使用
- 如果使用的npm构建的方式先导入weui样式库
@import '/miniprogram_npm/weui-miniprogram/weui-wxss/dist/style/weui.wxss';
- 注册:参考昨天的注册方式—使用组件
2.4使用weui完成订单页面
首页 |返回
- js文件
data: {
tab:[{
text:"物流查询",
iconPath:"/static/icon/dd.png",
selectedIconPath:"/static/icon/ddFull.png"
},{
text:"物流查询",
iconPath:"/static/icon/dd.png",
selectedIconPath:"/static/icon/ddFull.png",
badge:"3"
},{
text:"物流查询",
iconPath:"/static/icon/dd.png",
selectedIconPath:"/static/icon/ddFull.png",
},{
text:"物流查询",
iconPath:"/static/icon/dd.png",
selectedIconPath:"/static/icon/ddFull.png",
}],
groups:[
{ text: '示例菜单', value: 1 },
{ text: '示例菜单', value: 2 },
{ text: '负向菜单', type: 'warn', value: 3 }
],
show:false
},
_goIndex:function(){
wx.switchTab({
url: '../index/index',
})
},
_switchTab:function(e){
if(e.detail.index==1){
}
},
_showAction:function(){
this.setData({
show:true
})
},
- wxss文件
/* pages/order/order.wxss */

.back{

  padding: 10rpx;

  border:1rpx solid #ccc;

  border-radius: 25rpx;

}

image{

  width: 40rpx;

  height: 40rpx;

}
- json文件
{

 "usingComponents": {

  "mp-navigation-bar": "/miniprogram_npm/weui-miniprogram/navigation-bar/navigation-bar",

  "mp-icon": "/miniprogram_npm/weui-miniprogram/icon/icon",

  "mp-searchbar": "/miniprogram_npm/weui-miniprogram/searchbar/searchbar",

  "mp-tabbar": "/miniprogram_npm/weui-miniprogram/tabbar/tabbar",

  "mp-cells": "/miniprogram_npm/weui-miniprogram/cells/cells",

  "mp-cell": "/miniprogram_npm/weui-miniprogram/cell/cell",

  "mp-actionSheet": "/miniprogram_npm/weui-miniprogram/actionsheet/actionsheet"

 },

 "navigationStyle":"custom"

}
3分包机制
https://developers.weixin.qq.com/miniprogram/dev/framework/subpackages.html
3.1基础分包
概念
-
某些情况下,开发者需要将小程序划分成不同的子包,在构建时打包成不同的分包,用户在使用时按需进行加载。
-
在构建小程序分包项目时,构建会输出一个或多个分包。每个使用分包小程序必定含有一个主包。所谓的主包,即放置默认启动页面/TabBar 页面,以及一些所有分包都需用到公共资源/JS 脚本;而分包则是根据开发者的配置进行划分。
-
在小程序启动时,默认会下载主包并启动主包内页面,当用户进入分包内某个页面时,客户端会把对应分包下载下来,下载完成后再进行展示。
-
一个小程序如果使用分包技术,必须有一个主包,至少有一个分包,公共的资源和首页和tabbar必须放在主包
-
目前小程序分包大小有以下限制:
- 整个小程序所有分包大小不超过 20M
- 单个分包/主包大小不能超过 2M
优点
- 将小程序的代码的限制提升到20M。对小程序运行速度影响很
分包的实现
- 开发者通过在 app.json
subpackages字段声明项目分包结构:
"subPackages": [{
"root":"animate",
"pages":[
"pages/cat/cat",
"pages/dog/dog"
]
},{
"root":"firut",
"pages":[
"pages/orange/orange",
"pages/pear/pear"
]
}],
打包原则
-
声明 subpackages 后,将按 subpackages 配置路径进行打包,subpackages 配置路径外的目录将被打包到 app(主包) 中
-
app(主包)也可以有自己的 pages(即最外层的 pages 字段)
-
subpackage 的根目录不能是另外一个 subpackage 内的子目录
-
tabBar 页面必须在 app(主包)内
引用原则
- packageA 无法 require packageB JS 文件,但可以 require app、自己 package 内的 JS 文件
- packageA 无法 import packageB 的 template,但可以 require app、自己 package 内的 template
- packageA 无法使用 packageB 的资源,但可以使用 app、自己 package 内的资源
低版本兼容问题
- 由微信后台编译来处理旧版本客户端的兼容,后台会编译两份代码包,一份是分包后代码,另外一份是整包的兼容代码。 新客户端用分包,老客户端还是用的整包,完整包会把各个
subpackage里面的路径放到 pages 中。
3.2独立分包
概述
- 独立分包是小程序中一种特殊类型的分包,可以独立于主包和其他分包运行。从独立分包中页面进入小程序时,不需要下载主包。当用户进入普通分包或主包内页面时,主包才会被下载。
- 开发者可以按需将某些具有一定功能独立性的页面配置到独立分包中。当小程序从普通的分包页面启动时,需要首先下载主包;而独立分包不依赖主包即可运行,可以很大程度上提升分包页面的启动速度。
实现
"subPackages": [{
"root":"animate",
"pages":[
"pages/cat/cat",
"pages/dog/dog"
],
"independent": true
},{
"root":"firut",
"pages":[
"pages/orange/orange",
"pages/pear/pear"
]
}],
限制
- 独立分包中不能依赖主包和其他分包中的内容,包括js文件、template、wxss、自定义组件、插件等。主包中的
app.wxss对独立分包无效,应避免在独立分包页面中使用app.wxss中的样式; App只能在主包内定义,独立分包中不能定义App,会造成无法预期的行为;
关于getApp
- 与普通分包不同,独立分包运行时,App 并不一定被注册,因此 getApp() 也不一定可以获得 App 对象:
- 当用户从独立分包页面启动小程序时,主包不存在,App也不存在,此时调用 getApp() 获取到的是 undefined。 当用户进入普通分包或主包内页面时,主包才会被下载,App 才会被注册。
- 当用户是从普通分包或主包内页面跳转到独立分包页面时,主包已经存在,此时调用 getApp() 可以获取到真正的 App。
2云开发
2.1云开发的概述
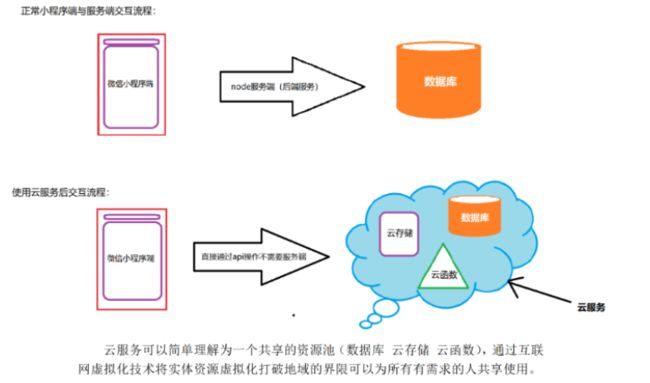
- 开发者可以使用云开发开发微信小程序、小游戏,无需搭建服务器,即可使用云端能力。
- 云开发为开发者提供完整的原生云端支持和微信服务支持,弱化后端和运维概念,无需搭建服务器,使用平台提供的 API 进行核心业务开发,即可实现快速上线和迭代,同时这一能力,同开发者已经使用的云服务相互兼容,并不互斥。
2.2传统开发模式vs云开发模式
- 学习云环境+学会操作云环境的api。
- 公司里使用的是传统的开发模式,云开发比较少。
2.3云开发好处
- 对于个人来说,不需后端,一个人就可以上线一个完整的小程序
- 对于公司,节省成本(服务器),初创型公司选择使用云开发。
2.4开通云环境
- 一个账号可以免费创建两个云环境,两个环境的配置一样(数据库,存储空间),各个环境是相互独立的
- 用户开通云开发后即创建了一个环境,建议一个是测试环境xxx-test,另一个是线上环境 xxx-release
2.5云环境的管理后台
- 图形化管理云环境的工具
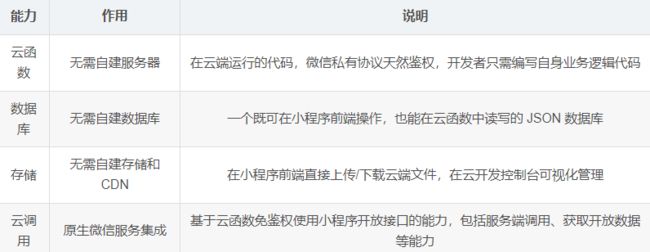
2.6云开发能力的介绍
2.6.1数据库
- 云开发提供了一个 JSON 数据库,顾名思义,数据库中的每条记录都是一个 JSON 格式的对象。一个数据库可以有多个集合(相当于关系型数据中的表),集合可看做一个 JSON 数组,数组中的每个对象就是一条记录,记录的格式是 JSON 对象。
| 关系型 | 文档型 |
|---|---|
| 数据库 database | 数据库 database |
| 表 table | 集合 collection |
| 行 row | 记录 record / doc |
| 列 column | 字段 field |
2.6.2云存储
- 云开发提供了一块存储空间,提供了上传文件到云端、带权限管理的云端下载能力,开发者可以在小程序端和云函数端通过 API 使用云存储功能。
2.6.3云函数
- 就是运行在云环境上的函数
2.7小程序云开发api的使用
- 云开发提供了一整套云服务及简单、易用的 API 和管理界面,以尽可能降低后端开发成本,让开发者能够专注于核心业务逻辑的开发、尽可能轻松的完成后端的操作和管理。
2.7.1初始化云环境
- 在app.js中的onlaunch中告诉小程序使用哪个云环境
onLaunch: function () {
if (!wx.cloud) {
console.error('请使用 2.2.3 或以上的基础库以使用云能力')
} else {
wx.cloud.init({
env: 'music-dev-wi2lv',
traceUser: true,
})
}
}
2.7.2使用api操作数据库
1初始化数据库的连接
const db=wx.cloud.database()
增
- mysql:insert Into 表 (字段1,字段2,字段3,…) values(‘val1’,‘val2’,‘val3’…)
- db.collection(表名).add(data:{ 字段名:字段值,…},success:res=>{ })
- db.collection(表名).add(data:{ 字段名:字段值,…}).then(res=>{ })
db.collection("test").add({
data:{
book_name:"西游记",
book_pirce:120,
book_author:"吴承恩",
book_tag:["神话","古装"]
},
success:res=>{
console.log(res)
}
})
db.collection("test").add({
data:{
book_name:"西游记",
book_pirce:1200,
book_author:"吴承恩",
book_tag:["神话","古装"]
}
}).then(res=>{
console.log(res)
})
- 插入成功后res返回插入数据的_id值
删
db.collection(表名).where({ 匹配的字段名:字段值 }).remove().then(res=>{ })
_delete:function(){
db.collection("test").where({
book_pirce:1200
}).remove().then(res=>{
console.log(res)
})
},
改
| API | 说明 |
|---|---|
| update | 局部更新一个或多个记录 |
| set | 替换更新一个记录 |
db.collection(表名).doc("id值").update/set({data:{要更新的字段名:更新后的字段值}}).then(res=>{ })
db.collection("test")
.doc("21ded5cb5fe59586000dbef439a762df").update({
data:{
"book_name":"大话西游"
}
}).then(res=>{
console.log(res)
})
db.collection("test")
.doc("21ded5cb5fe59586000dbef439a762df").set({
data:{
"book_name":"大话西游"
}
}).then(res=>{
console.log(res)
})
查
- 使用doc通过主键查询获取单条数据,doc只能放置主键id
- db.collection(表名).doc(“id值”).get().then(res=>{ })
- db.collection(表名).where({ 匹配的字段名:字段值,…}).get().then(res=>{ })
//使用doc通过主键查询获取单条数据,doc只能放置主键id
db.collection(“test”)
.doc("023ce9555fe590a6000c372d714bcc02")

.get().then(res=>{

  console.log(res)

})
db.collection(“test”)
.where({

  book_author:"吴承恩",

  book_pirce:120

})

.get().then(res=>{

  console.log(res)

})
2.7.3使用api操作存储空间
上传文件
_selectImg:function(){
wx.chooseImage({
count: 9,
success:res=>{
this.setData({
fileList:res.tempFilePaths
})
}
})
},
_upload:function(){
this.data.fileList.forEach((item,index)=>{
let ext=item.split(".").pop()
let file=(new Date).getTime()+index+"."+ext
wx.cloud.uploadFile({
cloudPath:file,
filePath:item
}).then(res=>{
console.log(res)
})
})
},
下载文件
wx.cloud.downloadFile({
fileID:"cloud://music-dev-wi2lv.6d75-music-dev-wi2lv-1302673657/1.jpg"
}).then(res=>{
wx.saveFile({
tempFilePath:res.tempFilePath,
success:res=>{
console.log(res)
wx.showToast({
title: '下载成功',
})
}
})
})
删除文件
_deleteImg:function(){
wx.cloud.deleteFile({
fileList:[" cloud://music-dev-wi2lv.6d75-music-dev-wi2lv-1302673657/1608885426389.jpg","cloud://music-dev-wi2lv.6d75-music-dev-wi2lv-1302673657/1608885426387.jpg"]
}).then(res=>{
console.log(res)
})
},
2.7.4云函数的使用
1定义云函数
- 右击cloudfunctions目录—新建node.js云函数—云函数放在index.js中
- 云函数新建成功后就会部署到云环境上,修改云函数文件后要重新上传 右击云函数—上传并部署。
- 云函数自带了用户的登录体系。
- 总结:获取openid方法有两种
- 通过登录形式获取
- 通过云函数的方式
const cloud = require('wx-server-sdk')
//初始化云能力
cloud.init()
// 云函数入口函数
exports.main = async (event, context) => {
const wxContext = cloud.getWXContext()
let sum=event.a+event.b
return {
sum,
openid: wxContext.OPENID
}
}
2使用云函数
wx.cloud.callFunction({
name:"g_sum",
data:{
a:1003,
b:3849
}
}).then(res=>{
console.log(res)
})
- 使用云函数删除多条记录
// 云函数入口文件
const cloud = require('wx-server-sdk')
cloud.init()
// 云函数入口函数
const db=cloud.database()
exports.main = async (event, context) => {
const wxContext = cloud.getWXContext()
let res=await db.collection(event.table).where(event.where).remove()
return {
openid: wxContext.OPENID,
res
}
}
3 软件的开发流程
-
1 市场调研
- 市场专员---------------市场调研报告
-
2 需求分析
- 产品经理
- 做什么功能 ----功能模块图
- 确定系统的流程图
- 原型图
- 需求分析文档
-
3 概要设计
- 项目经理
- 站在整个系统上整理系统的功能图,系统流程图,E-R-概要设计文档
-
4 详细设计
- 站在功能模块的角度上设计----详细设计文档。
- ui设计工程师—根据原型图–设计页面的视觉稿
-
5 编码
- git svn 禅道
- web前端工程师 2
- 后端开发工程师 3
- Android开发工程师 1
- ios开发工程师 1
-
6 测试
- 测试工程师
-
7 上线运维
- linux运维工程师,网络工程师,监控工程师,架构师
-
8 产品运营
- 运营

