- JSON 与 AJAX
Auscy
jsonajax前端
一、JSON(JavaScriptObjectNotation)1.数据类型与语法细节支持的数据类型:基本类型:字符串(需用双引号)、数字、布尔值(true/false)、null。复杂类型:数组([])、对象({})。严格语法规范:键名必须用双引号包裹(如"name":"张三")。数组元素用逗号分隔,最后一个元素后不能有多余逗号。数字不能以0开头(如012会被解析为12),不支持八进制/十六进制
- JavaScript 树形菜单总结
Auscy
microsoft
树形菜单是前端开发中常见的交互组件,用于展示具有层级关系的数据(如文件目录、分类列表、组织架构等)。以下从核心概念、实现方式、常见功能及优化方向等方面进行总结。一、核心概念层级结构:数据以父子嵌套形式存在,如{id:1,children:[{id:2}]}。节点:树形结构的基本单元,包含自身信息及子节点(若有)。展开/折叠:子节点的显示与隐藏切换,是树形菜单的核心交互。递归渲染:因数据层级不固定,
- 精通Canvas:15款时钟特效代码实现指南
烟幕缭绕
本文还有配套的精品资源,点击获取简介:HTML5的Canvas是一个用于绘制矢量图形的API,通过JavaScript实现动态效果。本项目集合了15种不同的时钟特效代码,帮助开发者通过学习绘制圆形、线条、时间更新、旋转、颜色样式设置及动画效果等概念,深化对Canvas的理解和应用。项目中的CSS文件负责时钟的样式设定,而JS文件则包含实现各种特效的逻辑,通过不同的函数或类处理时间更新和动画绘制,提
- 深入剖析OpenJDK 18 GA源码:Java平台最新发展
想法臃肿
本文还有配套的精品资源,点击获取简介:OpenJDK18GA作为Java开发的关键里程碑,提供了诸多新特性和改进。本文章深入探讨了OpenJDK18GA源码,揭示其内部机制,帮助开发者更好地理解和利用这个版本。文章还涵盖了PatternMatching、SealedClasses、Records、JEP395、JEP406和JEP407等特性,以及HotSpot虚拟机、编译器、垃圾收集器、内存模型
- docker-compose方式搭建lnmp环境——筑梦之路
筑梦之路
linux系统运维国产化dockerandroidadb
docker-compose.yml文件#生成docker-compose.ymlcat>docker-compose.ymlnginx/conf.d/default.conf">www/index.phpecho"开始启动服务..."docker-composeup-d#获取本机ipip_addr=$(hostname-I|awk'{print$1}')echo"部署完成!"echo"访问测试页
- Android ViewBinding 使用与封装教程
积跬步DEV
Android开发实战大全android
AndroidViewBinding使用与封装教程:一、ViewBinding是什么?核心功能:为每个XML布局文件自动生成一个绑定类(如ActivityMainBinding),直接暴露所有带ID的视图引用。优点:避免繁琐的findViewById(),类型安全且编译时检查。对比DataBinding:ViewBinding仅处理视图引用,无数据绑定功能。DataBinding支持双向数据绑定,
- Java大厂面试实录:谢飞机的电商场景技术问答(Spring Cloud、MyBatis、Redis、Kafka、AI等)
Java大厂面试实录:谢飞机的电商场景技术问答(SpringCloud、MyBatis、Redis、Kafka、AI等)本文模拟知名互联网大厂Java后端岗位面试流程,以电商业务为主线,由严肃面试官与“水货”程序员谢飞机展开有趣的对话,涵盖SpringCloud、MyBatis、Redis、Kafka、SpringSecurity、AI等热门技术栈,并附详细解析,助力求职者备战大厂面试。故事设定谢
- 【超硬核】JVM源码解读:Java方法main在虚拟机上解释执行
HeapDump性能社区
java开发语言后端jvm
本文由HeapDump性能社区首席讲师鸠摩(马智)授权整理发布第1篇-关于Java虚拟机HotSpot,开篇说的简单点开讲Java运行时,这一篇讲一些简单的内容。我们写的主类中的main()方法是如何被Java虚拟机调用到的?在Java类中的一些方法会被由C/C++编写的HotSpot虚拟机的C/C++函数调用,不过由于Java方法与C/C++函数的调用约定不同,所以并不能直接调用,需要JavaC
- 算法学习笔记:17.蒙特卡洛算法 ——从原理到实战,涵盖 LeetCode 与考研 408 例题
在计算机科学和数学领域,蒙特卡洛算法(MonteCarloAlgorithm)以其独特的随机抽样思想,成为解决复杂问题的有力工具。从圆周率的计算到金融风险评估,从物理模拟到人工智能,蒙特卡洛算法都发挥着不可替代的作用。本文将深入剖析蒙特卡洛算法的思想、解题思路,结合实际应用场景与Java代码实现,并融入考研408的相关考点,穿插图片辅助理解,帮助你全面掌握这一重要算法。蒙特卡洛算法的基本概念蒙特卡
- Java大厂面试故事:谢飞机的互联网音视频场景技术面试全纪录(Spring Boot、MyBatis、Kafka、Redis、AI等)
来旺
Java场景面试宝典JavaSpringBootMyBatisKafkaRedis微服务AI
Java大厂面试故事:谢飞机的互联网音视频场景技术面试全纪录(SpringBoot、MyBatis、Kafka、Redis、AI等)互联网大厂技术面试不仅考察技术深度,更注重业务场景与系统设计能力。本篇以严肃面试官与“水货”程序员谢飞机的对话,带你体验音视频业务场景下的Java面试全过程,涵盖主流技术栈,并附详细答案解析,助你面试无忧。故事场景设定谢飞机是一名有趣但技术基础略显薄弱的程序员,这次应
- 【前端】jQuery数组合并去重方法总结
在jQuery中合并多个数组并去重,推荐使用原生JavaScript的Set对象(高效简单)或$.unique()(仅适用于DOM元素,不适用于普通数组)。以下是完整解决方案:方法1:使用ES6Set(推荐)//定义多个数组constarr1=[1,2,3];constarr2=[2,3,4];constarr3=[3,4,5];//合并数组并用Set去重constmergedArray=[...
- 配音助手:自媒体神器,内置海量音色的语音,支持多主播配音
阿幸软件杂货间
媒体
软件介绍内置文字转语音,提供多个主播音色,男声、女声、小孩、方言。支持的场景也是比较多,比如:广告促销、有声读物、广播配音、影视配音、Ai配音等。这个软件是免费的,只不过需要通过手机号码登录就可以使用全部功能了。软件下载夸克下载
- CentOS7环境卸载MySQL5.7
Hadoop_Liang
mysql数据库mysql
备份重要数据切记,卸载之前先备份mysql重要的数据。备份一个数据库例如:备份名为mydatabase的数据库到backup.sql的文件中mysqldump-uroot-ppassword123mydatabase>backup.sql备份所有数据库mysqldump-uroot-ppassword123--all-databases>all_databases_backup.sql注意:-p后
- centos7安装 mysql5.7(安装包)
heiPony
linuxmysqlmariadbcentosmysql
一.卸载centos7自带数据库查看系统自带的Mariadbrpm-qa|grepmariadbmariadb-libs-5.5.44-2.el7.centos.x86_64卸载rpm-e--nodepsmariadb-libs-5.5.44-2.el7.centos.x86_64删除etc目录下的my.cnfrm/etc/my.cnf二.检查mysql是否存在(有就卸载,删除相关文件)rpm-q
- EMQX 社区版单机和集群部署
pcj_888
MQTTMQTTEMQ
EMQ支持Docker,宿主机,k8s部署;支持单机或集群部署。以下给出EMQX社区版单机和集群部署方法1.Docker单机部署官方推荐最小配置:2核4G下载容器镜像dockerpullemqx/emqx:5.3.2启动容器dockerrun-d--nameemqx\-p1883:1883\-p8083:8083\-p8883:8883\-p8084:8084\-p18083:18083\emqx
- MySQL Explain 详解:从入门到精通,让你的 SQL 飞起来
引言:为什么Explain是SQL优化的“照妖镜”?在Java开发中,我们常常会遇到数据库性能瓶颈的问题。一条看似简单的SQL语句,在数据量增长到一定规模后,可能会从毫秒级响应变成秒级甚至分钟级响应,直接拖慢整个应用的性能。此时,你是否曾困惑于:为什么这条SQL突然变慢了?索引明明建了,为什么没生效?到底是哪里出了问题?答案就藏在MySQL的EXPLAIN命令里。EXPLAIN就像一面“照妖镜”,
- Linux/Centos7离线安装并配置MySQL 5.7
有事开摆无事百杜同学
LInux/CentOS7linuxmysql运维
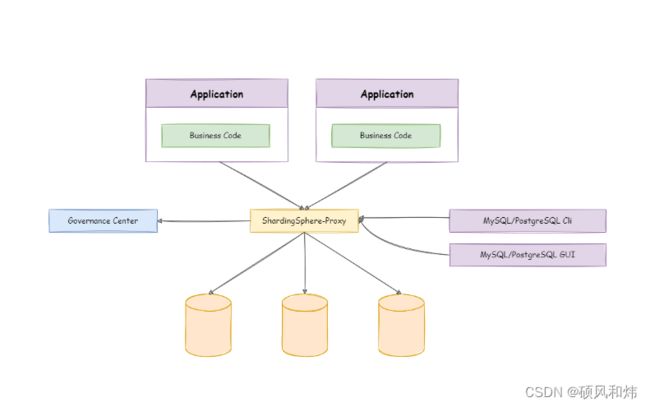
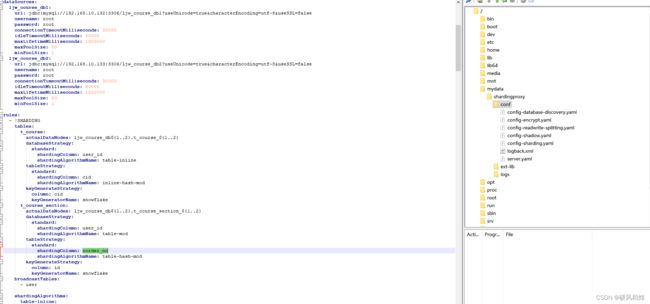
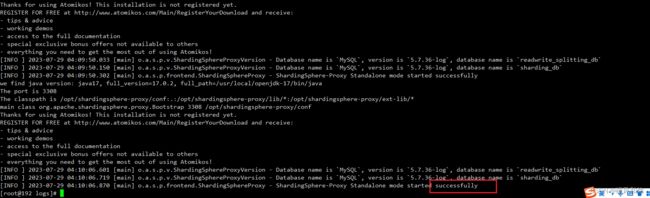
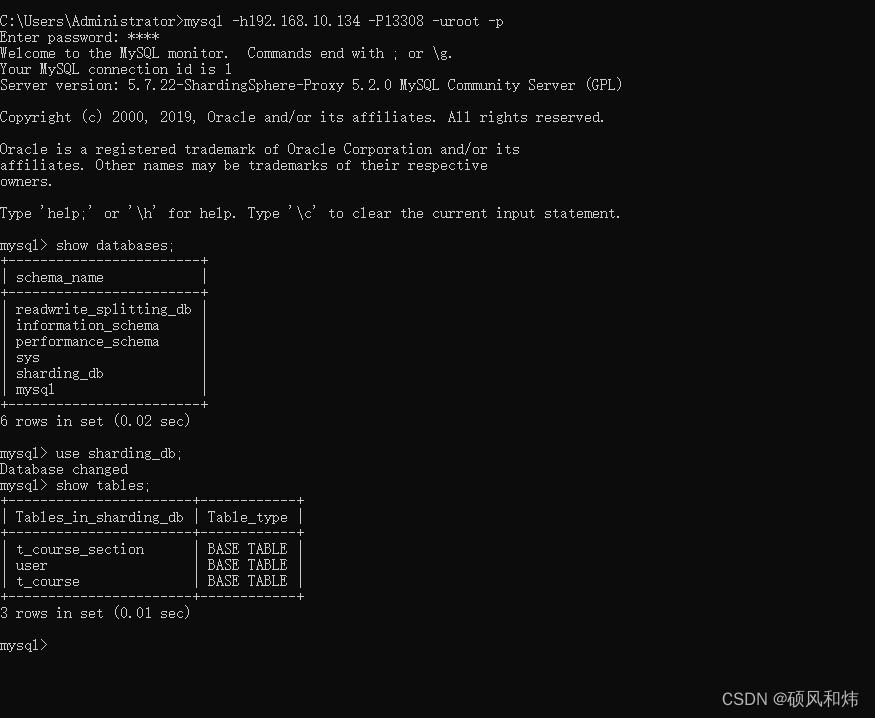
Linux/Centos7离线安装并配置MySQL5.7超详细教程一、环境准备1.下载MySQL5.7离线包2.使用rpm工具卸载MariaDB(避免冲突)3.创建系统级别的MySQL专用用户二、安装与配置1.解压并重命名MySQL目录2.创建数据目录和配置文件3.设置目录权限4.初始化MySQL5.配置启动脚本6.配置环境变量三、启动与验证1.启动MySQL服务2.获取初始密码3.登录并修改密码
- docker安装node部分问题
自律的蜗牛
docker容器node.js
sudonlatestsudo:n:commandnotfound如果运行sudonlatest时出现:sudo:n:commandnotfound说明n版本管理工具未安装或未添加到PATH环境变量。解决方案1️⃣先检查n是否已安装运行:whichn或者:command-vn如果有输出/usr/local/bin/n,说明n已安装,但可能需要sudo访问。如果没有任何输出,说明n没有安装,跳到方法
- 本地包解决npm error code E404
雅痞yuppie
npm前端node.js
这个错误提示表明npm找不到名为create-vue-admin-cli的包。这是因为你开发的CLI工具还没有发布到npm官方注册表。要解决这个问题,有两种方法:方法一:使用本地开发模式测试1.确保你的CLI已正确链接到全局在你的vue-admin-cli项目根目录下执行:npmlink这会在全局环境中创建一个符号链接,指向你本地的CLI项目。2.使用本地链接的CLI创建项目直接使用命令:vue-
- Java特性之设计模式【责任链模式】
Naijia_OvO
Java特性java设计模式责任链模式
一、责任链模式概述顾名思义,责任链模式(ChainofResponsibilityPattern)为请求创建了一个接收者对象的链。这种模式给予请求的类型,对请求的发送者和接收者进行解耦。这种类型的设计模式属于行为型模式在这种模式中,通常每个接收者都包含对另一个接收者的引用。如果一个对象不能处理该请求,那么它会把相同的请求传给下一个接收者,依此类推主要解决:职责链上的处理者负责处理请求,客户只需要将
- 日历插件-FullCalendar的详细使用
老马聊技术
JavaScript前端javascript
一、介绍FullCalendar是一个功能强大、高度可定制的JavaScript日历组件,用于在网页中显示和管理日历事件。它支持多种视图(月、周、日等),可以轻松集成各种框架,并提供丰富的事件处理功能。二、实操案例具体代码如下:FullCalendar日期选择body{font-family:Arial,sans-serif;margin:20px;}#calendar{max-width:900
- 玩转Docker | 使用Docker部署gopeed下载工具
心随_风动
玩转Dockerdocker容器运维
玩转Docker|使用Docker部署gopeed下载工具前言一、gopeed介绍Gopeed简介主要特点二、系统要求环境要求环境检查Docker版本检查检查操作系统版本三、部署gopeed服务下载镜像创建容器检查容器状态检查服务端口安全设置四、访问gopeed应用五、测试与下载六、总结前言在当今信息爆炸的时代,高效地获取和管理网络资源变得尤为重要。无论是下载大型文件还是进行日常的数据传输,一个稳
- react-native android 环境搭建
环境:macjava版本:Java11最重要:一定要一定要一定要react涉及到很多的依赖下载,gradle和react相关的,第一次安装环境时有外网环境会快速很多。安装nodejs安装react-nativenpminstallreact-native-clinpminstallreact-native创建一个新项目react-nativeinitfirstReact替换gradle下载源rep
- Docker指定网桥和指定网桥IP
$dockernetworklsNETWORKIDNAMEDRIVER7fca4eb8c647bridgebridge9f904ee27bf5nonenullcf03ee007fb4hosthostBridge默认bridge网络,我们可以使用dockernetworkinspect命令查看返回的网络信息,我们使用dockerrun命令是将网络自动应用到新的容器Host如果是hosts模式,启动容
- Java 调用 HTTP 接口的 7 种方式:全网最全指南
Java调用HTTP接口的7种方式:全网最全指南在开发过程中,调用HTTP接口是最常见的需求之一。本文将详细介绍Java中7种主流的调用HTTP接口的方式,包括每种工具的优缺点和完整代码实现。1.使用RestTemplateRestTemplate是Spring提供的同步HTTP客户端,适用于传统项目。尽管从Spring5开始被标记为过时,它仍然是许多开发者的首选。示例代码importorg.sp
- Java三年经验程序员技术栈全景指南:从前端到架构,对标阿里美团全栈要求
可曾去过倒悬山
java前端架构
Java三年经验程序员技术栈全景指南:从前端到架构,对标阿里美团全栈要求三年经验是Java程序员的分水岭,技术栈深度决定你成为“业务码农”还是“架构师候选人”。本文整合阿里、美团、滴滴等大厂招聘要求,为你绘制可落地的进阶路线。一、Java核心:从语法糖到JVM底层三年经验与初级的核心差异在于系统级理解,大厂面试常考以下能力:JVM与性能调优内存模型(堆外内存、元空间)、GC算法(G1/ZGC适用场
- docker0网卡没有ip一步解决
ξ流ぁ星ぷ132
tcp/ip网络服务器
正常查看ip的时候一直显示没有ip这里先删除docker0网卡iplinkdeletedocker0然后重启服务systemctlrestartdocker再次查看显示有ip了并且查看配置文件也是正常的cat/etc/docker/daemon.json{"registry-mirrors":["https://docker.m.daocloud.io","https://docker.imgdb
- javascript高级程序设计第3版——第12章 DOM2与DOM3
weixin_30687587
javascript数据结构与算法ViewUI
12章——DOM2与DOM3为了增强D0M1,DOM级规范定义了一些模块。DOM2核心:为不同的DOM类型引入了一些与XML命名空间有关的方法,还定义了以编程方式创建Document实例的方法;DOM2级样式:针对操作元素的样式而开发;其特性总结:1.每个元素都有一个关联的style对象,可用来确定和修改行内样式;2.要确定某个元素的计算样式,可使用getComgetComputedStyle()
- Java设计模式实战:高频场景解析与避坑指南
mckim_
笔记学习java设计模式
引言设计模式是软件开发的基石,但许多开发者面对23种模式时容易陷入“学完就忘”或“滥用模式”的困境。本文从工业级项目视角出发,精选10种高频设计模式,结合真实代码案例与主流框架应用,帮你建立模式思维,拒绝纸上谈兵。一、创建型模式:告别new的暴力美学1.工厂方法模式(FactoryMethod)核心痛点:对象创建逻辑散落各处,难以统一管理。场景案例:电商平台需要支持多种支付方式(支付宝、微信、银联
- JavaScript 基础09:Web APIs——日期对象、DOM节点
梦想当全栈
JavaScriptjavascript前端开发语言
JavaScript基础09:WebAPIs——日期对象、DOM节点进一步学习DOM相关知识,实现可交互的网页特效能够插入、删除和替换元素节点。能够依据元素节点关系查找节点。一、日期对象掌握Date日期对象的使用,动态获取当前计算机的时间。ECMAScript中内置了获取系统时间的对象Date,使用Date时与之前学习的内置对象console和Math不同,它需要借助new关键字才能使用。1.实例
- 安装数据库首次应用
Array_06
javaoraclesql
可是为什么再一次失败之后就变成直接跳过那个要求
enter full pathname of java.exe的界面
这个java.exe是你的Oracle 11g安装目录中例如:【F:\app\chen\product\11.2.0\dbhome_1\jdk\jre\bin】下的java.exe 。不是你的电脑安装的java jdk下的java.exe!
注意第一次,使用SQL D
- Weblogic Server Console密码修改和遗忘解决方法
bijian1013
Welogic
在工作中一同事将Weblogic的console的密码忘记了,通过网上查询资料解决,实践整理了一下。
一.修改Console密码
打开weblogic控制台,安全领域 --> myrealm -->&n
- IllegalStateException: Cannot forward a response that is already committed
Cwind
javaServlets
对于初学者来说,一个常见的误解是:当调用 forward() 或者 sendRedirect() 时控制流将会自动跳出原函数。标题所示错误通常是基于此误解而引起的。 示例代码:
protected void doPost() {
if (someCondition) {
sendRedirect();
}
forward(); // Thi
- 基于流的装饰设计模式
木zi_鸣
设计模式
当想要对已有类的对象进行功能增强时,可以定义一个类,将已有对象传入,基于已有的功能,并提供加强功能。
自定义的类成为装饰类
模仿BufferedReader,对Reader进行包装,体现装饰设计模式
装饰类通常会通过构造方法接受被装饰的对象,并基于被装饰的对象功能,提供更强的功能。
装饰模式比继承灵活,避免继承臃肿,降低了类与类之间的关系
装饰类因为增强已有对象,具备的功能该
- Linux中的uniq命令
被触发
linux
Linux命令uniq的作用是过滤重复部分显示文件内容,这个命令读取输入文件,并比较相邻的行。在正常情 况下,第二个及以后更多个重复行将被删去,行比较是根据所用字符集的排序序列进行的。该命令加工后的结果写到输出文件中。输入文件和输出文件必须不同。如 果输入文件用“- ”表示,则从标准输入读取。
AD:
uniq [选项] 文件
说明:这个命令读取输入文件,并比较相邻的行。在正常情况下,第二个
- 正则表达式Pattern
肆无忌惮_
Pattern
正则表达式是符合一定规则的表达式,用来专门操作字符串,对字符创进行匹配,切割,替换,获取。
例如,我们需要对QQ号码格式进行检验
规则是长度6~12位 不能0开头 只能是数字,我们可以一位一位进行比较,利用parseLong进行判断,或者是用正则表达式来匹配[1-9][0-9]{4,14} 或者 [1-9]\d{4,14}
&nbs
- Oracle高级查询之OVER (PARTITION BY ..)
知了ing
oraclesql
一、rank()/dense_rank() over(partition by ...order by ...)
现在客户有这样一个需求,查询每个部门工资最高的雇员的信息,相信有一定oracle应用知识的同学都能写出下面的SQL语句:
select e.ename, e.job, e.sal, e.deptno
from scott.emp e,
(se
- Python调试
矮蛋蛋
pythonpdb
原文地址:
http://blog.csdn.net/xuyuefei1988/article/details/19399137
1、下面网上收罗的资料初学者应该够用了,但对比IBM的Python 代码调试技巧:
IBM:包括 pdb 模块、利用 PyDev 和 Eclipse 集成进行调试、PyCharm 以及 Debug 日志进行调试:
http://www.ibm.com/d
- webservice传递自定义对象时函数为空,以及boolean不对应的问题
alleni123
webservice
今天在客户端调用方法
NodeStatus status=iservice.getNodeStatus().
结果NodeStatus的属性都是null。
进行debug之后,发现服务器端返回的确实是有值的对象。
后来发现原来是因为在客户端,NodeStatus的setter全部被我删除了。
本来是因为逻辑上不需要在客户端使用setter, 结果改了之后竟然不能获取带属性值的
- java如何干掉指针,又如何巧妙的通过引用来操作指针————>说的就是java指针
百合不是茶
C语言的强大在于可以直接操作指针的地址,通过改变指针的地址指向来达到更改地址的目的,又是由于c语言的指针过于强大,初学者很难掌握, java的出现解决了c,c++中指针的问题 java将指针封装在底层,开发人员是不能够去操作指针的地址,但是可以通过引用来间接的操作:
定义一个指针p来指向a的地址(&是地址符号):
- Eclipse打不开,提示“An error has occurred.See the log file ***/.log”
bijian1013
eclipse
打开eclipse工作目录的\.metadata\.log文件,发现如下错误:
!ENTRY org.eclipse.osgi 4 0 2012-09-10 09:28:57.139
!MESSAGE Application error
!STACK 1
java.lang.NoClassDefFoundError: org/eclipse/core/resources/IContai
- spring aop实例annotation方法实现
bijian1013
javaspringAOPannotation
在spring aop实例中我们通过配置xml文件来实现AOP,这里学习使用annotation来实现,使用annotation其实就是指明具体的aspect,pointcut和advice。1.申明一个切面(用一个类来实现)在这个切面里,包括了advice和pointcut
AdviceMethods.jav
- [Velocity一]Velocity语法基础入门
bit1129
velocity
用户和开发人员参考文档
http://velocity.apache.org/engine/releases/velocity-1.7/developer-guide.html
注释
1.行级注释##
2.多行注释#* *#
变量定义
使用$开头的字符串是变量定义,例如$var1, $var2,
赋值
使用#set为变量赋值,例
- 【Kafka十一】关于Kafka的副本管理
bit1129
kafka
1. 关于request.required.acks
request.required.acks控制者Producer写请求的什么时候可以确认写成功,默认是0,
0表示即不进行确认即返回。
1表示Leader写成功即返回,此时还没有进行写数据同步到其它Follower Partition中
-1表示根据指定的最少Partition确认后才返回,这个在
Th
- lua统计nginx内部变量数据
ronin47
lua nginx 统计
server {
listen 80;
server_name photo.domain.com;
location /{set $str $uri;
content_by_lua '
local url = ngx.var.uri
local res = ngx.location.capture(
- java-11.二叉树中节点的最大距离
bylijinnan
java
import java.util.ArrayList;
import java.util.List;
public class MaxLenInBinTree {
/*
a. 1
/ \
2 3
/ \ / \
4 5 6 7
max=4 pass "root"
- Netty源码学习-ReadTimeoutHandler
bylijinnan
javanetty
ReadTimeoutHandler的实现思路:
开启一个定时任务,如果在指定时间内没有接收到消息,则抛出ReadTimeoutException
这个异常的捕获,在开发中,交给跟在ReadTimeoutHandler后面的ChannelHandler,例如
private final ChannelHandler timeoutHandler =
new ReadTim
- jquery验证上传文件样式及大小(好用)
cngolon
文件上传jquery验证
<!DOCTYPE html>
<html>
<head>
<meta http-equiv="Content-Type" content="text/html; charset=utf-8" />
<script src="jquery1.8/jquery-1.8.0.
- 浏览器兼容【转】
cuishikuan
css浏览器IE
浏览器兼容问题一:不同浏览器的标签默认的外补丁和内补丁不同
问题症状:随便写几个标签,不加样式控制的情况下,各自的margin 和padding差异较大。
碰到频率:100%
解决方案:CSS里 *{margin:0;padding:0;}
备注:这个是最常见的也是最易解决的一个浏览器兼容性问题,几乎所有的CSS文件开头都会用通配符*来设
- Shell特殊变量:Shell $0, $#, $*, $@, $?, $$和命令行参数
daizj
shell$#$?特殊变量
前面已经讲到,变量名只能包含数字、字母和下划线,因为某些包含其他字符的变量有特殊含义,这样的变量被称为特殊变量。例如,$ 表示当前Shell进程的ID,即pid,看下面的代码:
$echo $$
运行结果
29949
特殊变量列表 变量 含义 $0 当前脚本的文件名 $n 传递给脚本或函数的参数。n 是一个数字,表示第几个参数。例如,第一个
- 程序设计KISS 原则-------KEEP IT SIMPLE, STUPID!
dcj3sjt126com
unix
翻到一本书,讲到编程一般原则是kiss:Keep It Simple, Stupid.对这个原则深有体会,其实不仅编程如此,而且系统架构也是如此。
KEEP IT SIMPLE, STUPID! 编写只做一件事情,并且要做好的程序;编写可以在一起工作的程序,编写处理文本流的程序,因为这是通用的接口。这就是UNIX哲学.所有的哲学真 正的浓缩为一个铁一样的定律,高明的工程师的神圣的“KISS 原
- android Activity间List传值
dcj3sjt126com
Activity
第一个Activity:
import java.util.ArrayList;import java.util.HashMap;import java.util.List;import java.util.Map;import android.app.Activity;import android.content.Intent;import android.os.Bundle;import a
- tomcat 设置java虚拟机内存
eksliang
tomcat 内存设置
转载请出自出处:http://eksliang.iteye.com/blog/2117772
http://eksliang.iteye.com/
常见的内存溢出有以下两种:
java.lang.OutOfMemoryError: PermGen space
java.lang.OutOfMemoryError: Java heap space
------------
- Android 数据库事务处理
gqdy365
android
使用SQLiteDatabase的beginTransaction()方法可以开启一个事务,程序执行到endTransaction() 方法时会检查事务的标志是否为成功,如果程序执行到endTransaction()之前调用了setTransactionSuccessful() 方法设置事务的标志为成功则提交事务,如果没有调用setTransactionSuccessful() 方法则回滚事务。事
- Java 打开浏览器
hw1287789687
打开网址open浏览器open browser打开url打开浏览器
使用java 语言如何打开浏览器呢?
我们先研究下在cmd窗口中,如何打开网址
使用IE 打开
D:\software\bin>cmd /c start iexplore http://hw1287789687.iteye.com/blog/2153709
使用火狐打开
D:\software\bin>cmd /c start firefox http://hw1287789
- ReplaceGoogleCDN:将 Google CDN 替换为国内的 Chrome 插件
justjavac
chromeGooglegoogle apichrome插件
Chrome Web Store 安装地址: https://chrome.google.com/webstore/detail/replace-google-cdn/kpampjmfiopfpkkepbllemkibefkiice
由于众所周知的原因,只需替换一个域名就可以继续使用Google提供的前端公共库了。 同样,通过script标记引用这些资源,让网站访问速度瞬间提速吧
- 进程VS.线程
m635674608
线程
资料来源:
http://www.liaoxuefeng.com/wiki/001374738125095c955c1e6d8bb493182103fac9270762a000/001397567993007df355a3394da48f0bf14960f0c78753f000 1、Apache最早就是采用多进程模式 2、IIS服务器默认采用多线程模式 3、多进程优缺点 优点:
多进程模式最大
- Linux下安装MemCached
字符串
memcached
前提准备:1. MemCached目前最新版本为:1.4.22,可以从官网下载到。2. MemCached依赖libevent,因此在安装MemCached之前需要先安装libevent。2.1 运行下面命令,查看系统是否已安装libevent。[root@SecurityCheck ~]# rpm -qa|grep libevent libevent-headers-1.4.13-4.el6.n
- java设计模式之--jdk动态代理(实现aop编程)
Supanccy2013
javaDAO设计模式AOP
与静态代理类对照的是动态代理类,动态代理类的字节码在程序运行时由Java反射机制动态生成,无需程序员手工编写它的源代码。动态代理类不仅简化了编程工作,而且提高了软件系统的可扩展性,因为Java 反射机制可以生成任意类型的动态代理类。java.lang.reflect 包中的Proxy类和InvocationHandler 接口提供了生成动态代理类的能力。
&
- Spring 4.2新特性-对java8默认方法(default method)定义Bean的支持
wiselyman
spring 4
2.1 默认方法(default method)
java8引入了一个default medthod;
用来扩展已有的接口,在对已有接口的使用不产生任何影响的情况下,添加扩展
使用default关键字
Spring 4.2支持加载在默认方法里声明的bean
2.2
将要被声明成bean的类
public class DemoService {