SpringBoot学习(二)
一、SpringBoot简介
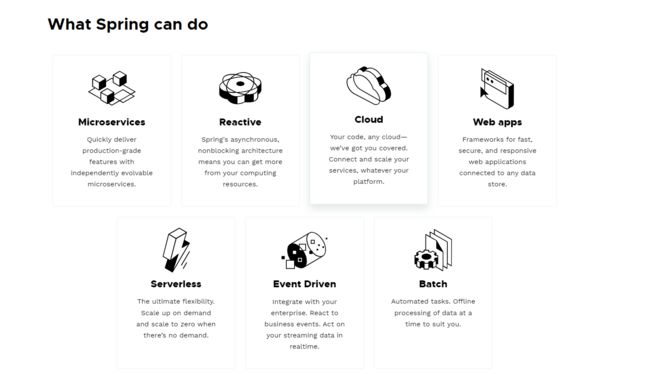
1.1、Spring能做什么
1.1.1、Spring的能力及生态
1.1.2、Spring5的响应式编程

1.2、SpringBoot是什么
百度百科:Spring Boot是由Pivotal团队提供的全新框架,其设计目的是用来简化新Spring应用的初始搭建以及开发过程。该框架使用了特定的方式来进行配置,从而使开发人员不再需要定义样板化的配置。通过这种方式,Spring Boot致力于在蓬勃发展的快速应用开发领域(rapid application development)成为领导者。
自我理解:SpringBoot是一个基于Spring框架的可以快速开发Web应用的轻量型框架,以前的Spring在开发Web应用的时候需要借助MVC,配置很多配置文件,整合MyBatis需要Spring和Mybatis的整合依赖以及配置文件等,SpringBoot的出现使得这一复杂的配置简化为了注解的方式。
1.3、SpringBoot的特点
- Create stand-alone Spring applications
- 独立创建一个Spring应用程序
- Embed Tomcat, Jetty or Undertow directly (no need to deploy WAR files)
- 内置Tomcat、Jetty、Undertow(不在需要部署WAR文件)
- Provide opinionated ‘starter’ dependencies to simplify your build configuration
- 提供自动的"starter"依赖,用于简化配置参数
- Automatically configure Spring and 3rd party libraries whenever possible
- 自动配置Spring以及第三方库
- Provide production-ready features such as metrics, health checks, and externalized configuration
- 提供生产级别的指标监控、健康检测、外部化配置
- Absolutely no code generation and no requirement for XML configuration
- 无代码生成不需要配置XML文件
1.4、时代背景
1.4.1、微服务
In short, the microservice architectural style is an approach to developing a single application as a suite of small services, each running in its own process and communicating with lightweight mechanisms, often an HTTP resource API. These services are built around business capabilities and independently deployable by fully automated deployment machinery. There is a bare minimum of centralized management of these services, which may be written in different programming languages and use different data storage technologies.
- 微服务是一种架构风格
- 一个应用拆分为一组小型服务
- 每个服务运行在自己的进程内,也就是可独立部署和升级
- 服务之间使用轻量级HTTP交互
- 服务围绕业务功能拆分
- 可以由全自动部署机制独立部署
- 去中心化,服务自治。服务可以使用不同的语言、不同的存储技术
1.4.2、分布式
1.4.3、云原生
1.5、如何学习SpringBoot
SpringBoot官方文档
https://docs.spring.io/spring-boot/docs/2.7.14/reference/html/
二、SpringBoot快速入门
2.1、创建maven项目


2.2、引入依赖
   <parent>
        <groupId>org.springframework.bootgroupId>
        <artifactId>spring-boot-starter-parentartifactId>
        <version>2.3.4.RELEASEversion>
    parent>
	<dependencies>
        <dependency>
            <groupId>org.springframework.bootgroupId>
            <artifactId>spring-boot-starter-webartifactId>
        dependency>
	dependencies>
2.3、添加主程序Application
package com.lzx.springboot.main;

import org.springframework.boot.SpringApplication;
import org.springframework.boot.autoconfigure.SpringBootApplication;

// TODO SpringBoot主程序入口
@SpringBootApplication
public class MainApplication {
    public static void main(String[] args) {
        SpringApplication.run(MainApplication.class,args);
    }
}
在java包下一定要包否则会报错
2.4、创建Controller、添加注解
package com.lzx.springboot.main.controller;
import org.springframework.web.bind.annotation.RequestMapping;
import org.springframework.web.bind.annotation.RestController;
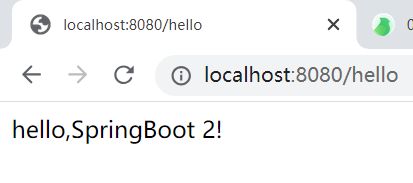
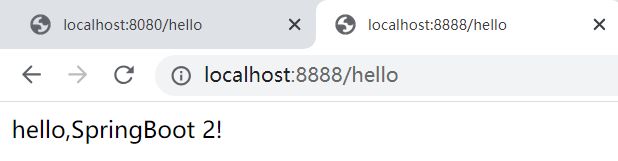
@RestController //包括 @Controller、@ResponseBody ==> 在浏览器中写入hello,SpringBoot 2!
public class HelloController {
@RequestMapping("/hello")
public String hello01() {
return "hello,SpringBoot 2!";
}
}
页面路由发生变化只是会在页面输出,不会发生页面跳转,需要用@ResponseBody进行标注。@RestController包含了@Controller、@ResponseBody两个注释
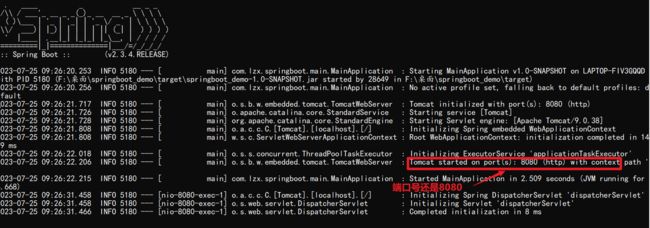
2.5、启动项目
直接点击绿色箭头进行运行,不需要添加Tomcat服务器
![]()
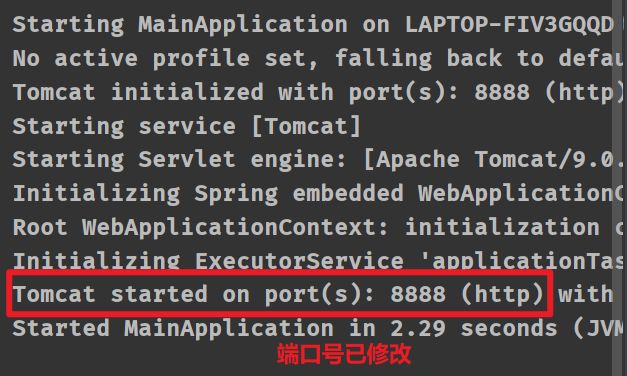
2.6、配置文件
在application.properties配置文件配置项目的文件
server.port=8888
参考SpringBoot配置的官方文档:https://docs.spring.io/spring-boot/docs/2.7.14/reference/html/application-properties.html#appendix.application-properties
2.7、部署项目
    <build>
        <plugins>
            <plugin>
                <groupId>org.springframework.bootgroupId>
                <artifactId>spring-boot-maven-pluginartifactId>
            plugin>
        plugins>
    build>
项目打包成"jar"文件


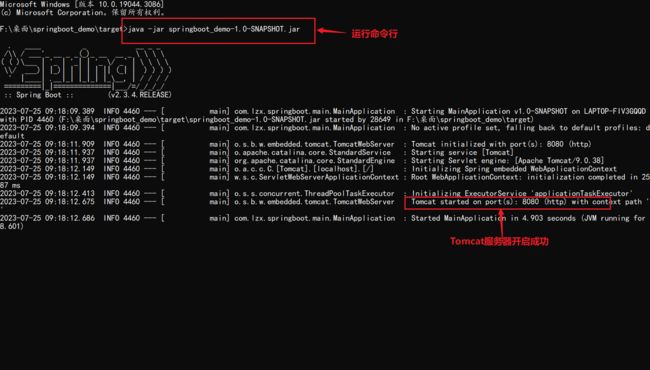

:已经打包的项目中的端口号若想修改需要吃重新打包
三、自动配置原理
3.1、SpringBoot特点
3.1.1、依赖管理
- 父级依赖
<parent>
        <groupId>org.springframework.bootgroupId>
        <artifactId>spring-boot-starter-parentartifactId>
        <version>2.3.4.RELEASEversion>
parent>

  <parent>
    <groupId>org.springframework.bootgroupId>
    <artifactId>spring-boot-dependenciesartifactId>
    <version>2.3.4.RELEASEversion>
  parent>

<properties>
    <activemq.version>5.15.13activemq.version>
    <antlr2.version>2.7.7antlr2.version>
    <appengine-sdk.version>1.9.82appengine-sdk.version>
    <artemis.version>2.12.0artemis.version>
    <aspectj.version>1.9.6aspectj.version>
    <assertj.version>3.16.1assertj.version>
    <atomikos.version>4.0.6atomikos.version>
    <awaitility.version>4.0.3awaitility.version>
    <bitronix.version>2.1.4bitronix.version>
    <build-helper-maven-plugin.version>3.1.0build-helper-maven-plugin.version>
  	..............
properties>
spring-boot-dependencies的文件中包含了很多已经内置的文件,导入他的子类就可以导入对应的配置文件对应的版本号
- starter场景启动器
<dependency>
  <groupId>org.springframework.bootgroupId>
  <artifactId>spring-boot-starterartifactId>
  <version>2.3.4.RELEASEversion>
  <scope>compilescope>
dependency>
spring-boot-starter:场景启动器,引入它以后它对应的场景所需要的常规依赖就可以注入完毕了
SpringBoot所有支持的场景如以下网址:
https://docs.spring.io/spring-boot/docs/current/reference/html/using-spring-boot.html#using-boot-starter
- 无需关注版本号,自动版本仲裁
引入依赖的时候可以不写版本号,除非引入非版本仲裁的jar,必须写版本号
- 可以修改默认版本号
3.1.2、自动配置
1、自动装配Tomcat服务器
<dependency>
      <groupId>org.springframework.bootgroupId>
      <artifactId>spring-boot-starter-tomcatartifactId>
      <version>2.3.4.RELEASEversion>
      <scope>compilescope>
dependency>
2、自动配置好SpringMVC
-
引入SpringMVC全套组件
-
自动配好SpringMVC常用组件(功能)
3、自动配置Web常见功能
SpringBoot已经配置了所有web开发的常见场景
4、添加注解包自动扫描
默认添加@SpringBootApplication注释以后,标注的主程序所在的包及其下方的所有的包里面的组件都会被默认扫描出来
若想改变扫描包的路径:@SpringBootApplication(scanBasePackages=“xxxx”)或者使用ComponentScan指定扫描路径。
@SpringBootApplication
等同于
@SpringBootConfiguration
@EnableAutoConfiguration
@ComponentScan("xxxxxxx")
5、按需加载所有自动配置项
需要哪个场景就导入哪个starter,导入以后对应的场景就会开启,SpringBoot所有的自动配置功能都会在spring-boot-autoconfigure
3.2、容器功能
3.2.1、组件添加
1、@Configuration
@Configuration通常标注一个类,@Bea通常标注一个方法,他们通常搭配使用。
简单粗暴理解就是:@Configuration标注的类相当于以前在Spring中配置的一个XML文件(用于创建对象的文件),@Bean表示的方法相当于原Spring文件中
标签。
两个模式
- Lite模式 @Comfiguration(proxyBeanMethods = false)配置类组件之间没有任何依赖关系,此模式可以加速容器启动过程,减少判断,保证不管每个@Bean标识的方法调用多少次都是新创建方法。
- Full模式 @Comfiguration(proxyBeanMethods = true) 配置类组件之间有依赖关系,方法会被调用得到之前的单实例组件,此模式下可以保证不管每个@Bean方法被调用多少次都是单实例的
测试实例
@Configuration(proxyBeanMethods = false) //创建的对象都是新创建的
public class MyConfiguration {

    @Bean  //创建对象,相当于标签
    public User user() {
        User zhangsan = new User("zhangsan",18);
        //user组件依赖了pet组件
        zhangsan.setPet(tomcatPet());
        return zhangsan;
    }
    @Bean("tom")
    public Pet tomcatPet() {
        return new Pet("tomcat");
    }
}
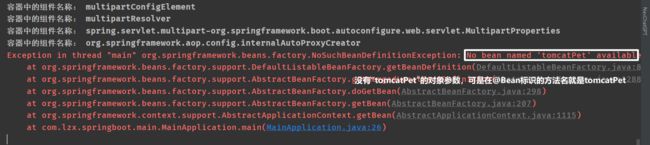
若按照上述写法的话会有错误,在@Configuration(proxyBeanMethods = false)限制了@Bean之间不能有关联
![]()
上述的错误意思是:在@Configuration参数中proxyBeanMethods设置为了false,直接调用了带有@Bean的方法,将proxyBeanMethods设置为true或者使用依赖注入DI。
@SpringBootApplication
public class MainApplication {
    public static void main(String[] args) {
        //返回IOC容器
        ConfigurableApplicationContext run = SpringApplication.run(MainApplication.class, args);
        //查看容器中的组件
        String[] names = run.getBeanDefinitionNames();
        for (String name : names) {
            System.out.println("容器中的组件名称: " + name);
        }
        //从容器中获取容器
        Pet tom = run.getBean("tomcatPet", Pet.class);
        Pet tom1 = run.getBean("tomcatPet", Pet.class);
        System.out.println("组件:" + (tom == tom1));
        MyConfiguration myConfiguration = run.getBean(MyConfiguration.class);
        System.out.println("myConfiguration = " + myConfiguration);
    }
按照上述写法,会报错,按理来说IOC容器中获取bean对象,默认方法名就是id、可按照上述写法还是会报错。
解决办法
将main()方法中的@SpringBootApplication注释修改为@SpringBootConfiguration、@EnableAutoConfiguration
@ComponentScan(“xxxxx”)的组合,注意:不是@SpringBootApplication和他们的组合是@SpringBootConfiguration,否则的话也会报错。

冗余声明:@SpringBootApplication已经声明了@EnableAutoCinfiguration,在@Bean中设置名称以后在容器创建以后获取对象时候不能在使用方法名获取,否则会报错:No bean named “xxx” available

package com.lzx.springboot.main;

import com.lzx.springboot.config.MyConfiguration;
import com.lzx.springboot.entity.Pet;
import com.lzx.springboot.entity.User;
import org.springframework.boot.SpringApplication;
import org.springframework.boot.SpringBootConfiguration;
import org.springframework.boot.autoconfigure.EnableAutoConfiguration;
import org.springframework.boot.autoconfigure.SpringBootApplication;
import org.springframework.context.ConfigurableApplicationContext;
import org.springframework.context.annotation.ComponentScan;

@SpringBootConfiguration
@EnableAutoConfiguration
@ComponentScan("com.lzx.springboot")
public class MainApplication {
    public static void main(String[] args) {
        //返回IOC容器
        ConfigurableApplicationContext run = SpringApplication.run(MainApplication.class, args);
        //查看容器中的组件
        String[] names = run.getBeanDefinitionNames();
        for (String name : names) {
            System.out.println("容器中的组件名称: " + name);
        }
        //从容器中获取容器
        Pet tom = run.getBean("tom", Pet.class);
        Pet tom1 = run.getBean("tom", Pet.class);
        System.out.println("组件:" + (tom == tom1));
        MyConfiguration myConfiguration = run.getBean(MyConfiguration.class);
        System.out.println("myConfiguration = " + myConfiguration);

        User user = myConfiguration.user();
        User user1 = myConfiguration.user();
        System.out.println("User组件:" + (user == user1));

        User user2 = run.getBean("user", User.class);
        Pet tom2 = run.getBean("tom",Pet.class);
        System.out.println("用户的宠物是:" + (user2.getPet() == tom2));
    }

}

因MyConfiguration被@Configuration(proxyBeanMethods = true)标识,故为Full模式,此模式下被@Bean标识的方法无论被调用多少次,都是单例对象,保证各个类组件之间有依赖关系。
2、@Bean
详细说明:Bean注解用于在Spring容器中创建一个bean对象,被标识的地方返回一个对象,Spring将该对象注册为一个bean,使其他组件可以使用,一般都是和@Configuration一起使用,一般标识在方法上。
实例
@Configuration
public class AppConfig {
    @Bean
    public MyBean myBean() {
        return new MyBean();
    }
}
3、@Component
详细说明:Component注解用于标识一个普通的spring bean组件,一般表示在类上。
实例
@Component
public class  MyComponent {
   //代码逻辑
}
4、@Controller
详细说明:Controller注解用于标识一个类是SpringMVC中的控制器组件,用于处理客服端请求和返回相应的响应结果。
实例
@Controller
public class MyController {
    @RequestMapping("/hello")
    public String hello() {
        return "Hello, World!";
    }
}
5、@Service
详细说明:Service注解用于标识一个类是Service服务层的组件,主要封装业务逻辑。
实例
@Service
public class UserService {
    public void createUser(User user) {
        // 创建用户的业务逻辑
    }
}
6、@Repository
详细说明:Reposity注解用于标识一个类是数据访问层的组件,通常用于数据库交互
实例
@Service
public class UserService {
    public void createUser(User user) {
        // 创建用户的业务逻辑
    }
}
7、@ComponentScan
详细说明:ComponentScan注解用于指定Spring中进行组件扫描时所需要扫描的包和类路径
实例
@Configuration
@ComponentScan("xxxxx")
public class AppConfig {
    // 配置代码
}
8、@Import
详细说明:Import注解用于引入其他的配置类和组件类,将他们收纳到当前的配置类的上下文中。
实例
@Configuration
@Import({OtherConfig.class, OtherComponent.class})
public class AppConfig {
    // 配置代码
}
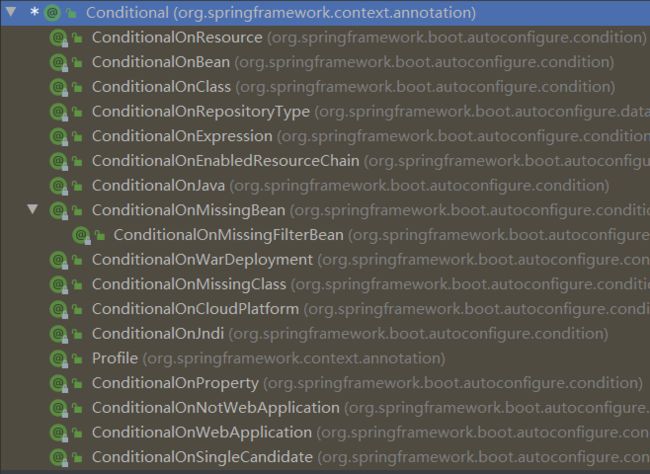
9、@Conditional
条件装配:满足Conditional条件进行注入
@Configuration(proxyBeanMethods = true) //各个类之间不能有依赖关系,创建的对象都是新创建的
@ConditionalOnMissingBean(name = "tom")
public class MyConfiguration {
}
@SpringBootConfiguration
@EnableAutoConfiguration
@ComponentScan("com.lzx.springboot")
public class MainApplication {
    public static void main(String[] args) {
        //返回IOC容器
        ConfigurableApplicationContext run = SpringApplication.run(MainApplication.class, args);
				boolean tom = run.containsBean("tom");
        System.out.println("容器中的Tom组件:" + tom);
        boolean user01 = run.containsBean("user01");
        System.out.println("容器中的user01组件:" + user01);
        boolean tom22 = run.containsBean("tom22");
        System.out.println("容器中的tom22组件:" + tom22);
    }

3.2.2、原生配置文件引入
@ImportResource


3.2.3、配置绑定
1、@ConfigurationProperties
将Java读取的properties文件中的内容,封装到JavaBean中
2、@EnableConfigurationProperties + @ConfigurationProperties
通常ConfigurationProperties注解和EnableConfigurationProperties 一起使用,EnableConfigurationProperties 用于开启对@ConfigurationProperties注解类的配置
3、@Component + @ConfigurationProperties
@EnableConfigurationProperties(Car.class)
//1、开启Car配置绑定功能
//2、把这个Car这个组件自动注册到容器中
public class MyConfig {
}
3.3、自动配置原理入门
3.1、引导加载自动配置类
1、@SpringBootConfiguration
2、@ComponentScan
3、@EnableAutoConfiguration
(1)、@AutoConfigurationPackage
(2)、@Import(AutoConfigurationImportSelector.class)
3.2、按需开启自动配置项
3.3、修改默认配置
3.4、最佳实战
3.4、开发技巧
3.4.1、Lombok
作用:简化JavaBean的配置
在pom.xml文件中添加以下依赖:
  <dependency>
            <groupId>org.projectlombokgroupId>
            <artifactId>lombokartifactId>
dependency>
在IDEA中搜索Lombok下载

===============================简化JavaBean开发===================================
@NoArgsConstructor
//@AllArgsConstructor
@Data
@ToString
@EqualsAndHashCode
public class User {

    private String name;
    private Integer age;

    private Pet pet;

    public User(String name,Integer age){
        this.name = name;
        this.age = age;
    }


}
================================简化日志开发===================================
@Slf4j
@RestController
public class HelloController {
    @RequestMapping("/hello")
    public String handle01(@RequestParam("name") String name){

        log.info("请求进来了....");

        return "Hello, Spring Boot 2!"+"你好:"+name;
    }
}
3.4.2、dev-tools
作用:在修改项目或者页面以后,按住ctrl + F9;
在pom.xml文件中添加以下依赖
<dependency>
  		<groupId>org.springframework.bootgroupId>
  		<artifactId>spring-boot-devtoolsartifactId>
  		<optional>trueoptional>
dependency>
3.4.3、Spring Initailizr(项目初始化向导)
1、选择新建模块或者新建项目(此处是以新建模块为例)
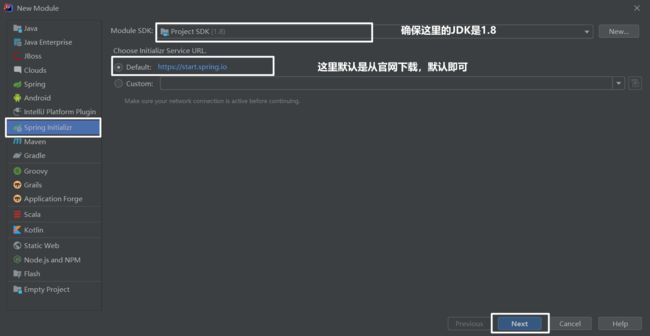
2、修改项目配置

3、选择想要添加的配置

4、选择文件位置

四、配置文件
4.1、文件类型
4.1.1、properties
同以前Properties的用法
4.1.2、yaml
1、简介
YAML,用来表达数据序列化的格式。是"YAML Ain’t a Markup Language"(YAML不是一种标记语言)的递归缩写。在开发的这种语言时,YAML的意思其实是:“Yet Another Markup Language”(仍是一种标记语言),但为了强调这种语言以数据做为中心,而不是以标记语言为重点,而用反向缩略语重命名。
YAML非常适合用来做以数据为中心的配置文件。
2、基本语法
- key: value;kv之间有空格
- 大小写敏感
- 使用缩进表示层级关系
- 缩进不允许使用tab,只允许空格
- 缩进的空格数不重要,只要相同层级的元素左对齐即可
- '#'表示注释
- 字符串无需加引号,如果要加,''与""表示字符串内容 会被 转义/不转义
3、数据类型
- 字面量:单个的、不可再分的值。date、boolean、string、number、null
k: v
- 对象:键值对的集合。map、hash、set、object
行内写法:  k: {k1:v1,k2:v2,k3:v3}
#或
k:
	k1: v1
  k2: v2
  k3: v3
- 数组:一组按次序排列的值。array、list、queue
行内写法:  k: [v1,v2,v3]
#或者
k:
 - v1
 - v2
 - v3
4、实例
# yaml表示上述对象
person:
  userName: zhangsan
  boss: false
  birth: 20919/12/12
  age: 18
  pet:
    name: tomcat
    weight: 23.4
  interests: [篮球,游泳]
  animal:
    -jerry
    -mario
  sorce:
    english: # 按照map集合的写法
      first: 30
      second: 40
      third: 50
    math: [143,45,4]
    chinese: {first: 123} # 按照map集合的写法
  salarys: [125,45,78,56]
  allPets:
    sick:
      - {name: tom}
      - {name: jerry,weight: 21}
    heakthy: [{name: mario,weight: 45}]
4.2、配置提示
自定义的类和配置文件绑定一般没有提示。
        <dependency>
            <groupId>org.springframework.bootgroupId>
            <artifactId>spring-boot-configuration-processorartifactId>
            <optional>trueoptional>
        dependency>

 <build>
        <plugins>
            <plugin>
                <groupId>org.springframework.bootgroupId>
                <artifactId>spring-boot-maven-pluginartifactId>
                <configuration>
                    <excludes>
                        <exclude>
                            <groupId>org.springframework.bootgroupId>
                            <artifactId>spring-boot-configuration-processorartifactId>
                        exclude>
                    excludes>
                configuration>
            plugin>
        plugins>
    build>
五、Web开发
5.1、SpringMVC自动配置概览
Spring Boot provides auto-configuration for Spring MVC that works well with most applications.(大多场景我们都无需自定义配置)
The auto-configuration adds the following features on top of Spring’s defaults:
-
Inclusion of
ContentNegotiatingViewResolverandBeanNameViewResolverbeans. -
- 内容协商视图解析器和BeanName视图解析器
-
Support for serving static resources, including support for WebJars (covered later in this document)).
-
- 静态资源(包括webjars)
-
Automatic registration of
Converter,GenericConverter, andFormatterbeans. -
- 自动注册
Converter,GenericConverter,Formatter
- 自动注册
-
Support for
HttpMessageConverters(covered later in this document). -
- 支持
HttpMessageConverters(后来我们配合内容协商理解原理)
- 支持
-
Automatic registration of
MessageCodesResolver(covered later in this document). -
- 自动注册
MessageCodesResolver(国际化用)
- 自动注册
-
Static
index.htmlsupport. -
- 静态index.html 页支持
-
Custom
Faviconsupport (covered later in this document). -
- 自定义
Favicon
- 自定义
-
Automatic use of a
ConfigurableWebBindingInitializerbean (covered later in this document). -
-
自动使用
ConfigurableWebBindingInitializer,(DataBinder负责将请求数据绑定到JavaBean上) -
If you want to keep those Spring Boot MVC customizations and make more MVC customizations (interceptors, formatters, view controllers, and other features), you can add your own
@Configurationclass of typeWebMvcConfigurerbut without@EnableWebMvc.不用@EnableWebMvc注解。使用
**@Configuration**+**WebMvcConfigurer**自定义规则If you want to provide custom instances of
RequestMappingHandlerMapping,RequestMappingHandlerAdapter, orExceptionHandlerExceptionResolver, and still keep the Spring Boot MVC customizations, you can declare a bean of typeWebMvcRegistrationsand use it to provide custom instances of those components.声明
**WebMvcRegistrations**改变默认底层组件If you want to take complete control of Spring MVC, you can add your own
@Configurationannotated with@EnableWebMvc, or alternatively add your own@Configuration-annotatedDelegatingWebMvcConfigurationas described in the Javadoc of@EnableWebMvc.使用
**@EnableWebMvc+@Configuration+DelegatingWebMvcConfiguration 全面接管SpringMVC**
-
5.2、静态页面功能分析
5.2.1、静态资源访问
1、静态资源目录
静态资源放在类路径下: called /static (or /public or /resources or /META-INF/resources
访问:当前项目根目录 + 静态资源名
原理:静态映射/**;
客户端发出请求以后,先在Controller处理,若不能处理就将所有的请求交给静态资源处理器,若静态资源处理器找不到则会报出404页面未找到
2、静态资源访问前缀
默认无前缀
spring:
  mvc:
    static-path-pattern: /res/**
3、webjar
自动映射 /webjars/**
pom.xml文件引入以下依赖
        <dependency>
            <groupId>org.webjarsgroupId>
            <artifactId>jqueryartifactId>
            <version>3.5.1version>
        dependency>
访问地址:http://localhost:8080/webjars/jquery/3.5.1/jquery.js 后面地址要按照依赖里面的包路径

5.2.2、欢迎页支持
-
静态资源路径下 index.html
-
- 可以配置静态资源路径
- 但是不可以配置静态资源的访问前缀。否则导致 index.html不能被默认访问
-
spring:
#  mvc:
#    static-path-pattern: /res/**   这个会导致welcome page功能失效

  resources:
    static-locations: [classpath:/haha/]
5.2.3、自定义Favicon
favicon.ico放在静态资源目录下即可
spring:
#  mvc:
#    static-path-pattern: /res/**   这个会导致 Favicon 功能失效
5.2.4、静态资源配置原理
- SpringBoot启动默认加载 xxxAutoConfiguration 类(自动配置类)
- SpringMVC功能的自动配置类 WebMvcAutoConfiguration,生效
@Configuration(proxyBeanMethods = false)
@ConditionalOnWebApplication(type = Type.SERVLET)
@ConditionalOnClass({ Servlet.class, DispatcherServlet.class, WebMvcConfigurer.class })
@ConditionalOnMissingBean(WebMvcConfigurationSupport.class)
@AutoConfigureOrder(Ordered.HIGHEST_PRECEDENCE + 10)
@AutoConfigureAfter({ DispatcherServletAutoConfiguration.class, TaskExecutionAutoConfiguration.class,
		ValidationAutoConfiguration.class })
public class WebMvcAutoConfiguration {}
@Configuration(proxyBeanMethods = false)
@Import(EnableWebMvcConfiguration.class)
@EnableConfigurationProperties({ WebMvcProperties.class, ResourceProperties.class })
@Order(0)
public static class WebMvcAutoConfigurationAdapter implements WebMvcConfigurer {}