从0到1框架搭建,Python+Pytest+Allure+Git+Jenkins接口自动化框架(超细整理)
目录:导读
-
- 前言
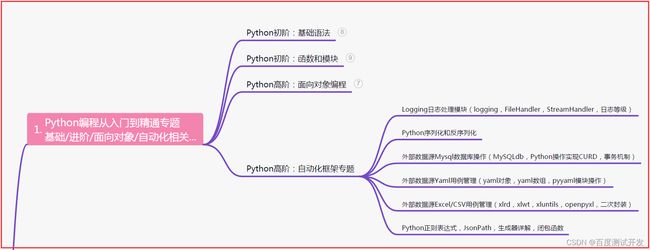
- 一、Python编程入门到精通
- 二、接口自动化项目实战
- 三、Web自动化项目实战
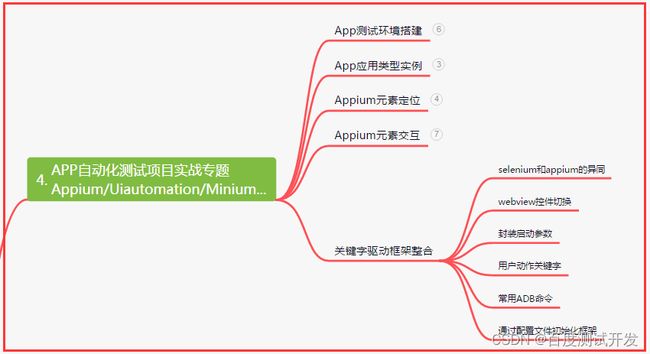
- 四、App自动化项目实战
- 五、一线大厂简历
- 六、测试开发DevOps体系
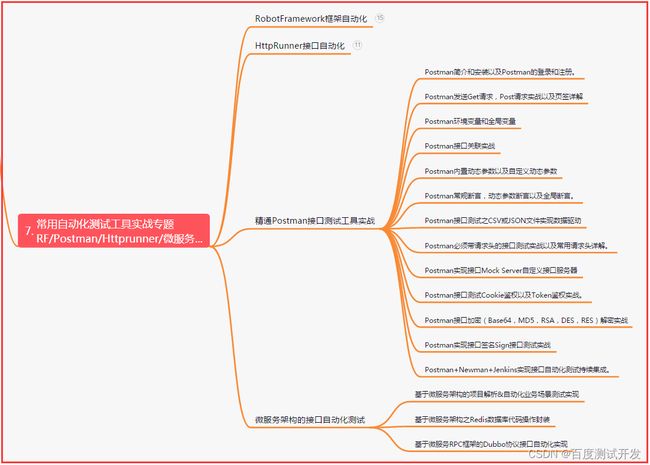
- 七、常用自动化测试工具
- 八、JMeter性能测试
- 九、总结(尾部小惊喜)
前言
接口测试是对系统和组件之间的接口进行测试,主要是效验数据的交换,传递和控制管理过程,以及相互逻辑依赖关系。其中接口协议分为HTTP,RPC,Webservice,Dubbo,RESTful等类型。
接口测试流程
1、需求评审,熟悉业务和需求
2、开发提供接口文档
3、编写接口测试用例
4、用例评审
5、提测后开始测试
6、提交测试报告
两种常见的 HTTP 请求方法:GET 和 POST
框架是一套基于Python+Pytest+Requests+Allure+Jenkins而设计的数据驱动接口自动化测试的框架。
技术栈:
Python、Pytest、Requests、Pactverity、Excel、Json、Mysql、Allure、Logbook、Git、Jenkins
框架结构图:
项目功能:
Python+Pytest+Allure+Jenkins接口自动化框架,实现Excel或Json维护测试用例,支持数据库操作,利用封装的请求基类调取相应的测试用例接口,获取配置文件中的环境地址与环境变量,
结合Pytest进行单元测试,使用LogBook进行记录日志,并生成allure测试报告,最后进行Jenkins集成项目实现集成部署,并发送测试报告邮件。
工具类封装
1、日志模块
项目中的log日志是logbook进行日志记录的,方便测试开发调试时进行排错纠正或修复优化。日志可选择是否打印在屏幕上即运行时是否在终端输出打印。日志格式输出可调整。
handle_log.py部分源码
 def log_type(record, handler):
     log = "[{date}] [{level}] [{filename}] [{func_name}] [{lineno}] {msg}".format(
         date=record.time,  # 日志时间
         level=record.level_name,  # 日志等级
         filename=os.path.split(record.filename)[-1],  # 文件名
         func_name=record.func_name,  # 函数名
         lineno=record.lineno,  # 行号
         msg=record.message  # 日志内容
     )
     return log
 # 日志存放路径
 LOG_DIR = BasePath + '/log'
 print(LOG_DIR)
 if not os.path.exists(LOG_DIR):
     os.makedirs(LOG_DIR)
 # 日志打印到屏幕
 log_std = ColorizedStderrHandler(bubble=True)
 log_std.formatter = log_type
 # 日志打印到文件
 log_file = TimedRotatingFileHandler(
     os.path.join(LOG_DIR, '%s.log' % 'log'), date_format='%Y-%m-%d', bubble=True, encoding='utf-8')
 log_file.formatter = log_type

 # 脚本日志
 run_log = Logger("global_log")
 def init_logger():
     logbook.set_datetime_format("local")
     run_log.handlers = []
     run_log.handlers.append(log_file)
     run_log.handlers.append(log_std)
     return ""
打印在终端的日志,如下图所示。
同时运行项目后,会在项目文件log中自动生成一个以当天日期命名的log文件。点击log日志文件可查看日志详情即项目运行时所记录的日志或报错日志。如下图所示。
2、配置文件模块
项目中涉及到一些配置文件如username、password或环境变量时,我们可通过配置文件来获取配置值。通过配置文件中key与value的定义来确定获取配置文件的值。
handle_init.py部分源码
 class HandleInit:
     # 读取配置文件
     def load_ini(self):
         file_path = BasePath + "/config/config.ini"
         cf = configparser.ConfigParser()
         cf.read(file_path, encoding='UTF-8')
         return cf

     # 获取ini里面对应key的value
     def get_value(self, key, node=None):
         if node == None:
             node = 'Test'
         cf = self.load_ini()
         try:
             data = cf.get(node, key)
             logger.info('获取配置文件的值,node:{},key:{}, data:{}'.format(node, key, data))
         except Exception:
             logger.exception('没有获取到对应的值,node:{},key:{}'.format(node, key))
             data = None
         return data
获取配置文件中的值日志如下图所示。
![]()
3、接口请求封装
获取相关测试用例及接口用例配置,记录请求相关参数的日志,定义Allure测试报告的步骤。
handle_apirequest.py部分代码
class ApiRequest:
     def api_request(self, base_url, test_case_data, case_data):
         get_name = None
         get_url = None
         get_method = None
         get_headers = None
         get_cookies = None
         get_case_name = None
         get_case_params = None
         response_data = None
         try:
             get_name = test_case_data['config']['name']
             get_url = base_url + test_case_data['config']['url']
             get_method = test_case_data['config']['method']
             get_headers = test_case_data['config']['headers']
             get_cookies = test_case_data['config']['cookies']
         except Exception as e:
             logger.exception('获取用例基本信息失败,{}'.format(e))
         try:
             get_case_name = case_data['name']
             get_case_params = case_data['params']
         except Exception as e:
             logger.exception('获取测试用例信息失败,{}'.format(e))
         with allure.step("请求接口:%s,请求地址:%s,请求方法:%s,请求头:%s,请求Cookies:%s" % (
                 get_name, get_url, get_method, get_headers, get_cookies)):
             allure.attach("接口用例描述:", "{0}".format(get_case_name))
             allure.attach("接口用例请求参数:", "{0}".format(get_case_params))
         logger.info(
             '请求接口名:%r,请求地址:%r,请求方法:%r,请求头:%r,请求Cookies:%r' %\

(get_name, get_url, get_method, get_headers, get_cookies))
         logger.info('请求接口名:%r,请求接口用例名:%r,接口用例请求参数:%r' %\

 (get_name, get_case_name, get_case_params))
         try:
             response_data = baseRequest.run_main(get_method, get_url, get_case_params, get_headers)
         except Exception as e:
             logger.exception('用例请求返回失败,{}'.format(e))
         logger.info('请求接口名:%r,请求接口用例名:%r,返回参数:%r' % (get_name, get_case_name, response_data.json()))
         return response_data
4、Excel数据处理-测试用例
测试用例中维护在Excel文件中,类中定义如何获取Excel中的相关数据(如获取某个单元格的内容,获取单元格的行数,以及将数据写入Excel中等操作)。
handle_exceldata.py部分源码
class OperationExcel:
    def __init__(self, file_name=None, sheet_id=None):
        if file_name:
            self.file_name = file_name
            self.sheet_id = sheet_id
        else:
            self.file_name = ''
            self.sheet_id = 0
        self.data = self.get_data()

    # 获取sheets的内容
    def get_data(self):
        data = xlrd.open_workbook(self.file_name)
        tables = data.sheets()[self.sheet_id]
        return tables

    # 获取单元格的行数
    def get_lines(self):
        tables = self.data
        return tables.nrows

    # 获取某一个单元格的内容
    def get_cell_value(self, row, col):
        return self.data.cell_value(row, col)
5、JSON数据处理-测试用例
{
    "config":{
        "name":"post接口名",
        "url":"/langdetect",
        "method":"POST",
        "headers":{
            "Content-Type":"application/json"
        },
        "cookies":{

        }
    },
    "testcase":[
        {
            "name":"测试用例1",
            "params":{
                "query":"测试"
            },
            "validate":[
                {
                    "check":"status_code",
                    "comparator":"eq",
                    "expect":"200"
                }
            ]
        },
        {
            "name":"测试用例2",
            "params":{
                "query":"python"
            },
            "validate":[
                {
                    "check":"msg",
                    "comparator":"eq",
                    "expect":"success"
                }
            ]
        }
    ]
}
获取Json文件中里具体字段的值。
handle.json.py部分源码
class HandleJson:
    # 读取json文件
    def load_json(self, file_name):
        if file_name == None:
            file_path = ""
        else:
            file_path = file_name
        try:
            with open(file_path, encoding='UTF-8') as f:
                data = json.load(f)
            return data
        except Exception:
            print("未找到json文件")
            return {}

    # 读取json文件里具体的字段值
    def getJson_value(self, key, file_name):
        if file_name == None:
            return ""
        jsonData = self.load_json(file_name)
        if key == None:
            getJsonValue = ""
        else:
            getJsonValue = jsonData.get(key)
        return getJsonValue
基类封装
接口支持Get、Post请求,调用requests请求来实现接口的调用与返回。接口参数包括,接口地址、接口请求参数、cookie参数、header参数。
class BaseRequest:

    def send_get(self, url, data, header=None, cookie=None):
        """
        Requests发送Get请求
        :param url:请求地址
        :param data:Get请求参数
        :param cookie:cookie参数
        :param header:header参数
        """
        response = requests.get(url=url, params=data, cookies=cookie, headers=header)
        return response

    def send_post(self, url, data, header=None, cookie=None):
        """
        Requests发送Post请求
        :param url:请求地址
        :param data:Post请求参数
        :param data:Post请求参数
        :param cookie:cookie参数
        :param header:header参数
        """
        response = requests.post(url=url, json=data, cookies=cookie, headers=header)
        return response

    # 主函数调用

    def run_main(self, method, url, data, header, cookie=None):
        try:
            result = ''
            if method.upper() == 'GET':
                result = self.send_get(url, data, header, cookie)
            elif method.upper() == 'POST':
                result = self.send_post(url, data, header, cookie)
            return result
        except Exception as e:
            logger.exception('请求主函数调用失败:{}'.format(e))
测试用例编写
引用Pytest来进行接口的单元测试,通过JSON中多个测试用例来做为参数化数据驱动。结合Allure制定相应接口的测试报告。在接口返回断言之前,我们先进行该接口的契约测试,
我们采用的是Pactverity的全量契约校验测试。当契约测试通过时,我们再进行返回参数的相关校验测试。
test_getRequestJson.py部分源码
@allure.feature('测试GET请求模块')
class TestRequestOne():
    @allure.title('测试标题')
    @allure.testcase('测试地址:https://www.imooc.com')
    @pytest.mark.parametrize('case_data', testCaseData['testcase'])
    def test_requestOne(self, case_data):
        try:
            api_response = apiRequest.api_request(baseurl, testCaseData, case_data)
            api_response_data = api_response.json()
            # pactverity——全量契约校验
            config_contract_format = Like({
                "msg": "成功",
                "result": 0,
                "data": EachLike({
                    "word": Like("testng")
                })
            })
            mPactVerify = PactVerify(config_contract_format)
            try:
                mPactVerify.verify(api_response_data)
                logger.info(
                    'verify_result:{},verify_info:{}'.format(mPactVerify.verify_result, mPactVerify.verify_info))
                assert mPactVerify.verify_result == True
            except Exception:
                err_msg = '契约校验错误'
                logger.exception('测试用例契约校验失败,verify_result:{},verify_info:{}'.format(mPactVerify.verify_result,
                                                                                     mPactVerify.verify_info))
            try:
                for case_validate in case_data['validate']:
                    logger.info('断言期望相关参数:check:{},comparator:{},expect:{}'.format(case_validate['check'],
                                                                                   case_validate['comparator'],
                                                                                   case_validate['expect']))
                    comparatorsTest.comparators_Assert(api_response, case_validate['check'],
                                                       case_validate['comparator'], case_validate['expect'])
                    logger.info('测试用例断言成功')
            except Exception as e:
                logger.exception('测试用例断言失败')
        except Exception as e:
            logger.exception('测试用例请求失败,原因:{}'.format(e))
主运行:
运用Pytest和Allure的特性,命令行运行测试用例文件夹,并生成对应的allure测试报告。
if __name__ == "__main__":
	pytest.main(['-s', '-v', 'test_case/testRequest/', '-q', '--alluredir', 'reports'])
Alluer2 测试报告
当我们运行主函数时,并生成对应的测试用例报告时,我们可以看到在该文件夹中会生成对应的json文件的测试报告。
reports是json格式测试报告存放的目录位置,allure_reports是html测试报告文件生成的目录位置。allure命令如下。
allure generate reports -o allure_result/
项目根目录下的allure_reports文件,存放的是allure生成的测试报告。可看出文件下有一个HTML文件,可通过Python的编辑器Pycharm来打开该HTML文件(测试报告),或可通过allure命令来打开该HTML。
| 下面是我整理的2023年最全的软件测试工程师学习知识架构体系图 |
一、Python编程入门到精通
二、接口自动化项目实战
三、Web自动化项目实战
四、App自动化项目实战
五、一线大厂简历
六、测试开发DevOps体系
七、常用自动化测试工具
八、JMeter性能测试
九、总结(尾部小惊喜)
勇攀高峰,永不言弃,奋斗的旅程犹如绽放的花朵;跨越征程,超越极限,拼搏的力量铸就辉煌的人生。相信自己的潜能,释放内心的火焰,用汗水和努力砥砺出属于自己的辉煌之路。
披荆斩棘,破浪前行,奋斗是人生最壮丽的交响乐;勇往直前,超越极限,梦想是心灵最美的翅膀。相信坚持,追逐光芒,奋斗点亮未来的星空,谱写属于自己的辉煌篇章。
不畏艰辛,奋斗向前,执着追寻心中的星辰大海;拥抱挑战,超越极限,每一次努力都是成长的脚印。相信自己的力量,燃烧激情,创造出属于自己的辉煌人生。


