免疫浸润结果可视化
免疫浸润结果可视化
在之前的推文中我们介绍了2行代码实现9种免疫浸润方法,今天给大家介绍下常见的免疫浸润结果的可视化。
就以大家最常见的cibersort为例进行介绍。
首先大家要对每种免疫浸润方法的结果有一个大体的认知,比如cibersort的结果是各种免疫细胞在样本中的比例,所以一个样本中所有的免疫细胞比例加起来总和是1!
但是ssGSEA就不是这样了。
只有理解了结果是什么样的,你才能选择合适的可视化方法。数就是图,图就是数
library(tidyHeatmap)
library(tidyverse)
library(RColorBrewer)

# 首先变为长数据
cibersort_long <- im_cibersort %>%
  select(`P-value_CIBERSORT`,Correlation_CIBERSORT, RMSE_CIBERSORT,ID,everything()) %>%
  pivot_longer(- c(1:4),names_to = "cell_type",values_to = "fraction") %>%
  dplyr::mutate(cell_type = gsub("_CIBERSORT","",cell_type),
                cell_type = gsub("_"," ",cell_type))

head(cibersort_long[,4:6])
## # A tibble: 6 × 3
##   ID                           cell_type                  fraction
##
## 1 TCGA-D5-6540-01A-11R-1723-07 B cells naive                0.0504
## 2 TCGA-D5-6540-01A-11R-1723-07 B cells memory               0
## 3 TCGA-D5-6540-01A-11R-1723-07 Plasma cells                 0
## 4 TCGA-D5-6540-01A-11R-1723-07 T cells CD8                  0.119
## 5 TCGA-D5-6540-01A-11R-1723-07 T cells CD4 naive            0
## 6 TCGA-D5-6540-01A-11R-1723-07 T cells CD4 memory resting   0.0951
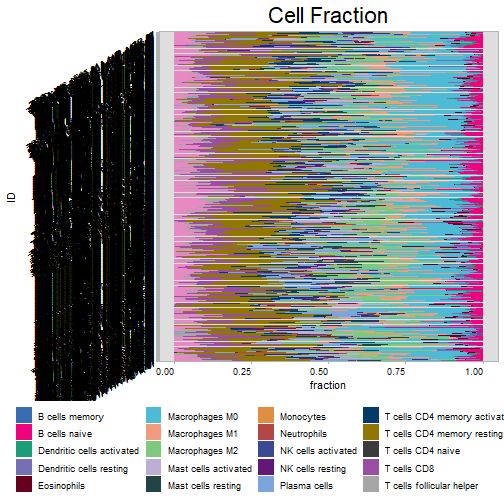
如果你是初学者,也可以直接用IOBR为大家提供的cell_bar_plot()函数,可以直接帮你转换为长数据,并且还可以把图画出来。
res_cibersort <- cell_bar_plot(im_cibersort)
## There are seven categories you can choose: box, continue2, continue, random, heatmap, heatmap3, tidyheatmap
## >>>>=== Palette option for random: 1: palette1; 2: palette2; 3: palette3;  4: palette4
但是这个图你可能不能接受,没关系,转换好的长数据已经在res_cibersort这个对象里了。
head(res_cibersort$data)
##                             ID     cell_type   fraction
## 1 TCGA-D5-6540-01A-11R-1723-07 B cells naive 0.05044811
## 2 TCGA-AA-3525-11A-01R-A32Z-07 B cells naive 0.11573408
## 3 TCGA-AA-3525-01A-02R-0826-07 B cells naive 0.06545120
## 4 TCGA-AA-3815-01A-01R-1022-07 B cells naive 0.03903166
## 5 TCGA-D5-6923-01A-11R-A32Z-07 B cells naive 0.02560987
## 6 TCGA-G4-6322-01A-11R-1723-07 B cells naive 0.08727238
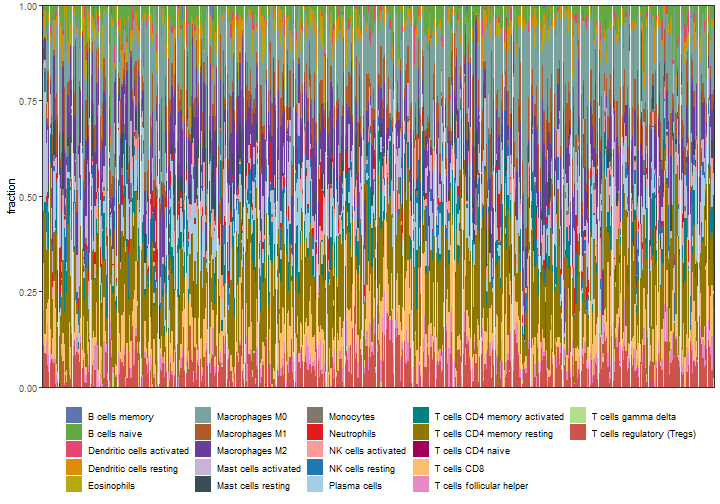
和我们自己转换的是差不多的,这个数据就可以直接使用ggplot2自己画图了:
p1 <- cibersort_long %>%
  ggplot(aes(ID,fraction))+
  geom_bar(stat = "identity",position = "stack",aes(fill=cell_type))+
  labs(x=NULL)+
  scale_y_continuous(expand = c(0,0))+
  scale_fill_manual(values = palette4,name=NULL)+ # iobr还给大家准备了几个色盘,贴心!
  theme_bw()+
  theme(axis.text.x = element_blank(),
        axis.ticks.x = element_blank(),
        legend.position = "bottom"
        )
p1
除了这个最常见的堆叠条形图,还可以画箱线图,热图。
# 有顺序的箱线图
library(forcats)

p2 <- ggplot(cibersort_long,aes(fct_reorder(cell_type, fraction),fraction,fill = cell_type)) +
  geom_boxplot() +
  #geom_jitter(width = 0.2,aes(color=cell_type))+
  theme_bw() +
  labs(x = "Cell Type", y = "Estimated Proportion") +
  theme(axis.text.x = element_blank(),
        axis.ticks.x = element_blank(),
        legend.position = "bottom") +
  scale_fill_manual(values = palette4)
p2
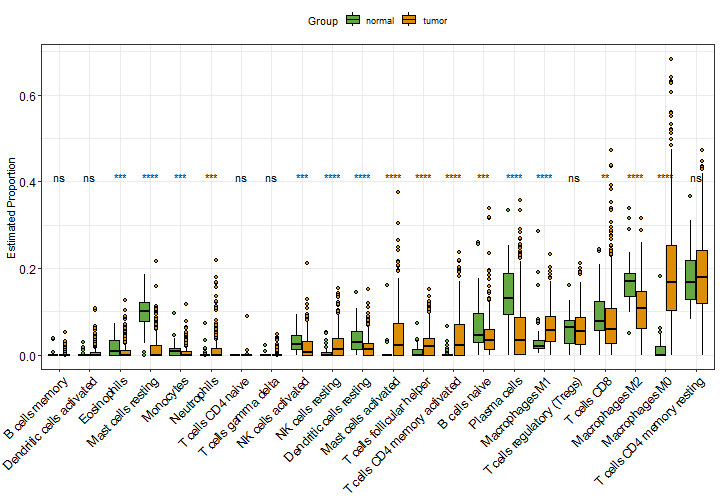
如果你的样本有不同分组,就可以根据画出分组箱线图。比如我这里就根据tumor/normal把样本分组,然后再组间进行非参数检验,并添加P值。
这些都是R语言基础操作,本号的可视化合集中介绍了太多这些基本绘图知识了。
library(ggpubr)
library(stringr)

# 分组
cibersort_long$Group = ifelse(as.numeric(str_sub(cibersort_long$ID,14,15))<10,"tumor","normal")

p3 <- ggplot(cibersort_long,aes(fct_reorder(cell_type,fraction),fraction,fill = Group)) +
  geom_boxplot(outlier.shape = 21,color = "black") +
  scale_fill_manual(values = palette1[c(2,4)])+
  theme_bw() +
  labs(x = NULL, y = "Estimated Proportion") +
  theme(legend.position = "top") +
  theme(axis.text.x = element_text(angle=45,hjust = 1),
        axis.text = element_text(color = "black",size = 12))+
  stat_compare_means(aes(group = Group,label = ..p.signif..),
                     method = "kruskal.test",label.y = 0.4)
p3
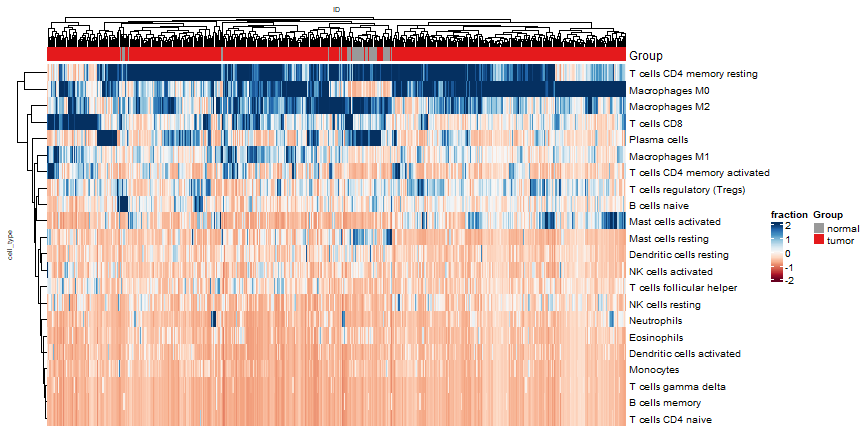
热图也是一样的easy,而且有了tidyHeatmap的加持,直接使用长数据即可,不用在变为宽数据了!
可以参考文章:tidyHeatmap完美使用长数据的热图可视化
library(tidyHeatmap)

p4 <- heatmap(.data = cibersort_long
        ,.row = cell_type
        ,.column = ID
        ,.value = fraction
        ,scale = "column"
        ,palette_value = circlize::colorRamp2(
            seq(-2, 2, length.out = 11),
            RColorBrewer::brewer.pal(11, "RdBu")
        )
        ,show_column_names=F
        ,row_names_gp = gpar(fontsize = 10),
        column_names_gp = gpar(fontsize = 7),
        column_title_gp = gpar(fontsize = 7),
        row_title_gp = gpar(fontsize = 7)
        ) %>%
  add_tile(Group) # 新版本已经改了,注意
p4
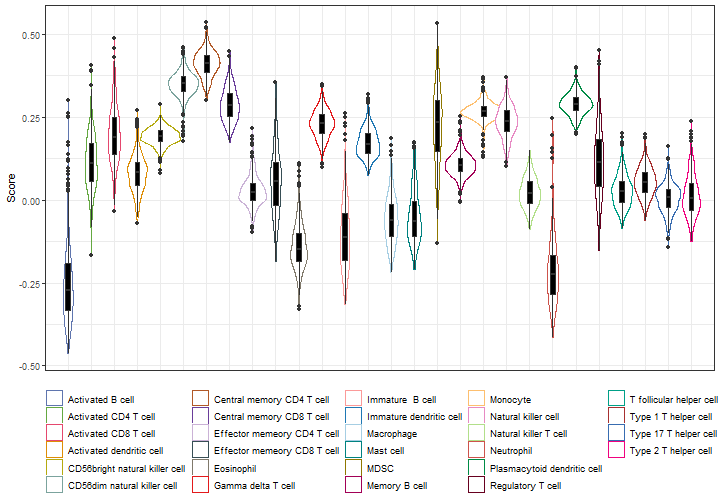
ssGSEA的可视化方法也是类似的,不过就没有堆叠条形图了,因为加和不是1,堆叠起来就会参差不齐,毫无美感。
常用的还是箱线图这种样式的。
ssgsea_long <- im_ssgsea %>%
  pivot_longer(- ID,names_to = "cell_type",values_to = "Score")
head(ssgsea_long)
## # A tibble: 6 × 3
##   ID                           cell_type                         Score
##
## 1 TCGA-3L-AA1B-01A-11R-A37K-07 Activated B cell               -0.192
## 2 TCGA-3L-AA1B-01A-11R-A37K-07 Activated CD4 T cell            0.0120
## 3 TCGA-3L-AA1B-01A-11R-A37K-07 Activated CD8 T cell            0.170
## 4 TCGA-3L-AA1B-01A-11R-A37K-07 Activated dendritic cell        0.00545
## 5 TCGA-3L-AA1B-01A-11R-A37K-07 CD56bright natural killer cell  0.199
## 6 TCGA-3L-AA1B-01A-11R-A37K-07 CD56dim natural killer cell     0.351
ggplot(ssgsea_long, aes(cell_type, Score))+
  geom_violin(width=2.0,aes(color=cell_type))+
  geom_boxplot(width=0.2,fill="black") +
  theme_bw() +
  labs(x = NULL) +
  theme(axis.text.x = element_blank(),
        axis.ticks.x = element_blank(),
        legend.position = "bottom") +
  #scale_fill_manual(values = palette4)+
  scale_color_manual(values = palette4,name=NULL)
除此之外也是可以添加分组,画热图等,其他的免疫浸润结果也是同样的可视化思路,这里就不再重复了,大家自己尝试下即可。
和分子联系起来
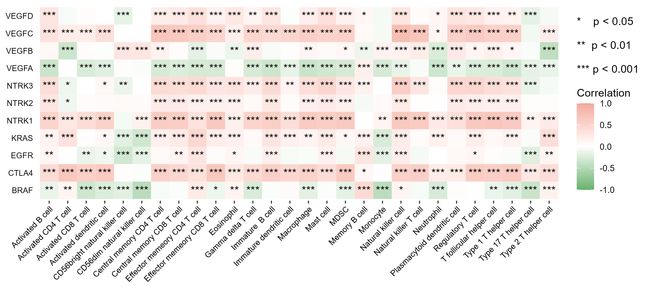
如果和某个分子联系起来,又可以画出各种花里胡哨的图,比如棒棒糖图,热图,散点图等。
我这里是以ssGSEA的结果为例进行演示的,其他的都是一样的。
我们就以CTLA4 EGFR PDL1 BRAF “VEGFB” “VEGFA” “VEGFC” “VEGFD” “NTRK2” “NTRK1” "NTRK3"这几个分子为例吧。
genes <- c("CTLA4","EGFR","PDL1","BRAF","KRAS","VEGFA","VEGFB","VEGFC","VEGFD","NTRK1","NTRK2","NTRK3")

genes_expr <- as.data.frame(t(expr_coad[rownames(expr_coad) %in% genes,]))
genes_expr <- genes_expr[match(im_ssgsea$ID,rownames(genes_expr)),]
identical(im_ssgsea$ID,rownames(genes_expr))
## [1] TRUE
接下来就是批量计算每一个基因和28种细胞之间的相关系数和P值,这个需求你可以写循环实现,或者apply系列,purrr系列等,但是我试过,都太慢了,尤其是数据量很大的时候。
所以我这里给大家介绍一种更快的方法,借助linkET包实现,这个包在之前也介绍过了:mantel-test可视化,别再只知道ggcor!
library(linkET)
##
## Attaching package: 'linkET'
## The following object is masked from 'package:purrr':
##
##     simplify
## The following object is masked from 'package:ComplexHeatmap':
##
##     anno_link

cor_res <- correlate(genes_expr, im_ssgsea[,-1],method = "spearman")

qcorrplot(cor_res) +
  geom_square() +
  scale_fill_gradientn(colours = RColorBrewer::brewer.pal(11, "RdBu"))
但是这个图并没有明显的表示出P值,所以我知道大家想自己画的更加花里胡哨一点,在很久之前我就介绍过了这个方法了:R语言ggplot2画相关性热图
画图前先准备下数据,把P值数据和相关系数数据整合到一起,所以借助linkET包也是有缺点的,如果自己写函数肯定是直接弄好的。
# 先整理下数据
df_r <- cor_res$r %>%
  as.data.frame() %>%
  rownames_to_column(var = "gene") %>%
  pivot_longer(-1,names_to = "cell_type",values_to = "correlation")

df_p <- cor_res$p %>%
  as.data.frame() %>%
  rownames_to_column(var = "gene") %>%
  pivot_longer(-1,names_to = "cell_type",values_to = "pvalue")

df_cor <- df_r %>%
  left_join(df_p) %>%
  mutate(stars = cut(pvalue,breaks = c(-Inf,0.05,0.01,0.001,Inf),right = F,labels = c("***","**","*"," ")))
## Joining with `by = join_by(gene, cell_type)`

head(df_cor)
## # A tibble: 6 × 5
##   gene  cell_type                      correlation   pvalue stars
##
## 1 VEGFB Activated B cell                    0.0837 5.55e- 2 " "
## 2 VEGFB Activated CD4 T cell               -0.338  2.35e-15 "***"
## 3 VEGFB Activated CD8 T cell                0.0417 3.41e- 1 " "
## 4 VEGFB Activated dendritic cell           -0.0181 6.79e- 1 " "
## 5 VEGFB CD56bright natural killer cell      0.287  2.48e-11 "***"
## 6 VEGFB CD56dim natural killer cell         0.289  1.82e-11 "***"
数据都有了,画图就行了。ggplot2搞定一切,求求大家赶紧学学ggplot2吧,别再天天问图怎么画了。两本说明书,随便买一本认真看看就搞定了:《R数据可视化手册》或者《ggplot2:数据分析与图形艺术》
library(ggplot2)

ggplot(df_cor, aes(cell_type,gene))+
  geom_tile(aes(fill=correlation))+
  geom_text(aes(label=stars), color="black", size=4)+
  scale_fill_gradient2(low='#67B26F', high='#F2AA9D',mid = 'white',
                      limit=c(-1,1),name=paste0("*    p < 0.05","\n\n","**  p < 0.01","\n\n","*** p < 0.001","\n\n","Correlation"))+
  labs(x=NULL,y=NULL)+
  theme(axis.text.x = element_text(size=8,angle = 45,hjust = 1,color = "black"),
        axis.text.y = element_text(size=8,color = "black"),
        axis.ticks.y = element_blank(),
        panel.background=element_blank())
ggsave("df_cor.png",height = 4,width = 9) # 保存时不断调整长宽比即可得到满意的图形
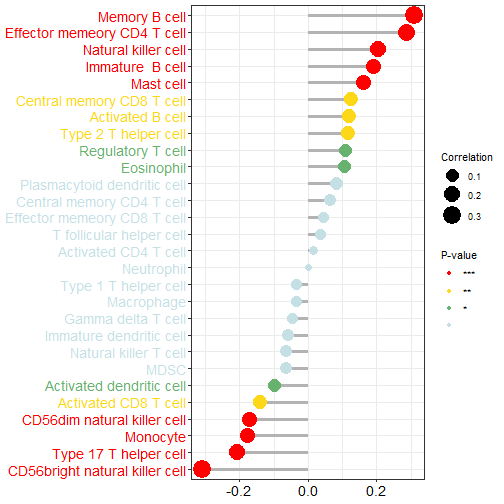
棒棒糖图也是一样的简单,我们之前也介绍过了:你还不会画棒棒糖图?
不过这种展示的是1个基因和其他细胞的关系,就是1对多的关系展示,上面的热图是多对多的关系展示。
# 以EGFR为例
df_egfr <- df_cor %>%
  filter(gene=="EGFR")

text_color <- c(rep("red",4),rep("#FDD819",1),rep("#67B26F",1),rep("#C4E0E5",12),rep("#67B26F",2),rep("#FDD819",3),rep("red",5))

ggplot(df_egfr, aes(correlation, fct_reorder(cell_type,correlation)))+
  geom_segment(aes(xend = 0,yend = cell_type),color="grey70",size=1.2)+
  geom_point(aes(size = abs(correlation), color=factor(stars)))+
  scale_color_manual(values = c("red","#FDD819","#67B26F","#C4E0E5"),name="P-value")+
  scale_size_continuous(range = c(3,8),name="Correlation")+
  labs(x=NULL,y=NULL)+
  theme_bw()+
  theme(axis.text.x = element_text(color="black",size = 14),
        axis.text.y = element_text(color = text_color,size = 14)#给标签上色没想到特别好的方法
        )
ggsave("df_egfr.png",width = 8,height = 8)
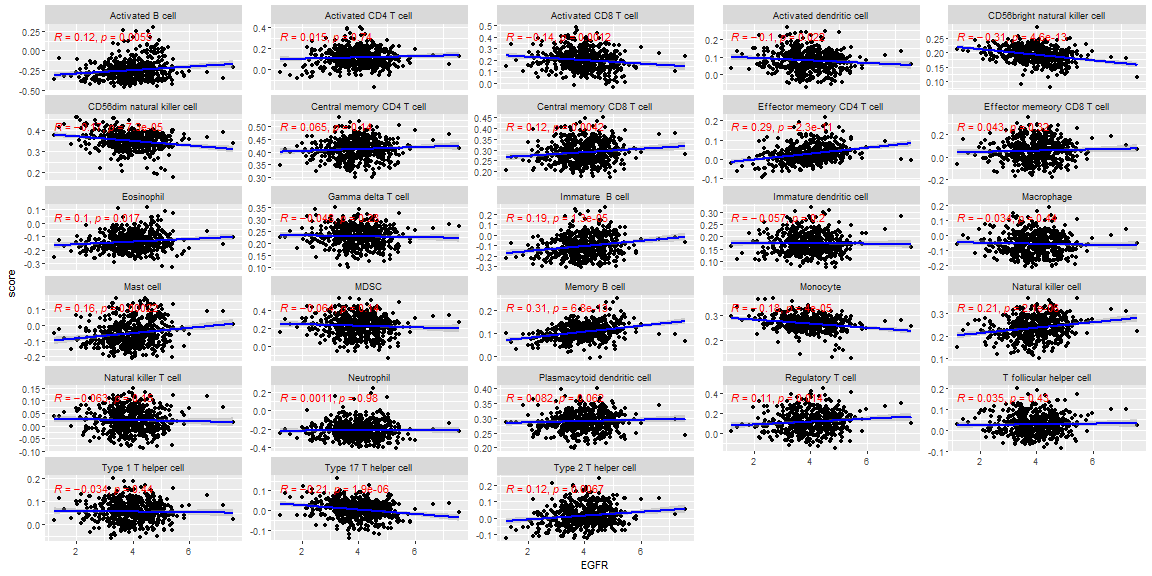
除此之外,你还可以可视化1个基因和1个细胞之间的关系,用散点图或者散点图矩阵的形式。
我们可以直接使用ggplot2里面的分面,画一张图。
# 还是以EGFR为例
df_egfr_scatter <- im_ssgsea %>%
  mutate(EGFR = genes_expr[,"EGFR"],.before = 1) %>%
  pivot_longer(-c(1,2),names_to = "cell_type",values_to = "score")
画图即可:
ggplot(df_egfr_scatter, aes(EGFR,score))+
  geom_point()+
  geom_smooth(method = "lm",color="blue")+
  stat_cor(method = "spearman",color="red")+
  facet_wrap(~cell_type,scales = "free_y",ncol = 5)
## `geom_smooth()` using formula = 'y ~ x'
ggsave("df_facet.png",width = 14,height = 8)
## `geom_smooth()` using formula = 'y ~ x'
注意:到目前为止我们用的都是所有样本,tumor和normal都有!
我们也可以按照tumor和normal分个组,再画图:
df_egfr_scatter$sample_type <- ifelse(as.numeric(substr(df_egfr_scatter$ID,14,15))<10,"tumor","normal")

ggplot(df_egfr_scatter, aes(EGFR,score,color=sample_type))+
  geom_point()+
  geom_smooth(method = "lm")+
  stat_cor(method = "spearman")+
  scale_color_manual(values = c('#FDD819','#028EA1'))+
  facet_wrap(~cell_type,scales = "free_y",ncol = 5)
## `geom_smooth()` using formula = 'y ~ x'
ggsave("df_facet_two.png",width = 14,height = 8)
## `geom_smooth()` using formula = 'y ~ x'
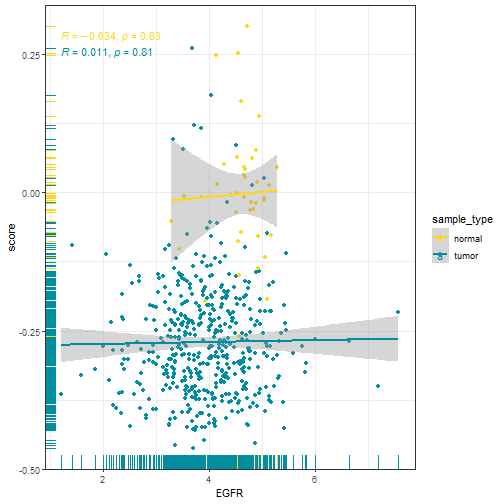
如果你需要单独画图,并保存,也是可以的,都没有问题,只要你基础够扎实,想做什么都可以,你R语言基础不行,啥都做不出来。
# 还是以EGFR为例
df_egfr_scatter %>%
  filter(cell_type == "Activated B cell") %>%
  ggplot(aes(EGFR, score,color=sample_type))+
  geom_point()+
  geom_rug(aes(color=sample_type))+
  geom_smooth(method = "lm")+
  stat_cor(method = "spearman")+
  scale_color_manual(values = c('#FDD819','#028EA1'))+
  theme_bw()
## `geom_smooth()` using formula = 'y ~ x'
是不是很简单呢?
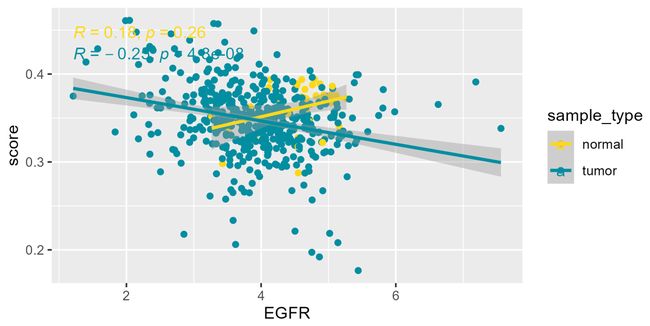
然后你可以循环出图并保存到本地,不过我并没有使用上面这种花里胡哨的图,你可以自己修改:
library(purrr)

plot_list <- df_egfr_scatter %>%
  split(.$cell_type) %>% # group_split没有名字
  map(~ ggplot(., aes(EGFR,score,color=sample_type))+
        geom_point()+
        geom_smooth(method = "lm")+
        stat_cor(method = "spearman")+
        scale_color_manual(values = c('#FDD819','#028EA1'))
      )
paths <- paste0(names(plot_list),".png")

pwalk(list(paths, plot_list),ggsave,width=6,height=3)
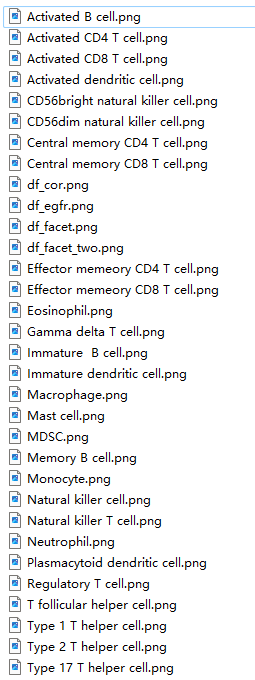
28张图片已保存到本地:
每一张都长这样:
OK,就先介绍到这里,关于结果的可视化,我这里介绍的只是最常见的,冰山一角而已,毕竟可视化方法太多了,不可能全都介绍到。
大家如果有喜欢的图形,可通过评论区,粉丝QQ群等方式发给我~
