关于Qt HttpServer的一些测试(Qt6.4.0rc)
前言
关于Qt的httpserver,官方早就放出很多消息了,自称是和nginx同一级别速率的。Qt5中,这个模块是一个未发布的,需要用户自己编译。Qt6.4中,官方终于以技术预览版的方式,提供预编译库,笔者进行了简单的测试
一、新建一个http服务
1.简单的示例
 QHttpServer server;

 server.route("/", [] () {
     return "hello world";
 });
 server.listen();
示例代码很简单,但不实用。listen函数定义如下:
quint16 QAbstractHttpServer::listen(const QHostAddress &address = QHostAddress::Any, quint16 port = 0)可以在listen()中设置要监听的地址或端口号,返回的是监听的端口号
2.添加证书
首先要生成证书文件,这个教程很多,笔者不再重复,直接上测试代码
const auto sslCertificateChain =
            QSslCertificate::fromPath(QStringLiteral(":/assets/certificate.crt"));
if (sslCertificateChain.empty()) {
        qDebug() << QCoreApplication::translate("QHttpServerExample",
                                                "Couldn't retrive SSL certificate from file.");
    return 0;
}
QFile privateKeyFile(QStringLiteral(":/assets/private.key"));
if (!privateKeyFile.open(QIODevice::ReadOnly)) {
    qDebug() << QCoreApplication::translate("QHttpServerExample",
                                            "Couldn't open file for reading.");
    return 0;
}
httpServer.sslSetup(sslCertificateChain.front(), QSslKey(&privateKeyFile, QSsl::Rsa));
privateKeyFile.close();

const auto sslPort = httpServer.listen(QHostAddress::Any);
if (!sslPort) {
    qDebug() << QCoreApplication::translate("QHttpServerExample",
                                            "Server failed to listen on a port.");
    return 0;
}

qDebug() << QCoreApplication::translate("QHttpServerExample",
                                        "Running on http://127.0.0.1:%1/ and "
                                        "https://127.0.0.1:%2/ (Press CTRL+C to quit)")
                    .arg(port)
                    .arg(sslPort);
先读取证书和私钥,然后设置给http server就可以了。
若是需要同时监听多个端口,需要先监听http的端口,然后设置证书后,再监听https的端口
二、处理请求
1.基本请求处理
QHttpServer::route()函数是简化路由器API的包装器,有多种使用方式,如下所示是最简单的使用方式
QHttpServer httpServer;
httpServer.route("/", []() {
    return "Hello world";
});
第一个参数是url的路径,在后面的lamda式中,可以直接返回字符串
    httpServer.route("/query", [] (const QHttpServerRequest &request) {
        return QString("%1/query/").arg(host(request));
    });

    httpServer.route("/query/", [] (qint32 id, const QHttpServerRequest &request) {
        return QString("%1/query/%2").arg(host(request)).arg(id);
    });

    httpServer.route("/query//log", [] (qint32 id, const QHttpServerRequest &request) {
        return QString("%1/query/%2/log").arg(host(request)).arg(id);
    });

    httpServer.route("/query//log/", [] (qint32 id, float threshold,
                                              const QHttpServerRequest &request) {
        return QString("%1/query/%2/log/%3").arg(host(request)).arg(id).arg(threshold);
    });

    httpServer.route("/user/", [] (const qint32 id) {
        return QString("User %1").arg(id);
    });

    httpServer.route("/user//detail", [] (const qint32 id) {
        return QString("User %1 detail").arg(id);
    });

    httpServer.route("/user//detail/", [] (const qint32 id, const qint32 year) {
        return QString("User %1 detail year - %2").arg(id).arg(year);
    });
url中,可以使用占位符的,其对应的参数也可以被lamda表达式捕获。
除了请求参数,可以捕获QHttpServerRequest,用于访问一些请求参数
    httpServer.route("/json/", [] {
        return QJsonObject{
            {
                {"key1", "1"},
                {"key2", "2"},
                {"key3", "3"}
            }
        };
    });

    httpServer.route("/assets/", [] (const QUrl &url) {
        return QHttpServerResponse::fromFile(QStringLiteral(":/assets/%1").arg(url.path()));
    });
返回参数也不限于字符串,可以是json等。其实只要是能构造成QHttpServerResponse对象的,都可以
2.区分get/post
默认的是处理所有支持的请求方式,如果需要明确用什么方式,可以通过第二个参数区分
    httpServer.route("/v2/get", QHttpServerRequest::Method::Get,
                     [](const QHttpServerRequest &request) {
        qDebug() << "get query" << request.query().toString();
        return QJsonObject{
            {
                {"method", "get"}
            }
        };
    });

    httpServer.route("/v2/post", QHttpServerRequest::Method::Post,
                     [](const QHttpServerRequest &request) {
        qDebug() << "post query" << request.query().toString();
        qDebug() << "post body" << request.body();
        return QJsonObject{
            {
                {"method", "post"}
            }
        };
    });
3.基本验证
// Basic authentication example (RFC 7617)
    httpServer.route("/auth", [](const QHttpServerRequest &request) {
        auto auth = request.value("authorization").simplified();

        if (auth.size() > 6 && auth.first(6).toLower() == "basic ") {
            auto token = auth.sliced(6);
            auto userPass = QByteArray::fromBase64(token);

            if (auto colon = userPass.indexOf(':'); colon > 0) {
                auto userId = userPass.first(colon);
                auto password = userPass.sliced(colon + 1);

                if (userId == "Aladdin" && password == "open sesame")
                    return QHttpServerResponse("text/plain", "Success\n");
            }
        }
        QHttpServerResponse response("text/plain", "Authentication required\n",
                                     QHttpServerResponse::StatusCode::Unauthorized);
        response.setHeader("WWW-Authenticate", R"(Basic realm="Simple example", charset="UTF-8")");
        return response;
    });
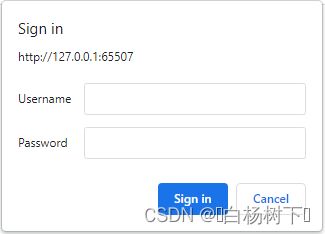
基本验证也简单,只是这个解析还需要手动的,这样可以在前端弹出一个验证页面
4.跨域问题
有时需要解决下跨域访问的问题,需要在返回值时添加一些数据
    httpServer.route("/", []() {
            QHttpServerResponse response("Hello world");
            response.setHeader("Access-Control-Allow-Origin", "*");
            response.setHeader("Access-Control-Allow-Methods", "POST,GET,PUT,DELETE");
            response.setHeader("Access-Control-Max-Age", "3600");
            response.setHeader("Access-Control-Allow-Headers", "*");
            response.setHeader("Access-Control-Allow-Credentials", "true");

            return response;

        });
5.多线程处理
Qt的QHttpServer类并没有提供设置线程或进程的地方,除了可以手动开启多线程外,可以使用Qt的高级线程类
    httpServer.route("/feature/", [] (int id) {
        return QtConcurrent::run([] () {
            return QHttpServerResponse("the future is coming");
        });
    });
后记
因时间所限,笔者没有进行太多测试
笔者使用的是Qt6.4.0RC版,建议读者在正式项目中,使用正式版
有些让人遗憾的是,这个模块使用了GPL协议,商业化的小伙伴要注意下
笔者也测试了下它的websocket功能,但很遗憾,当前没法正常使用
本次测试源码
