大数据学习教程:Linux高级教程(下)
四、大数据集群服务器搭建
1. 新增Linux服务器
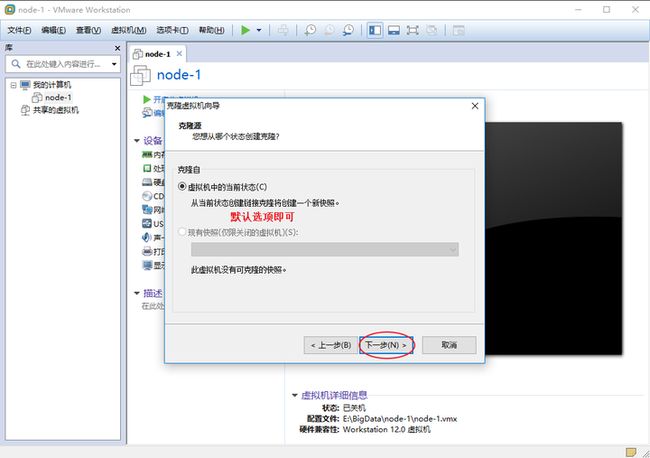
1.1、克隆虚拟机
学习环境中,一般使用VMware虚拟机克隆Linux系统,用来进行集群服务器的搭建。
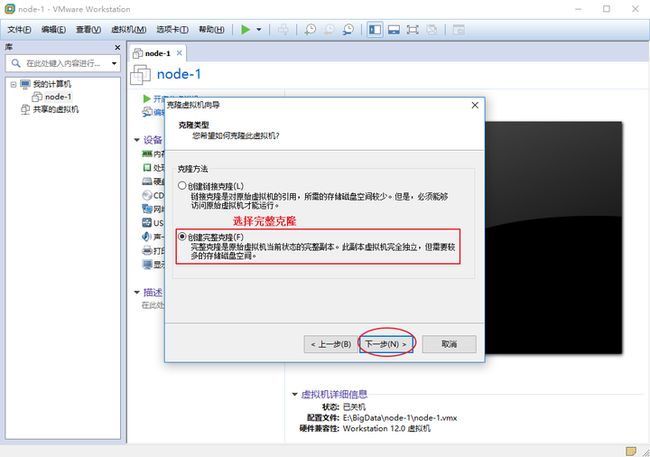
VMware支持两种类型的克隆:完整克隆、链接克隆
完整克隆是和原始虚拟机完全独立的一个复制,它不和原始虚拟机共享任何资源。可以脱离原始虚拟机独立使用。链接克隆需要和原始虚拟机共享同一虚拟磁盘文件,不能脱离原始虚拟机独立运行。但采用共享磁盘文件却大大缩短了创建克隆虚拟机的时间,同时还节省了宝贵的物理磁盘空间。通过链接克隆,可以轻松的为不同的任务创建一个独立的虚拟机。
虚拟机克隆的前置条件:虚拟机处于关闭状态。
虚拟机克隆的流程:
1.2、修改虚拟机的硬件配置
1.3、修改虚拟机的网络配置
修改主机名hostname:
vim /etc/hostname
node2.itcast.cn
修改IP地址
vim /etc/sysconfig/network-scripts/ifcfg-ens33
TYPE="Ethernet" # 网卡类型 以太网
PROXY_METHOD="none"
BROWSER_ONLY="no"
BOOTPROTO="none"
DEFROUTE="yes"
IPV4_FAILURE_FATAL="no"
IPV6INIT="yes"
IPV6_AUTOCONF="yes"
IPV6_DEFROUTE="yes"
IPV6_FAILURE_FATAL="no"
IPV6_ADDR_GEN_MODE="stable-privacy"
NAME="ens33" #网卡名称
UUID="74c3b442-480d-4885-9ffd-e9f0087c9cf7"
DEVICE="ens33"
ONBOOT="yes" #是否开机启动网卡服务
IPADDR="192.168.88.152" #IP地址
PREFIX="24" #子网掩码 等效: NETMASK=255.255.255.0
GATEWAY="192.168.88.2" #网关服务
DNS1="192.168.88.2" #网关DNS解析
DOMAIN="114.114.114.114" #公网DNS解析 114.114.114.114 谷歌:8.8.8.8 阿里百度DNS
IPV6_PRIVACY="no
systemctl restart network # 重启网络服务
2. 关闭防火墙
2.1、关闭firewalld
# 查看防火墙状态 systemctl status firewalld
# 关闭防火墙
systemctl stop firewalld
# 关闭防火墙开机自启动
systemctl disable firewalld
# centos服务开启关闭命令
centos6:(某些可以在centos7下使用)
service 服务名 start|stop|status|restart
chkconfig on|off 服务名
centos7:
systemctl start|stop|status|restart 服务名
systemctl disable|enable 服务名 #开机自启动 关闭自启
2.2、关闭SElinux
安全增强型 Linux(Security-Enhanced Linux)简称 SELinux,它是一个 Linux 内核模块,也是 Linux 的一个安全子系统。
SELinux 主要由美国国家安全局开发。2.6 及以上版本的 Linux 内核都已经集成了 SELinux 模块。
SELinux 主要作用就是最大限度地减小系统中服务进程可访问的资源(最小权限原则)。
注意需要重启才能生效。
vim /etc/selinux/config
# This file controls the state of SELinux on the system.
# SELINUX= can take one of these three values:
# enforcing - SELinux security policy is enforced.
# permissive - SELinux prints warnings instead of enforcing.
# disabled - No SELinux policy is loaded.
SELINUX=disabled
3. 修改主机名
使用vi编辑器,修改主机名:
vim /etc/hostname root
重启后生效
4. 修改hosts映射
分别编辑每台虚拟机的hosts文件,在原有内容的基础上,填下以下内容:
注意:不要修改文件原来的内容,三台虚拟机的配置内容都一样。
vim /etc/hosts
127.0.0.1 localhost localhost.localdomain localhost4 localhost4.localdomain4
::1 localhost localhost.localdomain localhost6 localhost6.localdomain6
192.168.88.151 node1.itcast.cn node1
192.168.88.152 node2.itcast.cn node2
192.168.88.153 node3.itcast.cn node3
5. SSH免密登录
# 实现node1----->node2
# step1
在node1生成公钥私钥
ssh-keygen 一顿回车 在当前用户的home下生成公钥私钥 隐藏文件
[root@node1 .ssh]# pwd
/root/.ssh
[root@node1 .ssh]# ll
total 12
-rw------- 1 root root 1675 May 20 11:59 id_rsa
-rw-r--r-- 1 root root 402 May 20 11:59 id_rsa.pub
-rw-r--r-- 1 root root 183 May 20 11:50 known_hosts
# step2
copy公钥给node2
ssh-copy-id node2
注意第一次需要密码
# step3
[root@node1 .ssh]# ssh node2
Last login: Thu May 20 12:03:30 2021 from node1.itcast.cn
[root@node2 ~]# exit
logout
Connection to node2 closed.
# 课程要求:至少打通node1---->node1 node2 node3 这三个免密登录
# 至于所有机器之间要不要互相免密登录 看心情
6. 时钟同步
| 命令 |
英文 |
含义 |
|---|---|---|
| ntpdate 互联网时间服务器地址 |
Network Time Protocol |
同步时间 |
阿里云时钟同步服务器:ntpdate ntp4.aliyun.com
7. 远程文件拷贝
远程文件拷贝命令:scp
scp是 remote file copy program 的缩写, scp是远程文件拷贝命令
7.1、从本机拷贝到远程服务器
准备工作
# 创建目录
mkdir -p /export/aaa/bbb/ccc
# 创建文件
touch /export/aaa/01.txt /export/aaa/02.txt
# 显示
tree /export/aaa
1、文件
语法格式
拷贝文件
scp local_file remote_username@remote_ip:remote_folder
需求: 将本地 01.txt 文件 复制到 192.168.153.102 机器的 /export目录下
scp /export/aaa/01.txt [email protected]:/export
scp /export/aaa/02.txt root@hadoop02:/export
scp /export/aaa/02.txt hadoop02:/export
2、文件夹
语法格式
拷贝目录
scp -r local_folder remote_username@remote_ip:remote_folder
需求: 将本地 aaa 目录 复制到 192.168.150.102 机器的 /export 目录下
scp -r /export/aaa [email protected]:/export
scp -r /export/aaa root@hadoop02:/export
scp -r /export/aaa hadoop02:/export
7.2、从远程服务器复制到本机
准备工作
# 创建目录
mkdir -p /export/a1/b1/c1
# 创建文件
touch /export/a1/111.txt touch /export/a1/222.txt
# 显示内容
tree /export/a1
1、文件
语法格式
scp remote_username@remote_ip:remote_file local_folder
练习: 将 hadoop02的 111.txt 文件 复制到 hadoop01的 export目录下
scp [email protected]:/export/a1/111.txt /exportscp root@hadoop02:/export/a1/222.txt /exportscp hadoop02:/export/a1/222.txt /export
2 目录
语法格式
scp -r remote_username@remote_ip:remote_folder local_folder练习: 将hadoop02的 /export/a1/ 目录 复制到 hadoop01 的 export目录下
scp -r [email protected]:/export/a1 /exportscp -r hadoop02:/export/a1 /export
五、Shell编程
1. 什么是Shell
1.1、简介
Shell 是一个用 C 语言编写的程序, 通过 Shell 用户可以访问操作系统内核服务。
它类似于 DOS 下的 command 和后来的 cmd.exe。Shell既是一种命令语言,又是一种程序设计语言。
Shell script 是一种为shell编写的脚本程序。 Shell 编程一般指shell脚本编程,不是指开发shell自身。
1.2、Shell解释器
Shell编程跟java、php编程一样,只要有一个能编写代码的文本编辑器和一个能解释执行的脚本解释器就可以了。
Linux的Shell解释器种类众多,一个系统可以存在多个 shell,可以通过cat /etc/shells 命令查看系统中安装的 shell。
bash 由于易用和免费,在日常工作中被广泛使用。同时, bash 也是大多数Linux 系统默认的 Shell。
总结:java执行需要虚拟机解释器, 同理shell程序执行也需要解析器
2. 快速入门
2.1、编写Shell脚本
使用 vi 编辑器新建一个文件hello.sh(扩展名并不影响脚本执行)
#!/bin/bash
echo "Hello World !"
# ! 是一个约定的标记,它告诉系统这个脚本需要什么解释器来执行,即使用哪一种 Shell
echo命令 用于向窗口输出文本。
给shell程序赋予执行权限:
chmod +x ./hello.sh # 使脚本具有执行权限
2.2、执行Shell脚本
执行shell程序:
./hello.sh #执行脚本
直接写 hello.sh,linux 系统会去 PATH 里寻找有没有叫hello.sh的。
用 ./hello.sh 告诉系统说,就在当前目录找
还可以作为解释器参数运行。直接运行解释器,其参数就是 shell 脚本的文件名,如:sh /root/shelldemo/hello.sh
在使用解释器直接执行shell程序这种方式来运行脚本,不需要考虑脚本程序的执行权限了
小结: 使用vi编辑器,创建shell程序文件。通常使用.sh作为shell程序后缀名。
shell程序的基本格式:
1、指定解释器信息。默认:/bin/bash
2、书写shell程序代码
3、保存shell程序代码
4、执行shell程序 提前:给shell程序授予可执行权限
第一种:./xxx.sh #在当前目录中执行shell程序
第二种:/xx/xxx.sh #书写全路径的shell程序
第三种:sh /xx/xxx.sh #把shell程序作用/bin/sh解释器的参数,通过运行解释器来执行shell


