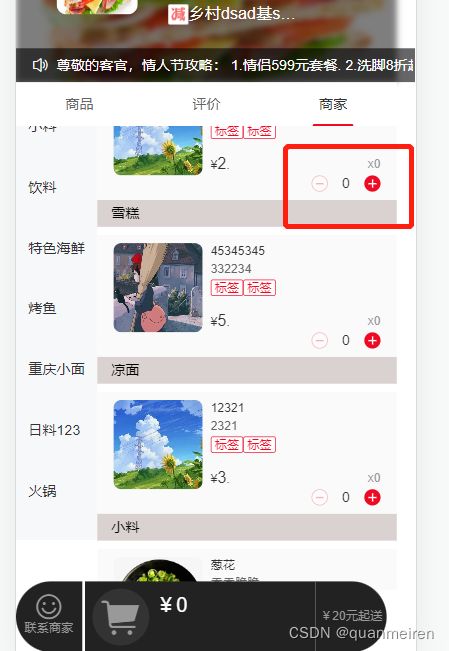
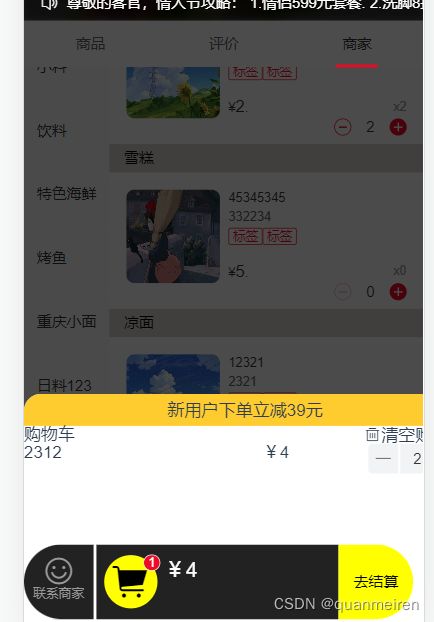
使用vuex让购物车联动


// 1.vuex点击加减触发函数提交仓库把我们请求的数据存到仓库
2.在仓库定义这个函数和对象 把我们存进去的数据存起来
// 3。在我们需要的页面拿出数据,然后循环就可以
// 4.当我们点击加号就触发函数然后在vuex对这个数据进行处理
// 5.对我们点进来的数据进行一个对右边的循环我们只要判断他是否》0,如果是大于0就push到新的数组
6.然后拿到新的数组渲染到购物车里面
这个是goods页面 就是整体的页面 asidelist: [], 是左边要渲染的数据定义
rightlist: [],就是右边要渲染的数组
<template>
 <div class="box">
   <!-- 左边 -->
   <div class="leftbox">
     <van-sidebar v-model="activeKey">
       <van-sidebar-item
         @click="onChange"
         v-for="(v,i) in asidelist"
         :title="v.name"
         :key="i"
         :id="'cate' +i"
       />
     </van-sidebar>
   </div>
   <!-- 右边 -->
   <div class="rightbox">
     <div>
       <div v-for="(v,i) in rightlist" :key="i" :id="'list' +i">
         <h3>{{v.name}}</h3>
         <van-card
           v-for="(v2,i2) in v.foods"
           :key="i2"
           :num="v2.num"
           :price="v2.price"
           :desc="v2.goodsDesc"
           :title="v2.name"
           :thumb="v2.imgUrl"
         >
           <template #tags>
             <van-tag plain type="danger">标签</van-tag>
             <van-tag plain type="danger">标签</van-tag>
           </template>
           <template #footer>
             <van-stepper
               @change="changecate"
               v-model="v2.num"
               theme="round"
               button-size="16"
               min="0"
               disable-input
             />
           </template>
         </van-card>
       </div>
     </div>
   </div>
 </div>
</template>
<script>
import { goodsList } from "@/api/account.api";
import BScroll from "@better-scroll/core";
import { mapState, mapMutations } from "vuex";
export default {
 data() {
   return {
     activeKey: 0,
     bs: {},
     bsr: {}
   };
 },
 // 点击左边跳转到右边的节点
 methods: {
   onChange(i) {
     this.bsr.scrollToElement("#list" + i, 300);
   },
   // 4.当我们点击加号就触发函数然后在vuex对这个数据进行处理

   changecate() {
     this.$store.commit("changecate");
   }
 },
 async created() {
   // 页面初始化的时候把他提交给仓库,提交仓库要用commit去提交仓库里面去定义一个数组
   console.log(this.rightlist);
   const res = await goodsList();
   res.data.data.forEach(v => {
     v.foods.forEach(v2 => {
       v2.num = 0;
     });
   });
   // 1.vuex点击加减触发函数提交仓库把我们请求的数据存到仓库
   this.$store.commit("addlist", res.data.data);
   // 获取两个左右边的父节点
   this.$nextTick(() => {
     this.bs = new BScroll(".leftbox", {
       probeType: 3,
       click: true
     });
     this.bsr = new BScroll(".rightbox", {
       probeType: 3,
       click: true
     });

     // 拿到我们初始值的右边所有商品列表把他放到一个数组里面
     let arr = [];
     this.rightlist.forEach((v, i) => {
       arr.push(
         document.querySelector("#list" + i).offsetTop -
           document.querySelector("#list0").offsetTop
       );
     });

     // 给右边添加滚动事件
     this.bsr.on("scroll", v => {
       let y = Math.abs(v.y);

       for (let i = 0; i < arr.length; i++) {
         if (y >= arr[i] && y < arr[i + 1]) {
           this.activeKey = i;
           this.bs.scrollToElement("#cate" + i, 300);
           break;
         }
       }
     });
   });
 },
 // 3。在我们需要的页面拿出数据,然后循环就可以
 computed: {

   ...mapState(["rightlist"]),

   asidelist() {
     return this.rightlist;
   }
 }
};
</script>
<style lang="scss" scoped>
h3 {
 color: black;
 font-size: 14px;
 height: 4vh;
 line-height: 4vh;
 width: 100%;
 background-color: rgb(218, 209, 209);
 text-indent: 1em;
}
.box {
 display: flex;
 flex-direction: row;
 .leftbox {
   // width: 100px;
   overflow-y: hidden;
   background-color: f7f8fa;
   margin-bottom: 50px;
 }
 .rightbox {
   height: 100vh;
   flex: 1;
   margin-bottom: 100px;
   overflow-y: hidden;
   // background-color: antiquewhite;
 }
}
</style>


...............................................
下面是vuex的代码
import Vue from "vue";
import Vuex from "vuex";

Vue.use(Vuex);

export default new Vuex.Store({
 namespaced: true,
 state: {
   asidelist: [],
   rightlist: [],
 },

 mutations: {
   // 2.在仓库定义这个函数和对象  把我们存进去的数据存起来
   addlist(state, payload) {
     state.rightlist = payload;
   },
   // 5.对我们点进来的数据进行一个对右边的循环我们只要判断他是否》0,如果是大于0就push到新的数组
   changecate(state, payload) {
     let arr = [];
     state.rightlist.forEach((v) => {
       v.foods.forEach((v2) => {
         console.log(v2.num);
         if (v2.num > 0) {
           arr.push(v2);
           console.log(v2);
         }
       });
     });
     state.asidelist = arr;
   },
 },

 getters: {},

 actions: {},
 modules: {},
});
。。。。。。。。。。。。。。。。。。。。。。。。。。。


这个是我们下面 那个 购物车的代码
<template>
 <div class="cart">
   <!-- 购物车显示条 -->
   <div class="cartbar">
     <div class="concat">
       <van-icon name="smile-o" />联系商家
     </div>
     <div class="cartico">
       <van-badge v-if="asidelist.length>0" :content="asidelist.length">
         <van-icon name="shopping-cart" @click="show = !show" />
       </van-badge>
       <van-icon v-else name="shopping-cart" class="cartico-off" />

       <div class="price">
         <strong>¥{{tatol}}</strong>
         <span>{{asidelist.num}}</span>
       </div>
     </div>

     <div v-if="asidelist.length>0" class="delivery delivery-on">去结算</div>
     <div v-else class="delivery">¥20元起送</div>
   </div>

   <!-- 购物车列表 -->
   <van-popup v-model="show" round position="bottom" :style="{ height: '30%' }">
     <h1>新用户下单立减39元</h1>
     <div class="clear">
       <span>购物车</span>
       <span>
         <van-icon name="delete-o" />清空购物车
       </span>
     </div>

     <ul>
       <li class="box" v-for="(v,i) in asidelist" :key="i">
         <span class="titeles">
           {{v.goodsDesc}}
         </span>
         <span>¥{{v.price*v.num}}</span>
         <van-stepper v-model="v.num" min="0" />
       </li>
     </ul>
   </van-popup>
 </div>
</template>
<script>
import { mapState } from "vuex";
import { reactive } from "vue";
export default {
 data() {
   return {
     show: false,
     value: 0
   };
 },
 created() {},
 computed: {
   ...mapState(["asidelist"]),
   tatol() {
     let sum = 0;
     this.asidelist.forEach(v => {
       sum += v.price * v.num;
     });
     return sum;
   }
 }
};
</script>

<style lang="scss" scoped>
.box {
 display: flex;
 justify-content: space-between;
 .titeles {
   display: block;
   overflow: hidden; //隐藏文字
   text-overflow: ellipsis; //显示 ...
   white-space: nowrap; //不换行
   width: 150px;
 }
}
.clear {
 display: flex;
 justify-content: space-between;
}
h1 {
 height: 30px;
 line-height: 30px;
 text-align: center;
 width: 100%;
 background-color: #ffcc30;
}
.cart {
 position: fixed;
 left: 0;
 bottom: 0;
}

.cartbar {
 z-index: 9999;
 position: fixed;
 // left: 2%;
 bottom: 10px;
 width: 88%;
 height: 70px;
 display: flex;
 color: #999;

 .concat {
   background: #222;
   width: 65px;
   font-size: 12px;
   text-align: center;
   padding-top: 10px;
   border-radius: 35px 0 0 35px;
   margin-right: 3px;

   .van-icon {
     font-size: 30px;
     display: block;
   }
 }

 .cartico {
   width: 1px;
   flex-grow: 1;
   background: #222;
   display: flex;

   .van-badge__wrapper {
     width: 50px;
     height: 50px;
     background: #ff0;
     font-size: 36px;
     line-height: 50px;
     text-align: center;
     border-radius: 30px;
     margin: 10px 7px;

     :deep(.van-badge--fixed) {
       top: 7px;
       right: 5px;
     }

     .van-icon {
       color: #000;
     }
   }

   .cartico-off {
     width: 56px;
     height: 56px;
     background: #333;
     font-size: 40px;
     line-height: 56px;
     text-align: center;
     border-radius: 30px;
     margin: 7px;
   }

   .price {
     width: 1px;
     flex-grow: 1;
     font-size: 12px;
     padding-top: 14px;

     strong {
       display: block;
       color: #fff;
       font-size: 20px;
     }
   }
 }

 .delivery {
   width: 70px;
   background: #222;
   font-size: 12px;
   line-height: 70px;
   border-radius: 0 35px 35px 0;
   text-align: center;
 }

 .delivery-on {
   background: #ff0;
   font-size: 14px;
   color: #000;
 }
}
</style>