怎样优雅地增删查改(一):从0开始搭建Volo.Abp项目
文章目录
-
- 项目介绍
-
- 模块化
- 由框架实现的
- 需要实现的
- 创建项目
- 创建业务模块
- 配置引用和依赖
- 配置DbContext
- 创建实体和Dto
- 配置AutoMapper
- 项目地址
软件系统中数据库或者持久层的基本操作功能可以用Curd描述,Curd即 增加(Create)、更新(Update)、读取查询(Retrieve)和删除(Delete), 这4个单词的首字母。
在常见的业务系统中,对数据的大部分操作都是Curd,在实践的过程中对数据的筛选、排序、分页、关联查询等功能抽象和封装。
本系列博文将从0开始,逐步搭建一个基于Volo.Abp + Vue 的前后端分离的,具有Curd通用查询功能的项目。
-
怎样优雅地增删查改(一):从0开始搭建Volo.Abp项目
-
怎样优雅地增删查改(二):扩展身份管理模块
-
怎样优雅地增删查改(三):业务用户的增删查改
-
怎样优雅地增删查改(四):创建通用查询基类
-
怎样优雅地增删查改(五):按组织架构查询
-
怎样优雅地增删查改(六):按任意字段关键字查询
-
怎样优雅地增删查改(七):按用户查询
-
怎样优雅地增删查改(八):按用户关系查询
-
怎样优雅地增删查改(九):按日期范围查询
项目介绍
本项目是基于一个简单的用户健康数据管理系统,我们将对业务常用的查询功能进行扩展,抽象这些业务并封装成接口,称之为通用查询接口(GeneralCurdInterfaces),本项目关注的是基础设施层,但大部分实现还是围绕业务,对于普适性有待研究,所以我还是决定以Sample为名。
模块化
Abp模块是可以供主模块重用的独立功能单元,每个模块可以包含应用服务、领域层、数据访问层、Web API等,模块可以被其他模块引用,也可以被主模块引用。
本项目模块化的目的除了可重用,更多是为微服务架构做准备。微服务架构不在本博文的讨论范围,为了简化,还是使用单体应用架构。
由框架实现的
Volo.Abp 为我们实现了CrudAppService,(在旧版本的AbpBoilerplate中称Crud为Curd,在我看来两者没有什么区别,本项目还是以Curd命名)
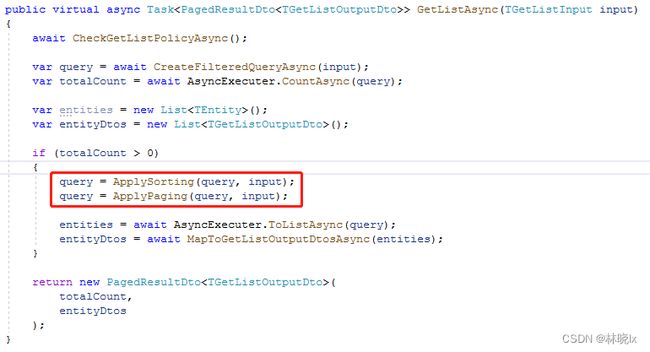
CrudAppService为我们提供了基本的增删改查,以及分页、排序的实现
需要实现的
-
按任意字段关键字查询
-
按任意字段排序
-
按组织架构查询
-
按用户查询
-
按用户关系查询
-
按创建日期查询(起始日期,结束日期)
本项目虽然是用Volo.Abp实现,但对于旧版本的AbpBoilerplate仍然可以方便的移植,可以看我之前的博文:[Volo.Abp升级笔记]使用旧版Api规则替换RESTful Api以兼容老程序,如何以最大限度保持接口的兼容性。
创建项目
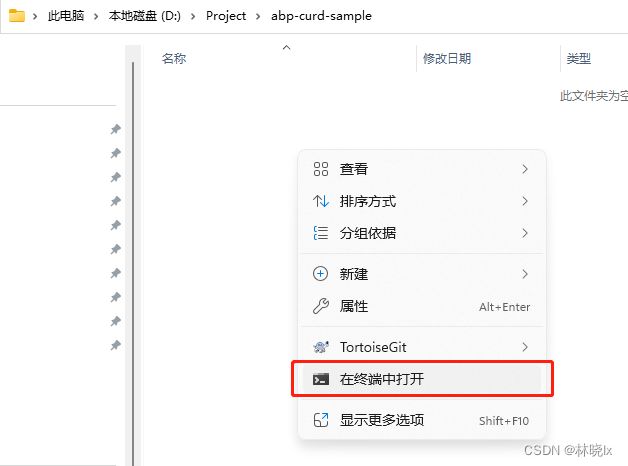
创建空白文件夹,在文件夹内打开命令行
使用AbpCli创建一个无UI的项目 拆分Auth Server,执行以下命令
abp new Matoapp -u none --separate-auth-server -csf
等待项目创建成功
创建业务模块
作为命名空间前缀,Matoapp是一个虚构的企业名称。
在解决方案目录中创建新目录src/modules,在该目录下创建员工健康管理模块Health,公共业务模块Common,以及扩展了Volo.Abp.Indentity的Identity模块
在modules目录下打开命令行,分别执行以下命令
abp new Matoapp.Health -t module --no-ui
abp new Matoapp.Common -t module --no-ui
abp new Matoapp.Identity -t module --no-ui
等待模块创建完成
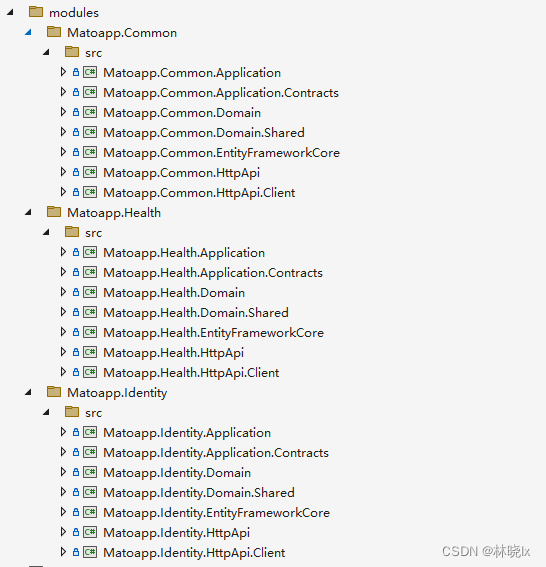
打开解决方案,将业务模块中的各个项目添加到解决方案中,我们只需要添加各模块的Application,Application.Contracts,Domain,Domain.Shared,EntityFrameworkCore,HttpApi以及HttpApi.Client。
添加完成后的解决方案结构看上去像这样:
配置引用和依赖
将Volo.Abp.Identity.Application添加到Application项目的引用中
dotnet add package Volo.Abp.Identity.Application
将Volo.Abp.Identity.Application.Contracts添加到Application.Contracts项目的引用中
dotnet add package Volo.Abp.Identity.Application.Contracts
将Volo.Abp.Identity.Domain,Volo.Abp.PermissionManagement.Domain添加到Domain项目的引用中
dotnet add package Volo.Abp.Identity.Domain
dotnet add package Volo.Abp.PermissionManagement.Domain
将Volo.Abp.Identity.EntityFrameworkCore添加到EntityFrameworkCore项目的引用中
dotnet add package Volo.Abp.Identity.EntityFrameworkCore
Application层
Application层添加对各模块的引用,
ApplicationModule中添加对各模块的依赖
[DependsOn(
    ...
    typeof(CommonApplicationModule),
    typeof(HealthApplicationModule),
    typeof(IdentityApplicationModule)
    )]
public class MatoappApplicationModule : AbpModule
{

}
AuthServer添加Identity数据访问层引用,并配置依赖关系
[DependsOn(
    ...
    typeof(IdentityDomainModule),
    typeof(IdentityEntityFrameworkCoreModule)
)]
public class MatoappAuthServerModule : AbpModule
{

}
HttpApi层添加对各模块的引用,
HttpApiModule中添加对各模块的依赖
[DependsOn(
    ...
    typeof(CommonHttpApiModule),
    typeof(HealthHttpApiModule),
    typeof(IdentityHttpApiModule)
    )]
public class MatoappHttpApiModule : AbpModule
{

}
配置DbContext
用CodeFirst方式创建一些业务表,比如员工表,客户表,报警表等,这些表都是在Health模块中创建的,
Tag相关的表放入Common模块中,Relation表放入Identity模块中。
这些业务表按照业务模块的划分,放入各自的DbContext中。
public interface IIdentityDbContext : IEfCoreDbContext
{

    DbSet Relation { get; set; }

}
public interface IHealthDbContext : IEfCoreDbContext
{

    DbSet Client { get; set; }
    DbSet Employee { get; set; }

    DbSet Alarm { get; set; }

    DbSet SimpleValueRecord { get; set; }
}
public interface ICommonDbContext : IEfCoreDbContext
{
    DbSet DataEnum { get; set; }
    DbSet DataEnumCategory { get; set; }
    DbSet Tag { get; set; }
}
各业务模块的DbContextModelCreatingExtensions中添加对各表的字段,约束,索引等的配置。以便在DbContext的OnModelCreating中调用
builder.ConfigureCommon();
builder.ConfigureHealth();
builder.ConfigureMatoIdentity();
EntityFrameworkCore层中改写MatoappDbContext如下:
[ReplaceDbContext(typeof(Matoapp.Identity.EntityFrameworkCore.IIdentityDbContext))]
[ReplaceDbContext(typeof(IHealthDbContext))]
[ReplaceDbContext(typeof(ICommonDbContext))]
[ReplaceDbContext(typeof(ITenantManagementDbContext))]
[ConnectionStringName("Default")]
public class MatoappDbContext :
    AbpDbContext,
    Matoapp.Identity.EntityFrameworkCore.IIdentityDbContext,
    IHealthDbContext,
    ICommonDbContext,
    ITenantManagementDbContext
{

    #region Entities from the modules

    public DbSet Relation { get; set; }

    // Tenant Management
    public DbSet Tenants { get; set; }
    public DbSet TenantConnectionStrings { get; set; }

    public DbSet Client { get; set; }
    public DbSet Employee { get; set; }

    public DbSet Alarm { get; set; }

    public DbSet SimpleValueRecord { get; set; }

    public DbSet DataEnum { get; set; }
    public DbSet DataEnumCategory { get; set; }
    public DbSet Tag { get; set; }


    #endregion

    public MatoappDbContext(DbContextOptions options)
        : base(options)
    {

    }

    protected override void OnModelCreating(ModelBuilder builder)
    {
        base.OnModelCreating(builder);

        /* Include modules to your migration db context */

        builder.ConfigurePermissionManagement();
        builder.ConfigureSettingManagement();
        builder.ConfigureBackgroundJobs();
        builder.ConfigureAuditLogging();
        builder.ConfigureIdentity();
        builder.ConfigureOpenIddict();
        builder.ConfigureFeatureManagement();
        builder.ConfigureTenantManagement();

        builder.ConfigureCommon();
        builder.ConfigureHealth();
        builder.ConfigureMatoIdentity();

        /* Configure your own tables/entities inside here */

        //builder.Entity(b =>
        //{
        //    b.ToTable(MatoappConsts.DbTablePrefix + "YourEntities", MatoappConsts.DbSchema);
        //    b.ConfigureByConvention(); //auto configure for the base class props
        //    //...
        //});
    }
}
在AuthServer创建AuthServerDbContextFactory,AuthServerDbContext。
AuthServerDbContext.cs代码如下
public class AuthServerDbContext : AbpDbContext
{
    public AuthServerDbContext(DbContextOptions options)
        : base(options)
    {

    }

    protected override void OnModelCreating(ModelBuilder modelBuilder)
    {
        base.OnModelCreating(modelBuilder);
        modelBuilder.ConfigureIdentity();
        modelBuilder.ConfigureIdentityServer();
        modelBuilder.ConfigureAuditLogging();
        modelBuilder.ConfigurePermissionManagement();
        modelBuilder.ConfigureSettingManagement();
        modelBuilder.ConfigureTenantManagement();
        modelBuilder.ConfigureFeatureManagement();
        modelBuilder.ConfigureMatoIdentity();

    }
}
创建实体和Dto
在各业务模块中创建实体类,以及对应的Dto类
此处以Health模块为例,创建以下实体类
- Employee 员工
- Client 客户
- Alarm 报警
- SimpleValueRecord 简单值记录
配置AutoMapper
根据实际业务需求,配置AutoMapper,将实体类映射到DTO类。此处以Health模块为例。
public HealthApplicationAutoMapperProfile()
{
    CreateMap().Ignore(c => c.EntityVersion);
    CreateMap().Ignore(c => c.EntityVersion);

    CreateMap();
    CreateMap();

    CreateMap();
    CreateMap();

    CreateMap().Ignore(c => c.TenantId)
            .Ignore(c => c.ConcurrencyStamp);
    CreateMap().IgnoreFullAuditedObjectProperties()
            .IgnoreSoftDeleteProperties()
            .Ignore(c => c.TenantId)
            .Ignore(c => c.User)
            .Ignore(c => c.ConcurrencyStamp)
            .Ignore(c => c.Id);

    CreateMap().IgnoreFullAuditedObjectProperties()
            .IgnoreSoftDeleteProperties()
            .Ignore(c => c.TenantId)
            .Ignore(c => c.User)
            .Ignore(c => c.ConcurrencyStamp);


    CreateMap();
    CreateMap();
    CreateMap().Ignore(c => c.TenantId)
        .Ignore(c => c.Alarm)
            .Ignore(c => c.ConcurrencyStamp);


    CreateMap()
        .ForAllMembers(opt => opt.Condition((src, dest, srcMember, destMember) => srcMember != null));

    CreateMap()
        .IgnoreFullAuditedObjectProperties()
        .IgnoreSoftDeleteProperties()
        .Ignore(c => c.LockoutEnabled)
        .Ignore(c => c.LockoutEnd)
        .Ignore(c => c.TenantId)
        .Ignore(c => c.ConcurrencyStamp)
        .Ignore(c => c.EmailConfirmed)
        .Ignore(c => c.PhoneNumberConfirmed)

        .Ignore(c => c.Id)
        .ForAllMembers(opt => opt.Condition((src, dest, srcMember, destMember) => srcMember != null));


    CreateMap()
        .ForAllMembers(opt => opt.Condition((src, dest, srcMember, destMember) => srcMember != null));

    CreateMap()

        .IgnoreFullAuditedObjectProperties()
        .IgnoreSoftDeleteProperties()
        .Ignore(c => c.LockoutEnabled)
        .Ignore(c => c.LockoutEnd)
        .Ignore(c => c.TenantId)
        .Ignore(c => c.ConcurrencyStamp)
        .Ignore(c => c.EmailConfirmed)
        .Ignore(c => c.PhoneNumberConfirmed)

        .Ignore(c => c.Id)
        .ForAllMembers(opt => opt.Condition((src, dest, srcMember, destMember) => srcMember != null));
}
至此,我们有了基础的数据库,实体类,Dto类。下一步我们将创建通用Curd应用服务,以及通用查询接口。
项目地址
Github:general-curd-sample


