JDK19 - 虚拟线程详解
JDK19 - 虚拟线程详解
- 前言
- 一. Continuation 和 虚拟线程
-
- 1.1 Continuation 案例
- 1.2 Continuation 内的重要成员
- 1.3 run() 执行/恢复执行
- 1.4 yield() 暂停执行
- 1.5 测试和小总结
- 二. VirtualThread 解读
-
- 2.1 VirtualThread 内的重要成员和构造
- 2.2 VirtualThread 的首次执行
- 2.3 结束阻塞再次调度
- 2.4 跟着Debug走一遍
前言
之前在 Virtual Thread 虚拟线程探究 这篇文章里面主要讲了一下虚拟线程的使用和简要的介绍。这篇文章我们就来深入学习一下相关的原理。
虚拟线程的实现可以由两个部分组成:
Continuation:一种提供执行和暂停函数的服务类。Scheduler:执行器。负责将虚拟线程挂载到平台线程上。底层交给ForkJoinPool执行。
一. Continuation 和 虚拟线程
虚拟线程的实现,底层重度依赖于Continuation这个类的实现。
Loom的愿景是啥?write sync run async。- 那遇到同步阻塞(
write sync)的时候怎么办?将底层切换为异步非阻塞(run async)。 - 异步事件处理完了之后怎么办?需要切回原先的代码点继续执行。
从上面可以发现,有两个重要的功能点就是:
- 同步切异步:暂停执行。
- 异步处理完毕时切同步:恢复执行。
虚拟线程会把调度任务包装到一个Continuation 实例中,在里面主要完成上面两件事情 :
- 当任务需要阻塞挂起的时候,调用
Continuation的yield操作进行阻塞。 - 任务需要解除阻塞继续执行的时候,则调用
Continuation的run恢复执行。
1.1 Continuation 案例
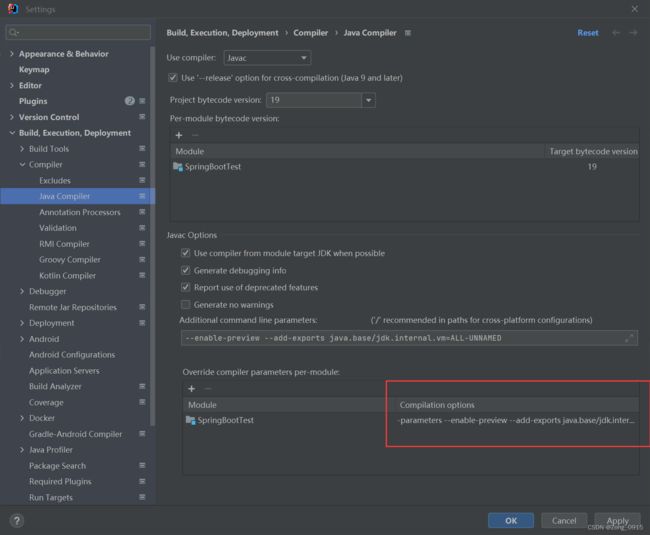
我们用一个简单的案例,让大家直观的感受到Continuation的作用和神奇之处。不过在此之前,Continuation属于非常底层的一种API,常规情况下,我们无法直接调用,因此我们在编写测试用例的时候,需要添加相关的参数。我们给Java Compiler添加以下参数:
--add-exports java.base/jdk.internal.vm=ALL-UNNAMED
@org.junit.Test
public void testContinuation(){
    ContinuationScope scope = new ContinuationScope("scope");
    Continuation continuation = new Continuation(scope, () -> {
        System.out.println("Running before yield");
        Continuation.yield(scope);
        System.out.println("Running after yield");
    });
    System.out.println("First run");
    // 第一次执行Continuation.run
    continuation.run();
    System.out.println("Second run");
    // 第二次执行Continuation.run
    continuation.run();
    System.out.println("Done");
}
如果运行时候还是报错了:
java.lang.IllegalAccessError: class Test (in unnamed module @0x4d76f3f8) cannot access class jdk.internal.vm.ContinuationScope (in module java.base) because module java.base does not export jdk.internal.vm to unnamed module @0x4d76f3f8
我们给UT添加相关的VM参数即可: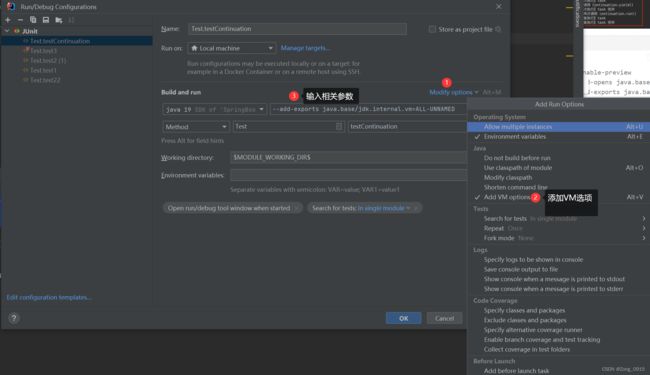
再次运行即可成功执行:
从这个运行结果我们可以看出来:
Continuation实例进行yield调用后进入阻塞。- 再次调用其
run方法就可以从yield的调用之处往下执行,从而实现了程序的中断和恢复。
1.2 Continuation 内的重要成员
public class Continuation {
    // 是否开启本地缓存
    private static final boolean PRESERVE_EXTENT_LOCAL_CACHE;
    // 主要用于对 Java 核心类库中的一些非公开方法和字段的访问
    private static final JavaLangAccess JLA = SharedSecrets.getJavaLangAccess();
    // 实际运行的 runnable,外部传入
    private final Runnable target;
    // scope对象,使用同一scope的Continuation可以相互之间yield
    private final ContinuationScope scope;
    // 父节点
    private Continuation parent;
    // 子节点
    private Continuation child;
    // 栈内存空间
    private StackChunk tail;
    // 当前Continuation是否已完成
    private boolean done;
    // 装载状态
    private volatile boolean mounted = false;
    // yield信息
    private Object yieldInfo;
    // 标记一个未挂载的Continuation是否通过强制抢占式卸载
	private boolean preempted;
	public Continuation(ContinuationScope scope, Runnable target) {
        this.scope = scope;
        this.target = target;
    }
}
我们从这个成员结构上可以发现几个重要的点:
Continuation的数据结构是一个链表。有父节点和子节点。Continuation中唯一的构造函数有俩参数:一个是ContinuationScope(用于标识Continuation)。一个是Runnable:我们要执行的任务。
如图:

我们再来说下ContinuationScope 和Continuation的关系。
ContinuationScope是一个用于标识Continuation的作用域的类。它可以被看作是一个上下文环境,用于将Continuation与特定的执行环境相关联。在协程或轻量级线程的实现中,ContinuationScope通常用于区分不同的协程或线程,以便在不同的上下文中执行Continuation。
Continuation是一个表示协程或轻量级线程的对象。它可以被看作是一个可以中断和恢复的执行单元。通过Continuation,可以实现在不同的执行环境中暂停和恢复执行,从而实现协程的切换和轻量级线程的执行。
同时两者满足:
- 一个
Continuation必须绑定一个ContinuationScope上下文环境。 - 一个
ContinuationScope上下文环境可以绑定多个Continuation。
1.3 run() 执行/恢复执行
public final void run() {
    while (true) {
        // 进行线程装载
        mount();
        JLA.setExtentLocalCache(extentLocalCache);
		// 如果这个任务已经执行完毕了,就抛异常
        if (done)
            throw new IllegalStateException("Continuation terminated");
		// 获取当前虚拟线程对应的运载线程
        Thread t = currentCarrierThread();
        // 如果parent和child都执行了yield,但是child先执行run。倘若当前线程和父
        if (parent != null) {
            if (parent != JLA.getContinuation(t))
                throw new IllegalStateException();
        } else
            this.parent = JLA.getContinuation(t);
        // 运载线程设置当前Continuation实例
        JLA.setContinuation(t, this);

        try {
            boolean isVirtualThread = (scope == JLA.virtualThreadContinuationScope());
            // 此处判断是否存在堆栈内存空间,如不存在则说明未开始
            if (!isStarted()) {
                // 相当于执行我们的task任务了
                enterSpecial(this, false, isVirtualThread);
            } else {
                assert !isEmpty();
                // 如果执行过了,那么isContinue为true,代表继续执行。
                enterSpecial(this, true, isVirtualThread);
            }
        } finally {
            fence();
            try {
                // 清理
                assert isEmpty() == done : "empty: " + isEmpty() + " done: " + done + " cont: " + Integer.toHexString(System.identityHashCode(this));
                // 当前Continuation执行完毕,那么重新将Continuation指向父节点,链表执行。
                JLA.setContinuation(currentCarrierThread(), this.parent);
                // 如果有父节点,那么清理一下子节点(说明这个子节点被执行过了)
                if (parent != null)
                    parent.child = null;
				// 进行后置的yield清理工作
                postYieldCleanup();
				// 进行unmount卸载操作
                unmount();
                // 判断是否需要保留当前线程的本地缓存并处理
                if (PRESERVE_EXTENT_LOCAL_CACHE) {
                    extentLocalCache = JLA.extentLocalCache();
                } else {
                    extentLocalCache = null;
                }
                JLA.setExtentLocalCache(null);
            } catch (Throwable e) { e.printStackTrace(); System.exit(1); }
        }
        // 到这里为止,我们就来到了父Continuation
        assert yieldInfo == null || yieldInfo instanceof ContinuationScope;
        // 两种可能
        // 情况一:执行完了,清除相关引用并结束死循环(返回)
        if (yieldInfo == null || yieldInfo == scope) {
            this.parent = null;
            this.yieldInfo = null;
            return;
        } else {
        	// 此时是子Continuation执行了yield,那么需要将控制权转义给父Continuation来进行yield操作
            parent.child = this;
            parent.yield0((ContinuationScope)yieldInfo, this);
            parent.child = null;
        }
    }
}
1.4 yield() 暂停执行
我们来看下相关代码:
// 将当前的延续挂起到给定范围
public static boolean yield(ContinuationScope scope) {
	// 获取当前运载线程的Continuation
    Continuation cont = JLA.getContinuation(currentCarrierThread());
    Continuation c;
    // 基于当前的 Continuation 向父节点方向遍历寻找。直到找到一个节点的ContinuationScope(上下文环境)
    // 和当前的上下文环境不一致的时候停止。也就是找到当前上下文环境里面,Continuation边界
    for (c = cont; c != null && c.scope != scope; c = c.parent)
        ;
    // 找不到就抛异常
    if (c == null)
        throw new IllegalStateException("Not in scope " + scope);
    // 找到了就调用yield函数,将当前执行权交给父Continuation
    return cont.yield0(scope, null);
}

private boolean yield0(ContinuationScope scope, Continuation child) {
    // 代码将`preempted`变量设置为false,表示当前的Continuation对象没有被抢占。
    preempted = false;
    // 检查当前传入的scope(上下文)和当前Continuation的scope是否已只,若不相等,说明需要切换到不同的scope
    // 那么就将传入的scope赋值给当前Continuation对象的yieldInfo信息中,表示要在父Continuation中进行yield操作
    // 这里和run函数的最后处理做对其(else分支)
    if (scope != this.scope)
        this.yieldInfo = scope;
    // 进行yield操作
    int res = doYield();
    U.storeFence(); // needed to prevent certain transformations by the compiler

    assert scope != this.scope || yieldInfo == null : "scope: " + scope + " this.scope: " + this.scope + " yieldInfo: " + yieldInfo + " res: " + res;
    assert yieldInfo == null || scope == this.scope || yieldInfo instanceof Integer : "scope: " + scope + " this.scope: " + this.scope + " yieldInfo: " + yieldInfo + " res: " + res;
    // 若child不是null,说明当前Continuation对象是子Continuation,那么需要把结果传递给父Continuation
    if (child != null) { // TODO: ugly
        if (res != 0) {
            child.yieldInfo = res;
        } else if (yieldInfo != null) {
            assert yieldInfo instanceof Integer;
            child.yieldInfo = yieldInfo;
        } else {
            child.yieldInfo = res;
        }
        this.yieldInfo = null;
    } else {
    	// 若当前是父Continuation,那么根据yield结果做不同处理
        if (res == 0 && yieldInfo != null) {
            res = (Integer)yieldInfo;
        }
        this.yieldInfo = null;

        if (res == 0)
        	// 续执行前回调
            onContinue();
        else
        	// Continuation固定在运载线程前回调
            onPinned0(res);
    }
    assert yieldInfo == null;

    return res == 0;
}
1.5 测试和小总结
其实对上面的流程进行一个简要的总结就是。
针对 run() 执行/恢复执行:
- 先进行装载。把
Continuation实例和运载线程进行绑定。 - 判断是否存在堆栈内存空间,若存在,说明之前已经执行过一部分调用栈了。那么继续执行(倘若执行过调用栈,那么会把相关数据信息存储到堆内存中)。
- 若不存在,则完整的执行一遍调用栈即可。
- 当前
Continuation执行完毕,卸载。然后更新Continuation指向为父Continuation。 - 若
yieldInfo就是当前的scope环境或者为null,说明执行完毕,退出死循环。 - 否则,说明是子
Continuation执行了yield函数,那么此时需要将控制权交给父Continuation。
针对 yield() 暂停执行:
- 会从当前
Continuation实例开始向父节点遍历寻找scope边界处的Continuation。将控制权交给最顶层的Continuation(前提是同一个scope上下文) - 进行
yield操作进入阻塞。 - 如果当前是子
Continuation,将结果传递给父Continuation。 - 如果当前是父
Continuation,那么针对yield结果做不同处理。比如是否要继续执行当前Continuation。
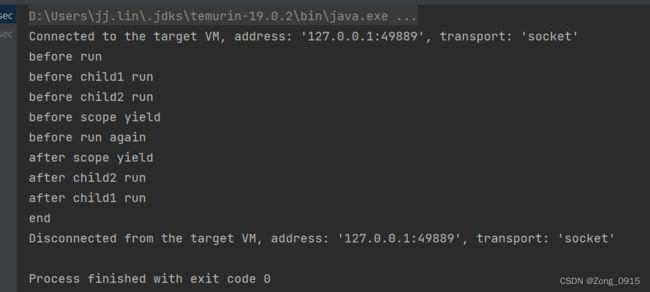
案例如下:
@org.junit.Test
public void test4(){
    ContinuationScope scope1 = new ContinuationScope("scope1");

    ContinuationScope scope2 = new ContinuationScope("scope2");

    ContinuationScope scope3 = new ContinuationScope("scope3");

    Continuation child2 = new Continuation(scope3, () -> {
        System.out.println("before scope yield");
        Continuation.yield(scope1);
        System.out.println("after scope yield");
    });

    Continuation child1 = new Continuation(scope2, () -> {
        System.out.println("before child2 run");
        child2.run();
        System.out.println("after child2 run");
    });

    Continuation continuation = new Continuation(scope1, () ->  {
        System.out.println("before child1 run");
        child1.run();
        System.out.println("after child1 run");
    });

    System.out.println("before run");
    continuation.run();
    System.out.println("before run again");
    continuation.run();
    System.out.println("end");
}
执行yield的时候,我们传入的是scope1,但是当前的上下文却是scope3。发现两者并不一致,因此根据代码逻辑,就会将控制权交给scope1本身。此时scope1进入阻塞。

用泳道图表示如下:
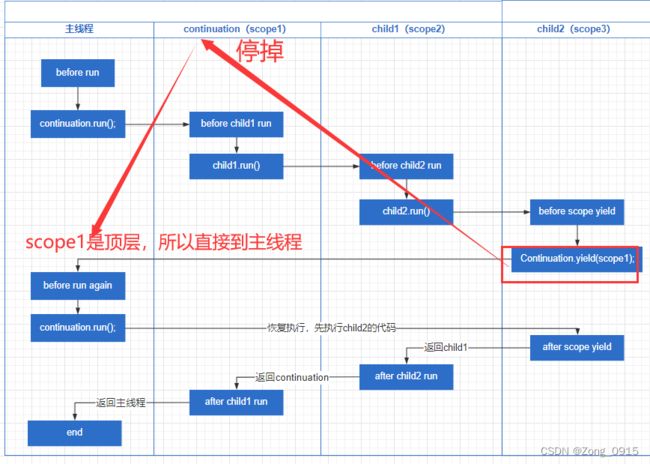
二. VirtualThread 解读
我们从案例出发:
private static int sendHttpRequest() {
    try {
        HttpClient client = HttpClient.newHttpClient();
        HttpRequest request = HttpRequest.newBuilder()
                .uri(URI.create("https://www.google.com/"))
                .build();
        HttpResponse<String> httpResponse = client.send(request, HttpResponse.BodyHandlers.ofString());
        return httpResponse.statusCode();
    } catch (Exception e) {
        throw new RuntimeException(e);
    }
}

@org.junit.Test
public void testVT()throws Exception{
    Runnable sendHttpTask = () -> {
        System.out.println(new Random().nextInt());
        // 虚线程执行过程中,同步阻塞式发送Http请求
        System.out.println(sendHttpRequest());
        System.out.println(new Random().nextInt());
    };
    // 1. 创建虚线程
    Thread virtualThread = Thread.ofVirtual().unstarted(sendHttpTask);
    // 2. 启动虚线程
    virtualThread.start();
    // 等待虚线程执行完毕
    virtualThread.join();
}
2.1 VirtualThread 内的重要成员和构造
虚拟线程VirtualThread构造:
private static final Unsafe U = Unsafe.getUnsafe();
private static final ContinuationScope VTHREAD_SCOPE = new ContinuationScope("VirtualThreads");
private static final ForkJoinPool DEFAULT_SCHEDULER = createDefaultScheduler();
private static final ScheduledExecutorService UNPARKER = createDelayedTaskScheduler();
private static final int TRACE_PINNING_MODE = tracePinningMode();
private static final long STATE = U.objectFieldOffset(VirtualThread.class, "state");
private static final long PARK_PERMIT = U.objectFieldOffset(VirtualThread.class, "parkPermit");
private static final long CARRIER_THREAD = U.objectFieldOffset(VirtualThread.class, "carrierThread");
private static final long TERMINATION = U.objectFieldOffset(VirtualThread.class, "termination");
private final Executor scheduler;
private final Continuation cont;
private final Runnable runContinuation;
private volatile int state;
private static final int NEW      = 0;
private static final int STARTED  = 1;
private static final int RUNNABLE = 2;     // runnable-unmounted
private static final int RUNNING  = 3;     // runnable-mounted
private static final int PARKING  = 4;
private static final int PARKED   = 5;     // unmounted
private static final int PINNED   = 6;     // mounted
private static final int YIELDING = 7;     // Thread.yield
private static final int TERMINATED = 99;  // final state
private static final int SUSPENDED = 1 << 8;
private static final int RUNNABLE_SUSPENDED = (RUNNABLE | SUSPENDED);
private static final int PARKED_SUSPENDED   = (PARKED | SUSPENDED);
private volatile boolean parkPermit;
private volatile Thread carrierThread;
private volatile CountDownLatch termination;
挑几个重点:
DEFAULT_SCHEDULER:默认的调度器。底层是ForkJoinPool。UNPARKER:调度线程实例,用于唤醒带超时阻塞的虚拟线程实例。用于sleep的唤醒操作。TRACE_PINNING_MODE:pined thread的跟踪模式。cont:Continuation实例。主要负责虚拟线程的阻塞和继续执行操作。runContinuation:Continuation实例中包装的Runnable实例。state:虚拟线程的状态。由JVM直接访问和修改。parkPermit:park操作的许可。carrierThread:运载线程实例。termination:一个栅栏值,用于join操作。
再来看下它的唯一构造器:
VirtualThread(Executor scheduler, String name, int characteristics, Runnable task) {
    super(name, characteristics, /*bound*/ false);
    Objects.requireNonNull(task);

    // 若调度器非空,直接使用,这个分支不会走到。
    if (scheduler == null) {
        Thread parent = Thread.currentThread();
        // 如果父线程是虚拟线程,那么使用父虚拟线程的调度器
        if (parent instanceof VirtualThread vparent) {
            scheduler = vparent.scheduler;
        } else {
        	// 否则使用默认的调度器
            scheduler = DEFAULT_SCHEDULER;
        }
    }

    this.scheduler = scheduler;
    this.cont = new VThreadContinuation(this, task);
    this.runContinuation = this::runContinuation;
}
主要做了这么几件事:
- 给定一个默认的调度器
ForkJoinPool。 - 初始化一个
Continuation。在Continuation的基础上封装成一个VThreadContinuation。 - 封装一下
Continuation的Runnable,最终将它提交给调度器来执行。
我们看一下VThreadContinuation,它继承于Continuation:
private static class VThreadContinuation extends Continuation {
    VThreadContinuation(VirtualThread vthread, Runnable task) {
    	// 父类Continuation构造,传入一个Scope(上下文环境)和一个VirtualThread.run()函数。
        super(VTHREAD_SCOPE, () -> vthread.run(task));
    }
    // 同时重写了onPinned函数,基于跟踪模式决定pinned线程栈的打印策略
    @Override
    protected void onPinned(Continuation.Pinned reason) {
        if (TRACE_PINNING_MODE > 0) {
            boolean printAll = (TRACE_PINNING_MODE == 1);
            PinnedThreadPrinter.printStackTrace(System.out, printAll);
        }
    }
}
而我们上面创建虚拟线程时调用的代码,实际上就是调用构造函数进行了一系列的初始化动作:
Thread virtualThread = Thread.ofVirtual().unstarted(sendHttpTask);
紧接着执行了start函数:
virtualThread.start();
↓↓↓↓↓↓↓↓↓↓  VirtualThread.start()  ↓↓↓↓↓↓↓↓↓↓
@Override
void start(ThreadContainer container) {
    // 尝试将虚拟线程的状态改为 STARTED
    if (!compareAndSetState(NEW, STARTED)) {
        throw new IllegalThreadStateException("Already started");
    }
    // bind thread to container
    setThreadContainer(container);
    // start thread
    boolean started = false;
    container.onStart(this); // may throw
    try {
        // extent locals may be inherited
        inheritExtentLocalBindings(container);
        // 平台代码完成这段代码的执行
        submitRunContinuation();
        started = true;
    } finally {
        if (!started) {
            setState(TERMINATED);
            container.onExit(this);
            afterTerminate(/*executed*/ false);
        }
    }
}
↓↓↓↓↓↓↓↓↓↓  VirtualThread.submitRunContinuation()  ↓↓↓↓↓↓↓↓↓↓
private void submitRunContinuation() {
    submitRunContinuation(false);
}
↓↓↓↓↓↓↓↓↓↓  VirtualThread.submitRunContinuation()  ↓↓↓↓↓↓↓↓↓↓
private void submitRunContinuation(boolean lazySubmit) {
    try {
    	// 是否开启延迟提交
        if (lazySubmit && scheduler instanceof ForkJoinPool pool) {
            pool.lazySubmit(ForkJoinTask.adapt(runContinuation));
        } else {
        	// 倘若不开启,就把runContinuation任务提交。
            scheduler.execute(runContinuation);
        }
    } catch (RejectedExecutionException ree) {
        // ...省略
    }
}
↓↓↓↓↓↓↓↓↓↓  VirtualThread.runContinuation()  ↓↓↓↓↓↓↓↓↓↓
private void runContinuation() {
    // 从这段代码可以发现,到目前为止的执行任务都是交给平台线程来执行的。
    if (Thread.currentThread().isVirtual()) {
        throw new WrongThreadException();
    }
    boolean firstRun;
    int initialState = state();
    // 如果虚拟线程的状态处于刚启动,那么就把他改为执行中,并且标记为首次执行
    if (initialState == STARTED && compareAndSetState(STARTED, RUNNING)) {
        // first run
        firstRun = true;
    } else if (initialState == RUNNABLE && compareAndSetState(RUNNABLE, RUNNING)) {
        // 否则,说明这个线程已经处于执行状态了,那么就设置park的许可,并标记为非首次执行
        setParkPermit(false);
        firstRun = false;
    } else {
        // not runnable
        return;
    }

    // notify JVMTI before mount
    if (notifyJvmtiEvents) notifyJvmtiMountBegin(firstRun);

    try {
    	// 执行Continuation的run函数。
        cont.run();
    } finally {
        // 如果执行完毕了,就做后续的清理工作。
        if (cont.isDone()) {
            afterTerminate(/*executed*/ true);
        } else {
        	// 倘若没有执行完成,说明某个地方调用了Continuation.yield()函数,或者pin到运载线程中进行了park操作
        	// 例如LockSupport的park操作
            afterYield();
        }
    }
}
总结下就是:(注意,这里都是平台线程来完成)
- 虚拟线程
VirtualThread在Continuation的基础上,封装了下run函数。主要做了虚拟线程状态state的维护工作。刚启动的时候改为STARTED。 - 以及虚拟线程发生
park的时候(阻塞挂起),调用afterYield()函数,也是做了状态的维护的动作。 - 而真正的
run/yield逻辑则交给底层的Continuation来实现。
2.2 VirtualThread 的首次执行
在经历了VirtualThread的一层封装之后(维护了虚拟线程的状态变化),最后会调用实际的Continuation对象的run函数。
1.当首次执行Continuation.run函数的时候,会先执行VirtualThread.run方法。主要目的就是将当前的虚拟线程装载到载体线程上。
↓↓↓↓↓↓↓↓↓↓  VirtualThread.run()  ↓↓↓↓↓↓↓↓↓↓
@ChangesCurrentThread
private void run(Runnable task) {
    assert state == RUNNING;
    boolean notifyJvmti = notifyJvmtiEvents;

    // first mount
    mount();
    if (notifyJvmti) notifyJvmtiMountEnd(true);

    // emit JFR event if enabled
    if (VirtualThreadStartEvent.isTurnedOn()) {
        var event = new VirtualThreadStartEvent();
        event.javaThreadId = threadId();
        event.commit();
    }

    try {
        task.run();
    } catch (Throwable exc) {
        dispatchUncaughtException(exc);
    } finally {
        try {
            // pop any remaining scopes from the stack, this may block
            StackableScope.popAll();
            // emit JFR event if enabled
            if (VirtualThreadEndEvent.isTurnedOn()) {
                var event = new VirtualThreadEndEvent();
                event.javaThreadId = threadId();
                event.commit();
            }

        } finally {
            // last unmount
            if (notifyJvmti) notifyJvmtiUnmountBegin(true);
            unmount();

            // final state
            setState(TERMINATED);
        }
    }
}
这段代码看起来比较长,但是再把它精简一点,核心的三个步骤就是:
mount();
try{
	task.run();
}finally{
	unmount();
}
- 将
VirtualThread装载到CarrierThread上。 - 调用真正的
Task任务,本文的案例就是sendHttpTask。 - 从载体上卸载这个虚拟线程。返回时,当前线程就是当前平台。
2.本文的案例中,sendHttpTask这个任务存在IO阻塞。而Loom会重写所有可能的同步阻塞。一旦出现阻塞点,最终就会调用VirtualThread.park()方法。这里是我的调用链:
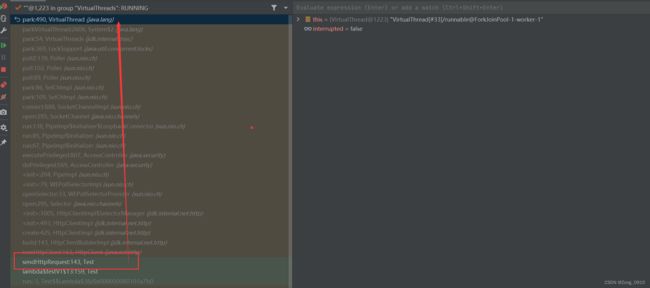
VirtualThread.park()方法做了啥:
@Override
void park() {
    assert Thread.currentThread() == this;

    // complete immediately if parking permit available or interrupted
    if (getAndSetParkPermit(false) || interrupted)
        return;

    // park the thread
    setState(PARKING);
    try {
        if (!yieldContinuation()) {
            // park on the carrier thread when pinned
            parkOnCarrierThread(false, 0);
        }
    } finally {
        assert (Thread.currentThread() == this) && (state() == RUNNING);
    }
}
核心做了两件事情:
- 把虚拟线程状态置为
PARKING。 - 调用
yieldContinuation函数,也是VirtualThread里面对原生Continuation.yield()函数的一层封装。
@ChangesCurrentThread
private boolean yieldContinuation() {
    boolean notifyJvmti = notifyJvmtiEvents;

    // unmount
    if (notifyJvmti) notifyJvmtiUnmountBegin(false);
    unmount();
    try {
        // 利用Continuation的yield函数,停止继续执行,等待外部调用Continuation.run之后恢复执行
        return Continuation.yield(VTHREAD_SCOPE);
    } finally {
        // 倘若执行到这里,说明外部已经调用了Continuation.run函数,此时重新将虚拟线程进行挂载,利用虚拟线程执行后续代码
        mount();
        if (notifyJvmti) notifyJvmtiMountEnd(false);
    }
}
yieldContinuation()方法中,先进行unmount卸载。那么运载线程此刻就可以不再执行虚拟线程的任务了,就可以干别的事情了。- 然后执行
Continuation的yield函数,实现真正的“暂停”。等待外部调用Continuation.run之后恢复执行。
这里可以看出来,此时虚拟线程已经进入了阻塞状态。由于运载线程已经和虚拟线程解除了绑定,因此运载线程可以做自己想做的事情。所以并没有“真正的阻塞”(真正的阻塞指OS Thread的阻塞,而运载线程是绑定了OS Thread的,而VirtualThread是不会直接绑定OS Thread的,它依靠运载线程执行代码)
2.3 结束阻塞再次调度
当网络的IO请求处理完毕之后,就会调用VirtualThread.unpark方法:
@Override
@ChangesCurrentThread
void unpark() {
    Thread currentThread = Thread.currentThread();
    if (!getAndSetParkPermit(true) && currentThread != this) {
        int s = state();
        if (s == PARKED && compareAndSetState(PARKED, RUNNABLE)) {
            if (currentThread instanceof VirtualThread vthread) {
                Thread carrier = vthread.carrierThread;
                carrier.setCurrentThread(carrier);
                try {
                    submitRunContinuation();
                } finally {
                    carrier.setCurrentThread(vthread);
                }
            } else {
                submitRunContinuation();
            }
        } else if (s == PINNED) {
            // unpark carrier thread when pinned.
            synchronized (carrierThreadAccessLock()) {
                Thread carrier = carrierThread;
                if (carrier != null && state() == PINNED) {
                    U.unpark(carrier);
                }
            }
        }
    }
}
主要做了两件事情:
- 将虚拟线程的状态置为
RUNNABLE。 - 再次调用
submitRunContinuation函数(这里就和第一次执行时候的逻辑大致一样了),将任务交给线程池来调度。同样地submitRunContinuation函数最终把任务交给runContinuation。
只不过执行runContinuation函数的时候,走的不再是第一个分支了,如图:
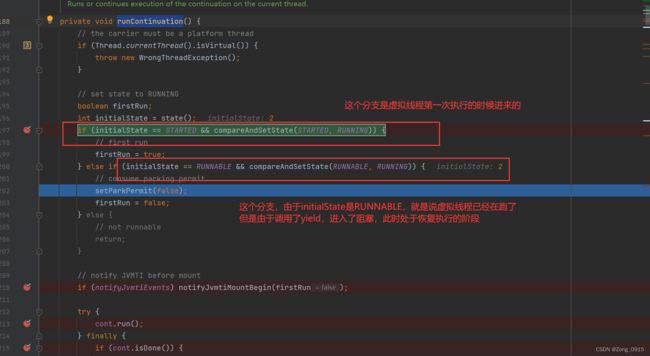
然后开始调用cont.run(),借助Continuation来完成任务栈的恢复调用。最终Continuation执行完毕,将虚拟线程的状态置为TERMINATED。
2.4 跟着Debug走一遍
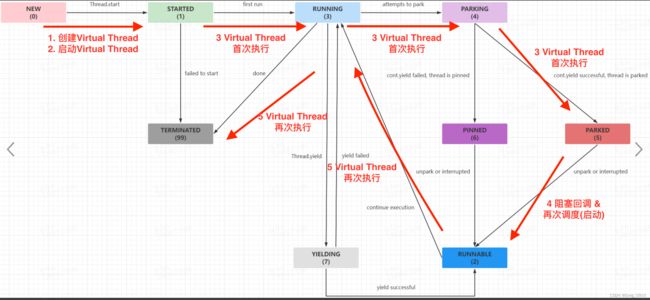
1.启动Test,创建了一个虚拟线程(未启动),做一些初始化操作(调度器、VirtualThread自己封装的Continuation等)虚拟线程状态:New。
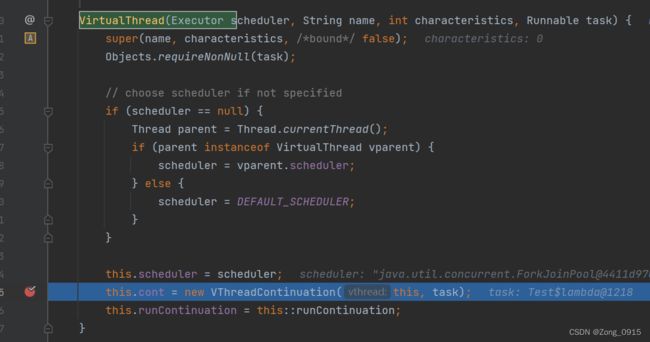
2.紧接着准备启动虚拟线程了:
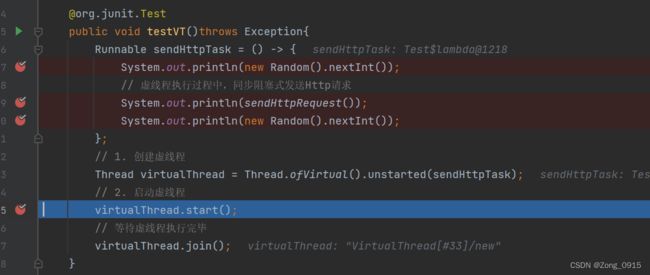
此时是我们第一次启动该虚拟线程,调用栈为:
VirtualThread.start():虚拟线程状态:STARTED。- 调用
submitRunContinuation–>交给调度器执行runContinuation任务(默认底层ForkJoinPool)。 runContinuation里面,主要是对原生Continuation的一层封装,维护了虚拟线程的状态,此时状态由STARTED改为RUNNING,并标记为第一次执行。
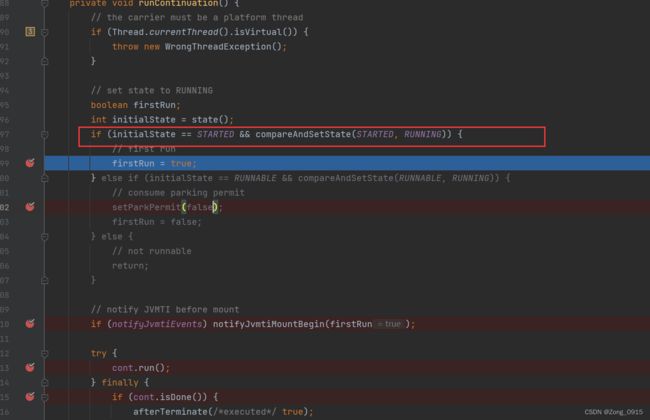
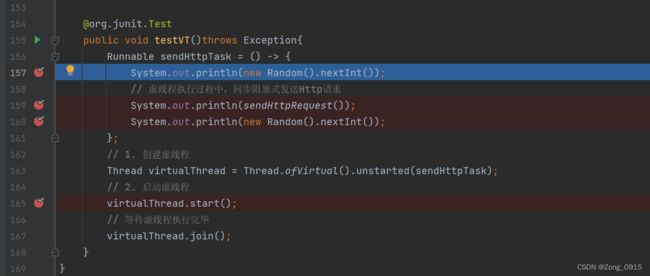
3.然后执行Continuation.run();,倘若是第一次执行,则还会调用一遍VirtualThread.run方法。将当前虚拟线程装载到运载线程上。运载完毕后调用真实的task任务:

调用真实的task任务了
4.直到执行sendHttpRequest这个任务的时候,发现存在IO阻塞,一旦出现阻塞点,就会调用VirtualThread.park函数:此时状态改为PARKING
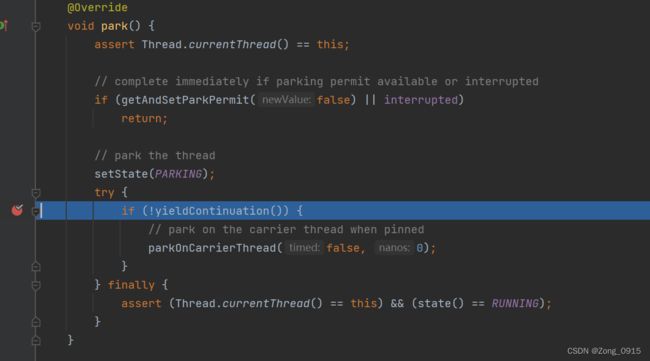
5.紧接着调用yieldContinuation(同Continuation,都是VirtualThread进行的一层封装)

先进行unmount卸载,解放运载线程,让他可以作别的事情,然后在调用底层的Continuation.yield进行暂停。此时虚拟线程状态为:PARKED
6.当IO结束阻塞之后,调用unpark()函数:如果状态是PARKED,就把他改为RUNNABLE。
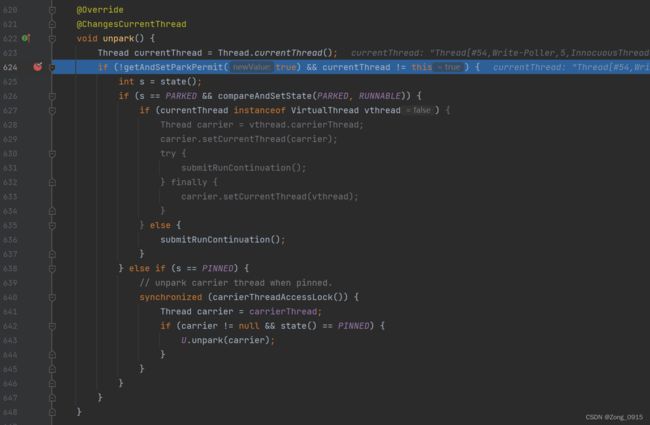
最终再次调用了submitRunContinuation函数,根据上面的逻辑,最终走到第二个if分支:

最终再次借助底层的Continuation.run()完成任务的恢复执行(这一部分debug不出来)
下面在debug的时候是看不到的,因为state的维护都是交给JVM来完成的,看注释。

不仅如此。源码中涉及mount,unmount,notifyJvmtiMount,notifyJvmtiUnmount处,涉及线程 虚线程 的装载与卸载,其之前或之后的代码可能无法debug到。
最后,关于虚拟线程使用还有一定的局限性,如果我们代码块包含了一些synchronized关键字,虚拟线程就无法在阻塞操作期间卸载,因为它被固定到其执行线程上。不仅如此,还存在着ThreadLocal的使用相关问题,这类问题会另外写一篇文章去总结分享。
