swagger 生成接口文档,并导出html和pdf的过程
swagger 生成接口文档,并导出html和pdf的过程
这里写目录标题
- swagger 生成接口文档,并导出html和pdf的过程
- swagger 生成接口文档
- swagger导出pdf和html
- 解决乱码问题:
-
- **一、**
swagger 生成接口文档
1.springboot版本:
        org.springframework.boot
        spring-boot-starter-parent
        2.1.3.RELEASE
2.导入swagger相关的依赖:
     com.github.xiaoymin
     swagger-bootstrap-ui
     1.9.5


    io.springfox
    springfox-swagger2
    2.6.1
3.API
package com.example.config;

import org.springframework.context.annotation.Bean;
import org.springframework.context.annotation.Configuration;
import springfox.documentation.builders.ApiInfoBuilder;
import springfox.documentation.builders.ParameterBuilder;
import springfox.documentation.builders.RequestHandlerSelectors;
import springfox.documentation.schema.ModelRef;
import springfox.documentation.service.ApiInfo;
import springfox.documentation.service.Parameter;
import springfox.documentation.spi.DocumentationType;
import springfox.documentation.spring.web.plugins.Docket;
import springfox.documentation.swagger2.annotations.EnableSwagger2;

import java.util.ArrayList;
import java.util.List;

/**
 * 蓝色界面
 */
@Configuration
@EnableSwagger2
public class SwaggerConfig {
	/**
	 * @Description 构建API基本信息
	 * @Param []
	 * @return springfox.documentation.service.ApiInfo
	 **/
	private ApiInfo buildApiInfo() {
		return new ApiInfoBuilder()
				.title("接口说明文档")
				.description("说明文档简介")
				.contact("sunrj")
				.version("1.0")
				.build();
	}

	@Bean
	public Docket docket() {
		/*
		 *  全局配置信息(可以不用)例如:token
		 */
		Parameter token = new ParameterBuilder().name("token")
				.description("用户令牌")
				.parameterType("header")
				.modelRef(new ModelRef("String"))
				.build();
		List parameters = new ArrayList<>();
		parameters.add(token);

		return new Docket(DocumentationType.SWAGGER_2)
				.globalOperationParameters(parameters)  //传入全局配置
				.apiInfo(buildApiInfo())  //传入api首页信息
				.select() //进行筛选
				//通过package筛选,
				.apis(RequestHandlerSelectors.basePackage("com.example.controller"))
				//构建api
				.build();
	}

}
3.controller
这里swagger的参数不做任何介绍,具体参数意思的大家自行百度
@RestController
@RequestMapping(value = "user", produces = MediaType.APPLICATION_JSON_VALUE)
@Api(value = "用户信息管理", tags ={"UserController"}, description = "用户基本信息操作API", consumes = MediaType.APPLICATION_JSON_VALUE, produces = MediaType.APPLICATION_JSON_VALUE)
public class UserController {

    @Autowired
    private UserService userService;

    @Ignore
    @RequestMapping(value = "loginUser",method = RequestMethod.POST )
    @ApiOperation(value = "/loginUser", notes="通过用户名密码验证是否登陆成功")
    //@ApiImplicitParam(paramType="query", name = "user", value = "登录的用户名和密码信息", required = true, dataType = "User")
    public ResponseServer loginUser(User user){
        return userService.loginUser(user);
    }


    /**
     * 查询当前用户拥有的问卷调查列表
     * @return
     */
    //@RequestMapping("queryUserSurveyList")
    @RequestMapping(value = "queryUserSurveyList",method = RequestMethod.POST )
    @ApiOperation(value = "/queryUserSurveyList", notes="查询当前用户拥有的问卷调查列表")
    public ResponseServer queryUserSurveyList(User userSel){
        return userService.queryUserSurveyList(userSel.getName());
    }

    @RequestMapping(value = "queryUserAll",method = RequestMethod.GET )
    @ApiOperation(value = "/queryUserAll", notes="查询所有用户")
    public ResponseServer queryUserAll(){
        return userService.queryUserAll();
    }

    @RequestMapping(value = "insertUser",method =RequestMethod.POST )
    @ApiOperation(value = "/insertUser", notes="增加用户")
    public ResponseServer insertUser(@RequestBody User user){
        return userService.insertUser(user);
    }


    @ApiOperation(value = "/deleteUser", notes="通过id删除用户信息")
    @RequestMapping(value = "deleteUser",method =RequestMethod.DELETE )
    @ApiImplicitParam(paramType="query", name = "userId", value = "删除的用户Id", required = true, dataType = "int")
    public ResponseServer deleteUser( Integer userId){
        return userService.deleteUser(userId);
    }


    @ApiOperation(value = "/updateUser", notes="通过id修改用户信息")
    @RequestMapping(value = "updateUser",method =RequestMethod.PUT )
    public ResponseServer updateUser(@RequestBody User user){
        return userService.updateUser(user);
    }
}
4.model
package com.example.model;


import com.baomidou.mybatisplus.annotation.IdType;
import com.baomidou.mybatisplus.annotation.TableField;
import com.baomidou.mybatisplus.annotation.TableId;
import com.baomidou.mybatisplus.annotation.TableName;
import io.swagger.annotations.ApiModel;
import lombok.AllArgsConstructor;
import lombok.Data;
import lombok.NoArgsConstructor;


@ApiModel(value="User", description = "用户的实体对象")
@AllArgsConstructor
@NoArgsConstructor
@Data
@TableName("t_user")
public class User {

    //@ApiModelProperty(value="userId" ,required=false)
    @TableId(value = "user_id", type = IdType.AUTO)
    @TableField(value = "user_id", exist = true)
    private Integer userId;

   // @ApiModelProperty(value="name" ,required=false)
    @TableField(value = "user_name", exist = true)
    private String name;

   // @ApiModelProperty(value="password" ,required=false)
    @TableField(value = "user_password", exist = true)
    private String password;


}
然后就成功了,启动程序:
访问:
http://localhost:8080/doc.html
成功:

还有另外一种页面,这里swagger的管理UI页面的依赖需要改成这个:
            io.springfox
            springfox-swagger-ui
            2.7.0
访问路径:
http://localhost:8088/swagger-ui.html

就可以了
swagger导出pdf和html
其实很简单,就是修改测试类,和配置文件
1.测试类
package com.example;
import static org.springframework.restdocs.mockmvc.RestDocumentationRequestBuilders.get;
import static org.springframework.restdocs.operation.preprocess.Preprocessors.preprocessResponse;
import static org.springframework.restdocs.operation.preprocess.Preprocessors.prettyPrint;
import static org.springframework.test.web.servlet.result.MockMvcResultMatchers.status;
import org.junit.After;
import org.junit.Test;
import org.junit.runner.RunWith;
import org.springframework.beans.factory.annotation.Autowired;
import org.springframework.boot.test.autoconfigure.restdocs.AutoConfigureRestDocs;
import org.springframework.boot.test.autoconfigure.web.servlet.AutoConfigureMockMvc;
import org.springframework.boot.test.context.SpringBootTest;
import org.springframework.http.MediaType;
import org.springframework.restdocs.mockmvc.MockMvcRestDocumentation;
import org.springframework.test.context.junit4.SpringRunner;
import org.springframework.test.web.servlet.MockMvc;
import io.github.robwin.markup.builder.MarkupLanguage;
import io.github.robwin.swagger2markup.GroupBy;
import io.github.robwin.swagger2markup.Swagger2MarkupConverter;
import springfox.documentation.staticdocs.SwaggerResultHandler;
@AutoConfigureMockMvc
@AutoConfigureRestDocs(outputDir = "target/generated-snippets")
@RunWith(SpringRunner.class)
@SpringBootTest
public class WeikangDemoApplicationTests {
private String snippetDir = "target/generated-snippets";
private String outputDir = "target/asciidoc";
@Autowired
private MockMvc mockMvc;
@After
public void Test() throws Exception {
// 得到swagger.json,写入outputDir目录中
mockMvc.perform(get("/v2/api-docs").accept(MediaType.APPLICATION_JSON))
.andDo(SwaggerResultHandler.outputDirectory(outputDir).build()).andExpect(status().isOk()).andReturn();
// 读取上一步生成的swagger.json转成asciiDoc,写入到outputDir
// 这个outputDir必须和插件里面2.配置文件
        1.8


        ${project.basedir}/docs/asciidoc
        ${project.build.directory}/asciidoc
        ${project.build.directory}/asciidoc/html
        ${project.build.directory}/asciidoc/pdf
            org.springframework.restdocs
            spring-restdocs-mockmvc
            test


            io.springfox
            springfox-staticdocs
            2.6.1
            test
        springboot_swagger


                org.springframework.boot
                spring-boot-maven-plugin


                org.apache.maven.plugins
                maven-surefire-plugin

                    true


                org.asciidoctor
                asciidoctor-maven-plugin
                1.5.3


                        org.asciidoctor
                        asciidoctorj-pdf
                        1.5.0-alpha.14


                        org.jruby
                        jruby-complete
                        1.7.21


                    ${asciidoctor.input.directory}
                    index.adoc

                        book
                        left
                        3


                        ${generated.asciidoc.directory}


                        output-html
                        test

                            process-asciidoc


                            html5
                            ${asciidoctor.html.output.directory}


                        output-pdf
                        test

                            process-asciidoc


                            pdf
                            ${asciidoctor.pdf.output.directory}


                                left
                                3


                                ${generated.asciidoc.directory}
                                fonts
                                themes
                                cn
解决乱码问题:
我这里上springboot 2.1.3.RELEASE的版本
解决方案:
一、
一种是下载字体(RobotoMono 开头和 KaiGenGothicCN 开头的字体文件)和theme文件(Source code (zip))。
字体下载链接:https://github.com/chloerei/asciidoctor-pdf-cjk-kai_gen_gothic/releases
然后在项目的资源目录下创建fonts和themes两个目录,把下载的8个字体文件复制到fonts目录下,解压asciidoctor-pdf-cjk-kai_gen_gothic-0.1.0-fonts.zip文件,把data\themes\下的cn-theme.yml复制到themes目录下
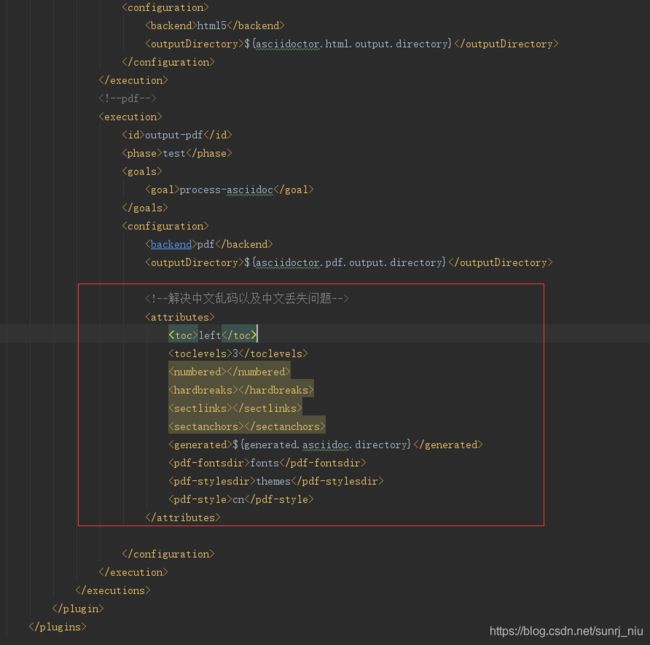
pom.xml配置,
如图:

这样就可以解决,网上还有别的方式。大家可以按照自己的版本解决
执行:
1.先执行测试类
2.命令 mvn clean test

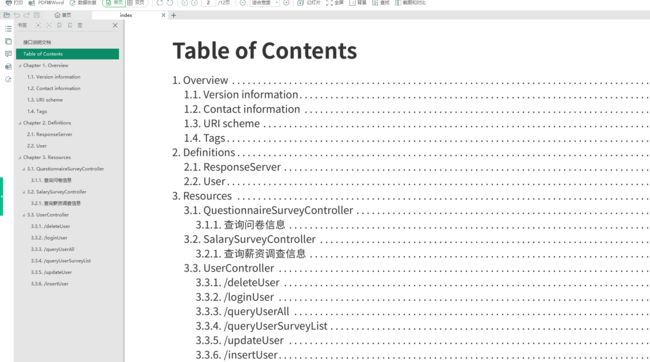
然后就生成了:

具体需要什么文档,大家按需求进行配置即可
