Swift 调用微信分享
配置:
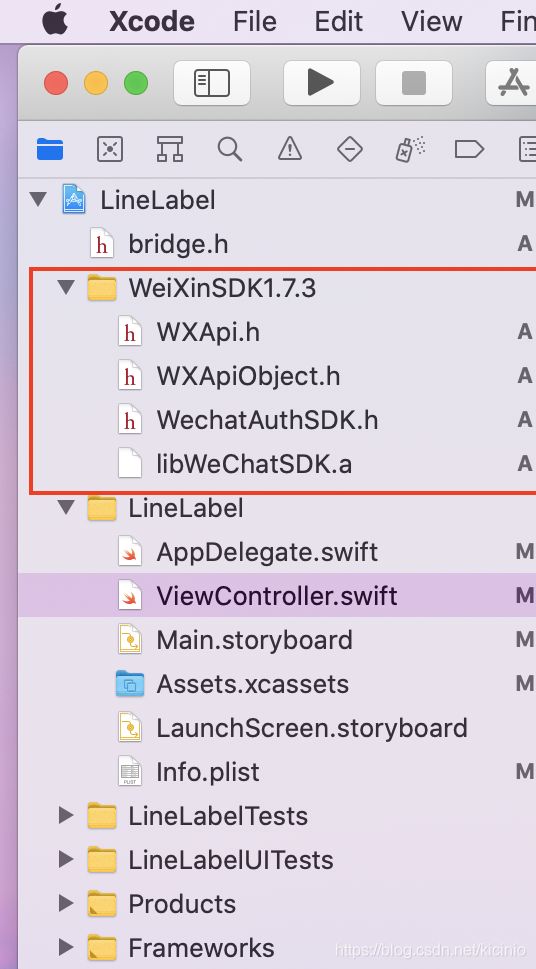
1:先下载微信分享的SDK。再复制到项目里。如图:

2: 创建桥接文件。名为bridge.h,内容如下:
#ifndef bridge_h
#define bridge_h

#import "WechatAuthSDK.h"
#import "WXApi.h"
#import "WXApiObject.h"

#endif /* bridge_h */
3:引用桥接文件,先点击1,出来一个白框子然后拖动1到白框子里面。
4:倒入有关类库。待导入内容如下:
CoreTelephony.framework,SystemConfiguration.framework,libc++.tbd,libz.tbd,libsqlite3.0.tbd
5:增添http访问策略,这一步可参考这篇文章:Xcode12 设置允许http连接
6:在 “info” -> “URL Types”中,新增一个 URL Schemes。新的 Schemes 命名是便是你注册的 AppID。(URL Schemes 的配置是为了让你跳转到微信发送消息后,还能跳回原来的App上。)
7: 配置AppDelegate.swift文件。内容如下:
import UIKit

@main
class AppDelegate: UIResponder, UIApplicationDelegate, WXApiDelegate{

    var window: UIWindow?

    func application(_ application: UIApplication, didFinishLaunchingWithOptions launchOptions: [UIApplication.LaunchOptionsKey: Any]?) -> Bool {
        // Override point for customization after application launch.

        // Registe application.
        WXApi.registerApp("wxe569f3b201ff5573")

        return true
    }

    func application(_ app: UIApplication, open url: URL, options: [UIApplication.OpenURLOptionsKey : Any] = [:]) -> Bool {

        return WXApi.handleOpen(url, delegate: self)
    }

    func onResp(_ resp: BaseResp!) {
        if resp.isKind(of: SendMessageToWXResp.self) {
            if resp.errCode == WXSuccess.rawValue{
                print("分享成功")
            }else if resp.errCode == WXErrCodeCommon.rawValue {
                print("分享失败:普通错误类型")
            }else if resp.errCode == WXErrCodeUserCancel.rawValue {
                print("分享失败:用户点击取消并返回")
            }else if resp.errCode == WXErrCodeSentFail.rawValue {
                print("分享失败:发送失败")
            }else if resp.errCode == WXErrCodeAuthDeny.rawValue {
                print("分享失败:授权失败")
            }else if resp.errCode == WXErrCodeUnsupport.rawValue {
                print("分享失败:微信不支持")
            }
        }

    }

    func applicationWillResignActive(_ application: UIApplication) {
    }

    func applicationDidEnterBackground(_ application: UIApplication) {
    }

    func applicationWillEnterForeground(_ application: UIApplication) {
    }

    func applicationDidBecomeActive(_ application: UIApplication) {
    }

    func applicationWillTerminate(_ application: UIApplication) {
    }


}
使用步骤:
使用步骤的前提是各项环境都配置正常,这一点可参考第一条和最后一条以及网络上的注意事项。
接下来就是“分享”这个行为是如何操作的。
- 确定操作行为是微信好友还是朋友圈。该属性是由
Int32(WXSceneSession.rawValue)确定的。
Int32(WXSceneSession.rawValue):好友
Int32(WXSceneTimeline.rawValue):朋友圈
-
创建
WXMediaMessage()对象。该对象是具体的分享媒体类,其属性包括标题、描述、缩略图等等 -
创建分享具体对象。该操作是可选或者针对不同类的。具体来说,如果分享的是文字,那么就不用创建该类,如果分享内容为图片,那该类就具体为
WXImageObject(),为视频则为WXVideoObject(),其它以此类推。 -
创建
SendMessageToWXReq()对象。该对象是管理分享内容的具体类,其属性包括标题、分享媒体类、分享种类等。 -
调用
WXApi.send(req)将创建的请求对象发送出去。
具体分享:
以下内容省略外部的监听方法。
文字:
let req = SendMessageToWXReq()
req.bText = true
req.text = "测试文本。"
req.scene = _scene
WXApi.send(req)
图片:
        let message =  WXMediaMessage()

        let image = UIImage(named: "taylor")
        let imageObject =  WXImageObject()
        imageObject.imageData = image!.pngData()
        message.mediaObject = imageObject

        let width = 240.0 as CGFloat
        let height = width*image!.size.height/image!.size.width

        UIGraphicsBeginImageContext(CGSize(width: width, height: height))
        image!.draw(in: CGRect(x: 0, y: 0, width: width, height: height))
        message.setThumbImage(UIGraphicsGetImageFromCurrentImageContext())
        UIGraphicsEndImageContext()

        let req =  SendMessageToWXReq()
        req.bText = false
        req.message = message
        req.scene = _scene
        WXApi.send(req)
链接:
        let message =  WXMediaMessage()

        message.title = "Test title"
        message.description = "This is a test description."
        message.setThumbImage(UIImage(named:"taylor"))

        let ext =  WXWebpageObject()
        ext.webpageUrl = "http://www.baidu.com"
        message.mediaObject = ext

        let req =  SendMessageToWXReq()
        req.bText = false
        req.message = message
        req.scene = _scene
        WXApi.send(req)
音乐:
        let message =  WXMediaMessage()

        message.title = "Lover"
        message.description = "Taylor Swift"
        message.setThumbImage(UIImage(named:"taylor"))

        let ext =  WXMusicObject()
        ext.musicUrl = "歌曲的访问地址"
        ext.musicDataUrl = "歌曲实际文件地址。例如http://test.music.com/lover.mp3"
        message.mediaObject = ext

        let req =  SendMessageToWXReq()
        req.bText = false
        req.message = message
        req.scene = _scene
        WXApi.send(req)
视频:
        let message =  WXMediaMessage()
        message.title = "Video Title"
        message.description = "Video description"
        message.setThumbImage(UIImage(named:"taylor"))

        let ext =  WXVideoObject()
        ext.videoUrl = "视频的访问地址"
        message.mediaObject = ext

        let req =  SendMessageToWXReq()
        req.bText = false
        req.message = message
        req.scene = _scene
        WXApi.send(req)
文件:
        let message =  WXMediaMessage()
        message.title = "my.doc"
        message.description = "Word document."
        message.setThumbImage(UIImage(named:"taylor"))

        let ext =  WXFileObject()
        ext.fileExtension = "doc"
        let filePath = Bundle.main.path(forResource: "my", ofType: "doc")
        let url = URL(fileURLWithPath: filePath!)
        ext.fileData = try! Data(contentsOf: url)
        message.mediaObject = ext

        let req =  SendMessageToWXReq()
        req.bText = false
        req.message = message
        req.scene = _scene
        WXApi.send(req)
注意事项:
- 配置过程中倒数第二步的URL是你的appid,这个是唯一的,需要申请
- 微信的appid不向个人开放申请渠道,只有企业才有
- 一定要允许http访问
- 模拟器上是不能正常测试的,只有安装了微信的真机才行