angular配置
The complete guide on how to setup Tailwind CSS in Angular
有关如何在Angular中设置Tailwind CSS的完整指南
In a previous article, I explained the reasons why I left Angular Material to move towards a low-level UI framework. My choice fell rather quickly on TailwindCSS, which has a realistic approach to developing a web application of any kind.
在上一篇文章中,我解释了离开Angular Material转向低级UI框架的原因。 我的选择很快落在TailwindCSS上 ,它采用了一种现实的方法来开发任何类型的Web应用程序。
How can we integrate it well into an Angular application?We will see it quickly enough, this framework developed by Google and its community allows you to create a robust and devilishly efficient configuration.
我们如何才能将其很好地集成到Angular应用程序中?我们将很快看到它,这是由Google及其社区开发的框架,可让您创建可靠且功能强大的配置。
There are many articles explaining how to do this, but some are outdated, or not detailed enough. Sometimes I had to do some extra research to find the missing information. And we will see that they are mostly wrong about one thing…
有很多文章说明了如何执行此操作,但是有些文章已经过时,或者不够详尽。 有时,我不得不做一些额外的研究以找到丢失的信息。 我们将看到他们在一件事情上大都是错的……
At the end of this article, you will have everything you need to configure TailwindCSS in any environment. Development, Staging, Production, … Let’s see this in detail!
在本文的结尾,您将拥有在任何环境中配置TailwindCSS所需的一切。 开发,暂存,生产……让我们详细了解一下!
安装依赖项 (Install dependencies )
We’ll start by running a big command in the console:
我们将从在控制台中运行一个大命令开始:
npm i -D @angular-builders/custom-webpack tailwindcss postcss-import postcss-loader postcss-scssWhat are these new dev-dependencies that we add in our application?
我们在应用程序中添加了哪些新的dev-dependencies?
@angular-builders/custom-webpack : Angular 6 removed the ‘eject’ command which allowed us to modify the Webpack configuration of our project … Fortunately, this library will give us the opportunity to modify the configuration easily without destroying the existing one!
@angular-builders/custom-webpack : Angular 6删除了“ eject”命令,该命令使我们能够修改项目的Webpack配置……幸运的是,该库将使我们有机会轻松修改配置,而不会破坏现有的配置!
postcss-import : This PostCSS plugin is to inline @import keywords.
postcss-import :此PostCSS插件用于内联@import关键字。
postcss-loader : Loader for Webpack to process CSS with PostCSS
postcss-loader :装载机用W ebpackCraft.ioCSS与PostCSS
postcss-scss : A SCSS plugin parser for PostCSS.
postcss-scss :一个SCSS插件解析器PostCSS 。
postcss-scss is not required if you are not using SCSS in your project. I present it here for informational purposes in case you are using SCSS in your project.
如果您不在项目中使用SCSS ,则不需要 postcss-scss 。 如果您在项目中使用SCSS,则在此处提供此信息仅供参考。
准备配置文件 (Preparing configuration files )
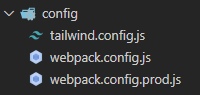
We are therefore going to create a folder (config) at the root of our app that will contain all our custom configuration for Webpack and Tailwind. Note that this is arbitrary and is just my way of doing things, you can manage your files very well otherwise.
因此,我们将在应用程序的根目录下创建一个文件夹(config),其中将包含我们所有针对Webpack和Tailwind的自定义配置。 请注意,这是任意的,这只是我的处理方式,否则您可以很好地管理文件。
tailwind.config.js is just initialized and I haven’t added anything in it, that’s not the purpose of this article. You can create this file very easily with the following command and move it to the config folder:
tailwind.config.js只是初始化了,我还没有添加任何东西,这不是本文的目的。 您可以使用以下命令轻松创建此文件并将其移至config文件夹:
npx tailwind init
npx tailwind init
Let’s also create our Webpack configurations. For now, development and production will have the exact same structure.
我们还创建我们的Webpack配置。 目前,开发和生产将具有完全相同的结构。
Webpack configuration Webpack配置导入Tailwind文件 (Import Tailwind files)
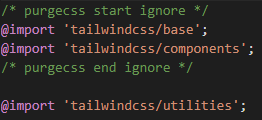
Now let’s add the different imports in our styles.scss
现在让我们在styles.scss中添加不同的导入
TailwindCSS is now imported TailwindCSS现在已导入修改angular.json (Modification of angular.json)
The configuration files are ready, you must now tell the Webpack builder to add this new configuration to the already existing one
配置文件已准备就绪,您现在必须告诉Webpack构建器将此新配置添加到已经存在的配置文件中
⚠️ And here is why most articles on this subject fail! ⚠️As we can see, we are only interested in the build part, not the serve. And this is due to the way @angular-builders/custom-webpack works.
⚠️这就是为什么大多数与此主题有关的文章都失败了的原因! As️正如我们所看到的,我们只对构建部分感兴趣,而不是服务。 这是由于@angular-builders/custom-webpack工作方式。
“Thus, if you use
@angular-builders/custom-webpack:dev-serveralong with@angular-builders/custom-webpack:browser,ng servewill run with custom configuration provided in the latter.”“因此,如果您将
@angular-builders/custom-webpack:dev-server与@angular-builders/custom-webpack:browser,则ng serve将使用后者提供的自定义配置来运行。”
Now, let’s test if everything is working… Take an example component in the Tailwind’s documentation. For my case, I used the 3D button example:
现在,让我们测试是否一切正常……以Tailwind文档中的示例组件为例。 就我而言,我使用了3D按钮示例:

配置生产模式以使我们的样式的捆束尺寸最小 (Configure production mode to get the smallest bundle size possible for our styles)
Right now we have everything we need to launch our Webpack setup, whether in a development or production environment. However, for the latter, we would like to have the smallest bundle size possible. We will therefore be using the excellent PurgeCSS library in production!
现在,无论在开发环境还是生产环境中,我们都有启动Webpack设置所需的一切。 但是,对于后者,我们希望具有尽可能小的束尺寸。 因此,我们将在生产中使用出色的PurgeCSS库 !
We will see it exists 3 ways to achieve this task, and you can choose what you want:
我们将看到它存在完成此任务的3种方法,您可以选择所需的方法:
Using Tailwind’s option
purge(the most recommended)使用Tailwind的选项
purge(最推荐)- Using our webpack.config.prod.js (recommended if your Tailwind’s version is less than 1.4) 使用我们的webpack.config.prod.js(如果您的Tailwind版本低于1.4,则建议使用)
- Using dotenv (not recommended, explaining why) 使用dotenv(不推荐,解释原因)
But before this, pay attention to one of the recommandations of Tailwind’s team:
但是在此之前 ,请注意Tailwind团队的一项建议:
we recommend only applying PurgeCSS to Tailwind’s utility classes, and not to base styles or component classes. […] This will ensure you don’t accidentally purge important base styles when working with frameworks like Next.js, Nuxt, vue-cli, create-react-app, and others that hide their base HTML template somewhere in your
node_modulesdirectory.我们建议仅将PurgeCSS应用于Tailwind的实用程序类,而不应用于基本样式或组件类 。 […]这将确保您在使用Next.js,Nuxt,vue-cli,create-react-app等框架以及将其基本HTML模板隐藏在
node_modules目录中的其他框架时,不会意外清除重要的基本样式。
Thus, let’s update our styles.scss :
因此,让我们更新我们的styles.scss :
方式1:尾风选项Purge (Way #1: Tailwind’s option Purge )
Since version 1.4, Tailwind provides an option to purge any class that is not used in our project. Under the hood, it uses the PurgeCSS library. This is the easiest option, because we just need to set NODE_ENV=production and it will do the job automatically. But before, we must tell Tailwind which files we want to purge…
从1.4版开始,Tailwind提供了一个选项来清除项目中未使用的任何类。 在后台,它使用PurgeCSS库。 这是最简单的选项,因为我们只需要设置NODE_ENV=production自动完成工作。 但是在此之前,我们必须告诉Tailwind我们要清除哪些文件…
Let’s update our tailwind.config.js to enable this:
让我们更新我们的tailwind.config.js以启用此功能:

As you can see, you just have to set the path to your html and ts (if you’re only using classes inside html, skip the second)
如您所见,您只需设置html和ts的路径(如果您仅在html中使用类,请跳过第二个)
To make it work, we need to update our script in package.json for the build process:
为了使其工作,我们需要在package.json中更新脚本以进行构建:
"build:prod": "cross-env NODE_ENV=production ng build --prod"
"build:prod": "cross-env NODE_ENV=production ng build --prod"
Since I am working in a Windows environment, the commands aiming to put the NODE_ENV break the good progress of the build. So I use cross-env, to make sure my whole team can benefit from it, whatever their working environment.
由于我在Windows环境中工作,旨在放置NODE_ENV的命令破坏了构建的良好进度。 因此,我使用cross-env来确保无论他们的工作环境如何,我的整个团队都可以从中受益。
To install it: npm i -D cross-env
要安装它: npm i -D cross-env

With this approach, you can remove the webpack.config.prod.js from your project, it is not necessary anymore.
使用这种方法,您可以从项目中删除webpack.config.prod.js,现在不再需要。
方式2:Webpack (Way #2: Webpack )
If you want to achieve this with webpack, or if your Tailwind’s version is less than 1.4, choose this way. Let’s begin by adding a new library in our app:
如果要使用webpack实现此目的,或者Tailwind的版本低于1.4,请选择这种方式。 首先,在我们的应用程序中添加一个新库:
npm i -D @fullhuman/postcss-purgecss
npm i -D @fullhuman/postcss-purgecss
And our webpack.config.prod.js will now look like this:
现在,我们的webpack.config.prod.js将如下所示:
For testing purpose, we will use the following command:
为了进行测试,我们将使用以下命令:
ng serve --prod
ng serve --prod
方式3:使用Dotenv⚠️ (Way #3: Using Dotenv ⚠️)
Someone wrote about this subject just before me, so I won’t copy paste this:
有人在我之前写过关于这个主题的文章,所以我不会复制粘贴:
however, concerning the production part, I don’t recommend this approach. We have to remember what Dotenv was designed for. It is mainly used to put environment variables there such as: API Keys, sensitive information for databases, secrets,… It is, in this case, indicated in their FAQ that this file should not be put on a repository, no commit. This means that within a team, you will have to share this file. However, since purging CSS is a bundler-specific process, I don’t see the reason to mix two concepts. This is only my opinion and you can very well not share it, the final choice is yours.
但是,对于生产部分,我不推荐这种方法。 我们必须记住Dotenv的设计目的。 它主要用于在其中放置环境变量 ,例如:API密钥,数据库的敏感信息,机密信息……在这种情况下,其常见问题解答中指出,不应将此文件放置在存储库中,也不能提交。 这意味着在团队中,您将必须共享此文件。 但是,由于清除CSS是特定于捆绑程序的过程 ,所以我看不出混合使用两个概念的原因。 这只是我的意见,您完全不能同意,最后的选择是您的。
VSCode中的尾风 (Tailwind in VSCode)
For VSCode, you have two extensions that are interesting to use in your project:The first allows you to activate intellisense when you write your classes in HTML. The second is to easily access the documentation.
对于VSCode,您有两个有趣的扩展名可以在您的项目中使用:第一个扩展允许您在用HTML编写类时激活智能感知。 第二是轻松访问文档。
尾风CSS IntelliSense (Tailwind CSS IntelliSense)
This is for the intellisense inside our HTML code. Autocomplete, Linting, Hover preview,… Take the time to look the documentation of this extension
这是针对我们HTML代码中的智能感知。 自动完成,整理,悬停预览...…花点时间查看此扩展程序的文档
尾风文档 (Tailwind Docs)
To open in your browser all the documentation you’re looking for.Tailwind Docs page
要在浏览器中打开您要查找的所有文档。 尾风文档页面
There you have it, that’s the end of this little guide to configuring TailwindCSS in Angular.
有了它,这是在Angular中配置TailwindCSS的小指南的结尾。
If you have any questions or comments, please do not hesitate to comment. I will make sure to keep this guide as up to date as possible. ;)
如果您有任何疑问或意见,请不要犹豫。 我将确保使该指南保持最新。 ;)
翻译自: https://medium.com/swlh/angular-configure-tailwindcss-6816f7cc6f8e
angular配置