【springboot进阶】SpringBoot整合RedisTemplate配置多个redis库
目录
一、加入自定义redis配置信息
二、创建redis配置基类
配置注解
注入配置文件的连接属性
创建连接池
获取redis模板实例
三、创建单独的redis库配置类
学生3库的redis配置类
老师5库的redis配置类
四、创建不同库的redis操作帮助类
学生3库的redis操作帮助类
教师5库的redis操作帮助类
五、测试效果
六、结语
一般的开发当中,很少会出现一个业务系统中要操作多个redis数据库的,但是也可能会出现特殊的情况,接下来我们看看如何配置。
一、加入自定义redis配置信息
因为redis需要配置多个数据库,所以不能够用spring的默认配置来注入,我们就要使用自定义的命名。
#多库redis配置
org:
  liurb:
    redis:
      config:
        enabled: true,
        host: 127.0.0.1
        password:
        port: 6379
        database_student: 3
        database_teacher: 5
        lettuce:
          pool:
            # 连接池最大连接数(使用负值表示没有限制) 默认 8
            max-active: 1000
            # 连接池中的最大空闲连接 默认 8
            max-idle: 300
            # 连接池中的最小空闲连接 默认 0
            min-idle: 3
            # 连接池最大阻塞等待时间毫秒(使用负值表示没有限制) 默认 -1
            max-wait: 1000
这个命名都可以自定义,但是最好还是按照一定的规范来,方便理解和查阅。
这里重点在于,我们定义了两个不同的库,database_student和database_teacher,分别为3库和5库。
二、创建redis配置基类
这个基类主要是构建配置信息的注入,还有一些redis公共连接参数的配置。
@ConditionalOnClass({RedisTemplate.class})
@ConditionalOnProperty(
        prefix = "org.liurb.redis.config",
        value = {"enabled"},
        matchIfMissing = true
)
public class BackendRedisConfig {

    @Value("${org.liurb.redis.config.host}")
    private String host;

    @Value("${org.liurb.redis.config.port}")
    private int port;

    @Value("${org.liurb.redis.config.password}")
    private String password;

    @Value("${org.liurb.redis.config.lettuce.pool.max-active}")
    private int maxActive;

    @Value("${org.liurb.redis.config.lettuce.pool.max-idle}")
    private int maxIdle;

    @Value("${org.liurb.redis.config.lettuce.pool.min-idle}")
    private int minIdle;

    @Value("${org.liurb.redis.config.lettuce.pool.max-wait}")
    private int maxWait;

    /**
     * 创建连接池
     *
     * @param database
     * @return
     */
    public LettuceConnectionFactory getLettuceConnectionFactory(int database) {
        GenericObjectPoolConfig genericObjectPoolConfig = new GenericObjectPoolConfig();
        genericObjectPoolConfig.setMaxIdle(maxIdle);
        genericObjectPoolConfig.setMinIdle(minIdle);
        genericObjectPoolConfig.setMaxTotal(maxActive);
        genericObjectPoolConfig.setMaxWait(Duration.ofMillis(maxWait));
        RedisStandaloneConfiguration redisStandaloneConfiguration = new RedisStandaloneConfiguration();
        redisStandaloneConfiguration.setDatabase(database);
        redisStandaloneConfiguration.setHostName(host);
        redisStandaloneConfiguration.setPort(port);
        redisStandaloneConfiguration.setPassword(RedisPassword.of(password));
        LettuceClientConfiguration clientConfig = LettucePoolingClientConfiguration.builder()
                .poolConfig(genericObjectPoolConfig)
                .build();

        LettuceConnectionFactory factory = new LettuceConnectionFactory(redisStandaloneConfiguration, clientConfig);
        // 重新初始化工厂
        factory.afterPropertiesSet();
        return factory;
    }

    /**
     * 获取redis模板实例
     *
     * @param database
     * @return
     */
    public RedisTemplate getRedisTemplate(int database) {
        RedisTemplate redisTemplate = new RedisTemplate<>();
        redisTemplate.setConnectionFactory(getLettuceConnectionFactory(database));

        redisTemplate.setKeySerializer(new StringRedisSerializer());

        GenericFastJsonRedisSerializer fastJsonRedisSerializer = new GenericFastJsonRedisSerializer();
        redisTemplate.setValueSerializer(fastJsonRedisSerializer);

        redisTemplate.setHashKeySerializer(new StringRedisSerializer());
        redisTemplate.setHashValueSerializer(fastJsonRedisSerializer);

        return redisTemplate;
    }

}
配置注解
这里使用了两个注解 @ConditionalOnProperty 和 @ConditionalOnClass,主要用于控制配置类是否生效,具体的使用就不在这里详细探讨,有兴趣的同学可以自行查阅相关文章。
注入配置文件的连接属性
通过@Value注解,将配置文件定义的属性值注入进来,用于下面创建的连接池。
创建连接池
方法有一个database参数,就是用于创建不同redis数据库的连接池。
    /**
     * 创建连接池
     *
     * @param database
     * @return
     */
    public LettuceConnectionFactory getLettuceConnectionFactory(int database) {
        GenericObjectPoolConfig genericObjectPoolConfig = new GenericObjectPoolConfig();
        genericObjectPoolConfig.setMaxIdle(maxIdle);
        genericObjectPoolConfig.setMinIdle(minIdle);
        genericObjectPoolConfig.setMaxTotal(maxActive);
        genericObjectPoolConfig.setMaxWait(Duration.ofMillis(maxWait));
        RedisStandaloneConfiguration redisStandaloneConfiguration = new RedisStandaloneConfiguration();
        redisStandaloneConfiguration.setDatabase(database);
        redisStandaloneConfiguration.setHostName(host);
        redisStandaloneConfiguration.setPort(port);
        redisStandaloneConfiguration.setPassword(RedisPassword.of(password));
        LettuceClientConfiguration clientConfig = LettucePoolingClientConfiguration.builder()
                .poolConfig(genericObjectPoolConfig)
                .build();

        LettuceConnectionFactory factory = new LettuceConnectionFactory(redisStandaloneConfiguration, clientConfig);
        // 重新初始化工厂
        factory.afterPropertiesSet();
        return factory;
    }
这里有个坑,一定要注意,就是 factory.afterPropertiesSet(); 这句一定要加上,要不然factory是不生效的,这涉及到执行顺序的问题,有兴趣的同学可以去查阅一下相关资料。
获取redis模板实例
这个方法也是有一个database参数,也是用于外部传递redis库的,后面的配置跟上一章节说的redis集成一样,就是配置redis的序列化,这里也是用的fastjson。
    /**
     * 获取redis模板实例
     *
     * @param database
     * @return
     */
    public RedisTemplate getRedisTemplate(int database) {
        RedisTemplate redisTemplate = new RedisTemplate<>();
        redisTemplate.setConnectionFactory(getLettuceConnectionFactory(database));

        redisTemplate.setKeySerializer(new StringRedisSerializer());

        GenericFastJsonRedisSerializer fastJsonRedisSerializer = new GenericFastJsonRedisSerializer();
        redisTemplate.setValueSerializer(fastJsonRedisSerializer);

        redisTemplate.setHashKeySerializer(new StringRedisSerializer());
        redisTemplate.setHashValueSerializer(fastJsonRedisSerializer);

        return redisTemplate;
    }
三、创建单独的redis库配置类
接下来就是对上面的两个库独立进行创建各自的redis配置类。
学生3库的redis配置类
学生配置类继承上面创建的基类,并通过注入配置文件的方式,拿到其库为3,然后通过@Bean注解,创建对应的RedisTemplate模板,调用的基类的getRedisTemplate方法。
/**
 * 学生3库的redis配置类
 *
 */
@Configuration
public class StudentRedisConfig extends BackendRedisConfig {

    @Value("${org.liurb.redis.config.database_student}")
    private int studentDatabase;

    @Bean(name = "studentRedisTemplate")
    public RedisTemplate redisTemplate(){

        return getRedisTemplate(studentDatabase);
    }

}
老师5库的redis配置类
跟上面创建学生的配置类一样,不同在于注入的库为5。
/**
 * 老师5库的redis配置类
 *
 */
@Configuration
public class TeacherRedisConfig extends BackendRedisConfig {

    @Value("${org.liurb.redis.config.database_teacher}")
    private int teacherDatabase;

    @Bean(name = "teacherRedisTemplate")
    public RedisTemplate redisTemplate(){

        return getRedisTemplate(teacherDatabase);
    }

}
基于注解@Bean创建的redis模板需要使用不同的命名,这个需要在后面使用到。
四、创建不同库的redis操作帮助类
通过将不同库的redis模板注入到各自的帮助类中,这样可以方便后续的redis操作,同时也便于管理。
学生3库的redis操作帮助类
通过@Resource注解,将上面创建的redis模板注入进来。并将这个帮忙类加入@Component注解,定义为一个组件,这样才能够注入成功。
/**
 * 学生3库的redis配置类
 *
 */
@Component
public class StudentRedisUtil {

    @Resource(name = "studentRedisTemplate")
    RedisTemplate redisTemplate;

    public void set(String key, Object value) {
        redisTemplate.opsForValue().set(key, value);
    }

    public void set(String key, Object value, Duration duration) {
        redisTemplate.opsForValue().set(key, value, duration);
    }

    public Object get(String key) {
        return redisTemplate.opsForValue().get(key);
    }

}
教师5库的redis操作帮助类
这里注入的就是教师的redis模板。
/**
 * 教师5库的redis配置类
 *
 */
@Component
public class TeacherRedisUtil {

    @Resource(name = "teacherRedisTemplate")
    RedisTemplate redisTemplate;

    public void set(String key, Object value) {
        redisTemplate.opsForValue().set(key, value);
    }

    public void set(String key, Object value, Duration duration) {
        redisTemplate.opsForValue().set(key, value, duration);
    }

    public Object get(String key) {
        return redisTemplate.opsForValue().get(key);
    }

}
五、测试效果
编写一个单元测试。
@SpringBootTest
class SpringbootFastjsonApplicationTests {
@Resource
StudentRedisUtil studentRedisUtil;
@Resource
TeacherRedisUtil teacherRedisUtil;
@Test
void contextLoads() {
studentRedisUtil.set("redis_db_student", "student", Duration.ofMinutes(5));
System.out.println(studentRedisUtil.get("redis_db_student"));
teacherRedisUtil.set("redis_db_teacher", "teacher", Duration.ofMinutes(5));
System.out.println(teacherRedisUtil.get("redis_db_teacher"));
}
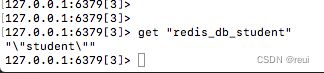
}运行后查看redis保存情况。
3库student的值。
5库teacher的值

六、结语
通过这种方式,可以灵活的加入多个redis库,并对其进行操作。如果大家有更好的方式,欢迎一起讨论。